day10-File,IO流,字节流,Properties集合,ResourceBundle工具类,递归
今日目标
- File类
- IO流的介绍
- IO流的分类
- 字节输出流
- 字节输入流
- 字节缓冲区流
- Properties集合
-
1 File类
1.1 File类的介绍
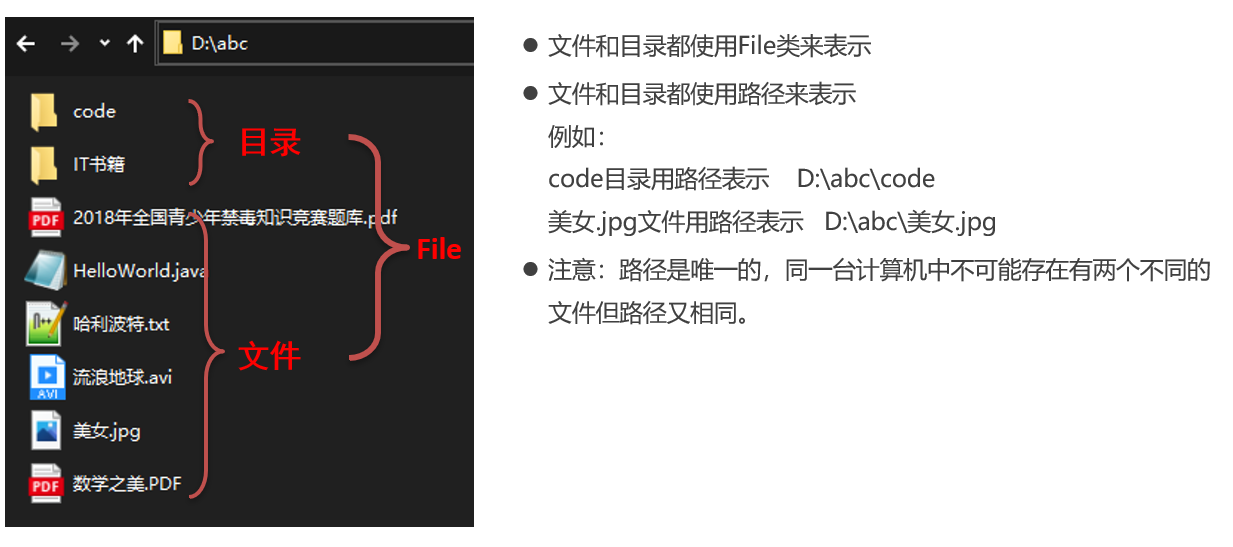
java.io.File 类是文件和目录路径名的抽象表示,主要用于文件和目录的创建、查找和删除等操作
1.2 构造方法
package com.itheima.file_demo;import java.io.File;/*File:它是文件和目录路径名的抽象表示文件和目录可以通过File封装成对象File封装的对象仅仅是一个路径名。它可以是存在的,也可以是不存在的。构造方法 :1 File(String pathname) 通过将给定的路径名字符串转换为抽象路径名来创建新的 File实例2 File(String parent, String child) 从父路径名字符串和子路径名字符串创建新的 File实例3 File(File parent, String child) 从父抽象路径名和子路径名字符串创建新的 File实例注意事项 : 父路径需要是一个目录路径*/public class FileDemo1 {public static void main(String[] args) {// 使用File对象描述 D:\abc\caocao.jpg// String path = "D:\\abc\\caocao.jpg";String path = "D:/abc/caocao.jpg";//windows 系统 \//Mac Unix Linux 系统 ///java语言中描述目录的分隔符,两者都行//1 File(String pathname)File f1 = new File(path);//2 File(String parent, String child)String parent = "D:/abc";//父目录String child = "caocao.jpg";//子文件File f2 = new File(parent, child);//3 File(File parent, String child)File f3 = new File(new File(parent), child);System.out.println("f1 = " + f1);//f1 = D:\abc\caocao.jpgSystem.out.println("f2 = " + f2);//f2 = D:\abc\caocao.jpgSystem.out.println("f3 = " + f3);//f3 = D:\abc\caocao.jpg//结论:以上三种方式创建文件对象,都是可以的}}
相对路径和绝对路径
package com.itheima.file_demo;import java.io.File;/*绝对路径 : 以盘符开始相对路径 : 相对于IDEA工具项目下相对路径的好处,更方便,更简洁的描述项目中的文件能不能用相对路径描述非项目中的文件?不能项目中文件的绝对路径,将项目路径删除就是该文件的相对路径了!导入模块时,一定要先将模块导入到项目中,否则你模块中文件的相对路径将会失效!!*/public class PathDemo {public static void main(String[] args) {//绝对路径 : 以盘符开始 [可以表示电脑中任意位置的文件]File f1 = new File("D:/abc/caocao.jpg");File f2 = new File("D:\\codeInClass\\JavaEE146Code\\JavaSE\\a.txt");File f4 = new File("D:\\codeInClass\\JavaEE146Code\\JavaSE\\day10_demo\\b.txt");//相对路径 : 相对于IDEA工具项目下File f3 = new File("a.txt");//f2和f3表示的是相同的文件,但是相对路径更加简洁File f5 = new File("day10_demo\\b.txt");}}
1.3 File类的创建功能
package com.itheima.file_demo;import java.io.File;import java.io.IOException;/*File类的创建功能 :1 public boolean createNewFile(): 创建一个新的空的文件,如果文件已经存在。不会覆盖返回false2 public boolean mkdir() : 创建一个单级文件夹3 public boolean mkdirs() : 创建一个多级文件夹 !!!*/public class FileDemo2 {public static void main(String[] args) throws IOException {//创建文件File f1 = new File("day10_demo/file01.txt");boolean newFile = f1.createNewFile();System.out.println("newFile = " + newFile);//File f2 = new File("day10_demo/abc/file02.txt");//boolean newFile1 = f2.createNewFile();//报错了,注意:如果父目录不存在,此方法会有异常。不会主动创建父目录//System.out.println("newFile1 = " + newFile1);//创建目录(文件夹)//public boolean mkdir() : 创建一个单级文件夹File dir1 = new File("day10_demo\\aaa");boolean mkdir1 = dir1.mkdir();System.out.println("mkdir1 = " + mkdir1);File dir2 = new File("day10_demo\\bbb\\ccc\\ddd");boolean mkdir2 = dir2.mkdir();//mkdir方法不支持创建多级目录System.out.println("mkdir2 = " + mkdir2);//public boolean mkdirs() : 创建一个多级文件夹 !!!boolean mkdirs = dir2.mkdirs();System.out.println("mkdirs = " + mkdirs);}}
1.4 File类的删除功能
package com.itheima.file_demo;import java.io.File;import java.io.IOException;/*File类删除功能 :public boolean delete() 删除由此抽象路径名表示的文件或目录注意 :1 delete方法直接删除不走回收站。2 如果删除的是一个文件,直接删除。3 如果删除的是一个文件夹,需要先删除文件夹中的内容,最后才能删除文件夹*/public class FileDemo3 {public static void main(String[] args) throws IOException {File f1 = new File("D:\\a.txt");// 1 public boolean createNewFile() : 创建一个新的空的文件System.out.println(f1.delete());File f2 = new File("day10_demo\\aaa");// 2 public boolean mkdir() : 创建一个单级文件夹System.out.println(f2.delete());File f3 = new File("day10_demo\\bbb");// 3 public boolean mkdirs() : 创建一个多级文件夹System.out.println(f3.delete());}}
1.5 File类的判断和获取功能
package com.itheima.file_demo;import java.io.File;/*File类判断和获取功能public boolean isDirectory() 测试此抽象路径名表示的File是否为目录public boolean isFile() 测试此抽象路径名表示的File是否为文件public boolean exists() 测试此抽象路径名表示的File是否存在public String getAbsolutePath() 返回此抽象路径名的绝对路径名字符串public String getPath() 获取的是创建File对象给定的路径public String getName() 返回由此抽象路径名表示的文件或目录的名称*/public class FileDemo4 {public static void main(String[] args) {File f1 = new File("day10_demo\\file01.txt");File f2 = new File("day10_demo\\aaa");File f3 = new File("day10_demo\\xxx.txt");//不存在的//public boolean isDirectory() 测试此抽象路径名表示的File是否为目录System.out.println("f1.isDirectory() = " + f1.isDirectory());//falseSystem.out.println("f2.isDirectory() = " + f2.isDirectory());//trueSystem.out.println("f3.isDirectory() = " + f3.isDirectory());//false//public boolean isFile() 测试此抽象路径名表示的File是否为文件System.out.println("f1.isFile() = " + f1.isFile());//trueSystem.out.println("f2.isFile() = " + f2.isFile());//falseSystem.out.println("f3.isFile() = " + f3.isFile());//false//public boolean exists() 测试此抽象路径名表示的File是否存在System.out.println("f1.exists() = " + f1.exists());//trueSystem.out.println("f2.exists() = " + f2.exists());//trueSystem.out.println("f3.exists() = " + f3.exists());//false//public String getAbsolutePath() 返回此抽象路径名的绝对路径名字符串String absolutePath = f1.getAbsolutePath();System.out.println("absolutePath = " + absolutePath);//D:\codeInClass\JavaEE146Code\JavaSE\day10_demo\file01.txt//public String getPath() 获取的是创建File对象给定的路径【构造路径】System.out.println("f1.getPath() = " + f1.getPath());File f4 = new File("D:/abc/caocao.jpg");System.out.println("f4.getPath() = " + f4.getPath());//public String getName() 返回由此抽象路径名表示的文件或目录的名称System.out.println("f4.getName() = " + f4.getName());//caocao.jpgSystem.out.println("f2.getName() = " + f2.getName());//aaa}}
1.6 File类高级获取功能
package com.itheima.file_demo;import java.io.File;/*File类高级获取功能public File[] listFiles() 返回此抽象路径名表示的目录中的文件和目录的File对象数组listFiles方法注意事项:1 当调用者不存在时,返回null2 当调用者是一个文件时,返回null3 当调用者是一个空文件夹时,返回一个长度为0的数组4 当调用者是一个有内容的文件夹时,将里面所有文件和文件夹的路径放在File数组中返回5 当调用者是一个有隐藏文件的文件夹时,将里面所有文件和文件夹的路径放在File数组中返回,包含隐藏内容*/public class FileDemo5 {public static void main(String[] args) {File file = new File("day10_demo\\bbb\\ccc");// 返回此抽象路径名表示的目录中的文件和目录的File对象数组File[] files = file.listFiles();// 遍历File类的数组for (File f : files) {// 拿到每一个文件的文字System.out.println(f.getName());}}}
练习 :
package com.itheima.file_demo;import java.io.File;import java.util.HashMap;/*练习一 :统计一个文件夹中每种文件的个数并打印。打印格式如下:txt:3个doc:1个jpg:2个…分析 :HashMap<String , Integer>集合 : 键存储的是文件扩展名 值存储的是文件类型出现的次数主要使用的是HashMap集合的键唯一File -> listFiles() -> File[] -> 遍历数组拿到每一个File-> getName() 拿到每一个文件的名字 -> 根据.进行切割,拿到文件的扩展名判断Map集合中是否存在键为此扩展名有 : 扩展名 = hm.get(扩展名) + 1没有 : 扩展名 = 1*/public class FileTest1 {public static void main(String[] args) {//要统计的文件夹File dir = new File("D:/abc");//统计每种格式文件的个数,使用Map集合保存HashMap<String, Integer> countMap = new HashMap<>();//遍历dir中所有的子文件File[] files = dir.listFiles();for (File file : files) {if (file.isFile()) {//获取文件名String name = file.getName(); // xxxx.yyyString[] strArr = name.split("\\.");//文件名 aaa.jpg aaa.bbb.jpgString type = strArr[strArr.length - 1];//统计type出现的次数//1.判断countMap中是否存在type,if (countMap.containsKey(type)) {Integer count = countMap.get(type);//存在,原有次数+1count++;countMap.put(type, count);} else {//不存在,第一次countMap.put(type, 1);}}}System.out.println("countMap = " + countMap);//{jpg=2, pptx=1, xlsx=1, txt=1, java=4}}}
2 IO流的介绍
2.1 为什么要学习IO流
通过变量,数组,或者集合存储数据
- 都是不能永久化存储 , 因为数据都是存储在内存中
- 只要代码运行结束,所有数据都会丢失
使用IO流
I 表示intput ,是数据从硬盘进内存的过程,称之为读。
- O 表示output ,是数据从内存到硬盘的过程。称之为写
IO的数据传输,可以看做是一种数据的流动,按照流动的方向,以内存为参照物,进行读写操作
按照流向区分
- 输入流 : 用来读数据
- 输出流 : 用来写数据
- 按照类型区分
- 字节流
- 字符流
注意 :
OutputStream有很多子类,我们从最简单的一个子类开始。java.io.FileOutputStream类是文件输出流,用于将数据写出到文件构造方法 :
public FileOutputStream(File file):创建文件输出流以写入由指定的 File对象表示的文件。public FileOutputStream(String name): 创建文件输出流以指定的名称写入文件。public class FileOutputStreamConstructor throws IOException {public static void main(String[] args) {// 使用File对象创建流对象File file = new File("a.txt");FileOutputStream fos = new FileOutputStream(file);// 使用文件名称创建流对象FileOutputStream fos = new FileOutputStream("b.txt");}}
字节输出流写数据快速入门
- 创建字节输出流对象。
- 写数据
- 释放资源
package com.itheima.outputstream_demo;import java.io.FileNotFoundException;import java.io.FileOutputStream;import java.io.IOException;/*字节输出流写数据快速入门 :1 创建字节输出流对象。2 写数据3 释放资源*/public class OutputStreamDemo1 {public static void main(String[] args) throws IOException {// 创建字节输出流对象// 如果指定的文件不存在 , 会自动创建文件// 如果文件存在 , 会把文件中的内容清空FileOutputStream fos = new FileOutputStream("day11_demo\\a.txt");// 写数据// 写到文件中就是以字节形式存在的// 只是文件帮我们把字节翻译成了对应的字符 , 方便查看fos.write(97);fos.write(98);fos.write(99);// 释放资源// while(true){}// 断开流与文件中间的关系fos.close();}}
3.2 字节输出流写数据的方法
- 字节流写数据的方法
- void write(int b) 一次写一个字节数据
- void write(byte[] b) 一次写一个字节数组数据
- void write(byte[] b, int off, int len) 一次写一个字节数组的部分数据
package com.itheima.outputstream_demo;import java.io.FileNotFoundException;import java.io.FileOutputStream;import java.io.IOException;/*字节流写数据的3种方式1 void write(int b) 一次写一个字节数据2 void write(byte[] b) 一次写一个字节数组数据3 void write(byte[] b, int off, int len) 一次写一个字节数组的部分数据*/public class OutputStreamDemo2 {public static void main(String[] args) throws IOException {// 创建字节输出流对象FileOutputStream fos = new FileOutputStream("day11_demo\\a.txt");// 写数据// 1 void write(int b) 一次写一个字节数据fos.write(97);fos.write(98);fos.write(99);// 2 void write(byte[] b) 一次写一个字节数组数据byte[] bys = {65, 66, 67, 68, 69};fos.write(bys);// 3 void write(byte[] b, int off, int len) 一次写一个字节数组的部分数据fos.write(bys, 0, 3);// 释放资源fos.close();}}
3.3 写数据的换行和追加写入
字节流写数据的换行和追加写入
- 字节流写数据如何实现换行呢?
写完数据后,加换行符
windows : \r\n
linux : \n
mac : \r - 字节流写数据如何实现追加写入呢?
通过构造方法 : public FileOutputStream(String name,boolean append)
创建文件输出流以指定的名称写入文件。如果第二个参数为true ,不会清空文件里面的内容package com.itheima.outputstream_demo;import java.io.FileNotFoundException;import java.io.FileOutputStream;import java.io.IOException;public class OutputStreamDemo3 {public static void main(String[] args) throws IOException {//1. 创//FileOutputStream fos = new FileOutputStream("day10_demo\\file\\file02.txt"); //默认不拼接FileOutputStream fos =new FileOutputStream("day10_demo\\file\\file02.txt",true); //可以续写//2. 写String str = "Hello\r\nWorld!\nHello\rJava\n";fos.write(str.getBytes());//先把字符串转为字节数组,写出//3. 关fos.close();}}
4 字节输入流
4.1 字节输入流介绍
- 字节输入流类
- InputStream类 : 字节输入流最顶层的类 , 抽象类
—- FileInputStream类 : FileInputStream extends InputStream
- InputStream类 : 字节输入流最顶层的类 , 抽象类
- 构造方法
- public FileInputStream(File file) : 从file类型的路径中读取数据
- public FileInputStream(String name) : 从字符串路径中读取数据
步骤
- 创建输入流对象
- 读数据
- 释放资源
package com.itheima.inputstream_demo;import java.io.FileInputStream;import java.io.IOException;/*字节输入流写数据快速入门 : 一次读一个字节第一部分 : 字节输入流类InputStream类 : 字节输入流最顶层的类 , 抽象类--- FileInputStream类 : FileInputStream extends InputStream第二部分 : 构造方法public FileInputStream(File file) : 从file类型的路径中读取数据public FileInputStream(String name) : 从字符串路径中读取数据第三部分 : 字节输入流步骤1 创建输入流对象2 读数据3 释放资源*/public class FileInputStreamDemo1 {public static void main(String[] args) throws IOException {// 创建字节输入流对象// 读取的文件必须存在 , 不存在则报错FileInputStream fis = new FileInputStream("day11_demo\\a.txt");// 读数据 , 从文件中读到一个字节// 返回的是一个int类型的字节// 如果想看字符, 需要强转int by = fis.read();System.out.println((char) by);// 释放资源fis.close();}}
4.2 字节输入流读多个字节
package com.itheima.inputstream_demo;import java.io.FileInputStream;import java.io.FileNotFoundException;import java.io.FileOutputStream;import java.io.IOException;/*FileInputStream类 :public int read(byte[] b):1 从输入流读取最多b.length个字节的数据2 返回的是真实读到的数据个数3 如果不到数据 , 那么会返回-1需求1 : 在当前模块下创建一个文件 , 文件存储数据hello world , 定义长度为5的字节数组进行读取数据String类public String(byte[] bys) : 把字节数组中的内容转成一个字符串public String(byte[] bytes, int startIndex, int length) : 把字节数组的一部分转成字符串*/public class FileInputStreamDemo5 {public static void main(String[] args) {//1. 创try (FileInputStream fis = new FileInputStream("day10_demo\\file\\file01.txt");) {//2. 读//public int read(byte[] b):// 从输入流读取最多b.length个字节的数据,回的是真实读到的数据个数,读取完成那么会返回-1/*byte[] buf = new byte[100];int len = fis.read(buf); //len就是读取的有效字节个数System.out.println("len=" + len +":"+ new String(buf));//把字节数组编程字符串输出System.out.println("len=" + len +":"+ new String(buf,0,len));//把字节数组编程字符串输出*///使用循环读取int len; //每次读取的有效数据个数byte[] buf = new byte[5];while ((len = fis.read(buf)) != -1) {//把读取的有效字节数据变成字符串System.out.println(new String(buf, 0, len));}//3. 关} catch (IOException e) {e.printStackTrace();}}}
4.3 图片的拷贝
package com.itheima.inputstream_demo;import java.io.FileInputStream;import java.io.FileNotFoundException;import java.io.FileOutputStream;import java.io.IOException;/*需求 : 把 "图片路径\xxx.jpg" 复制到当前模块下分析:复制文件,其实就把文件的内容从一个文件中读取出来(数据源),然后写入到另一个文件中(目的地)数据源:xxx.jpg --- 读数据 --- FileInputStream目的地:模块名称\copy.jpg --- 写数据 --- FileOutputStream*/public class FileInputStreamDemo2 {public static void main(String[] args) throws IOException {// 创建字节输入流对象FileInputStream fis = new FileInputStream("D:\\传智播客\\安装包\\好看的图片\\liqin.jpg");// 创建字节输出流FileOutputStream fos = new FileOutputStream("day11_demo\\copy.jpg");// 一次读写一个字节int by;while ((by = fis.read()) != -1) {fos.write(by);}// 释放资源fis.close();fos.close();}}
4.4 异常的捕获处理
JDK7版本之前处理方式 : 手动释放资源
package com.itheima.inputstream_demo;import java.io.FileInputStream;import java.io.FileOutputStream;import java.io.IOException;/*需求 : 对上一个赋值图片的代码进行使用捕获方式处理*/public class FileInputStreamDemo4 {public static void main(String[] args) {FileInputStream fis = null ;FileOutputStream fos = null;try {// 创建字节输入流对象fis = new FileInputStream("D:\\传智播客\\安装包\\好看的图片\\liqin.jpg");// 创建字节输出流fos = new FileOutputStream("day11_demo\\copy.jpg");// 一次读写一个字节int by;while ((by = fis.read()) != -1) {fos.write(by);}} catch (IOException e) {e.printStackTrace();} finally {// 释放资源if(fis != null){try {fis.close();} catch (IOException e) {e.printStackTrace();}}// 释放资源if(fos != null){try {fos.close();} catch (IOException e) {e.printStackTrace();}}}}}
JDK7版本优化处理方式 : 自动释放资源
- JDK7优化后可以使用 try-with-resource 语句 , 该语句确保了每个资源在语句结束时自动关闭。
简单理解 : 使用此语句,会自动释放资源 , 不需要自己在写finally代码块了 - 格式 :
格式 :try (创建流对象语句1 ; 创建流对象语句2 ...) {// 读写数据} catch (IOException e) {处理异常的代码...}举例 :try (FileInputStream fis1 = new FileInputStream("day11_demo\\a.txt") ;FileInputStream fis2 = new FileInputStream("day11_demo\\b.txt") ){// 读写数据} catch (IOException e) {处理异常的代码...}
- JDK7优化后可以使用 try-with-resource 语句 , 该语句确保了每个资源在语句结束时自动关闭。
代码实践
package com.itheima.inputstream_demo;import java.io.FileInputStream;import java.io.FileOutputStream;import java.io.IOException;/*JDK7版本优化处理方式需求 : 对上一个赋值图片的代码进行使用捕获方式处理*/public class FileInputStreamDemo5 {public static void main(String[] args) {try (// 创建字节输入流对象FileInputStream fis = new FileInputStream("D:\\传智播客\\安装包\\好看的图片\\liqin.jpg");// 创建字节输出流FileOutputStream fos = new FileOutputStream("day11_demo\\copy.jpg")) {// 一次读写一个字节int by;while ((by = fis.read()) != -1) {fos.write(by);}// 释放资源 , 发现已经灰色 , 提示多余的代码 , 所以使用 try-with-resource 方式会自动关流// fis.close();// fos.close();} catch (IOException e) {e.printStackTrace();}}}
4.4 对复制图片的代码进行使用一次读写一个字节数组的方式进行改进
FileInputStream类 :
- public int read(byte[] b) : 从输入流读取最多b.length个字节的数据, 返回的是真实读到的数据个数
对复制图片的代码进行使用一次读写一个字节数组的方式进行改进
package com.itheima.inputstream_demo;import java.io.FileInputStream;import java.io.FileOutputStream;import java.io.IOException;/*需求2 : 对复制图片的代码进行使用一次读写一个字节数组的方式进行改进FileInputStream类 :public int read(byte[] b):1 从输入流读取最多b.length个字节的数据2 返回的是真实读到的数据个数复制图片数据源 : D:\传智播客\安装包\好看的图片\liqin2.jpg目的地 : day11_demo\copy.jpg*/public class FileInputStreamDemo7 {public static void main(String[] args) {//1.创建流(输入,输出)try (FileInputStream fis = new FileInputStream("D:\\abc\\caocao.jpg");FileOutputStream fos =new FileOutputStream("day10_demo\\file\\caocao2.jpg");) {//2.读,写//一次读取一个字节方式拷贝: 慢/*int b;//表示每次读取的字节while ((b = fis.read()) != -1) {//读一个字节fos.write(b);//写一个字节}*///一次读取一个字节数组方式拷贝: 快int len;byte[] buf = new byte[8*1024];while ((len = fis.read(buf)) != -1) {//读取字节放到buf数组,有效的len个字节//把有效的字节数据写出去fos.write(buf,0,len);}//3.释放资源 [先开后关] 自动关流} catch (IOException e) {System.out.println("e = " + e);}}}
5 字节缓冲区流
5.1 字节缓冲流概述
字节缓冲流:
- BufferOutputStream:缓冲输出流
- BufferedInputStream:缓冲输入流
- 构造方法:
- 字节缓冲输出流:BufferedOutputStream(OutputStream out)
- 字节缓冲输入流:BufferedInputStream(InputStream in)
为什么构造方法需要的是字节流,而不是具体的文件或者路径呢?
- 字节缓冲流仅仅提供缓冲区,不具备读写功能 , 而真正的读写数据还得依靠基本的字节流对象进行操作
5.2 字节缓冲流案例
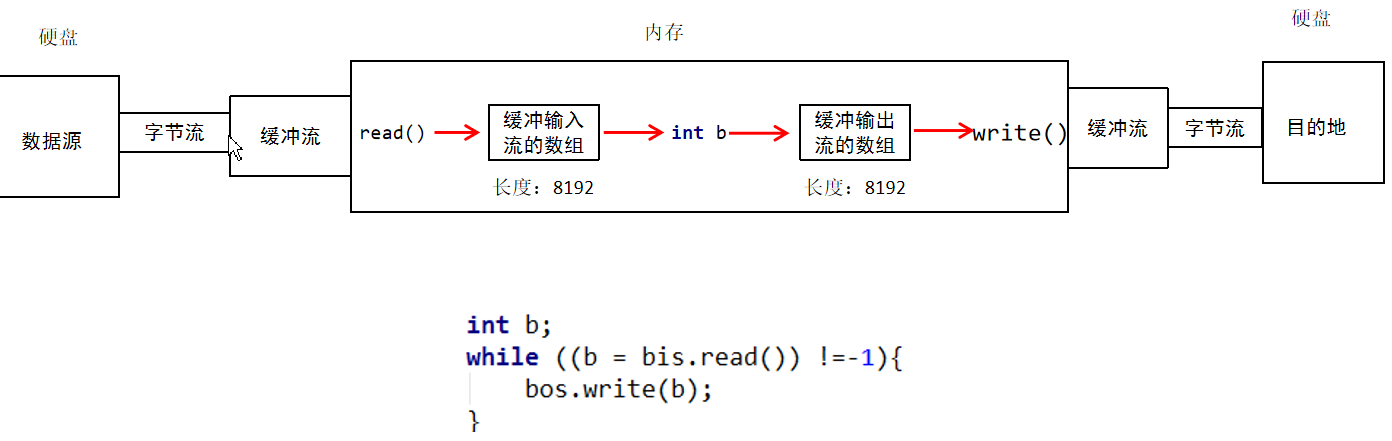
package com.itheima.bufferedstream_demo;import java.io.*;/*字节缓冲流:BufferOutputStream:缓冲输出流BufferedInputStream:缓冲输入流构造方法:字节缓冲输出流:BufferedOutputStream(OutputStream out)字节缓冲输入流:BufferedInputStream(InputStream in)为什么构造方法需要的是字节流,而不是具体的文件或者路径呢?字节缓冲流仅仅提供缓冲区,不具备读写功能 , 而真正的读写数据还得依靠基本的字节流对象进行操作需求 : 使用缓冲流进行复制文件*/public class BufferedStreamDemo1 {public static void main(String[] args) throws IOException {// 创建高效的字节输入流对象// 在底层会创建一个长度为8192的数组BufferedInputStream bis = new BufferedInputStream(new FileInputStream("D:\\传智播客\\安装包\\好看的图片\\liqin.jpg"));// 创建高效的字节输出流// 在底层会创建一个长度为8192的数组BufferedOutputStream bos = new BufferedOutputStream(new FileOutputStream("day11_demo\\copy.jpg"));// 使用高效流 , 一次读写一个字节int by;while ((by = bis.read()) != -1) {bos.write(by);}// byte[] bys = new byte[1024];// int len;// 每次真实读到数据的个数// while ((len = bis.read(bys)) != -1) {// bos.write(bys, 0, len);// }// 释放资源// 在底层会把基本的流进行关闭bis.close();bos.close();}}
5.3 缓冲流一次读写一个字节原理
5.4 四种方式复制视频文件
package com.itheima.bufferedstream_demo;import java.io.*;/*基本流和高效流效率对比需求:把“xxx.avi”复制到模块目录下的“copy.avi” , 使用四种复制文件的方式 , 打印所花费的时间四种方式:1 基本的字节流一次读写一个字节2 基本的字节流一次读写一个字节数组3 缓冲流一次读写一个字节4 缓冲流一次读写一个字节数组分析 :数据源 : D:\a.wmv目的地 : "day10_demo\copy.wmv"*/public class BufferedStreamDemo2 {public static void main(String[] args) {//高效流数组拷贝花费时间:236//基本流数组拷贝花费时间:221//高效流单字节拷贝花费时间:3318//基本流单字节拷贝花费时间: 332,727//结论:// 1.高效流,基本流数组拷贝方式相差不大。高效流的单字节拷贝方式远高于基本流单字节拷贝方式// 2.数组拷贝方式比单字节拷贝方式更高效new Thread(() -> {copy1("D:/abc/src1.wmv", "D:/abc/copy/dest1.wmv");}).start();new Thread(() -> {copy2("D:/abc/src2.wmv", "D:/abc/copy/dest2.wmv");}).start();new Thread(() -> {copy3("D:/abc/src3.wmv", "D:/abc/copy/dest3.wmv");}).start();new Thread(() -> {copy4("D:/abc/src4.wmv", "D:/abc/copy/dest4.wmv");}).start();}//基本流单字节拷贝public static void copy1(String src, String dest) {System.out.println("基本流单字节拷贝开始.....");long t1 = System.currentTimeMillis();try (FileInputStream fis = new FileInputStream(src);FileOutputStream fos = new FileOutputStream(dest);) {//2.读,写int b;//表示每次读取的字节while ((b = fis.read()) != -1) {//读一个字节fos.write(b);//写一个字节}} catch (IOException e) {System.out.println("e = " + e);}long t2 = System.currentTimeMillis();System.out.println("基本流单字节拷贝花费时间:" + (t2 - t1));}//高效流单字节拷贝public static void copy2(String src, String dest) {System.out.println("高效流单字节拷贝开始.....");long t1 = System.currentTimeMillis();try (FileInputStream fis = new FileInputStream(src);BufferedInputStream bis = new BufferedInputStream(fis);//把基本流改造为高效流FileOutputStream fos = new FileOutputStream(dest);BufferedOutputStream bos = new BufferedOutputStream(fos) //把基本流改造为高效流) {//2.读,写int b;//表示每次读取的字节while ((b = bis.read()) != -1) {//读一个字节bos.write(b);//写一个字节}} catch (IOException e) {System.out.println("e = " + e);}long t2 = System.currentTimeMillis();System.out.println("高效流单字节拷贝花费时间:" + (t2 - t1));}//基本流数组拷贝public static void copy3(String src, String dest) {System.out.println("基本流数组拷贝开始.....");long t1 = System.currentTimeMillis();try (FileInputStream fis = new FileInputStream(src);FileOutputStream fos = new FileOutputStream(dest);) {//2.读,写int len;byte[] buf = new byte[8 * 1024];while ((len = fis.read(buf)) != -1) {fos.write(buf, 0, len);}} catch (IOException e) {System.out.println("e = " + e);}long t2 = System.currentTimeMillis();System.out.println("基本流数组拷贝花费时间:" + (t2 - t1));}//高效流数组拷贝public static void copy4(String src, String dest) {System.out.println("高效流数组拷贝开始.....");long t1 = System.currentTimeMillis();try (FileInputStream fis = new FileInputStream(src);BufferedInputStream bis = new BufferedInputStream(fis);//把基本流改造为高效流FileOutputStream fos = new FileOutputStream(dest);BufferedOutputStream bos = new BufferedOutputStream(fos) //把基本流改造为高效流) {//2.读,写int len;byte[] buf = new byte[8 * 1024];while ((len = bis.read(buf)) != -1) {bos.write(buf, 0, len);}} catch (IOException e) {System.out.println("e = " + e);}long t2 = System.currentTimeMillis();System.out.println("高效流数组拷贝花费时间:" + (t2 - t1));}}
6 Properties
6.1 Properties集合的概述
- 字节缓冲流仅仅提供缓冲区,不具备读写功能 , 而真正的读写数据还得依靠基本的字节流对象进行操作
properties是一个Map体系的集合类
public class Properties extends Hashtable <Object,Object>
- 为什么在IO流部分学习Properties
- Properties中有跟IO相关的方法
当做双列集合使用
不需要加泛型 , 工作中只存字符串
package com.itheima.properties_demo;import java.util.Map;import java.util.Properties;import java.util.Set;/*1 properties是一个Map体系的集合类- `public class Properties extends Hashtable <Object,Object>`2 为什么在IO流部分学习Properties- Properties中有跟IO相关的方法3 当做双列集合使用- 不需要加泛型 , 工作中只存字符串*/public class PropertiesDemo1 {public static void main(String[] args) {// 创建集合对象Properties properties = new Properties();// 添加元素properties.put("it001" , "张三");properties.put("it002" , "李四");properties.put("it003" , "王五");// 遍历集合 : 键找值Set<Object> set = properties.keySet();for (Object key : set) {System.out.println(key + "---" + properties.get(key));}System.out.println("========================");// 遍历集合 : 获取对对象集合 , 获取键和值Set<Map.Entry<Object, Object>> set2 = properties.entrySet();for (Map.Entry<Object, Object> entry : set2) {Object key = entry.getKey();Object value = entry.getValue();System.out.println(key + "---" + value);}}}
6.2 Properties作为集合的特有方法
Object setProperty(String key, String value) 设置集合的键和值,都是String类型,相当于put方法
- String getProperty(String key) 使用此属性列表中指定的键搜索属性 , 相当于get方法
Set stringPropertyNames() 从该属性列表中返回一个不可修改的键集,其中键及其对应的值是字符串 , 相当于keySet方法
package com.itheima.properties_demo;import java.util.Properties;import java.util.Set;/*Properties作为集合的特有方法Object setProperty(String key, String value) 设置集合的键和值,都是String类型,相当于put方法String getProperty(String key) 使用此属性列表中指定的键搜索属性 , 相当于get方法Set<String> stringPropertyNames() 从该属性列表中返回一个不可修改的键集,其中键及其对应的值是字符串 , 相当于keySet方法*/public class PropertiesDemo2 {public static void main(String[] args) {// 创建集合对象Properties properties = new Properties();// 添加元素properties.setProperty("it001", "张三");properties.setProperty("it002", "李四");properties.setProperty("it003", "王五");// 遍历集合 : 键找值Set<String> set = properties.stringPropertyNames();for (String key : set) {System.out.println(key + "---" + properties.getProperty(key));}}}
6.3 properties中和IO相关的方法
void load(InputStream inStream) 以字节流形式 , 把文件中的键值对, 读取到集合中
- void load(Reader reader) 以字符流形式 , 把文件中的键值对, 读取到集合中
- void store(OutputStream out, String comments) 把集合中的键值对,以字节流形式写入文件中 , 参数二为注释
void store(Writer writer, String comments) 把集合中的键值对,以字符流形式写入文件中 , 参数二为注释
package com.itheima.properties_demo;import java.io.FileInputStream;import java.io.FileNotFoundException;import java.io.FileOutputStream;import java.io.IOException;import java.util.Properties;/*2 和IO流结合的方法void load(InputStream inStream) : 以字节流形式 , 把文件中的键值对, 读取到集合中// void load(Reader reader) 以字符流形式 , 把文件中的键值对, 读取到集合中void store(OutputStream out, String comments) 把集合中的键值对,以字节流形式写入文件中 , 参数二为注释// void store(Writer writer, String comments) 把集合中的键值对,以字符流形式写入文件中 , 参数二为注释*/public class PropertiesDemo3 {public static void main(String[] args) {//storeTest(); //保存配置信息到配置文件loadTest(); //读取配置文件的信息到内存}private static void loadTest() {Properties dbPro = new Properties();System.out.println("dbPro = " + dbPro);//dbPro = {}//void load(InputStream inStream) : 以字节流形式 , 把文件中的键值对, 读取到集合中try (FileInputStream fis = new FileInputStream("day10_demo\\db.properties")) {dbPro.load(fis); //将流中关联配置文件中的键值对数据放到dbPro对象中System.out.println("dbPro = " + dbPro);//dbPro = {password=1234, username=root}} catch (IOException e) {e.printStackTrace();}}private static void storeTest() {Properties pro = new Properties();pro.setProperty("username", "root");pro.setProperty("password", "1234");//把pro集合中的键值对数据保存到文件中try (FileOutputStream fos = new FileOutputStream("day10_demo\\db.properties");//用来保存键值对数据的文件,一般叫做属性集文件,配置文件,后缀一般就是 .properties) {//将内存中pro对象数据保存到db.properties文件中pro.store(fos, "this is comments! 中文注释");} catch (IOException e) {e.printStackTrace();}}}
7 ResourceBundle加载属性文件
学习目标
能够熟练使用ResourceBundle工具类快速读取属性文件的值
内容讲解
【1】API介绍
java.util.ResourceBundle它是一个抽象类,我们可以使用它的子类PropertyResourceBundle来读取以.properties结尾的配置文件。通过静态方法直接获取对象:
```java static ResourceBundle getBundle(String baseName) 可以根据名字直接获取默认语言环境下的属性资源。 参数注意: baseName
1.属性集名称不含扩展名。
2.属性集文件是在src目录中的
比如:src中存在一个文件 user.properties ResourceBundle bundle = ResourceBundle.getBundle(“user”);
ResourceBundle中常用方法:
```java
String getString(String key) : 通过键,获取对应的值
【2】代码实践
通过ResourceBundle工具类
将一个属性文件 放到src目录中,使用ResourceBundle去获取键值对数据
package com.itheima.resourcebundle_demo;
import java.util.ResourceBundle;
/*
    1   java.util.ResourceBundle : 它是一个抽象类
        我们可以使用它的子类PropertyResourceBundle来读取以.properties结尾的配置文件
    2   static ResourceBundle getBundle(String baseName) 可以根据名字直接获取默认语言环境下的属性资源。
        参数注意: baseName
            1.属性集名称不含扩展名。
            2.属性集文件是在src目录中的
        比如:src中存在一个文件 user.properties
        ResourceBundle bundle = ResourceBundle.getBundle("user");
    3 ResourceBundle中常用方法:
         String getString(String key) : 通过键,获取对应的值
    优点 : 快速读取属性文件的值
     需求 :
        通过ResourceBundle工具类
        将一个属性文件 放到src目录中,使用ResourceBundle去获取键值对数据
 */
public class ResourceBundleDemo {
    public static void main(String[] args) {
        // public static final ResourceBundle getBundle(String baseName)
        // baseName : properties文件的名字 , 注意 : 扩展名不需要加上 , properties必须在src的根目录下
        ResourceBundle resourceBundle = ResourceBundle.getBundle("user");
        // String getString(String key) : 通过键,获取对应的值
        String value1 = resourceBundle.getString("username");
        String value2 = resourceBundle.getString("password");
        System.out.println(value1);
        System.out.println(value2);
    }
}
内容小结
如果要使用ResourceBundle加载属性文件,属性文件需要放置在哪个位置?
src的根目录请描述使用ResourceBundle获取属性值的大致步骤是怎样的?
1 获取ResourceBundle对象
2 通过ResourceBundle类中的getString(key) : 根据键找值
8 递归
- 概述
- 递归概述:以编程的角度来看,递归指的是方法定义中调用方法本身的现象
- 好处
- 把一个复杂的问题层层转化为一个与原问题相似的规模较小的问题来求解
小的问题解决 , 大的问题也会逐一进行解决
- 把一个复杂的问题层层转化为一个与原问题相似的规模较小的问题来求解
- 注意
- 递归出口:否则会出现内存溢出
- 递归规则:需要找到与原问题相似的规模较小的问题
案例
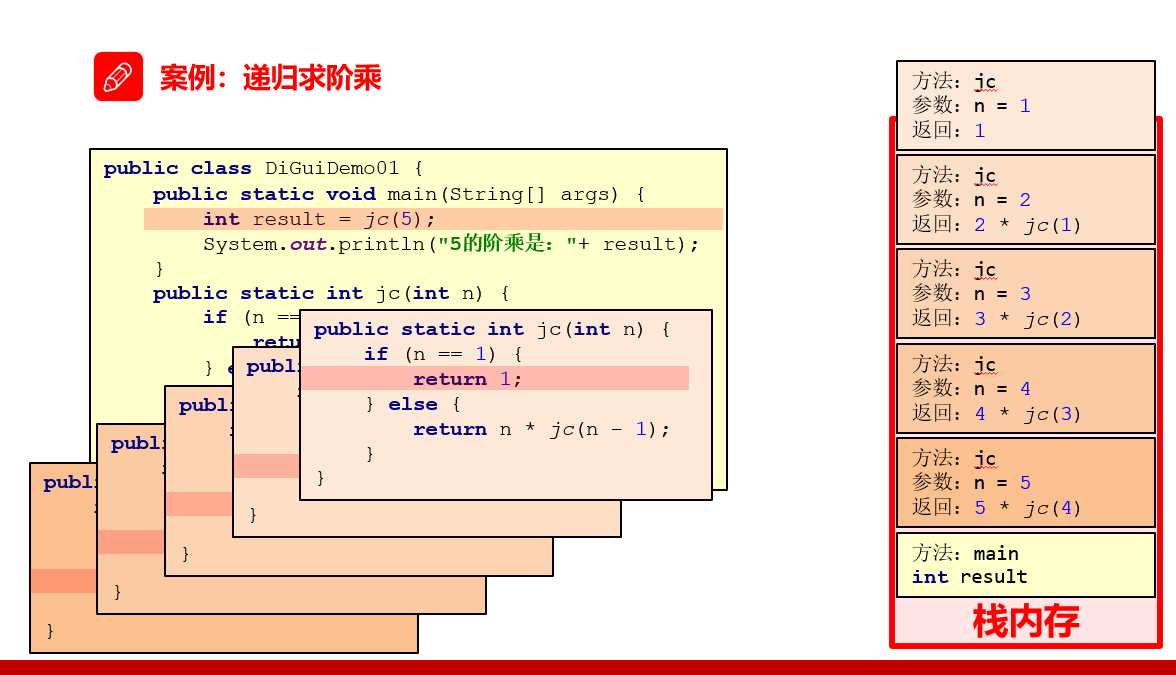
package com.itheima.recursion_demo;
/*
      需求:用递归求5的阶乘,并把结果在控制台输出
      思路:
          1 定义一个方法,用于递归求阶乘,参数为一个int类型的变量
          2 在方法内部判断该变量的值是否是1
              是:返回1
              不是:返回n*(n-1)!
          3 调用方法
          4 输出结果
*/
public class Demo1 {
  public static void main(String[] args) {
      int result = jc(5);
      System.out.println("5的阶乘是:" + result);
  }
  private static int jc(int n) {
      if (n == 1) {
          return 1;
      }
      return n * jc(n - 1);
  }
}
内存分析
package com.itheima.recursion_demo;
import java.io.File;
/*
  需求 : 使用递归删除计算机中指定的文件夹
  删除D盘中的aaa文件夹!
  File类 : delete()可以直接删除文件 或者 空文件夹
  aaa
      --bbb
          --ddd.txt
      --ccc.txt
*/
public class Demo2 {
  public static void main(String[] args) {
      //删除指定文件夹
      File dir = new File("D:/abc");
      deleteFile(dir);
  }
  /**
   * 删除文件或者文件夹
   *
   * @param file 文件或者文件夹
   */
  public static void deleteFile(File file) {
      if (!file.exists()) {
          //如果文件不存在,抛出一个异常
          throw new RuntimeException("您删除的文件,或者目录不存在!!");
      } else {
          //存在
          if (file.isFile()) {
              //删除文件
              boolean result = file.delete();//删除文件
              System.out.println("删除文件:" + file + "-->" + result);
          } else {
              //文件夹删除
              //文件夹删除前,先要把子文件删除
              //file删除是大问题,子文件删除是小问题
              File[] files = file.listFiles();
              for (File child : files) {
                  //删除子文件
                  deleteFile(child);//递归删除子文件
              }
              //子文件删除完毕后,删除自身
              boolean result = file.delete();
              System.out.println("删除文件夹:" + file + "-->" + result);
          }
      }
  }
}

若有收获,就点个赞吧
0 人点赞
