本文将学习对正在运行的堆栈进行简单更新的过程以观察其中的变化和影响。将执行以下流程:
- 创建起始堆栈 — 使用基础 Amazon Linux AMI 创建堆栈,然后使用 AWS CloudFormation 通过脚本安装 Apache Web 服务器和简单 PHP 应用程序。
- 更新应用程序 — 使用 AWS CloudFormation 更新应用程序中的一个文件并部署软件。
- 更新实例类型 — 更改底层 Amazon EC2 实例的实例类型。
- 更新 Amazon EC2 实例上的 AMI — 在您的堆栈中更改 Amazon EC2 实例的 Amazon 系统映像 (AMI)。
- 将密钥对添加到实例 — 向实例中添加 Amazon EC2 密钥对,然后更新安全组以允许 SSH 访问实例。
- 更改堆栈的资源 — 在堆栈中添加和删除资源,从而通过更新模板将其转换为自动扩展的负载平衡应用程序。
1. A simple application
我们将首先创建一个可以在本节其余部分使用的堆栈。
使用一个简单的模板,它可以在 Amazon AMI 的基础上启动一个 EC2 单实例,在 EC2实例安装 Apache Web 服务器并运行运行 PHP web 应用程序。
Apache Web 服务器、PHP 和简单的 PHP 应用程序都是通过 AWS CloudFormation 助手脚本安装的,这些脚本默认安装在 Amazon Linux AMI 上。
下面的模板片段,是一段元数据,描述了要安装的包和文件。在本例中是 Apache Web 服务器和来自 Amazon Linux AMI Yum 存储库的 PHP 基础设施。该代码片段还显示了服务部分,以确保 Apache Web 服务器正在运行。在Amazon EC2 实例定义的属性部分,UserData 属性包含调用 cfn-init 来安装包和文件的 CloudInit 脚本。
"WebServerInstance": {"Type" : "AWS::EC2::Instance","Metadata" : {"AWS::CloudFormation::Init" : {"config" : {"packages" : {"yum" : {"httpd" : [],"php" : []}},"files" : {"/var/www/html/index.php" : {"content" : { "Fn::Join" : ["", ["<?php\n","echo '<h1>AWS CloudFormation sample PHP application</h1>';\n","echo '<p>", { "Ref" : "WelcomeMessage" }, "</p>';\n","?>\n"]]},"mode" : "000644","owner" : "apache","group" : "apache"},},:"services" : {"sysvinit" : {"httpd" : { "enabled" : "true", "ensureRunning" : "true" }}}}}},"Properties": {:"UserData" : { "Fn::Base64" : { "Fn::Join" : ["", ["#!/bin/bash\n","yum install -y aws-cfn-bootstrap\n",:"# Install the files and packages from the metadata\n","/opt/aws/bin/cfn-init -v "," --stack ", { "Ref" : "AWS::StackName" }," --resource WebServerInstance "," --region ", { "Ref" : "AWS::Region" }, "\n",:]]}}}},
应用程序本身是一个非常简单的两行“Hello, World”示例,完全在模板中定义。对于真实的应用程序,文件可能存储在 Amazon S3、GitHub 或其他存储库中,并从模板中引用。AWS CloudFormation 可以下载包 (比如 rpm 或 RubyGems ),也可以引用单个文件(.zip 或 .tar)在 Amazon EC2 实例上创建应用程序构件。
模板启用和配置 cfn-hup 守护进程,以侦听对 Amazon EC2 实例元数据中定义的配置的更改。通过使用 cfn-hup 守护进程,您可以更新应用程序软件,比如 Apache 或 PHP 的版本,或者您可以从 AWS CloudFormation 更新 PHP 应用程序文件本身。下面的代码片段来自模板中的同一个 Amazon EC2 资源,显示了配置 cfn-hup,以便在检测到元数据有任何更改时调用 cfn-init 来更新软件所必需的部分:
"WebServerInstance": {"Type" : "AWS::EC2::Instance","Metadata" : {"AWS::CloudFormation::Init" : {"config" : {:"files" : {:"/etc/cfn/cfn-hup.conf" : {"content" : { "Fn::Join" : ["", ["[main]\n","stack=", { "Ref" : "AWS::StackName" }, "\n","region=", { "Ref" : "AWS::Region" }, "\n"]]},"mode" : "000400","owner" : "root","group" : "root"},"/etc/cfn/hooks.d/cfn-auto-reloader.conf" : {"content": { "Fn::Join" : ["", ["[cfn-auto-reloader-hook]\n","triggers=post.update\n","path=Resources.WebServerInstance.Metadata.AWS::CloudFormation::Init\n","action=/opt/aws/bin/cfn-init -s ", { "Ref" : "AWS::StackId" }, " -r WebServerInstance "," --region ", { "Ref" : "AWS::Region" }, "\n","runas=root\n"]]}}},:},"Properties": {:"UserData" : { "Fn::Base64" : { "Fn::Join" : ["", [:"# Start up the cfn-hup daemon to listen for changes to the Web Server metadata\n","/opt/aws/bin/cfn-hup || error_exit 'Failed to start cfn-hup'\n",:]]}}}},
完整模板
以下是完整的模板,在之前的基础上给 EC2 添加了安全组组员:
{"AWSTemplateFormatVersion" : "2010-09-09","Description" : "AWS CloudFormation Sample Template: Sample template that can be used to test EC2 updates. **WARNING** This template creates an Amazon Ec2 Instance. You will be billed for the AWS resources used if you create a stack from this template.","Parameters" : {"InstanceType" : {"Description" : "WebServer EC2 instance type","Type" : "String","Default" : "t2.small","AllowedValues" : ["t1.micro","t2.nano","t2.micro","t2.small","t2.medium","t2.large","m1.small","m1.medium","m1.large","m1.xlarge","m2.xlarge","m2.2xlarge","m2.4xlarge","m3.medium","m3.large","m3.xlarge","m3.2xlarge","m4.large","m4.xlarge","m4.2xlarge","m4.4xlarge","m4.10xlarge","c1.medium","c1.xlarge","c3.large","c3.xlarge","c3.2xlarge","c3.4xlarge","c3.8xlarge","c4.large","c4.xlarge","c4.2xlarge","c4.4xlarge","c4.8xlarge","g2.2xlarge","g2.8xlarge","r3.large","r3.xlarge","r3.2xlarge","r3.4xlarge","r3.8xlarge","i2.xlarge","i2.2xlarge","i2.4xlarge","i2.8xlarge","d2.xlarge","d2.2xlarge","d2.4xlarge","d2.8xlarge","hi1.4xlarge","hs1.8xlarge","cr1.8xlarge","cc2.8xlarge","cg1.4xlarge"],"ConstraintDescription" : "must be a valid EC2 instance type."}},"Mappings" : {"AWSInstanceType2Arch" : {"t1.micro" : { "Arch" : "HVM64" },"t2.nano" : { "Arch" : "HVM64" },"t2.micro" : { "Arch" : "HVM64" },"t2.small" : { "Arch" : "HVM64" },"t2.medium" : { "Arch" : "HVM64" },"t2.large" : { "Arch" : "HVM64" },"m1.small" : { "Arch" : "HVM64" },"m1.medium" : { "Arch" : "HVM64" },"m1.large" : { "Arch" : "HVM64" },"m1.xlarge" : { "Arch" : "HVM64" },"m2.xlarge" : { "Arch" : "HVM64" },"m2.2xlarge" : { "Arch" : "HVM64" },"m2.4xlarge" : { "Arch" : "HVM64" },"m3.medium" : { "Arch" : "HVM64" },"m3.large" : { "Arch" : "HVM64" },"m3.xlarge" : { "Arch" : "HVM64" },"m3.2xlarge" : { "Arch" : "HVM64" },"m4.large" : { "Arch" : "HVM64" },"m4.xlarge" : { "Arch" : "HVM64" },"m4.2xlarge" : { "Arch" : "HVM64" },"m4.4xlarge" : { "Arch" : "HVM64" },"m4.10xlarge" : { "Arch" : "HVM64" },"c1.medium" : { "Arch" : "HVM64" },"c1.xlarge" : { "Arch" : "HVM64" },"c3.large" : { "Arch" : "HVM64" },"c3.xlarge" : { "Arch" : "HVM64" },"c3.2xlarge" : { "Arch" : "HVM64" },"c3.4xlarge" : { "Arch" : "HVM64" },"c3.8xlarge" : { "Arch" : "HVM64" },"c4.large" : { "Arch" : "HVM64" },"c4.xlarge" : { "Arch" : "HVM64" },"c4.2xlarge" : { "Arch" : "HVM64" },"c4.4xlarge" : { "Arch" : "HVM64" },"c4.8xlarge" : { "Arch" : "HVM64" },"g2.2xlarge" : { "Arch" : "HVMG2" },"g2.8xlarge" : { "Arch" : "HVMG2" },"r3.large" : { "Arch" : "HVM64" },"r3.xlarge" : { "Arch" : "HVM64" },"r3.2xlarge" : { "Arch" : "HVM64" },"r3.4xlarge" : { "Arch" : "HVM64" },"r3.8xlarge" : { "Arch" : "HVM64" },"i2.xlarge" : { "Arch" : "HVM64" },"i2.2xlarge" : { "Arch" : "HVM64" },"i2.4xlarge" : { "Arch" : "HVM64" },"i2.8xlarge" : { "Arch" : "HVM64" },"d2.xlarge" : { "Arch" : "HVM64" },"d2.2xlarge" : { "Arch" : "HVM64" },"d2.4xlarge" : { "Arch" : "HVM64" },"d2.8xlarge" : { "Arch" : "HVM64" },"hi1.4xlarge" : { "Arch" : "HVM64" },"hs1.8xlarge" : { "Arch" : "HVM64" },"cr1.8xlarge" : { "Arch" : "HVM64" },"cc2.8xlarge" : { "Arch" : "HVM64" }},"AWSRegionArch2AMI" : {"us-east-1" : {"HVM64" : "ami-0ff8a91507f77f867", "HVMG2" : "ami-0a584ac55a7631c0c"},"us-west-2" : {"HVM64" : "ami-a0cfeed8", "HVMG2" : "ami-0e09505bc235aa82d"},"us-west-1" : {"HVM64" : "ami-0bdb828fd58c52235", "HVMG2" : "ami-066ee5fd4a9ef77f1"},"eu-west-1" : {"HVM64" : "ami-047bb4163c506cd98", "HVMG2" : "ami-0a7c483d527806435"},"eu-west-2" : {"HVM64" : "ami-f976839e", "HVMG2" : "NOT_SUPPORTED"},"eu-west-3" : {"HVM64" : "ami-0ebc281c20e89ba4b", "HVMG2" : "NOT_SUPPORTED"},"eu-central-1" : {"HVM64" : "ami-0233214e13e500f77", "HVMG2" : "ami-06223d46a6d0661c7"},"ap-northeast-1" : {"HVM64" : "ami-06cd52961ce9f0d85", "HVMG2" : "ami-053cdd503598e4a9d"},"ap-northeast-2" : {"HVM64" : "ami-0a10b2721688ce9d2", "HVMG2" : "NOT_SUPPORTED"},"ap-northeast-3" : {"HVM64" : "ami-0d98120a9fb693f07", "HVMG2" : "NOT_SUPPORTED"},"ap-southeast-1" : {"HVM64" : "ami-08569b978cc4dfa10", "HVMG2" : "ami-0be9df32ae9f92309"},"ap-southeast-2" : {"HVM64" : "ami-09b42976632b27e9b", "HVMG2" : "ami-0a9ce9fecc3d1daf8"},"ap-south-1" : {"HVM64" : "ami-0912f71e06545ad88", "HVMG2" : "ami-097b15e89dbdcfcf4"},"us-east-2" : {"HVM64" : "ami-0b59bfac6be064b78", "HVMG2" : "NOT_SUPPORTED"},"ca-central-1" : {"HVM64" : "ami-0b18956f", "HVMG2" : "NOT_SUPPORTED"},"sa-east-1" : {"HVM64" : "ami-07b14488da8ea02a0", "HVMG2" : "NOT_SUPPORTED"},"cn-north-1" : {"HVM64" : "ami-0a4eaf6c4454eda75", "HVMG2" : "NOT_SUPPORTED"},"cn-northwest-1" : {"HVM64" : "ami-6b6a7d09", "HVMG2" : "NOT_SUPPORTED"}}},"Resources" : {"WebServerInstance": {"Type" : "AWS::EC2::Instance","Metadata" : {"Comment" : "Install a simple PHP application","AWS::CloudFormation::Init" : {"config" : {"packages" : {"yum" : {"httpd" : [],"php" : []}},"files" : {"/var/www/html/index.php" : {"content" : { "Fn::Join" : ["", ["<?php\n","echo '<h1>AWS CloudFormation sample PHP application</h1>';\n","?>\n"]]},"mode" : "000644","owner" : "apache","group" : "apache"},"/etc/cfn/cfn-hup.conf" : {"content" : { "Fn::Join" : ["", ["[main]\n","stack=", { "Ref" : "AWS::StackId" }, "\n","region=", { "Ref" : "AWS::Region" }, "\n"]]},"mode" : "000400","owner" : "root","group" : "root"},"/etc/cfn/hooks.d/cfn-auto-reloader.conf" : {"content": { "Fn::Join" : ["", ["[cfn-auto-reloader-hook]\n","triggers=post.update\n","path=Resources.WebServerInstance.Metadata.AWS::CloudFormation::Init\n","action=/opt/aws/bin/cfn-init -s ", { "Ref" : "AWS::StackId" }, " -r WebServerInstance "," --region ", { "Ref" : "AWS::Region" }, "\n","runas=root\n"]]}}},"services" : {"sysvinit" : {"httpd" : { "enabled" : "true", "ensureRunning" : "true" },"cfn-hup" : { "enabled" : "true", "ensureRunning" : "true","files" : ["/etc/cfn/cfn-hup.conf", "/etc/cfn/hooks.d/cfn-auto-reloader.conf"]}}}}}},"Properties": {"ImageId" : { "Fn::FindInMap" : [ "AWSRegionArch2AMI", { "Ref" : "AWS::Region" },{ "Fn::FindInMap" : [ "AWSInstanceType2Arch", { "Ref" : "InstanceType" }, "Arch" ] } ] },"InstanceType" : { "Ref" : "InstanceType" },"SecurityGroups" : [ {"Ref" : "WebServerSecurityGroup"} ],"UserData" : { "Fn::Base64" : { "Fn::Join" : ["", ["#!/bin/bash -xe\n","yum install -y aws-cfn-bootstrap\n","# Install the files and packages from the metadata\n","/opt/aws/bin/cfn-init -v "," --stack ", { "Ref" : "AWS::StackName" }," --resource WebServerInstance "," --region ", { "Ref" : "AWS::Region" }, "\n","# Start up the cfn-hup daemon to listen for changes to the Web Server metadata\n","/opt/aws/bin/cfn-hup || error_exit 'Failed to start cfn-hup'\n","# Signal the status from cfn-init\n","/opt/aws/bin/cfn-signal -e $? "," --stack ", { "Ref" : "AWS::StackName" }," --resource WebServerInstance "," --region ", { "Ref" : "AWS::Region" }, "\n"]]}}},"CreationPolicy" : {"ResourceSignal" : {"Timeout" : "PT5M"}}},"WebServerSecurityGroup" : {"Type" : "AWS::EC2::SecurityGroup","Properties" : {"GroupDescription" : "Enable HTTP access via port 80","SecurityGroupIngress" : [{"IpProtocol" : "tcp", "FromPort" : "80", "ToPort" : "80", "CidrIp" : "0.0.0.0/0"}]}}},"Outputs" : {"WebsiteURL" : {"Description" : "Application URL","Value" : { "Fn::Join" : ["", ["http://", { "Fn::GetAtt" : [ "WebServerInstance", "PublicDnsName" ]}]] }}}}
2. Create the initial stack
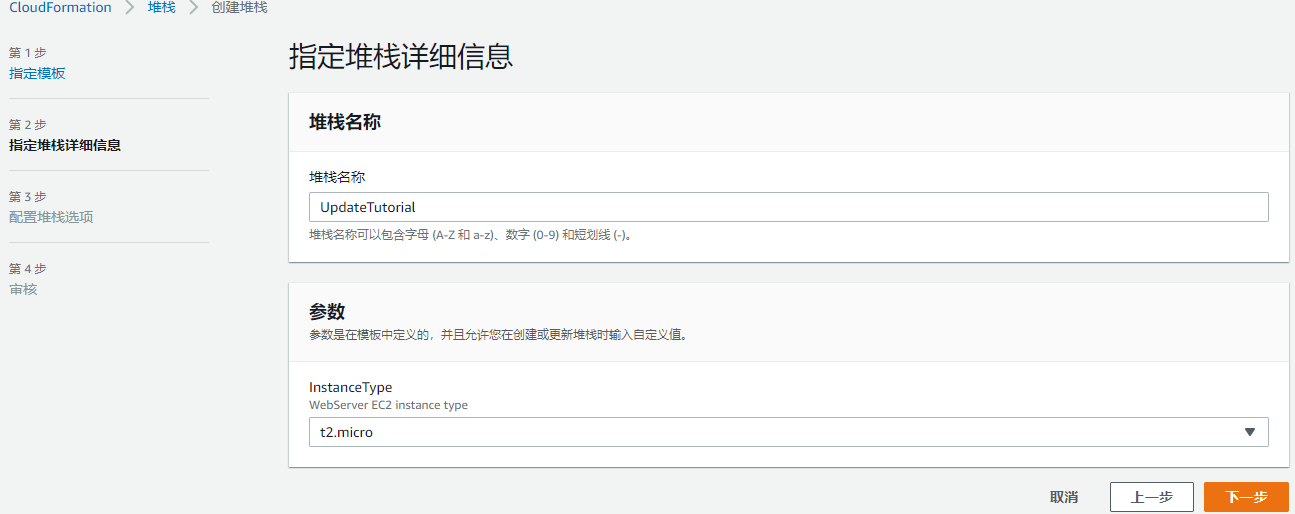
在本例中,我们将使用 AWS 管理控制台和示例模板创建初始堆栈。
将上面的模板保存为本地 UpdateTutorial.json 文件,然后在 CloudFormation 控制台上传模板: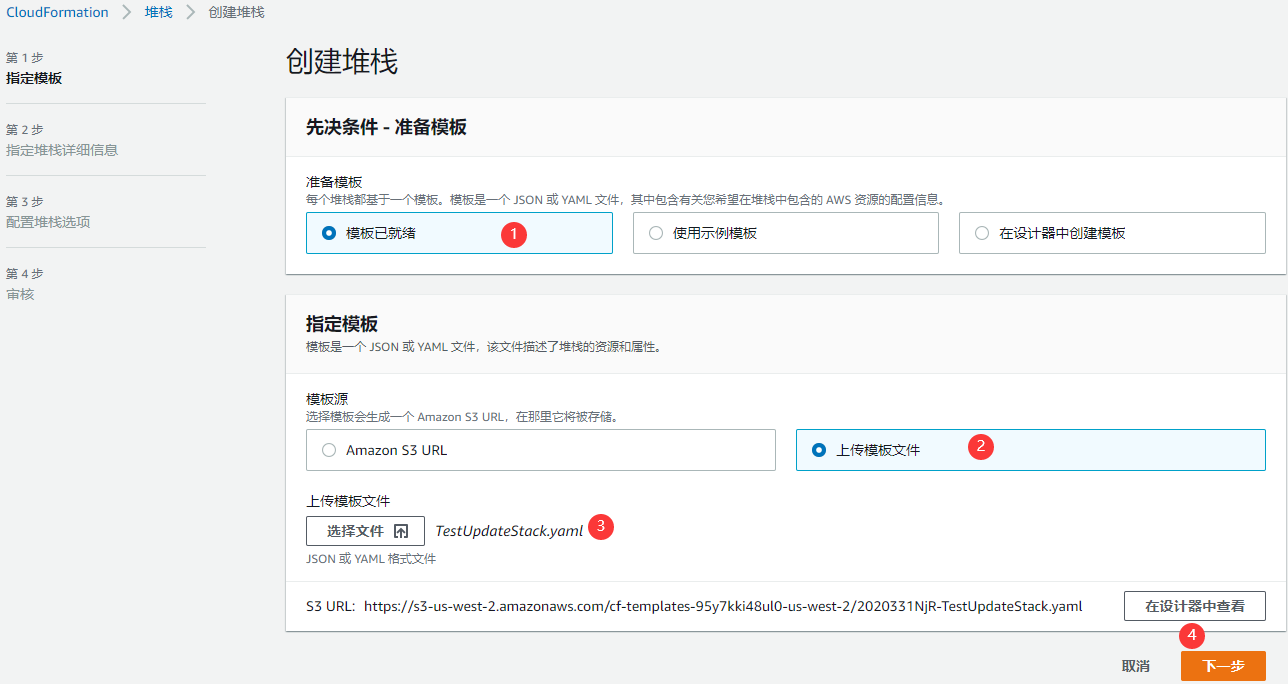
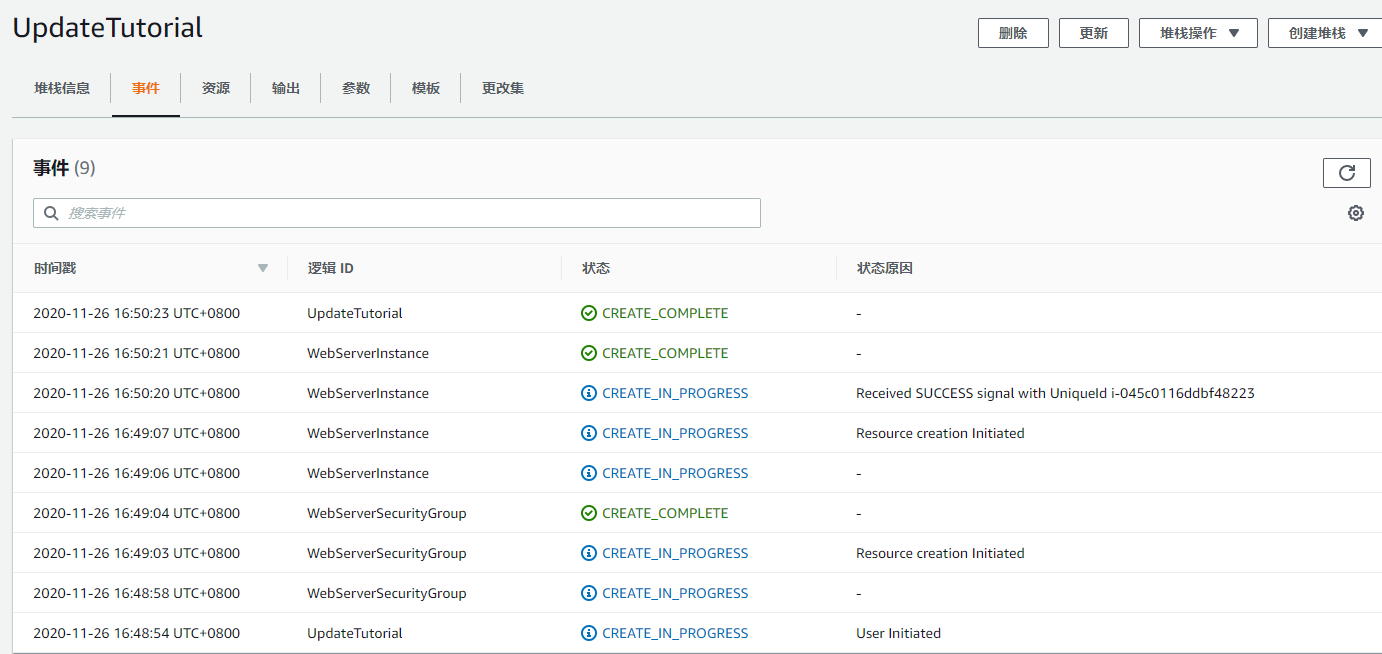
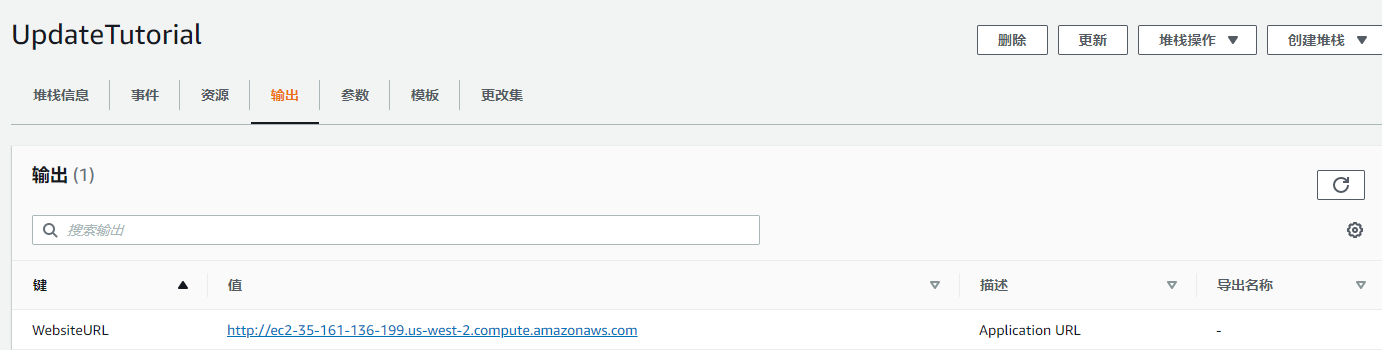

当您的堆栈状态变成 CREATE_COMPLETE 后,输出选项卡会显示网站的 URL。如果您单击 WebsiteURL 的输出值,您将看到新 PHP 应用程序在工作。
3. Update the application
现在我们已经部署了堆栈,让我们更新应用程序。我们将对应用程序输出的文本做一个简单的更改。为此,我们将在 index.php 文件中添加一个 echo 命令,如下面的模板片段所示:
"WebServerInstance": {"Type" : "AWS::EC2::Instance","Metadata" : {"AWS::CloudFormation::Init" : {"config" : {:"files" : {"/var/www/html/index.php" : {"content" : { "Fn::Join" : ["", ["<?php\n","echo '<h1>AWS CloudFormation sample PHP application</h1>';\n","echo 'Updated version via UpdateStack';\n ","?>\n"]]},"mode" : "000644","owner" : "apache","group" : "apache"},:}},
更新你本地的 UpdateTutorial.json 文件内容,更新堆栈: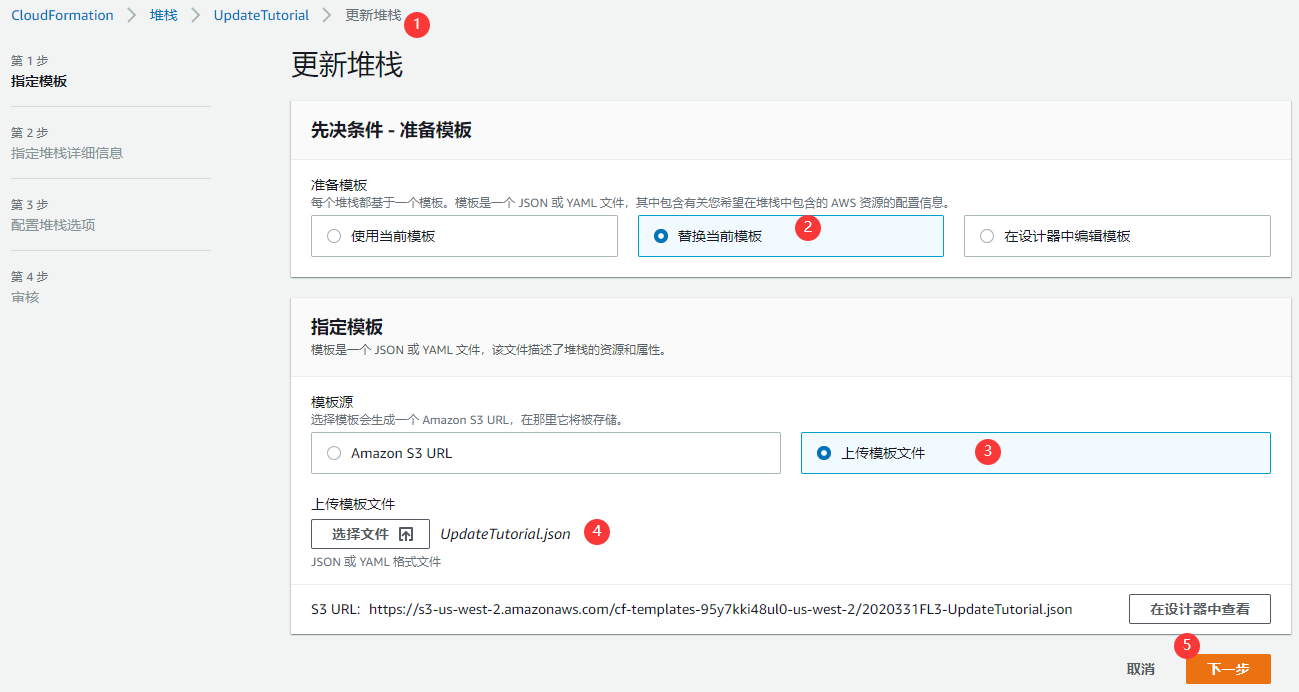
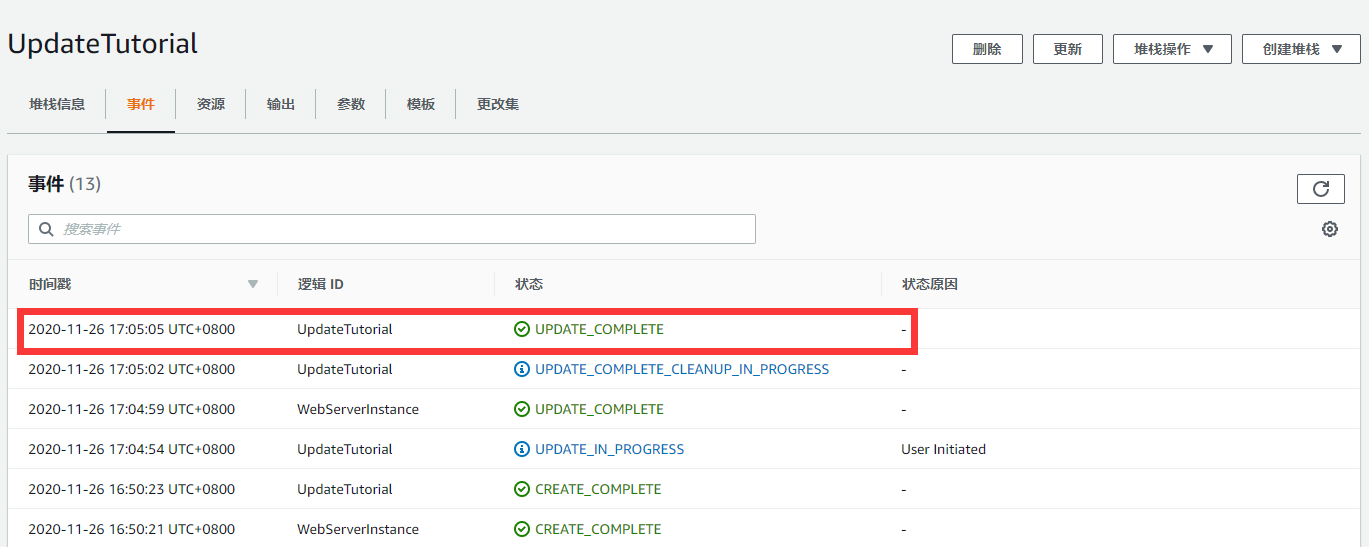
当您的堆栈处于 UPDATE_COMPLETE 状态时,您可以再次单击 WebsiteURL 输出值以验证应用程序的更改已生效。
:::info
默认状态下,cfn-hup 后台程序每 15 分钟运行一次,因此最多能花 15 分钟在堆栈更新后更改应用程序。
修改 EC2 实例的元数据,更新堆栈时不会重新创建 EC2 实例,而是通过其中的 cfn-hup 进程执行监听更新。 :::
也可以对部署到 Amazon EC2 实例的文件和包进行更复杂的更改。例如,您可能决定需要向实例中添加 MySQL,以及 PHP 对 MySQL 的支持。为此,只需将附加的包和文件以及任何附加的服务添加到配置中,然后更新堆栈以部署更改。
在下面的模板代码片段中,添加了 mysql,php-mysql 相关的依赖配置:
"WebServerInstance": {"Type" : "AWS::EC2::Instance","Metadata" : {"Comment" : "Install a simple PHP application","AWS::CloudFormation::Init" : {"config" : {"packages" : {"yum" : {"httpd" : [],"php" : [],"php-mysql" : [],"mysql-server" : [],"mysql-libs" : [],"mysql" : []}},:"services" : {"sysvinit" : {"httpd" : { "enabled" : "true", "ensureRunning" : "true" },"cfn-hup" : { "enabled" : "true", "ensureRunning" : "true","files" : ["/etc/cfn/cfn-hup.conf", "/etc/cfn/hooks.d/cfn-auto-reloader.conf"]},"mysqld" : { "enabled" : "true", "ensureRunning" : "true" }}}}}},"Properties": {:}}
您可以更新 CloudFormation 元数据,将应用程序所使用的软件包更新到新版本。前述示例中,每个软件包的版本属性都为空,这表示 cfn-init 应安装最新版的软件包。
"packages" : {"yum" : {"httpd" : [],"php" : []}
您也可以视需要指定软件包的版本字符串。
"packages" : {"rubygems" : {"mysql" : [],"rubygems-update" : ["1.6.2"],"rake" : ["0.8.7"],"rails" : ["2.3.11"]}}
使用 Auto Scaling 而不是 EC2 实例
如果你在模板中使用自动缩放组,而不是 Amazon EC2 实例资源,更新应用程序将以完全相同的方式工作(不会重建 EC2 实例,而是 cfn-hup 进程更新程序)。
但是,AWS CloudFormation 在自动伸缩组中不提供跨 Amazon EC2 实例的同步更新。每个主机上的 cfn-hup 守护进程将独立运行,并按照自己的计划更新应用程序。当使用 cfn-hup 更新实例上的配置时,每个实例将按照自己的计划运行 cfn-hup hook。堆栈中的实例之间不会进行协调。
因此,此时需要考虑以下几个问题:
- 如果 Auto Scaling 组中所有 Amazon EC2 实例的 cfn-hup 更改都同时运行,更新期间您的服务可能不可用。
- 如果 cfn-hup 更改在不同时间运行,则新旧版软件可能会同时运行。
要避免这些问题,请考虑在 Auto Scaling 组中强制滚动更新您的实例。
参考: UpdatePolicy 属性。
5. Changing resource properties
使用 AWS CloudFormation,您可以根据需要修改栈中支持更新的任何资源的任何属性。
更改 EC2 实例类型
之前堆栈中使用 t1.micro Amazon EC2 实例,假设现在网站需要处理的流量增多,需要升级使用 m1.small Amazon EC2 实例类型,这样网站的处理能力就更强。
:::info
但是注意,如果在更改实力类型时,实力类型的架构发生了变化,CloudFormation 会使用不同的 AMI 创建实例。
在示例模板中,Mappings 部分看到 t1.micro 和 m1.small 实例的架构相同,因此它们会使用相同的 Amazon Linux AMI。
:::
"Mappings" : {"AWSInstanceType2Arch" : {"t1.micro" : { "Arch" : "HVM64" },"m1.small" : { "Arch" : "HVM64" }...},"AWSRegionArch2AMI" : {..."us-west-2" : {"HVM64" : "ami-a0cfeed8", "HVMG2" : "ami-0e09505bc235aa82d"}...}
进行修改模板的实例类型,由于 InstanceType 是模板的输入参数,我们不需要修改模板;我们只能在“Stack Update”向导的“Specify Parameters”页面上更改参数值。
将 InstanceType 文本框的值从 t1.micro 更改为 m1.small。
CloudFormation 通过先停止实例,然后更改实例类型,再启动实例的过程来更改 EC2 实例的实例类型(类似给虚拟机增加内存配置,需要先停机),并且更改类型后,实例 ID 不会改变。
然而,当更改实例类型并重新启动后,实例的 公共 IP 会改变。CloudFormation 会将 Elastic IP 进行更新。
更改 EC2 实例上的 AMI
通过更新堆栈来触发 AMI 更改,这种情况下,CloudFormation 就不能像更改实例类型那样,只通过停止和启动实例来修改 AMI。CloudFormation 将 AMI 作为 EC2 实例资源的不可变属性,对不可变属性的修改,必需启动替代资源,创建运行拥有新 AMI 的新的 EC2 实例。
在新实例运行之后,CloudFormation 将更新堆栈中的其他资源以关联到新的 EC2 实例资源。堆栈中的实例 ID 和应用程序 URL 将随着更新而更改。
所有新资源的创建,旧资源的删除过程被称为, UPDATE_CLEANUP 。
更新 Auto Scaling 组的 EC2 启动配置
如果使用的是 Auto Scaling 组而不是 Amazon EC2 实例,更新正在运行实例的过程会有点不同。借助 Auto Scaling 资源,可将实例类型或 AMI ID 等 Amazon EC2 实例配置封装到 Auto Scaling 启动配置中。您可以用我们在前面部分中对 Amazon EC2 实例资源进行更改时所用的方法对启动配置进行更改。但是,启动配置的更改不会影响 Auto Scaling 组中任何正在运行的 Amazon EC2 实例。更新后的启动配置只适用于更新之后创建的新实例。
如果要将更改传播到 Auto Scaling 组中所有实例的启动配置,则可以使用更新属性。有关更多信息,请参阅 UpdatePolicy 属性。
6. Adding resource properties
到目前为止,我们已在模板中查看了资源现有属性的更改。您还可以添加原先未在模板中指定的属性。
为了阐明上述操作,我们将会添加 Amazon EC2 密钥对到现有 EC2 实例中然后在 Amazon EC2 安全组中打开端口 22,从而使您可以使用 SSH 访问实例。
将密钥对添加到实例
向模板额外添加两个参数,设置现有 Amazon EC2 密钥对和 SSH 源 IP 地址。
"Parameters" : {"KeyName" : {"Description" : "Name of an existing Amazon EC2 key pair for SSH access","Type": "AWS::EC2::KeyPair::KeyName"},"SSHLocation" : {"Description" : " The IP address range that can be used to SSH to the EC2 instances","Type": "String","MinLength": "9","MaxLength": "18","Default": "0.0.0.0/0","AllowedPattern": "(\\d{1,3})\\.(\\d{1,3})\\.(\\d{1,3})\\.(\\d{1,3})/(\\d{1,2})","ConstraintDescription": "must be a valid IP CIDR range of the form x.x.x.x/x."}:},
将 KeyName 属性添加到 Amazon EC2 实例。 ```json “WebServerInstance”: { “Type” : “AWS::EC2::Instance”, : “Properties”: { : “KeyName” : { “Ref” : “KeyName” }, :
}
},
3. 将端口 22 和 SSHLocation 添加到 Amazon EC2 安全组的入口规则。
```json
"WebServerSecurityGroup" : {
  "Type" : "AWS::EC2::SecurityGroup",
  "Properties" : {
    "GroupDescription" : "Enable HTTP and SSH",
    "SecurityGroupIngress" : [
      {"IpProtocol" : "tcp", "FromPort" : "22", "ToPort" : "22", "CidrIp" : { "Ref" : "SSHLocation"}},
      {"IpProtocol" : "tcp", "FromPort" : "80", "ToPort" : "80", "CidrIp" :  "0.0.0.0/0"}
    ]
  }
},
- 通过 AWS 管理控制台(如更新应用程序中所述)或使用 AWS 命令
aws cloudformation update-stack更新堆栈。
7. Change the stack’s resources
由于应用程序需求会随时间变化,因此 AWS CloudFormation 允许您更改堆栈中的资源集。
为了演示,我们将使用 6. Adding resource properties 中的单个实例应用程序,并通过更新堆栈将其转换为自动缩放、负载均衡的应用程序。
这将使用一个 Elastic IP 创建一个简单的、单实例的 PHP 应用程序。现在,我们将通过在更新期间更改其资源,将该应用程序转换为一个高可用性、自动伸缩、负载均衡的应用程序。
添加 Elastic Load Balancer 资源。
 "ElasticLoadBalancer" : {
   "Type" : "AWS::ElasticLoadBalancing::LoadBalancer",
   "Properties" : {
     "CrossZone" : "true",
     "AvailabilityZones" : { "Fn::GetAZs" : "" },
     "LBCookieStickinessPolicy" : [ {
       "PolicyName" : "CookieBasedPolicy",
       "CookieExpirationPeriod" : "30"
     } ],
     "Listeners" : [ {
       "LoadBalancerPort" : "80",
       "InstancePort" : "80",
       "Protocol" : "HTTP",
       "PolicyNames" : [ "CookieBasedPolicy" ]
     } ],
     "HealthCheck" : {
       "Target" : "HTTP:80/",
       "HealthyThreshold" : "2",
       "UnhealthyThreshold" : "5",
       "Interval" : "10",
       "Timeout" : "5"
     }
   }
 }
将模板中的 EC2 实例转换成 Auto Scaling 启动配置。由于属性都相同,所以我们只需要更改类型名称,从:
"WebServerInstance": {
"Type" : "AWS::EC2::Instance",
到:
"LaunchConfig": {
"Type" : "AWS::AutoScaling::LaunchConfiguration",
为了使模板更清楚,我们已将资源名称从 WebServerInstance 更改为 LaunchConfig,因此您将需要更新由 cfn-init 和 cfn-hup 引用的资源名称(只需搜索 WebServerInstance 并将其替换为 LaunchConfig(cfn-signal 除外))。对于 cfn-signal,您需要向 Auto Scaling 组 (WebServerGroup) 而非实例发送信号,如以下代码段所示:
          "# Signal the status from cfn-init\n",
          "/opt/aws/bin/cfn-signal -e $? ",
          "         --stack ", { "Ref" : "AWS::StackName" },
          "         --resource WebServerGroup ",
          "         --region ", { "Ref" : "AWS::Region" }, "\n"
添加 Auto Scaling 组资源。
 "WebServerGroup" : {
   "Type" : "AWS::AutoScaling::AutoScalingGroup",
   "Properties" : {
     "AvailabilityZones" : { "Fn::GetAZs" : "" },
     "LaunchConfigurationName" : { "Ref" : "LaunchConfig" },
     "MinSize" : "1",
     "DesiredCapacity" : "1",
     "MaxSize" : "5",
     "LoadBalancerNames" : [ { "Ref" : "ElasticLoadBalancer" } ]
   },
   "CreationPolicy" : {
     "ResourceSignal" : {
       "Timeout" : "PT15M"
     }
   },
   "UpdatePolicy": {
     "AutoScalingRollingUpdate": {
       "MinInstancesInService": "1",
       "MaxBatchSize": "1",
       "PauseTime" : "PT15M",
       "WaitOnResourceSignals": "true"
     }
   }
 }
更新安全组定义以锁定通过负载均衡器分配至实例的流量。
 "WebServerSecurityGroup" : {
   "Type" : "AWS::EC2::SecurityGroup",
   "Properties" : {
     "GroupDescription" : "Enable HTTP access via port 80 locked down to the ELB and SSH access",
     "SecurityGroupIngress" : [
       {"IpProtocol" : "tcp", "FromPort" : "80", "ToPort" : "80", "SourceSecurityGroupOwnerId" : {"Fn::GetAtt" : ["ElasticLoadBalancer", "SourceSecurityGroup.OwnerAlias"]},
                     "SourceSecurityGroupName" : {"Fn::GetAtt" : ["ElasticLoadBalancer", "SourceSecurityGroup.GroupName"]}},
       {"IpProtocol" : "tcp", "FromPort" : "22", "ToPort" : "22", "CidrIp" : { "Ref" : "SSHLocation"}}
     ]
   }
 }
更新 Outputs 以返回 Elastic Load Balancer 的 DNS 名称,以作为应用程序的位置,从: ```json
“WebsiteURL” : { “Value” : { “Fn::Join” : [“”, [“http://“, { “Fn::GetAtt” : [ “WebServerInstance”, “PublicDnsName” ]}]]}, “Description” : “Application URL” }
到:
```json

"WebsiteURL" : {
  "Value" : { "Fn::Join" : ["", ["http://",
      { "Fn::GetAtt" : [ "ElasticLoadBalancer", "DNSName" ]}]]},
  "Description" : "Application URL"
}
完整模板
为方便参考,以下示例显示了完整模板。如果您使用此模板更新堆栈,您会将您的单实例简单应用程序转换成可用性高、可自动扩展的、多可用区负载均衡型应用程序。只有需要更新的资源会被修改,所以,如果此应用程序有任何数据存储,该数据都会保持原样。现在,您可以使用 AWS CloudFormation 在您的要求更改时增大或增强您的堆栈。
{
  "AWSTemplateFormatVersion" : "2010-09-09",

  "Description" : "AWS CloudFormation Sample Template: Sample template that can be used to test EC2 updates. **WARNING** This template creates an Amazon Ec2 Instance. You will be billed for the AWS resources used if you create a stack from this template.",

  "Parameters" : {

    "KeyName": {
      "Description" : "Name of an existing EC2 KeyPair to enable SSH access to the instance",
      "Type": "AWS::EC2::KeyPair::KeyName",
      "ConstraintDescription" : "must be the name of an existing EC2 KeyPair."
    },

    "SSHLocation" : {
      "Description" : " The IP address range that can be used to SSH to the EC2 instances",
      "Type": "String",
      "MinLength": "9",
      "MaxLength": "18",
      "Default": "0.0.0.0/0",
      "AllowedPattern": "(\\d{1,3})\\.(\\d{1,3})\\.(\\d{1,3})\\.(\\d{1,3})/(\\d{1,2})",
      "ConstraintDescription": "must be a valid IP CIDR range of the form x.x.x.x/x."
    },

    "InstanceType" : {
      "Description" : "WebServer EC2 instance type",
      "Type" : "String",
      "Default" : "t2.small",
      "AllowedValues" : [
        "t1.micro",
        "t2.nano",
        "t2.micro",
        "t2.small",
        "t2.medium",
        "t2.large",
        "m1.small",
        "m1.medium",
        "m1.large",
        "m1.xlarge",
        "m2.xlarge",
        "m2.2xlarge",
        "m2.4xlarge",
        "m3.medium",
        "m3.large",
        "m3.xlarge",
        "m3.2xlarge",
        "m4.large",
        "m4.xlarge",
        "m4.2xlarge",
        "m4.4xlarge",
        "m4.10xlarge",
        "c1.medium",
        "c1.xlarge",
        "c3.large",
        "c3.xlarge",
        "c3.2xlarge",
        "c3.4xlarge",
        "c3.8xlarge",
        "c4.large",
        "c4.xlarge",
        "c4.2xlarge",
        "c4.4xlarge",
        "c4.8xlarge",
        "g2.2xlarge",
        "g2.8xlarge",
        "r3.large",
        "r3.xlarge",
        "r3.2xlarge",
        "r3.4xlarge",
        "r3.8xlarge",
        "i2.xlarge",
        "i2.2xlarge",
        "i2.4xlarge",
        "i2.8xlarge",
        "d2.xlarge",
        "d2.2xlarge",
        "d2.4xlarge",
        "d2.8xlarge",
        "hi1.4xlarge",
        "hs1.8xlarge",
        "cr1.8xlarge",
        "cc2.8xlarge",
        "cg1.4xlarge"
      ],
      "ConstraintDescription" : "must be a valid EC2 instance type."
    }
  },

  "Mappings" : {
    "AWSInstanceType2Arch" : {
      "t1.micro"    : { "Arch" : "HVM64"  },
      "t2.nano"     : { "Arch" : "HVM64"  },
      "t2.micro"    : { "Arch" : "HVM64"  },
      "t2.small"    : { "Arch" : "HVM64"  },
      "t2.medium"   : { "Arch" : "HVM64"  },
      "t2.large"    : { "Arch" : "HVM64"  },
      "m1.small"    : { "Arch" : "HVM64"  },
      "m1.medium"   : { "Arch" : "HVM64"  },
      "m1.large"    : { "Arch" : "HVM64"  },
      "m1.xlarge"   : { "Arch" : "HVM64"  },
      "m2.xlarge"   : { "Arch" : "HVM64"  },
      "m2.2xlarge"  : { "Arch" : "HVM64"  },
      "m2.4xlarge"  : { "Arch" : "HVM64"  },
      "m3.medium"   : { "Arch" : "HVM64"  },
      "m3.large"    : { "Arch" : "HVM64"  },
      "m3.xlarge"   : { "Arch" : "HVM64"  },
      "m3.2xlarge"  : { "Arch" : "HVM64"  },
      "m4.large"    : { "Arch" : "HVM64"  },
      "m4.xlarge"   : { "Arch" : "HVM64"  },
      "m4.2xlarge"  : { "Arch" : "HVM64"  },
      "m4.4xlarge"  : { "Arch" : "HVM64"  },
      "m4.10xlarge" : { "Arch" : "HVM64"  },
      "c1.medium"   : { "Arch" : "HVM64"  },
      "c1.xlarge"   : { "Arch" : "HVM64"  },
      "c3.large"    : { "Arch" : "HVM64"  },
      "c3.xlarge"   : { "Arch" : "HVM64"  },
      "c3.2xlarge"  : { "Arch" : "HVM64"  },
      "c3.4xlarge"  : { "Arch" : "HVM64"  },
      "c3.8xlarge"  : { "Arch" : "HVM64"  },
      "c4.large"    : { "Arch" : "HVM64"  },
      "c4.xlarge"   : { "Arch" : "HVM64"  },
      "c4.2xlarge"  : { "Arch" : "HVM64"  },
      "c4.4xlarge"  : { "Arch" : "HVM64"  },
      "c4.8xlarge"  : { "Arch" : "HVM64"  },
      "g2.2xlarge"  : { "Arch" : "HVMG2"  },
      "g2.8xlarge"  : { "Arch" : "HVMG2"  },
      "r3.large"    : { "Arch" : "HVM64"  },
      "r3.xlarge"   : { "Arch" : "HVM64"  },
      "r3.2xlarge"  : { "Arch" : "HVM64"  },
      "r3.4xlarge"  : { "Arch" : "HVM64"  },
      "r3.8xlarge"  : { "Arch" : "HVM64"  },
      "i2.xlarge"   : { "Arch" : "HVM64"  },
      "i2.2xlarge"  : { "Arch" : "HVM64"  },
      "i2.4xlarge"  : { "Arch" : "HVM64"  },
      "i2.8xlarge"  : { "Arch" : "HVM64"  },
      "d2.xlarge"   : { "Arch" : "HVM64"  },
      "d2.2xlarge"  : { "Arch" : "HVM64"  },
      "d2.4xlarge"  : { "Arch" : "HVM64"  },
      "d2.8xlarge"  : { "Arch" : "HVM64"  },
      "hi1.4xlarge" : { "Arch" : "HVM64"  },
      "hs1.8xlarge" : { "Arch" : "HVM64"  },
      "cr1.8xlarge" : { "Arch" : "HVM64"  },
      "cc2.8xlarge" : { "Arch" : "HVM64"  }
    },
    "AWSRegionArch2AMI" : {
      "us-east-1"        : {"HVM64" : "ami-0ff8a91507f77f867", "HVMG2" : "ami-0a584ac55a7631c0c"},
      "us-west-2"        : {"HVM64" : "ami-a0cfeed8", "HVMG2" : "ami-0e09505bc235aa82d"},
      "us-west-1"        : {"HVM64" : "ami-0bdb828fd58c52235", "HVMG2" : "ami-066ee5fd4a9ef77f1"},
      "eu-west-1"        : {"HVM64" : "ami-047bb4163c506cd98", "HVMG2" : "ami-0a7c483d527806435"},
      "eu-west-2"        : {"HVM64" : "ami-f976839e", "HVMG2" : "NOT_SUPPORTED"},
      "eu-west-3"        : {"HVM64" : "ami-0ebc281c20e89ba4b", "HVMG2" : "NOT_SUPPORTED"},
      "eu-central-1"     : {"HVM64" : "ami-0233214e13e500f77", "HVMG2" : "ami-06223d46a6d0661c7"},
      "ap-northeast-1"   : {"HVM64" : "ami-06cd52961ce9f0d85", "HVMG2" : "ami-053cdd503598e4a9d"},
      "ap-northeast-2"   : {"HVM64" : "ami-0a10b2721688ce9d2", "HVMG2" : "NOT_SUPPORTED"},
      "ap-northeast-3"   : {"HVM64" : "ami-0d98120a9fb693f07", "HVMG2" : "NOT_SUPPORTED"},
      "ap-southeast-1"   : {"HVM64" : "ami-08569b978cc4dfa10", "HVMG2" : "ami-0be9df32ae9f92309"},
      "ap-southeast-2"   : {"HVM64" : "ami-09b42976632b27e9b", "HVMG2" : "ami-0a9ce9fecc3d1daf8"},
      "ap-south-1"       : {"HVM64" : "ami-0912f71e06545ad88", "HVMG2" : "ami-097b15e89dbdcfcf4"},
      "us-east-2"        : {"HVM64" : "ami-0b59bfac6be064b78", "HVMG2" : "NOT_SUPPORTED"},
      "ca-central-1"     : {"HVM64" : "ami-0b18956f", "HVMG2" : "NOT_SUPPORTED"},
      "sa-east-1"        : {"HVM64" : "ami-07b14488da8ea02a0", "HVMG2" : "NOT_SUPPORTED"},
      "cn-north-1"       : {"HVM64" : "ami-0a4eaf6c4454eda75", "HVMG2" : "NOT_SUPPORTED"},
      "cn-northwest-1"   : {"HVM64" : "ami-6b6a7d09", "HVMG2" : "NOT_SUPPORTED"}
    }
  },

  "Resources" : {

    "ElasticLoadBalancer" : {
      "Type" : "AWS::ElasticLoadBalancing::LoadBalancer",
      "Properties" : {
        "CrossZone" : "true",
        "AvailabilityZones" : { "Fn::GetAZs" : "" },
        "LBCookieStickinessPolicy" : [ {
          "PolicyName" : "CookieBasedPolicy",
          "CookieExpirationPeriod" : "30"
        } ],
        "Listeners" : [ {
          "LoadBalancerPort" : "80",
          "InstancePort" : "80",
          "Protocol" : "HTTP",
          "PolicyNames" : [ "CookieBasedPolicy" ]
        } ],
        "HealthCheck" : {
          "Target" : "HTTP:80/",
          "HealthyThreshold" : "2",
          "UnhealthyThreshold" : "5",
          "Interval" : "10",
          "Timeout" : "5"
        }
      }
    },

    "WebServerGroup" : {
      "Type" : "AWS::AutoScaling::AutoScalingGroup",
      "Properties" : {
        "AvailabilityZones" : { "Fn::GetAZs" : "" },
        "LaunchConfigurationName" : { "Ref" : "LaunchConfig" },
        "MinSize" : "1",
        "DesiredCapacity" : "1",
        "MaxSize" : "5",
        "LoadBalancerNames" : [ { "Ref" : "ElasticLoadBalancer" } ]
      },
      "CreationPolicy" : {
        "ResourceSignal" : {
          "Timeout" : "PT15M"
        }
      },
      "UpdatePolicy": {
        "AutoScalingRollingUpdate": {
          "MinInstancesInService": "1",
          "MaxBatchSize": "1",
          "PauseTime" : "PT15M",
          "WaitOnResourceSignals": "true"
        }
      }
    },

    "LaunchConfig": {
      "Type" : "AWS::AutoScaling::LaunchConfiguration",
      "Metadata" : {
        "Comment" : "Install a simple PHP application",
        "AWS::CloudFormation::Init" : {
          "config" : {
            "packages" : {
              "yum" : {
                "httpd"             : [],
                "php"               : []
              }
            },

            "files" : {

              "/var/www/html/index.php" : {
                "content" : { "Fn::Join" : ["", [
                  "<?php\n",
                  "echo '<h1>AWS CloudFormation sample PHP application</h1>';\n",
                  "echo 'Updated version via UpdateStack';\n ",
                  "?>\n"
                ]]},
                "mode"    : "000644",
                "owner"   : "apache",
                "group"   : "apache"
              },


              "/etc/cfn/cfn-hup.conf" : {
                "content" : { "Fn::Join" : ["", [
                  "[main]\n",
                  "stack=", { "Ref" : "AWS::StackId" }, "\n",
                  "region=", { "Ref" : "AWS::Region" }, "\n"
                ]]},
                "mode"    : "000400",
                "owner"   : "root",
                "group"   : "root"
              },

              "/etc/cfn/hooks.d/cfn-auto-reloader.conf" : {
                "content": { "Fn::Join" : ["", [
                  "[cfn-auto-reloader-hook]\n",
                  "triggers=post.update\n",
                  "path=Resources.LaunchConfig.Metadata.AWS::CloudFormation::Init\n",
                  "action=/opt/aws/bin/cfn-init -s ", { "Ref" : "AWS::StackId" }, " -r LaunchConfig ",
                                                   " --region     ", { "Ref" : "AWS::Region" }, "\n",
                  "runas=root\n"
                ]]}
              }
            },

            "services" : {
              "sysvinit" : {
                "httpd"    : { "enabled" : "true", "ensureRunning" : "true" },
                "cfn-hup" : { "enabled" : "true", "ensureRunning" : "true",
                    "files" : ["/etc/cfn/cfn-hup.conf", "/etc/cfn/hooks.d/cfn-auto-reloader.conf"]}
              }
            }
          }
        }
      },

      "Properties": {
        "ImageId" : { "Fn::FindInMap" : [ "AWSRegionArch2AMI", { "Ref" : "AWS::Region" },
                          { "Fn::FindInMap" : [ "AWSInstanceType2Arch", { "Ref" : "InstanceType" }, "Arch" ] } ] },
        "InstanceType"   : { "Ref" : "InstanceType" },
        "KeyName"        : { "Ref" : "KeyName" },
        "SecurityGroups" : [ {"Ref" : "WebServerSecurityGroup"} ],
        "UserData"       : { "Fn::Base64" : { "Fn::Join" : ["", [
             "#!/bin/bash -xe\n",
             "yum install -y aws-cfn-bootstrap\n",

             "# Install the files and packages from the metadata\n",
             "/opt/aws/bin/cfn-init -v ",
             "         --stack ", { "Ref" : "AWS::StackName" },
             "         --resource LaunchConfig ",
             "         --region ", { "Ref" : "AWS::Region" }, "\n",

             "# Start up the cfn-hup daemon to listen for changes to the Web Server metadata\n",
             "/opt/aws/bin/cfn-hup || error_exit 'Failed to start cfn-hup'\n",

             "# Signal the status from cfn-init\n",
             "/opt/aws/bin/cfn-signal -e $? ",
             "         --stack ", { "Ref" : "AWS::StackName" },
             "         --resource WebServerGroup ",
             "         --region ", { "Ref" : "AWS::Region" }, "\n"
        ]]}}
      }
    },

    "WebServerSecurityGroup" : {
      "Type" : "AWS::EC2::SecurityGroup",
      "Properties" : {
        "GroupDescription" : "Enable HTTP access via port 80 locked down to the ELB and SSH access",
        "SecurityGroupIngress" : [
          {"IpProtocol" : "tcp", "FromPort" : "80", "ToPort" : "80", "SourceSecurityGroupOwnerId" : {"Fn::GetAtt" : ["ElasticLoadBalancer", "SourceSecurityGroup.OwnerAlias"]},"SourceSecurityGroupName" : {"Fn::GetAtt" : ["ElasticLoadBalancer", "SourceSecurityGroup.GroupName"]}},
          {"IpProtocol" : "tcp", "FromPort" : "22", "ToPort" : "22", "CidrIp" : { "Ref" : "SSHLocation"}}
        ]
      }
    }
  },

  "Outputs" : {
    "WebsiteURL" : {
      "Description" : "Application URL",
      "Value" : { "Fn::Join" : ["", ["http://", { "Fn::GetAtt" : [ "ElasticLoadBalancer", "DNSName" ]}]] }
    }
  }
}
8. 可用性和影响注意事项
不同的属性会对堆栈中的资源造成不同的影响。您可以使用 AWS CloudFormation 更新任何属性;但是您应该在进行任何更改之前考虑以下问题:
更新会如何影响资源本身? 例如,更新警报阈值会使警报在更新期间处于非活动状态。正如我们所见,更改实例类型时需要停止和重启实例。AWS CloudFormation 使用底层资源的 Update 或 Modify 操作来对资源进行更改。要了解更改的影响,您应该查看特定资源的文档。
更改可变还是不可变? 对资源属性的某些更改,如更改 Amazon EC2 实例上的 AMI,不受基础服务的支持。如果更改可变属性,AWS CloudFormation 将使用适用于基础资源的“Update”或“Modify”类型 API。对于不可变的属性更改,AWS CloudFormation 将用更新后的属性创建新资源,然后在删除旧资源之前将此资源链接至堆栈。虽然 AWS CloudFormation 尝试减少堆栈资源的停机时间,但替代资源是一个多步骤过程,需要时间。重新配置堆栈期间,您的应用程序不能全面运行。例如,它可能不能为请求提供服务或访问数据库。
9. 相关资源
有关使用 AWS CloudFormation 启动应用程序的更多信息以及集成其他配置与 Puppet 和 Opscode Chef 等部署服务的更多信息,请参阅以下白皮书:
此部分使用的模板为 “Hello, World” PHP 应用程序。模板库中还有一个 Amazon ElastiCache 示例模板,该模板显示如何使用 cfn-hup 和 cfn-init 集成 PHP 应用程序和 ElasticCache,以响应 Amazon ElastiCache 缓存集群配置中的更改,这所有的操作都可通过更新堆栈执行。

若有收获,就点个赞吧
0 人点赞
