✨ snowpack简介
ssnowpack官网
GitHub
snowpack,号称 无需打包工具(Webpack,Parcel)便能将代码结果实时展现在浏览器中。
Snowpack最初是Fred在Google 的 Polymer 团队工作中做出来一个用于替代 HTML imports规范的构建工具,后来引申出 「为什么npm包在浏览器运行都需要借助webpack打包,而不能单独运行在浏览器呢?」 的问题,于是Fred就针对 「npm包单独运行在浏览器」 的可行性开始不断的尝试,这就有了之后的Snowpack。
在 ESM 出现之前,JavaScript 的模块化就有各式各样的规范,主要有 CommonJS, AMD, CMD, UMD 等规范,最为广泛的就是 Node.js 的 CommonJS,使用 module.exports 和 require 来导出导入模块,它是 npm 中的模块最主要提供的格式。由于浏览器并不直接支持这些模块,因此打包工具(Webpack,Browserify,Parcel 等)出现了。
- 在开发过程中你是否遇到 webapp 总是需要等待才能看到结果,每次保存后电脑就非常疯狂。
- webpack 之类的打包工具功能非常强大,他们引入配置,插件,依赖成本很低,任意创建一个 react 应用便将要安装 200M 的依赖包,并且需要写很多行的webpack配置。
- ESM在浏览器中使用了大约5年的时间,现在在所有现代浏览器中都受支持(可追溯到2018年初)。使用ESM,不再需要打包工具。您可以在没有 Webpack 的情况下构建一个现代化,高性能,可用于生产的Web应用程序!
- 你只需安装运行一次 snowpack 替换 Webpack,Parcel等繁杂的打包工具,可以获得更快的开发环境,并减少工具复杂性。
bundle与bundleless对比图:
| Bundle(Webpack) | Bundleless(Snowpack) | |
|---|---|---|
| 启动时间 | 长,完整打包项目 | 短,只启动 dev server,按需加载 |
| 构建时间 | 随项目体积线性增长 | 构建时间复杂度O(1) |
| 加载性能 | 打包后加载对应bundle | 请求映射至本地文件 |
| 缓存能力 | 缓存利用率一般,受spit方式影响 | 缓存利用率近乎完美 |
| 文件更新 | 重新打包 | 重新请求单个文件 |
| 调试体验 | 通常需要SourceMap进行调试 | 不强依赖 SourceMap,可单文件调试 |
| 生态 | Webpack做的太好太强大了 | 不成熟,但一年时间发展迅猛 |
✨ 创建snowpack项目
创建一个snowpack项目,只需要安装snowpack包即可:
npm inityarn add -D snowpack
在package.json中添加以下脚本:
{"scripts": {"start": "snowpack dev","build": "snowpack build"},"devDependencies": {"snowpack": "^3.8.8"}}
接下来创建一个ESM的模块:
export function helloWorld() {console.log('Hello World !');}
在index.js中引入:
import { helloWorld } from './sayHello.js';helloWorld();
再创建一个index.html中引入:
<!DOCTYPE html><html lang="en"><head><meta charset="utf-8" /><meta name="viewport" content="width=device-width, initial-scale=1" /><meta name="description" content="Starter Snowpack App" /><title>Starter Snowpack App</title><script type="module" src="./js/index.js"></script></head><body><div>Hello Snowpack</div></body></html>
通过运行命令即可开启本地服务:
yarn start
默认运行在 http://localhost:8080,这是一个热更新服务器,修改代码可以直接看到效果。
使用NPM包
比如引入一个canvas-confetti包
yarn add canvas-confetti
修改index.js
import confetti from 'canvas-confetti';confetti.create(document.getElementById('canvas'), {resize: true,useWorker: true,})({ particleCount: 200, spread: 200 });
直接保存,在浏览器就可以看到效果。
使用CSS
可以跟正常使用CSS一样的,创建一个css,通过link引入
body {color: red;}
<link rel="stylesheet" type="text/css" href="./css/index.css" />
也可以在script中直接引入css(注意:一定要添加type="module")
<script type="module">import './css/index.css'</script>
运行项目
通过运行 yarn start运行项目,会自动打开浏览器访问,会在node_modules下生成.cache/snowpack目录: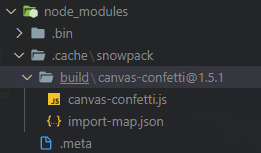
构建项目
通过运行 yarn build构建项目,会生成一个build目录: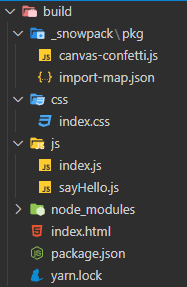
直接开启本地服务即可运行。
✨ 使用snowpack脚手架创建项目
针对一些特定项目(比如Vue、React),snowpack提供对应的脚手架创建项目。
- 官方文档:Create Snowpack App (CSA)
npx create-snowpack-app new-dir --template @snowpack/app-template-NAME [--use-yarn | --use-pnpm | --no-install | --no-git]
官方模板:
- @snowpack/app-template-blank
- @snowpack/app-template-blank-typescript
- @snowpack/app-template-11ty
- @snowpack/app-template-lit-element
- @snowpack/app-template-lit-element-typescript
- @snowpack/app-template-preact
- @snowpack/app-template-preact-typescript
- @snowpack/app-template-react
- @snowpack/app-template-react-typescript
- @snowpack/app-template-svelte
- @snowpack/app-template-svelte-typescript
- @snowpack/app-template-vue
- @snowpack/app-template-vue-typescript
创建空模板项目
使用@snowpack/app-template-minimal创建一个空模板项目
npx create-snowpack-app snowpack-test --template @snowpack/app-template-minimal --use-yarncd snowpack-testnpm run start
查看package.json,这样创建出的是一个最小化的snowpack应用程序,并没有用到其他依赖。
{"scripts": {"start": "snowpack dev","build": "snowpack build"},"devDependencies": {"snowpack": "^3.3.7"}}
创建React项目
通过模板创建React项目
npx create-snowpack-app snowpack-react-test --template @snowpack/app-template-react --use-yarncd snowpack-react-testyarn start
查看package.json,可以看到使用了以下依赖:
{"scripts": {"start": "snowpack dev","build": "snowpack build","test": "web-test-runner \"src/**/*.test.jsx\"","format": "prettier --write \"src/**/*.{js,jsx}\"","lint": "prettier --check \"src/**/*.{js,jsx}\""},"dependencies": {"react": "^17.0.2","react-dom": "^17.0.2"},"devDependencies": {"@snowpack/plugin-dotenv": "^2.1.0","@snowpack/plugin-react-refresh": "^2.5.0","@snowpack/web-test-runner-plugin": "^0.2.2","@testing-library/react": "^11.2.6","@web/test-runner": "^0.13.3","chai": "^4.3.4","prettier": "^2.2.1","snowpack": "^3.3.7"}}
通过空模板创建React项目
npx create-snowpack-app snowpack-react-test --template @snowpack/app-template-minimal --use-yarncd snowpack-react-testnpm run start
这样创建出的是一个最小化的snowpack应用程序,并没有用到其他依赖。
我们得手动添加依赖:
yarn add react react-dom
然后将index.js重命名为index.jsx,内容替换为:
import React from 'react';import ReactDOM from 'react-dom';ReactDOM.render(<div>"HELLO REACT"</div>, document.getElementById('root'));
在index.html中引入的仍然是index.js:
<!DOCTYPE html><html lang="en"><head><meta charset="utf-8" /><meta name="viewport" content="width=device-width, initial-scale=1" /><meta name="description" content="Starter Snowpack App" /><title>Starter Snowpack App</title></head><body><div id="root"></div><script type="module" src="/index.js"></script></body></html>
重新运行 yarn start,即可看到效果。
使用@snowpack/plugin-react-refresh
@snowpack/plugin-react-refresh用于增强snowpack对于React快速刷新。
安装:
yarn add -D @snowpack/plugin-react-refresh
配置:
module.exports = {plugins: ['@snowpack/plugin-react-refresh'],...};
修改index.jsx:
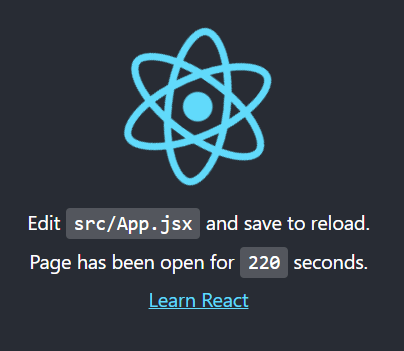
import React from 'react';import ReactDOM from 'react-dom';import App from './App.jsx';import './index.css';ReactDOM.render(<React.StrictMode><App /></React.StrictMode>,document.getElementById('root'),);// Hot Module Replacement (HMR) - Remove this snippet to remove HMR.// Learn more: https://www.snowpack.dev/concepts/hot-module-replacementif (import.meta.hot) {import.meta.hot.accept();}
其中App.jsx示例:
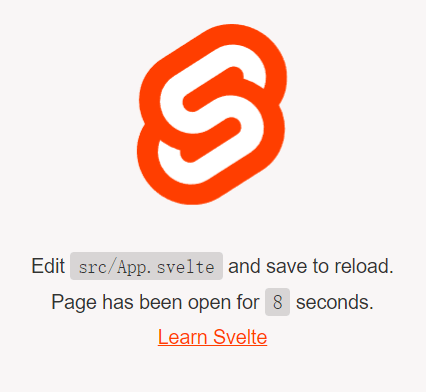
import React, {useState, useEffect} from 'react';function App() {// Create the count state.const [count, setCount] = useState(0);// Update the count (+1 every second).useEffect(() => {const timer = setTimeout(() => setCount(count + 1), 1000);return () => clearTimeout(timer);}, [count, setCount]);// Return the App component.return (<div className="App"><header className="App-header"><p>Page has been open for <code>{count}</code> seconds.</p></header></div>);}export default App;
创建Vue项目
通过模板创建Vue项目
npx create-snowpack-app snowpack-vue-test --template @snowpack/app-template-vue --use-yarncd snowpack-vue-testyarn start
查看package.json,可以看出其实是使用了@snowpack/plugin-vue插件解析Vue文件:
{"scripts": {"start": "snowpack dev","build": "snowpack build"},"dependencies": {"vue": "^3.0.11"},"devDependencies": {"@snowpack/plugin-dotenv": "^2.1.0","@snowpack/plugin-vue": "^2.4.0","snowpack": "^3.3.7"}}
通过空模板创建Vue项目
npx create-snowpack-app snowpack-vue-test --template @snowpack/app-template-minimal --use-yarncd snowpack-vue-testnpm run start
这样创建出的是一个最小化的snowpack应用程序,并没有用到其他依赖。
我们得手动添加依赖:
yarn add vue@3.0.11yarn add -D @snowpack/plugin-vue
然后在snowpack.config.mjs中注册插件:
export default {plugins: [/* ... */'@snowpack/plugin-vue',],...};
修改index.html
<!DOCTYPE html><html lang="en"><head><meta charset="utf-8" /><meta name="viewport" content="width=device-width, initial-scale=1" /><meta name="description" content="Starter Snowpack App" /><title>Starter Snowpack App</title></head><body><div id="root"></div><script type="module" src="/index.js"></script></body></html>
修改index.js
import {createApp} from 'vue';import App from './App.vue';const app = createApp(App);app.mount('#app');
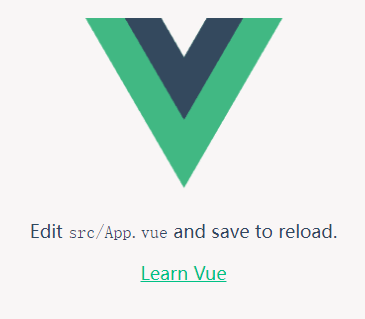
创建App.vue
<script>export default {setup() {return {};},};</script><template><div>Welcome to my Vue app!</div></template>
重新运行 yarn start,即可看到效果。
创建Svelte项目
通过模板创建Svelte项目
npx create-snowpack-app snowpack-svelte-test --template @snowpack/app-template-svelte --use-yarncd snowpack-svelte-testnpm run start
查看package.json,可以看出其实是使用了@snowpack/plugin-svelte插件解析Svelte文件:
{"scripts": {"start": "snowpack dev","build": "snowpack build","test": "web-test-runner \"src/**/*.test.js\""},"dependencies": {"svelte": "^3.37.0"},"devDependencies": {"@snowpack/plugin-dotenv": "^2.1.0","@snowpack/plugin-svelte": "^3.6.1","@snowpack/web-test-runner-plugin": "^0.2.2","@testing-library/svelte": "^3.0.3","@web/test-runner": "^0.13.3","chai": "^4.3.4","snowpack": "^3.3.7"}}
通过空模板创建Svelte项目
npx create-snowpack-app snowpack-svelte-test --template @snowpack/app-template-minimal --use-yarncd snowpack-svelte-testnpm run start
这样创建出的是一个最小化的snowpack应用程序,并没有用到其他依赖。
我们得手动添加依赖:
yarn add svelteyarn add -D @snowpack/plugin-svelte
然后在snowpack.config.mjs中注册插件:
export default {plugins: [/* ... */'@snowpack/plugin-svelte',],...};
配置完后,创建一个svelte文件:
<script>/* component logic will go here */</script><style>/* css will go here */</style><div class="App"><header class="App-header"><a class="App-link" href="https://svelte.dev" target="_blank" rel="noopener noreferrer">Learn Svelte</a></header></div>
再在index.js中引入:
import App from "./App.svelte";let app = new App({target: document.body,});export default app;
重新运行 yarn start,即可看到效果。
✨ snowpack工程化
引入less
使用snowpack-plugin-less以增加对less的支持。
安装依赖:
yarn add -D snowpack-plugin-less less
在snowpack.config.json中添加配置:
{"plugins": ["snowpack-plugin-less"]}
比如创建一个 index.less文件:
.a {.b {color: red;}}
在index.js中引入less文件:
import './index.less'
在index.html中引入js:
<!DOCTYPE html><html lang="en"><head><script type="module" src="./index.js"></script></head><body><div class="a"><div class="b">hello</div></div></body></html>
也可以在html的script中直接引入less文件(注意:一定要添加type="module"):
<!DOCTYPE html><html lang="en"><head><script type="module">import './index.less'</script></head><body><div class="a"><div class="b">hello</div></div></body></html>
引入scss/sass
使用@snowpack/plugin-sass插件以增加对sass的支持。
安装依赖:
yarn add -D @snowpack/plugin-sass sass
在snowpack.config.json中添加配置:
{"plugins": [['@snowpack/plugin-sass',{/* plugin options */},],]}
比如创建一个 index.scss文件:
.a {.b {color: red;}}
在index.js中引入scss文件:
import './index.scss'
在index.html中引入js:
<!DOCTYPE html><html lang="en"><head><script type="module" src="./index.js"></script></head><body><div class="a"><div class="b">hello</div></div></body></html>
也可以在html的script中直接引入scss(注意:一定要添加type="module"):
<!DOCTYPE html><html lang="en"><head><script type="module">import './index.scss'</script></head><body><div class="a"><div class="b">hello</div></div></body></html>
引入pug
使用snowpack-plugin-pug插件以增加对sass的支持。
安装依赖:
yarn add -D @marlonmarcello/snowpack-plugin-pug pug
在snowpack.config.json中添加配置:
export default {plugins: [['@marlonmarcello/snowpack-plugin-pug',{"data": {"meta": {"title": "My website"}}}]]}
将 index.html重命名为 index.pug,修改内容(注意title的传值):
doctype htmlhtml(lang="en")headmeta(charset="UTF-8")meta(name="viewport", content="width=device-width, initial-scale=1.0")title!=meta.titlebodydiv Hello
通过地址访问 http://localhost:8080/index.html,注意必须刚上文件名(index.html),暂时不知道解决方案。
如果要在pug中引入js或其他文件,可以通过以下写法引入:
doctype htmlhtml(lang="en")headmeta(charset="UTF-8")meta(name="viewport", content="width=device-width, initial-scale=1.0")title!=meta.titlescript(type='module' src="./index.js")script(type="module").import './index.scss'
✨ snowpack配置
snowpack配置文件位于snowpack.config.mjs。
配置目标路径
在 mount节点配置生成目录的映射,格式为:
mount: {[path: string]: string | {url: string, resolve: boolean, static: boolean, dot: boolean}}
其中key为源路径;value可以为字符串,也可以为对象,为目标路径。
当value为对象时,支持以下选项:
- mount.url | string | required : The URL to mount to, matching the string in the simple form above.
- mount.static | boolean | optional | Default: false : If true, don’t build files in this directory. Copy and serve them directly from disk to the browser.
- mount.resolve | boolean | optional | Default: true: If false, don’t resolve JS & CSS imports in your JS, CSS, and HTML files. Instead send every import to the browser, as written.
- mount.dot | boolean | optional | Default: false: If true, include dotfiles (ex: .htaccess) in the final build.
示例:
export default {mount: {// directory name: 'build directory'public: '/',src: '/dist',},};
或者:
export default {mount: {public: {url: '/', static: true},src: {url: '/dist'},},}
图解如下: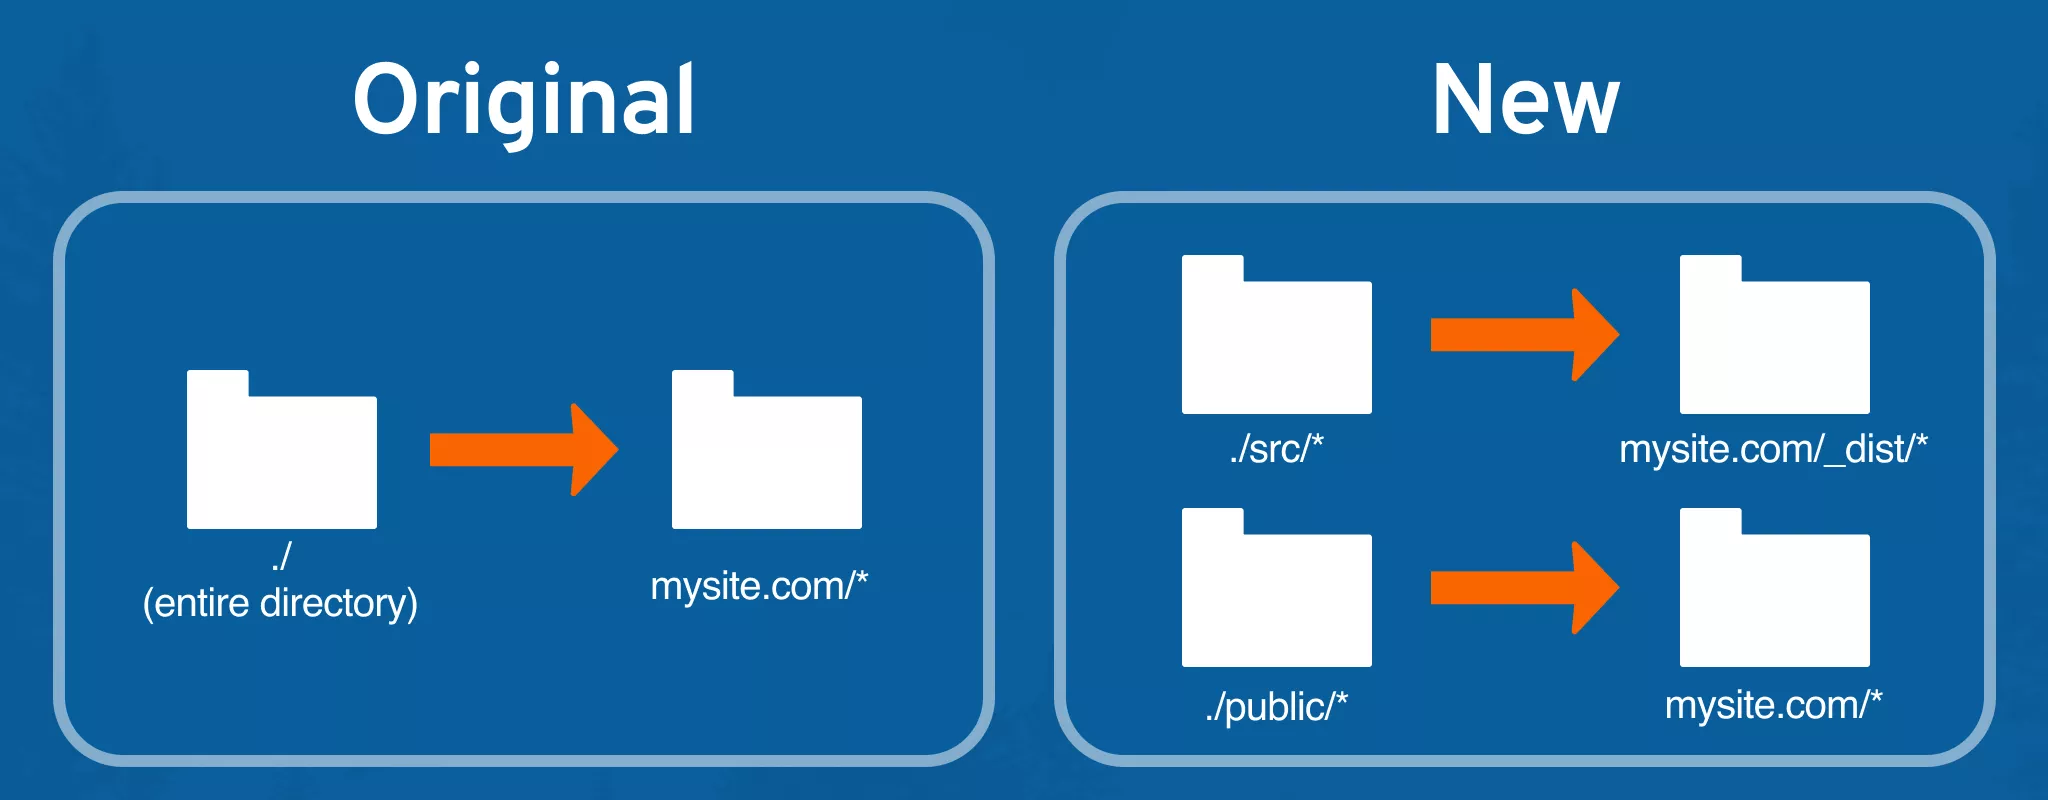
配置后,在相应引入文件的地方也得修改路径:
index.html --> public/index.htmlindex.css --> public/index.cssindex.js --> src/index.js
<body><h1>Welcome to Snowpack!</h1>- <script type="module" src="/index.js"></script>+ <script type="module" src="/dist/index.js"></script></body>
别名
使用alias选项可以配置别名,举例:
export default {alias: {'@components': './src/components','@': './src',}};
比如在Vue项目中使用:
<template><div class="App"><AAAVue></AAAVue></div></template><script>import AAAVue from '@components/AAA.vue';export default {components: { AAAVue }}</script>
除了路径别名外,node_modules里面的包也可通过这种方式设置别名:
export default {alias: {lodash: 'lodash-es',react: 'preact/compat',},};
插件
插件配置有两种格式,单字符串或数组形式:
export default {plugins: [// Simple format: no options needed'plugin-1',// Expanded format: allows you to pass options to the plugin['plugin-2', {'plugin-option': false}],];}
如果是数组形式,第0项为插件名称,第1项为插件选项
可以在这个页面查询需要的插件:
✨ snowpack原理
snowpack 的最初版核心目标就是不再打包业务代码,而是直接使用浏览器原生的 JavaScript Module 能力。
所以从它的处理流程上来看,对业务代码的模块,基本只需要把 ESM 发布(拷贝)到发布目录,再将模块导入路径从源码路径换为发布路径即可。
而对 node_modules 则通过遍历 package.json 中的依赖,按该依赖列表为粒度将 node_modules 中的依赖打包。以 node_modules 中每个包的入口作为打包 entry,使用 rollup 生成对应的 ESM 模块文件,放到 web_modules 目录中,最后替换源码的 import 路径,是得可以通过原生 JavaScript Module 来加载 node_modules 中的包。
node_modules/react/**/* -> http://localhost:3000/web_modules/react.jsnode_modules/react-dom/**/* -> http://localhost:3000/web_modules/react-dom.js
对比源码和生成后的代码对比大概长这样:
- import { createElement, Component } from "preact";- import htm from "htm";+ import { createElement, Component } from "/web_modules/preact.js";+ import htm from "/web_modules/htm.js";
✨ snowpack命令行
查看帮助
通过执行npx snowpack --help可以看到所有的snowpack命令:
$ npx snowpack --help[18:06:52] [snowpack] snowpack - A faster build system for the modern web.Snowpack is best configured via config file.But, most configuration can also be passed via CLI flags.📖 https://www.snowpack.dev/reference/configurationCommands:snowpack init Create a new project config file.snowpack prepare Prepare your project for development (optional).snowpack dev Develop your project locally.snowpack build Build your project for production.snowpack add [package] Add a package to your project.snowpack rm [package] Remove a package from your project.Flags:--config [path] Set the location of your project config file.--help Show this help message.--version Show the current version.--reload Clear the local cache (useful for troubleshooting).--cache-dir-path Specify a custom cache directory.--verbose Enable verbose log messages.--quiet Enable minimal log messages.
指定包管理工具
如果不想要使用npm作为包管理工具,可以添加以下参数指定其他包管理工具:
--use-yarn--use-pnpm
✨ 参考资料

若有收获,就点个赞吧
0 人点赞
