第一步创建一个根项目:
1)就是基本创建springboot的流程
2)依赖jar包
(子项目的依赖自己修改)
<modules><module>cloud_provider</module><module>cloud_consumer</module><module>cloud_common</module></modules>
根项目要打程pom包,不需要插件!!!!!
<packaging>pom</packaging><!-- 2.SpringBoot项目 --><parent><groupId>org.springframework.boot</groupId><artifactId>spring-boot-starter-parent</artifactId><version>2.5.9</version><relativePath/> <!-- lookup parent from repository --></parent><!-- 3.自定义属性--><properties><maven.compiler.source>8</maven.compiler.source><maven.compiler.target>8</maven.compiler.target><java.version>1.8</java.version><spring-cloud.version>2020.0.5</spring-cloud.version></properties><!-- 4.jar版本限定--><dependencyManagement><dependencies><dependency><groupId>org.springframework.cloud</groupId><artifactId>spring-cloud-dependencies</artifactId><version>${spring-cloud.version}</version><type>pom</type><scope>import</scope></dependency></dependencies></dependencyManagement><!-- 5.依赖,公共--><dependencies><dependency><groupId>org.projectlombok</groupId><artifactId>lombok</artifactId><optional>true</optional></dependency><dependency><groupId>org.springframework.boot</groupId><artifactId>spring-boot-starter-test</artifactId><scope>test</scope></dependency></dependencies>
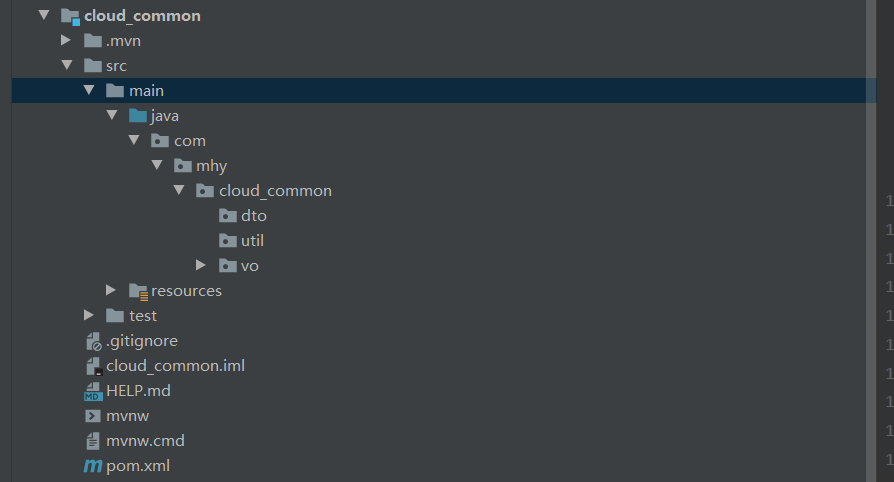
第二步创建公共类
1)在跟项目上面创建模块,也就是创建springboot项目
2)依赖jar包
(只需要导入根项目依赖,以及自定义属性,不需要插件)
<parent><groupId>com.mhy</groupId><artifactId>hellocloud</artifactId><version>0.0.1-SNAPSHOT</version></parent><properties><maven.compiler.source>8</maven.compiler.source><maven.compiler.target>8</maven.compiler.target></properties>
第三步:创建提供者
1)在跟项目上面创建模块,也就是创建springboot项目
2)依赖jar包
这是依赖跟项目,需要改为自己根目录的依赖
<!-- 依赖根项目--><parent><groupId>com.mhy</groupId><artifactId>hellocloud</artifactId><version>0.0.1-SNAPSHOT</version></parent>
<properties><maven.compiler.source>8</maven.compiler.source><maven.compiler.target>8</maven.compiler.target></properties><dependencies><dependency><groupId>org.springframework.boot</groupId><artifactId>spring-boot-starter-web</artifactId></dependency><!-- 依赖nacos注册中心的jar--><dependency><groupId>com.alibaba.cloud</groupId><artifactId>spring-cloud-starter-alibaba-nacos-discovery</artifactId><version>2021.1</version></dependency><!-- 熔断降级sentinel--><dependency><groupId>com.alibaba.cloud</groupId><artifactId>spring-cloud-starter-alibaba-sentinel</artifactId><version>2021.1</version></dependency><!-- 实时监控,链路追踪--><dependency><groupId>org.springframework.cloud</groupId><artifactId>spring-cloud-starter-sleuth</artifactId></dependency><dependency><groupId>org.springframework.cloud</groupId><artifactId>spring-cloud-starter-zipkin</artifactId><version>2.2.6.RELEASE</version></dependency><!-- Mysql数据库驱动--><dependency><groupId>mysql</groupId><artifactId>mysql-connector-java</artifactId><scope>runtime</scope></dependency><!-- 数据库连接池:Druid--><dependency><groupId>com.alibaba</groupId><artifactId>druid-spring-boot-starter</artifactId><version>1.2.6</version></dependency><!-- Mybatis-Plus简化JDBC,实现数据库操作--><dependency><groupId>com.baomidou</groupId><artifactId>mybatis-plus-boot-starter</artifactId><version>3.4.3.4</version></dependency></dependencies>
这个要依赖自己的公共模块
<!-- 依赖自定义jar--><dependency><groupId>com.mhy</groupId><artifactId>cloud_common</artifactId><version>0.0.1-SNAPSHOT</version></dependency>
3)配置yml配置文件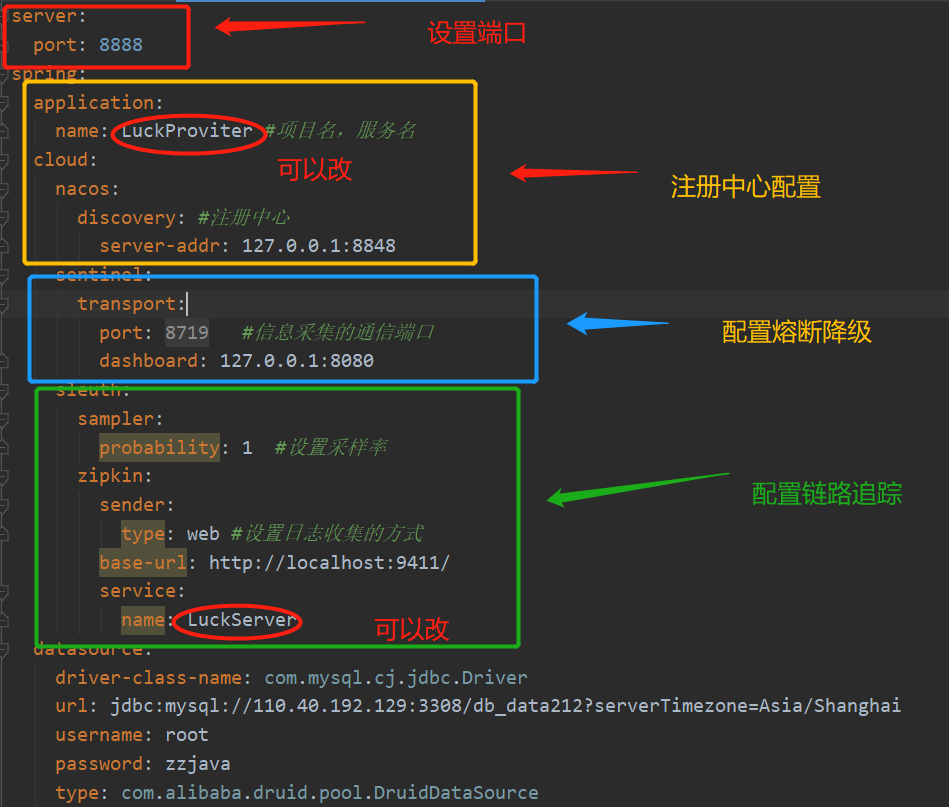
server:port: 8888spring:application:name: LuckProviter #项目名,服务名cloud:nacos:discovery: #注册中心server-addr: 127.0.0.1:8848sentinel:transport:port: 8719 #信息采集的通信端口dashboard: 127.0.0.1:8080sleuth:sampler:probability: 1 #设置采样率zipkin:sender:type: web #设置日志收集的方式base-url: http://localhost:9411/service:name: LuckServerdatasource:driver-class-name: com.mysql.cj.jdbc.Driverurl: jdbc:mysql://110.40.192.129:3308/db_data212?serverTimezone=Asia/Shanghaiusername: rootpassword: zzjavatype: com.alibaba.druid.pool.DruidDataSourcedruid:initialSize: 5minIdle: 5maxActive: 20filters: stat,wallstat-view-servlet:enabled: trueurl-pattern: "/druid/*"jackson:date-format: yyyy-MM-dd HH:mm:sstime-zone: GMT+8mvc:format:date: yyyy-MM-dd HH:mm:ss
4)配置开关类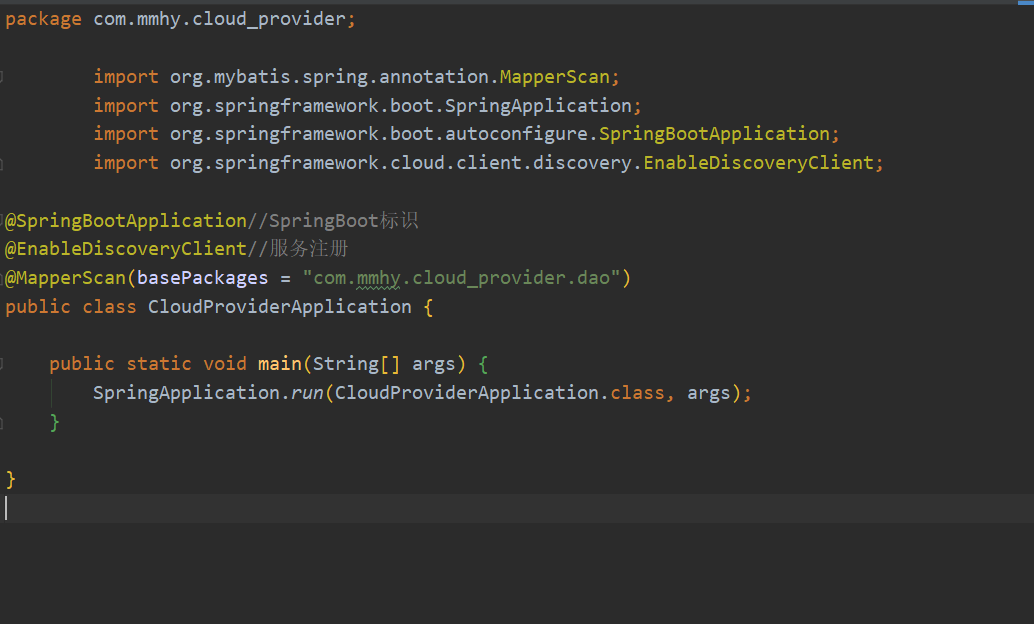
package com.mmhy.cloud_provider;import org.mybatis.spring.annotation.MapperScan;import org.springframework.boot.SpringApplication;import org.springframework.boot.autoconfigure.SpringBootApplication;import org.springframework.cloud.client.discovery.EnableDiscoveryClient;@SpringBootApplication//SpringBoot标识@EnableDiscoveryClient//服务注册@MapperScan(basePackages = "com.mmhy.cloud_provider.dao")public class CloudProviderApplication {public static void main(String[] args) {SpringApplication.run(CloudProviderApplication.class, args);}}
5)创建提供者目录结构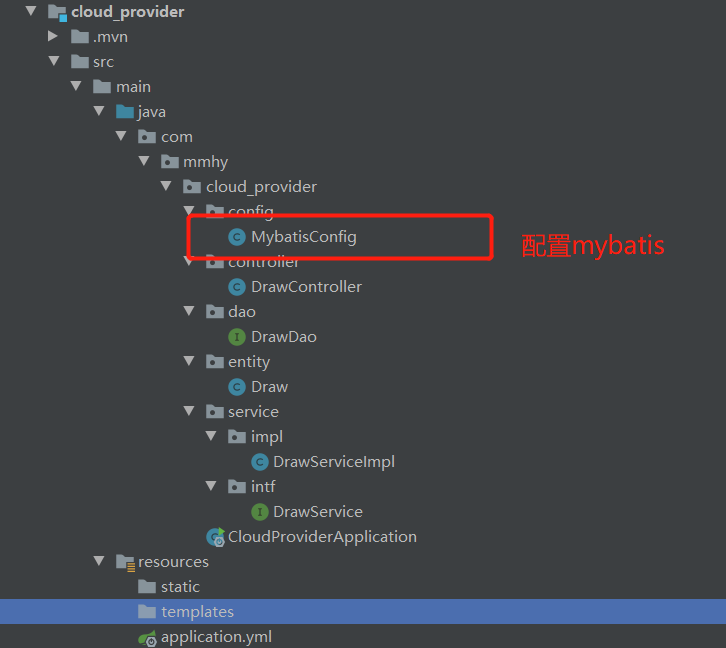
package com.mmhy.cloud_provider.config;import com.baomidou.mybatisplus.annotation.DbType;import com.baomidou.mybatisplus.extension.plugins.MybatisPlusInterceptor;import com.baomidou.mybatisplus.extension.plugins.inner.PaginationInnerInterceptor;import org.mybatis.spring.annotation.MapperScan;import org.springframework.context.annotation.Bean;import org.springframework.context.annotation.Configuration;import org.springframework.transaction.annotation.EnableTransactionManagement;/*** @author Feri* @date 2021/12/31 11:59* @description:TODO*/@Configuration@MapperScan(basePackages = "com.mmhy.cloud_provider.dao")//这个要改为自己的dao层@EnableTransactionManagement//表示开启事务支持public class MybatisConfig {@Beanpublic MybatisPlusInterceptor mybatisPlusInterceptor() {MybatisPlusInterceptor interceptor = new MybatisPlusInterceptor();interceptor.addInnerInterceptor(new PaginationInnerInterceptor(DbType.MYSQL));return interceptor;}}
第四步创建消费者项目
1)在跟项目上面创建模块,也就是创建springboot项目
2)依赖java包
依赖根项目,改为自己的
<!-- 依赖根项目,自己改成自己的--><parent><groupId>com.mhy</groupId><artifactId>hellocloud</artifactId><version>0.0.1-SNAPSHOT</version></parent>
<!-- 自定义属性--><properties><maven.compiler.source>8</maven.compiler.source><maven.compiler.target>8</maven.compiler.target></properties><dependencies><!-- 1.mvc--><dependency><groupId>org.springframework.boot</groupId><artifactId>spring-boot-starter-web</artifactId></dependency><!-- 2.负载均衡--><dependency><groupId>org.springframework.cloud</groupId><artifactId>spring-cloud-starter-loadbalancer</artifactId></dependency><!-- 3.服务调用 --><dependency><groupId>org.springframework.cloud</groupId><artifactId>spring-cloud-starter-openfeign</artifactId></dependency><!-- 4.依赖nacos注册中心的jar--><dependency><groupId>com.alibaba.cloud</groupId><artifactId>spring-cloud-starter-alibaba-nacos-discovery</artifactId><version>2021.1</version></dependency><!--链路追踪--><dependency><groupId>org.springframework.cloud</groupId><artifactId>spring-cloud-starter-sleuth</artifactId></dependency><dependency><groupId>org.springframework.cloud</groupId><artifactId>spring-cloud-starter-zipkin</artifactId><version>2.2.6.RELEASE</version></dependency><!-- 5.依赖kinf4J 接口文档--><dependency><groupId>com.github.xiaoymin</groupId><artifactId>knife4j-spring-boot-starter</artifactId><version>3.0.3</version></dependency><dependency><groupId>com.mhy</groupId><artifactId>cloud_common</artifactId><version>0.0.1-SNAPSHOT</version></dependency></dependencies><build><plugins><plugin><groupId>org.springframework.boot</groupId><artifactId>spring-boot-maven-plugin</artifactId><configuration><excludes><exclude><groupId>org.projectlombok</groupId><artifactId>lombok</artifactId></exclude></excludes></configuration></plugin></plugins></build>
3)配置yml配置文件
server:port: 8083spring:application:name: LuckConsumer #项目名,服务名cloud:nacos:discovery: #注册中心server-addr: 127.0.0.1:8848sleuth:sampler:probability: 1 #设置采样率zipkin:sender:type: web #设置日志收集的方式base-url: http://localhost:9411/service:name: LuckApi
4)配置开关类
package com.mhy.cloud_consumer;import org.springframework.boot.SpringApplication;import org.springframework.boot.autoconfigure.SpringBootApplication;import org.springframework.cloud.client.discovery.EnableDiscoveryClient;import org.springframework.cloud.openfeign.EnableFeignClients;@SpringBootApplication@EnableDiscoveryClient //服务发布@EnableFeignClients //开启OpenFeign,实现服务消费public class CloudConsumerApplication {public static void main(String[] args) {SpringApplication.run(CloudConsumerApplication.class, args);}}
5)配置swagger在线接口文档类,java日常总结中有详细的,等等可以去看看
package com.mhy.cloud_consumer.config;import io.swagger.annotations.Api;import org.springframework.context.annotation.Bean;import org.springframework.context.annotation.Configuration;import springfox.documentation.builders.ApiInfoBuilder;import springfox.documentation.builders.RequestHandlerSelectors;import springfox.documentation.service.ApiInfo;import springfox.documentation.service.Contact;import springfox.documentation.spi.DocumentationType;import springfox.documentation.spring.web.plugins.Docket;import springfox.documentation.swagger2.annotations.EnableSwagger2;/*** @author Feri* @date 2021/12/27 11:44* @description:TODO*/@Configuration //标记这是配置类,beans@EnableSwagger2 //启用Swaggerpublic class SwaggerConfig {/*** 构建文档的基本信息*/public ApiInfo createApi(){return new ApiInfoBuilder().description("微服务项目的接口在线文档,可以对接口进行测试等操作").title("微服务项目的接口文档").contact(new Contact("mhy","http://www.mhy.com","xingfei_work@163.com")).version("1.0.0").build();}/*** 就是ioc创建实例 修饰方法 方法必须返回对象*/@Beanpublic Docket createDocket(){return new Docket(DocumentationType.SWAGGER_2).apiInfo(createApi()).select().apis(RequestHandlerSelectors.withClassAnnotation(Api.class)).build();}}
消费者项目目录结构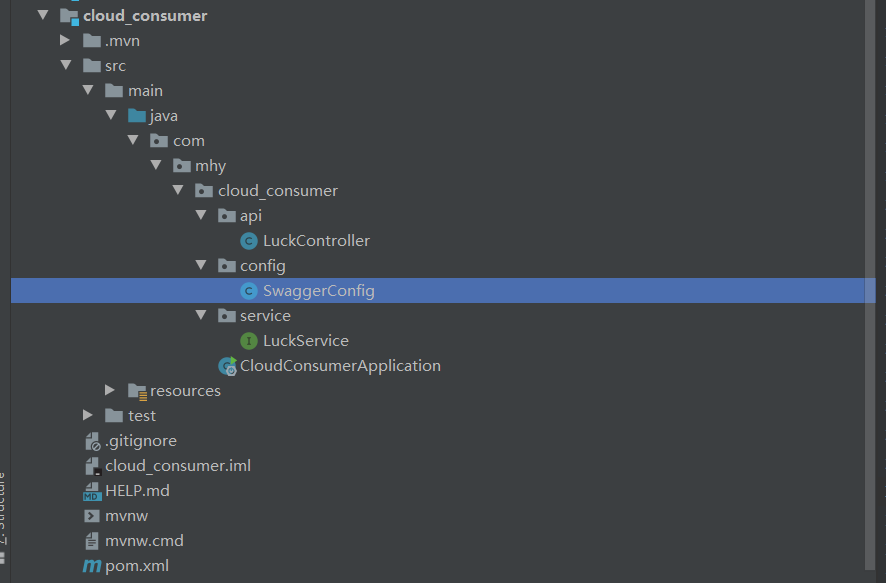
第五步:创建网关项目
1)在跟项目上面创建模块,也就是创建springboot项目
2)依赖jar包
依赖跟项目,,不需要插件
<!-- 依赖根项目--><parent><groupId>com.mhy</groupId><artifactId>hellocloud</artifactId><version>0.0.1-SNAPSHOT</version></parent>
<properties><maven.compiler.source>8</maven.compiler.source><maven.compiler.target>8</maven.compiler.target></properties><dependencies><dependency><groupId>org.springframework.cloud</groupId><artifactId>spring-cloud-starter-gateway</artifactId></dependency><!-- 依赖nacos注册中心的jar--><dependency><groupId>com.alibaba.cloud</groupId><artifactId>spring-cloud-starter-alibaba-nacos-discovery</artifactId><version>2021.1</version></dependency><!-- 2.负载均衡--><dependency><groupId>org.springframework.cloud</groupId><artifactId>spring-cloud-starter-loadbalancer</artifactId></dependency></dependencies>
3)配置yml配置类
server:port: 8082spring:application:name: LxGateway #项目名,服务名cloud:nacos:discovery: #注册中心server-addr: 127.0.0.1:8848gateway:routes:- id: luck #唯一uri: lb://LuckConsumer #lb 从注册中心获取服务。要跳转的服务名称predicates:- Path=/luck/** #外界的访问路径filters:- StripPrefix=1 #去除路由跳转时的路径的级别
4)配置开关类
package com.feri.gateway;import org.springframework.boot.SpringApplication;import org.springframework.boot.autoconfigure.SpringBootApplication;import org.springframework.cloud.client.discovery.EnableDiscoveryClient;@SpringBootApplication@EnableDiscoveryClientpublic class GatewayApplication {public static void main(String[] args) {SpringApplication.run(GatewayApplication.class,args);}}

若有收获,就点个赞吧
0 人点赞
