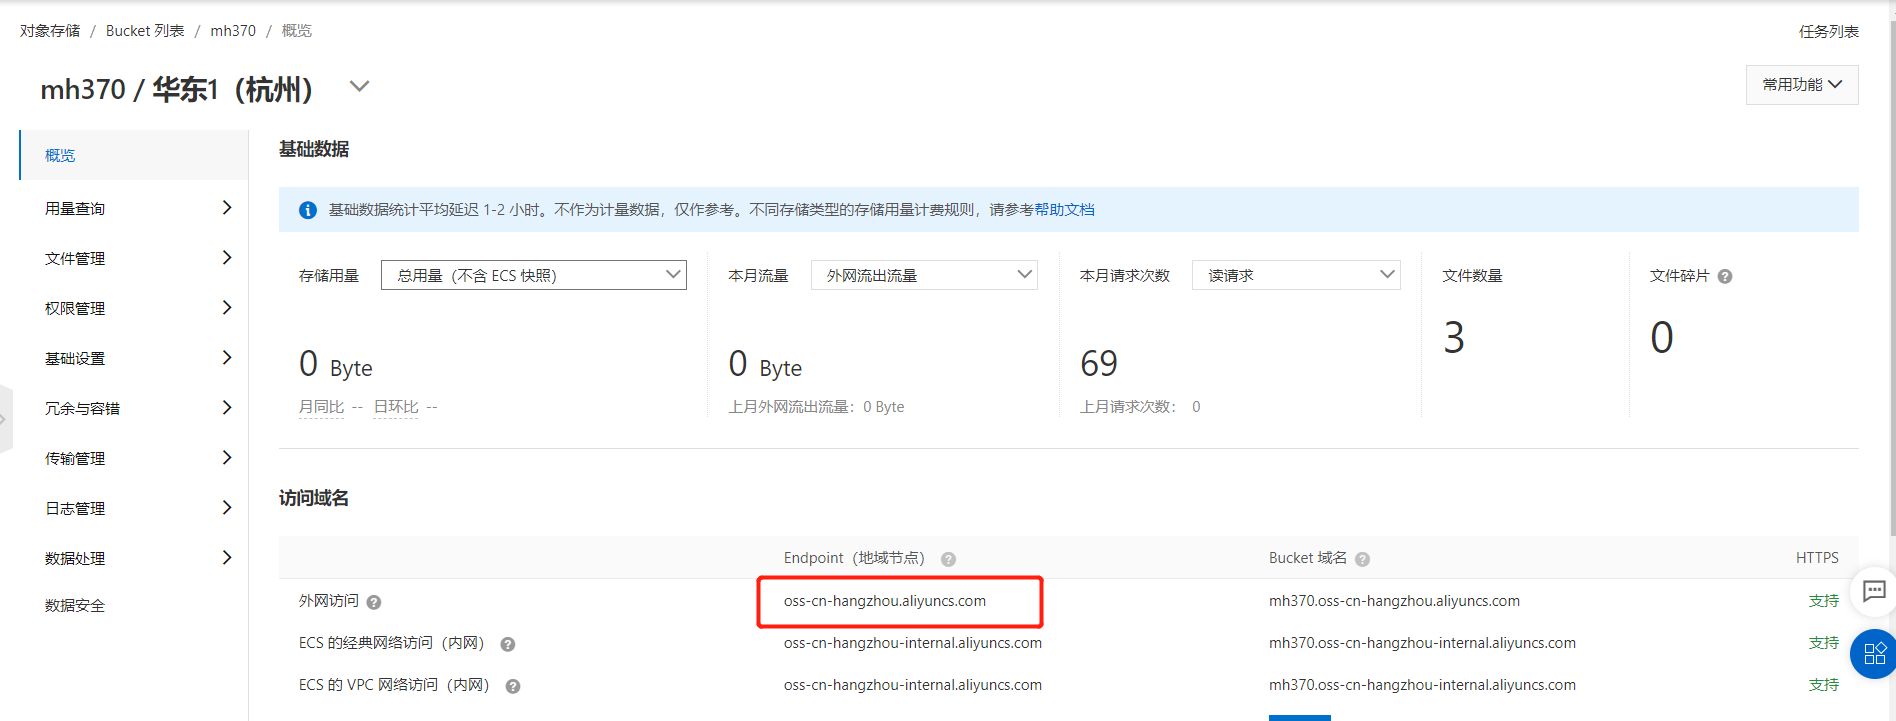
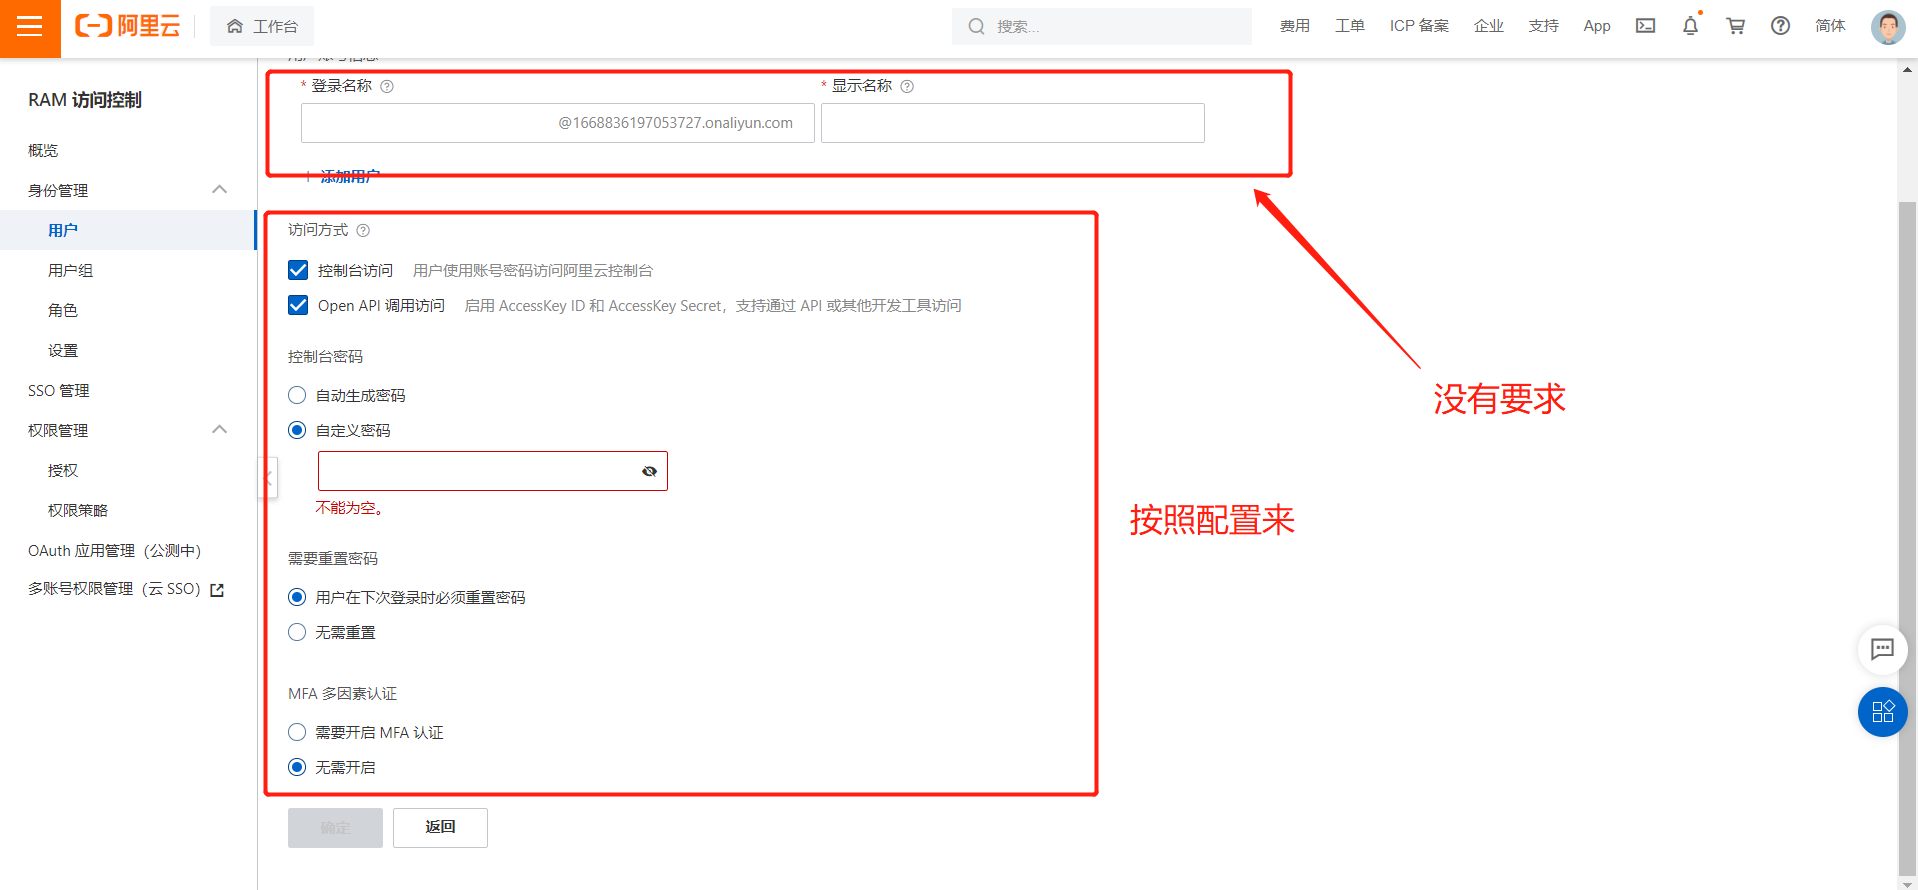
第一步:导入依赖jar包
<!-- 阿里云对象存储-OSS –>--><dependency><groupId>com.aliyun.oss</groupId><artifactId>aliyun-sdk-oss</artifactId><version>3.10.2</version></dependency>
注意:第二步到第四部的代码直接粘贴复制,个别地方改一下
第二步:封装工具类
package com.mhy.boot_plus.utils;//⠀⠀⠀⠀⠀⠀⠀⠀⠀⠀⠀⠀⠀⠀⠀⠀⠀⠀⠀⠀⠀⠀⠀⠀⠀// ⠀⠀⠀⠀⠀⠀⠀⠀⠀⠀⠀⠀⠀⠀⠀⠀⡖⠒⠒⠤⢄⠀⠀// ⠀⠀⠀⠀⠀⠀⠀⠀⠀⠀⠀⠀⠀⠀⠀⢸⠁⠀⠀⠀⡼⠀⠀⠀⠀ ⠀// ⠀⠀⠀⠀⠀⠀⠀⠀⠀⠀⠀⠀⢶⣲⡴⣗⣲⡦⢤⡏⠀⠀⠀⠀⠀// ⠀⠀⠀⠀⠀⠀⠀⠀⠀⠀⠀⠀⣰⠋⠉⠉⠓⠛⠿⢷⣶⣦⠀⠀⠀// ⠀⠀⠀⠀⠀⠀⠀⠀⠀⠀⠀⢠⠇⠀⠀⠀⠀⠀⠀⠘⡇⠀⠀⠀⠀// ⠀⠀⠀⠀⠀⠀⠀⠀⠀⠀⠀⡞⠀⠀⠀⠀⠀⠀⠀⢰⠇⠀⠀⠀⠀// ⠀⠀⠀⠀⠀⠀⠀⠀⡴⠊⠉⠳⡄⠀⢀⣀⣀⡀⠀⣸⠀⠀⠀⠀⠀// ⠀⠀⠀⠀⠀⠀⠀⢸⠃⠀⠰⠆⣿⡞⠉⠀⠀⠉⠲⡏⠀⠀⠀⠀⠀// ⠀⠀⠀⠀⠀⠀⠀⠈⢧⡀⣀⡴⠛⡇⠀:⠃⠀⠀⡗⠀⠀⠀⠀⠀// ⠀⠀⠀⠀⠀⠀⠀⠀⠀⣿⣱⠃⡴⠙⠢⠤⣀⠤⡾⠁⠀⠀⠀⠀⠀// ⠀⠀⠀⠀⠀⠀⠀⠀⢀⡇⣇⡼⠁⠀⠀⠀⠀⢰⠃⠀⠀⠀⠀⠀⠀// ⠀⠀⠀⠀⠀⠀⠀⠀⣸⢠⣉⣀⡴⠙⠀⠀⠀⣼⠀⠀⠀⠀⠀⠀⠀// ⠀⠀⠀⠀⠀⠀⠀⠀⡏⠀⠈⠁⠀⠀⠀⠀⢀⡇⠀⠀⠀⠀⠀⠀⠀// ⠀⠀⠀⠀⠀⠀⠀⢸⠃⠀⠀⠀⠀⠀⠀⠀⡼⠀⠀⠀⠀⠀⠀⠀⠀// ⠀⠀⠀⠀⠀⠀⠀⢸⠀⠀⠀⠀⠀⠀⠀⣰⠃⠀⠀⠀⠀⠀⠀⠀⠀// ⠀⠀⠀⠀⠀⣀⠤⠚⣶⡀⢠⠄⡰⠃⣠⣇⠀⠀⠀⠀⠀⠀⠀⠀⠀// ⠀⢀⣠⠔⣋⣷⣠⡞⠀⠉⠙⠛⠋⢩⡀⠈⠳⣄⠀⠀⠀⠀⠀⠀⠀// ⠀⡏⢴⠋⠁⠀⣸⠁⠀⠀⠀⠀⠀⠀⣹⢦⣶⡛⠳⣄⠀⠀⠀⠀⠀// ⠀⠙⣌⠳ 小马无忧 ⡏⠀⠀⠈⠳⡌⣦⠀⠀⠀// ⠀⠀⠈⢳⣈⣻ ⢰⣇⣀⡠⠴⢊⡡⠋⠀⠀⠀⠀// ⠀⠀⠀⠀⠳⢿⡇⠀⠀⠀⠀⠀⠀⢸⣻⣶⡶⠊⠁⠀⠀// ⠀⠀⠀⠀⠀⢠⠟⠙⠓⠒⠒⠒⠒⢾⡛⠋⠁⠀⠀⠀⠀⠀⠀⠀⠀// ⠀⠀⠀⠀⣠⠏⠀⣸⠏⠉⠉⠳⣄⠀⠙⢆⠀⠀⠀⠀⠀⠀⠀⠀⠀// ⠀⠀⠀⡰⠃⠀⡴⠃⠀⠀⠀⠀⠈⢦⡀⠈⠳⡄⠀⠀⠀⠀⠀⠀⠀// ⠀⠀⣸⠳⣤⠎⠀⠀⠀⠀⠀⠀⠀⠀⠙⢄⡤⢯⡀⠀⠀⠀⠀⠀⠀// ⠀⠐⡇⠸⡅⠀⠀⠀⠀⠀⠀⠀⠀⠀⠀⠀⠹⡆⢳⠀⠀⠀⠀⠀⠀// ⠀⠀⠹⡄⠹⡄⠀⠀⠀⠀⠀⠀⠀⠀⠀⠀⠀⣇⠸⡆⠀⠀⠀⠀⠀// ⠀⠀⠀⠹⡄⢳⡀⠀⠀⠀⠀⠀⠀⠀⠀⠀⠀⢹⡀⣧⠀⠀⠀⠀⠀// ⠀⠀⠀⠀⢹⡤⠳⡄⠀⠀⠀⠀⠀⠀⠀⠀⠀⢀⣷⠚⣆⠀⠀⠀⠀// ⠀⠀⠀⡠⠊⠉⠉⢹⡀⠀⠀⠀⠀⠀⠀⠀⠀⢸⡎⠉⠀⠙⢦⡀⠀// ⠀⠀⠾⠤⠤⠶⠒⠊⠀⠀⠀⠀⠀⠀⠀⠀⠀⠀⠉⠙⠒⠲⠤⠽⠀import com.aliyun.oss.OSS;import com.aliyun.oss.OSSClientBuilder;import org.springframework.web.multipart.MultipartFile;import java.io.ByteArrayInputStream;import java.io.File;import java.util.Calendar;import java.util.Date;public class AliOssUtils {// yourEndpoint填写Bucket所在地域对应的Endpoint。以华东1(杭州)为例,Endpoint填写为https://oss-cn-hangzhou.aliyuncs.com。//这个在自己的oss里面找见图一static String endpoint = "oss-cn-hangzhou.aliyuncs.com";// 阿里云账号AccessKey拥有所有API的访问权限,风险很高。强烈建议您创建并使用RAM用户进行API访问或日常运维,请登录RAM控制台创建RAM用户。//需要密钥对的id与秘钥,找不到的时候就删除重新创建一次用户,步骤如图二static String accessKeyId = "LTAI5tSTKkTMJhoQQpmVCGwV";static String accessKeySecret = "ViYG3tz07V1KBX6RuVSSOS1PZrP66i";//这个就是bucket容器的名字static String bucket="mh370";// 创建OSSClient实例。//必须有public static OSS ossClient ;static {ossClient= new OSSClientBuilder().build(endpoint, accessKeyId, accessKeySecret);}/*** 实现资源上传,并获取访问路径(定义的上传方法)*/public static String upload(String obj, byte[] data, Date date){//1.实现资源上传ossClient.putObject(bucket,obj,new ByteArrayInputStream(data));//2.生成访问路径return ossClient.generatePresignedUrl(bucket,obj,date).toString();}/*** 实现资源的删除(定义的上传方法)*/public static boolean delete(String obj){try{ossClient.deleteObject(bucket,obj);return true;}catch (Exception e){return false;}}/*** 验证资源是否存在(定义的上传方法)*/public static boolean exists(String obj){return ossClient.doesObjectExist(bucket,obj);}/*** 创建对象的访问链接(访问时效时可以使用)*/public static String createUrl(String obj,Date date){return ossClient.generatePresignedUrl(bucket,obj,date).toString();}}


第三步:为了防止文件名重复或者过长封装的工具类
package com.feri.bootplusstudy.util;import java.util.UUID;/*** @author Feri* @date 2021/12/28 17:07* @description:TODO*/public class FileUtils {/*** 实现上传的文件名,限制长度,并且重新命名*/public static String rename(String fn){//1.保证长度在可控范围if(fn.length()>50){fn.substring(fn.length()-50);}//2.重命名,保证名称唯一return UUID.randomUUID().toString().replaceAll("-","")+"_"+fn;}}
第四步:获取地址有效时间的工具类
package com.feri.bootplusstudy.util;import java.util.Calendar;import java.util.Date;/*** @author Feri* @date 2021/12/28 17:19* @description:TODO*/public class DateUtils {/*** 获取指定年后的日期*/public static Date getYearTime(int year){//1.日历类Calendar calendar=Calendar.getInstance();//2.添加指定的年calendar.add(Calendar.YEAR,year);return calendar.getTime();}}
第五步:为了防止上传文件过大需要在application.yml配置文件中添加配置
servlet:multipart:max-file-size: 10MBmax-request-size: 30MB
最后是controller层的实例
package com.feri.bootplusstudy.controller;import com.feri.bootplusstudy.util.AliOssUtils;import com.feri.bootplusstudy.util.DateUtils;import com.feri.bootplusstudy.util.FileUtils;import org.springframework.web.bind.annotation.PostMapping;import org.springframework.web.bind.annotation.RequestMapping;import org.springframework.web.bind.annotation.RequestPart;import org.springframework.web.bind.annotation.RestController;import org.springframework.web.multipart.MultipartFile;import java.io.IOException;import java.util.Calendar;/*** @author Feri* @date 2021/12/28 16:54* @description:TODO*/@RestController@RequestMapping("/api/oss/")public class OssController {@PostMapping("uploadimg.do")public String upload(@RequestPart("file") MultipartFile file) throws IOException {String fn= FileUtils.rename(file.getOriginalFilename());return AliOssUtils.upload(fn,file.getBytes(), DateUtils.getYearTime(1));}}

