需求:
用注解的方式完成注入对象中的效果。
创建文件:
同注入对象章节。
1.创建com.tutorialspoint包
2.创建HelloWorld类
3.创建MainAPP主类(void main)
4.创建Beans.xml
5.ModelTest类
代码:
HelloWorld.java
package com.tutorialspoint;public class HelloWorld {private String message;public void setMessage(String message){this.message = message;}public void getMessage(){System.out.println("Your Message : " + message);}}
MainApp.java
package com.tutorialspoint;import org.springframework.context.ApplicationContext;import org.springframework.context.support.ClassPathXmlApplicationContext;public class MainApp {public static void main(String[] args) {// TODO Auto-generated method stubApplicationContext context =new ClassPathXmlApplicationContext("Beans.xml");HelloWorld obj = (HelloWorld) context.getBean("helloWorld");obj.getMessage();ModelTest model = (ModelTest) context.getBean("test");model.getStr();model.getHelloWorld();}}
Beans.xml
<?xml version="1.0" encoding="UTF-8"?><beans xmlns="http://www.springframework.org/schema/beans"xmlns:xsi="http://www.w3.org/2001/XMLSchema-instance" xmlns:aop="http://www.springframework.org/schema/aop"xmlns:tx="http://www.springframework.org/schema/tx" xmlns:context="http://www.springframework.org/schema/context"xsi:schemaLocation="http://www.springframework.org/schema/beanshttp://www.springframework.org/schema/beans/spring-beans-3.0.xsdhttp://www.springframework.org/schema/aophttp://www.springframework.org/schema/aop/spring-aop-3.0.xsdhttp://www.springframework.org/schema/txhttp://www.springframework.org/schema/tx/spring-tx-3.0.xsdhttp://www.springframework.org/schema/contexthttp://www.springframework.org/schema/context/spring-context-3.0.xsd"><context:annotation-config/><bean id="helloWorld" name="hello" class="com.tutorialspoint.HelloWorld"><property name="message" value="Hello World!"/></bean><bean id="test" class="com.tutorialspoint.ModelTest"><property name="str" value="Hello Str!"/></bean></beans>
ModelTest.java
package com.tutorialspoint;import org.springframework.beans.factory.annotation.Autowired;public class ModelTest {private String str;@Autowiredprivate HelloWorld helloWorld;public void setStr(String string){this.str = string;}public void getStr(){System.out.println("Your str : " + str);}public void setHelloWorld(HelloWorld helloworld){this.helloWorld = helloworld;}public void getHelloWorld(){helloWorld.getMessage();}}
@Resource注解:
package com.tutorialspoint;import javax.annotation.Resource;import org.springframework.beans.factory.annotation.Autowired;public class ModelTest {private String str;@Resource(name="hello")private HelloWorld helloWorld;public void setStr(String string){this.str = string;}public void getStr(){System.out.println("Your str : " + str);}public void setHelloWorld(HelloWorld helloworld){this.helloWorld = helloworld;}public void getHelloWorld(){helloWorld.getMessage();}}
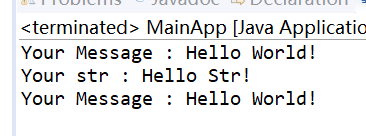
运行结果:
要点:
@autowired 一般用在service层,@resources一般用在Mapper层
@Resource:
@Resource默认按byName自动注入。
既不指定name属性,也不指定type属性,则自动按byName方式进行查找。如果没有找到符合的bean,则回退为一个原始类型进行进行查找,如果找到就注入。
只是指定了@Resource注解的name,则按name后的名字去bean元素里查找有与之相等的name属性的bean。
只指定@Resource注解的type属性,则从上下文中找到类型匹配的唯一bean进行装配,找不到或者找到多个,都会抛出异常。
@Autowired:
@Autowired默认先按byType进行匹配,如果发现找到多个bean,则又按照byName方式进行匹配,如果还有多个,则报出异常。

若有收获,就点个赞吧
0 人点赞
