1.导入jar包。
下载网址:https://repo.spring.io/release/org/springframework/spring/
2.配置web.xml
```jsx
springmvc org.springframework.web.servlet.DispatcherServlet contextConfigLocation classpath:springmvc-servlet.xml
3.添加springmvc配置文件,默认在WEB-INF下。文件名默认为 [servlet名(步骤二servlet-name)]-servlet.xml。例如:springmvc-servlet.xml。4.编写springmvc配置文件```xml<?xml version="1.0" encoding="UTF-8"?><beans xmlns="http://www.springframework.org/schema/beans"xmlns:xsi="http://www.w3.org/2001/XMLSchema-instance"xmlns:context="http://www.springframework.org/schema/context"xmlns:mvc="http://www.springframework.org/schema/mvc"xsi:schemaLocation="http://www.springframework.org/schema/beans http://www.springframework.org/schema/beans/spring-beans.xsdhttp://www.springframework.org/schema/context http://www.springframework.org/schema/context/spring-context-4.1.xsdhttp://www.springframework.org/schema/mvc http://www.springframework.org/schema/mvc/spring-mvc-4.1.xsd"><!-- scan the package and the sub package --><context:component-scan base-package="test.SpringMVC"/><!-- don't handle the static resource --><mvc:default-servlet-handler /><!-- if you use annotation you must configure following setting --><mvc:annotation-driven /><!-- configure the InternalResourceViewResolver --><bean class="org.springframework.web.servlet.view.InternalResourceViewResolver"id="internalResourceViewResolver"><!-- 前缀 --><property name="prefix" value="/WEB-INF/jsp/" /><!-- 后缀 --><property name="suffix" value=".jsp" /></bean></beans>
5.在WEB-INF文件夹下创建名为jsp的文件夹,用来存放jsp视图。创建一个hello.jsp,在body中添加“Hello World”。
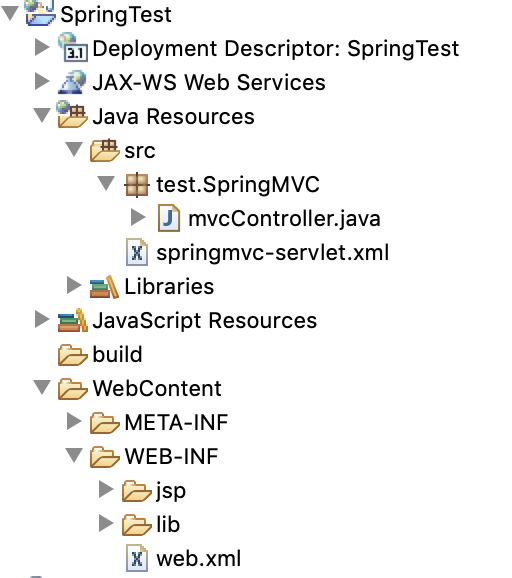
6.建立包以及mvcController.java文件。整体布局如下。

6.mvcController.java文件编写代码。
@Controller@RequestMapping("/mvc")public class mvcController {@RequestMapping("/hello")public String hello(){return "hello";}}

