这一节课,我们来完成指令下发剩余部分的功能, 当设备对指令进行回复以后,IotHub 会通过 RabbitMQ 将设备的回复通知到业务系统,最后我们将 IotHub Server 端的代码和 DeviceSDK 的代码进行联调。
通知业务系统
指令处理的最后一步就是将设备对指令的回复再转发到业务服务器,具体流程:
- IotHub Server 通过 WebHook 获取设备对指令的回复消息;
- IotHub Server 通过解析消息的主题名获取指令回复的元数据;
- IotHub 通过 RabbitMQ 对指令的回复转发到对应的业务系统。
首先在 WebHook 里添加对指令回复消息的处理:
//IotHub_Server/messages/message_service.jsstatic dispatchMessage({topic, payload, ts} = {}) {...const cmdRespRegx = pathToRegexp(cmdRespRule)var result = null;if ((result = topicRegx.exec(topic)) != null) {...} else if ((result = statusRegx.exec(topic)) != null) {...} else if ((result = cmdRespRegx.exec(topic)) != null) {this.checkMessageDuplication(result[5], function (isDup) {if (!isDup) {MessageService.handleCommandResp({productName: result[1],deviceName: result[2],ts: ts,command: result[3],requestId: result[4],payload: new Buffer(payload, 'base64')})}})}}
接下来再把指令回复通过 RabbitMQ 转发到对应的业务系统:
//IotHub_Server/service/message_service.jsstatic handleCommandResp({productName, deviceName, command, requestId, ts, payload}) {NotifyService.notifyCommandResp({productName: productName,deviceName: deviceName,command: command,requestId: requestId,ts: ts,payload: payload})}
//IotHub_Server/service/notify_service.jsstatic notifyCommandResp({productName, deviceName, command, requestId, ts, payload}){var data = bson.serialize({device_name: deviceName,command: command,request_id: requestId,send_at: ts,payload: payload})if(currentChannel != null){currentChannel.publish(commandRespExchange, productName, data)}}
代码联调
现在,我们可以总结整个指令下发的流程了: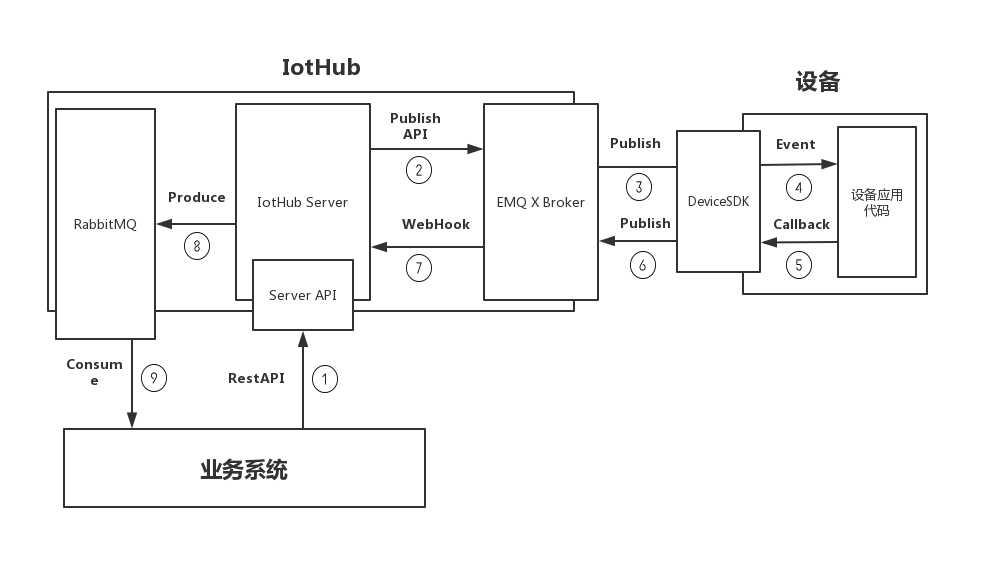
- 业务系统调用 Server API 发送指令。
- IotHub Server 调用 EMQ X 的 Publish API(RESTful)。
- EMQ X Broker Publish 消息到设备订阅的主题。
- DeviceSDK 提取出指令的信息并通过 Event 的方式传递到设备应用代码。
- 设备应用代码执行完指令要求的操作后,通过 Callback(闭包)的方式要求 DeviceSDK 对指令进行回复。
- DeviceSDK Publish 包含指令回复的消息到 EMQ X Broker。
- EMQ X Broker 通过 WebHook 将指令回复传递到 IotHub Server。
- IotHub Server 将指令回复放入到 RabbitMQ 对应的队列中。
- 业务系统从 RabbitMQ 的对应队列获得指令的回复。
下面我们来写点代码来验证这个流程。
现在开始我们把 Server 端的示例代码放在 IotHub_Server/samples 下面。
首先我们实现一段模拟业务系统的代码,它有以下的功能:
- 调用 IotHub Server API,向设备发送指令 “ping”,指令数据为当前的时间戳,以二进制格式传输;
- 可以通过命令行参数指定指令的 TTL,默认情况下指令无有效期的限制;
- 从 RabbitMQ 中获取设备对指令的回复,并打印出来。
然后实现一段设备端应用代码,当接受到”ping”指令时,回复设备当前的时间戳,使用二进制格式进行传输://IotHub_Server/samples/ping.jsrequire('dotenv').config({path: "../.env"})const bson = require('bson')const request = require("request")var amqp = require('amqplib/callback_api');var exchange = "iothub.events.cmd_resp"amqp.connect(process.env.RABBITMQ_URL, function (error0, connection) {if (error0) {console.log(error0);} else {connection.createChannel(function (error1, channel) {if (error1) {console.log(error1)} else {channel.assertExchange(exchange, 'direct', {durable: true})var queue = "iotapp_cmd_resp";channel.assertQueue(queue, {durable: true})channel.bindQueue(queue, exchange, process.env.TARGET_PRODUCT_NAME)channel.consume(queue, function (msg) {var data = bson.deserialize(msg.content)if(data.command == "ping") {console.log(`received from ${data.device_name}, requestId: ${data.request_id},payload: ${data.payload.buffer.readUInt32BE(0)}`)}channel.ack(msg)})}});}});const buf = Buffer.alloc(4);buf.writeUInt32BE(Math.floor(Date.now())/1000, 0);var formData = {command: "ping",data: buf.toString("base64"),encoding: "base64"}if(process.argv[2] != null){formData.ttl = process.argv[2]}request.post(`http://127.0.0.1:3000/devices/${process.env.TARGET_PRODUCT_NAME}/${process.env.TARGET_DEVICE_NAME}/command`, {form: formData}, function (error, response, body) {if (error) {console.log(error)} else {console.log('statusCode:', response && response.statusCode);console.log('body:', body);}})
//IotHub_Device/samples/pong.jsvar IotDevice = require("../sdk/iot_device")require('dotenv').config()var path = require('path');var device = new IotDevice({productName: process.env.PRODUCT_NAME,deviceName: process.env.DEVICE_NAME,secret: process.env.SECRET,clientID: path.basename(__filename, ".js"),storePath: `../tmp/${path.basename(__filename, ".js")}`})device.on("online", function () {console.log("device is online")})device.on("command", function (command, data, respondCommand) {if (command == "ping") {console.log(`get ping with: ${data.readUInt32BE(0)}`)const buf = Buffer.alloc(4);buf.writeUInt32BE(Math.floor(Date.now())/1000, 0);respondCommand(buf)}})device.connect()
这两段代码是有实际意义的,业务系统和设备可以通过一次指令的交互来了解他们之间数据传输的延迟状况(包括网络和 IotHub 处理的耗时)。
现在我们来运行上面的两段代码。
首先运行
node ping.js,然后再运行node pong.js可以看到以下输出:## node ping.jsstatusCode: 200body: {"request_id":"5cf25cce5cb7dc80277d4641"}received from HBG84L_M6, requestId: 5cf25cce5cb7dc80277d4641,payload: 1559387342
## node pong.js
device is online
get ping with: 1559387342
这说明设备可以接受离线消息并回复,业务系统也正确地接收了设备对指令的回复,设备回复里的 RequestID 和业务系统下发指令时的 RequestID 是一致的。
首先运行
node ping.js 10,设定指令有效期为 10 秒,然后在 10 秒内运行node pong.js,我们可以看到和第一步一致的输出。- 首先运行
node ping.js 10,设定指令有效期为 10 秒,然后等待 10 秒,再运行node pong.js,在控制台上不会有任何和指令相关的输出,说明指令的有效期设置是生效的。
到这一节为止,IotHub 的下行数据处理功能就完成了。目前 IotHub 可以正确地处理上行数据和下行数据了,在第四部分的课程里,我们基于 IotHub 上行和下行数据处理的框架,做进一步的抽象,实现一些更高级的功能。

若有收获,就点个赞吧
0 人点赞
