在这一节我们来实现设备分组的设备端实现,设备在连接到 IotHub 时,需要主动请求标签数据,在收到来自服务端的标签数据时,需要对比本地存储的标签数据,然后 subscribe 或者 unsubscribe 对应的主题。最后我们会把代码连在一起进行测试。
设备端的持久性存储
由于需要和服务端的标签进行对比,设备需要在本地使用持久性的存储来保存已订阅的标签。一般来说,DeviceSDK 需要根据自身平台的特点来提供存储的接口,这里为了演示起见,我们使用存储 in-flight 消息的 Message Store 所使用的 levelDB 作为 DeviceSDK 的本地存储。这里我们把标签数据的存取进行封装:
//IotHub_Device/sdk/persistent_store.jsvar level = require('level')class PersistentStore {constructor(dbPath) {this.db = level(`${dbPath}/device_db/`)}getTags(callback) {this.db.get("tags", function (error, value) {if (error != null) {callback({tags: [], tags_version: 0})} else {callback(JSON.parse(value))}})}saveTags(tags) {this.db.put("tags", Buffer.from(JSON.stringify(tags)))}close() {this.db.close()}}module.exports = PersistentStore;
然后在初始化的时候加载持久性存储:
//IotHub_Device/sdk/iot_device.jsconst PersistentStore = require("./persistent_storage")constructor({serverAddress = "127.0.0.1:8883", productName, deviceName, secret, clientID, storePath} = {}) {....this.persistent_store = new PersistentStore(storePath)}
标签数据处理
当收到 IotHub 下发的$set_tags指令时,DeviceSDK 需要进行以下操作:
- 将指令数据里的 tags_version 和本地存储的 tags_version 进行比较,如果指令的 tags_version 不大于本地的 tags_version,忽略该指令,否则进入下一步;
- 比较本地保存的 tags 和指令数据里的 tags,对本地有而指令里没有的 tag,unsubscribe 相应的主题;
- 比较本地保存的 tags 和指令数据里的 tags,对本地没有而指令里有的 tag,subscribe相应的主题;
- 将指令里的 tags 和 tags_version 存入本地存储。
然后在接收//IotHub_Device/sdk/iot_device.jssetTags(serverTags) {var self = thisvar subscribe = []var unsubscribe = []this.persistent_store.getTags(function (localTags) {if (localTags.tags_version < serverTags.tags_version) {serverTags.tags.forEach(function (tag) {if (localTags.tags.indexOf(tag) == -1) {subscribe.push(`tags/${self.productName}/${tag}/cmd/+/+/+/#`)}})localTags.tags.forEach(function (tag) {if (serverTags.tags.indexOf(tag) == -1) {unsubscribe.push(`tags/${self.productName}/${tag}/cmd/+/+/+/#`)}})if(subscribe.length > 0) {self.client.subscribe(subscribe, {qos: 1}, function (err, granted) {console.log(granted)})}if(unsubscribe.length > 0) {self.client.unsubscribe(unsubscribe)}self.persistent_store.saveTags(serverTags)}})}
$set_tags命令时调用这个方法://IotHub_Device/sdk/iot_device.jshandleCommand({commandName, requestID, encoding, payload, expiresAt, commandType = "cmd"}) {...if (commandName.startsWith("$")) {payload = JSON.parse(data.toString())if (commandName == "$set_ntp") {this.handleNTP(payload)} else if (commandName == "$set_tags") {this.setTags(payload)}} else {...}}}
标签数据请求
在设备连接到 IotHub 时,应该发起标签数据的请求:sendTagsRequest(){this.sendDataRequest("$tags")}connect() {...this.client.on("connect", function () {self.sendTagsRequest()self.emit("online")})...}
处理批量下发指令
设备在处理批量下发指令时,其流程和普通的指令下发没有区别,只是需要匹配批量指令下发的主题即可:
设备分组的的设备端实现就完成了。dispatchMessage(topic, payload) {var cmdTopicRule = "(cmd|rpc)/:productName/:deviceName/:commandName/:encoding/:requestID/:expiresAt?"var tagTopicRule = "tags/:productName/:tag/cmd/:commandName/:encoding/:requestID/:expiresAt?"var resultif ((result = pathToRegexp(cmdTopicRule).exec(topic)) != null) {...}else if ((result = pathToRegexp(tagTopicRule).exec(topic)) != null) {if (this.checkRequestDuplication(result[5])) {this.handleCommand({commandName: result[3],encoding: result[4],requestID: result[5],expiresAt: result[6] != null ? parseInt(result[6]) : null,payload: payload,})}}}
代码联调
设备获取标签信息
我们写一段简单的设备端代码,收到指令时,将指令的名称打印出来:
首先修改设备的标签为 test1、test2://IotHub_Device/samples/print_cmd.js ... device.on("online", function () { console.log("device is online") }) device.on("command", function (command) { console.log(`received cmd: ${command}`) }) device.connect()
然后运行curl -d "tags=test1,test2" http://localhost:3000/devices/IotApp/K-zHGEEmT/tags -X PUTprint_command.js:
通过 EMQ X Web Management Console 检查 Client 的订阅情况,可以看到: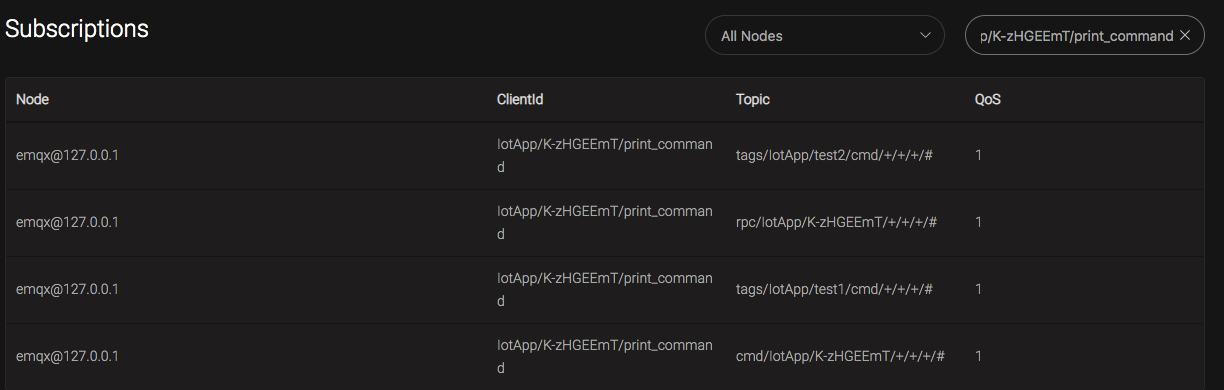
然后将设备的标签设为 “test1”:
通过EMQ X Web Management Console检查Client的订阅情况,可以看到:curl -d "tags=test1" http://localhost:3000/devices/IotApp/K-zHGEEmT/tags -X PUT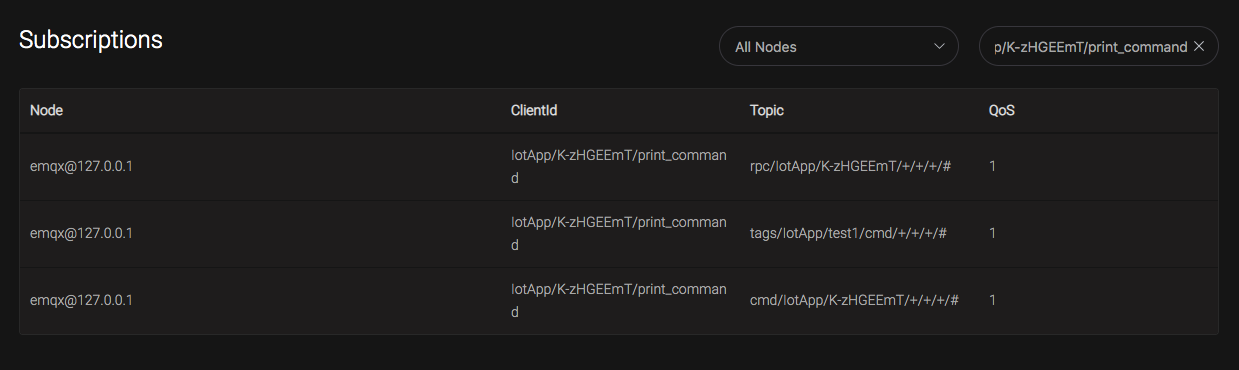
设备不再订阅到标签 test2 的主题了。指令批量下发
调用 Server API 向标签为 test1 的设备发送指令:
可以看到curl -d "command=echo" http://localhost:3000/tags/IotApp/test1/command -X POSTprint_command.js的输出为:
到这里,IotHub 的设备分组功能就完成了。device is online received cmd: echo
这一节我们完成 IotHub 的设备分组功能,并用代码进行了测试和验证。下一节我们来实现设备间通信功能。

若有收获,就点个赞吧
0 人点赞
