- Vue实战
- 1. Vue 引言
- 2. Vue入门
- 3. v-text和v-html
- 4.vue中事件绑定(v-on)
- 5.v-show v-if v-bind
- 6.v-for的使用
- 7 .v-model 双向绑定
- 8. 事件修饰符
- 9. 按键修饰符
- 10. Axios 基本使用
- 11. Vue 生命周期
- 12. Vue中组件(Component)
- 13.Vue中路由(VueRouter)
- 13.4 router-link使用
- 13.5 默认路由
- 13.6 路由中参数传递
- 13.7 嵌套路由
- 13.8路由守卫
- 14. Vue CLI 脚手架
- 1.下载nodejs nodejs新版不支持win7
- 2.配置nodejs环境变量
- 3.验证nodejs环境是否成功
- 4.npm介绍
- 5.配置淘宝镜像
- 6.配置npm下载依赖位置
- 7. 配置环境变量
- 8.验证nodejs环境配置
- 15.Vue Cli脚手架项目打包和部署
Vue实战
1. Vue 引言
渐进式JavaScript 框架 —摘自官网 https://cn.vuejs.org/v2/guide/
# 渐进式1. 易用 html css javascript2. 高效 开发前端页面 非常高效3. 灵活 开发灵活 多样性# 总结Vue 是一个javascript 框架# 后端服务端开发人员:Vue 渐进式javascript框架: 让我们通过操作很少的DOM,甚至不需要操作页面中任何DOM元素,就很容易的完成数据和视图绑定 双向绑定MVVM : M,V,VM注意: 日后在使用Vue 过程中页面中不要在引入Jquery框架htmlcss--->javascript ----->jquery---->angularjs -----> Vu# Vue 作者尤雨溪 国内的
2. Vue入门
2.1 下载Vuejs
//开发版本:
    <!-- 开发环境版本,包含了有帮助的命令行警,类似于源码版本 -->
    <script src="https://cdn.jsdelivr.net/npm/vue/dist/vue.js"></script>

//生产版本:
    <!-- 生产环境版本,优化了尺寸和速度,类似于mini版本 -->
    <script src="https://cdn.jsdelivr.net/npm/vue"></script>
2.2 Vue第一个入门应用
<!DOCTYPE html>
<html lang="en">
<head>
    <meta charset="UTF-8">
    <title>vue-helloworld</title>
</head>
<body>
    <div id="app">
        <!-- 在插值表达式中进行字符串拼接 -->
        <h3>{{msg+"!"}}</h3>
        <!-- 在插值表达式中调用函数 -->
        <h3>{{msg.substring(msg.indexOf(" "))}}</h3>
        <h3>{{username}}</h3>
        <!-- 在插值表达式中进行逻辑操作 -->
        <h3>{{!flag}}</h3>
        <!-- 在插值表达式中使用对象 -->
        <h3>{{user}}</h3>
        <h3>{{user.name}}</h3>
        <!-- 在插值表达式中进行算术运算 -->
        <h3>{{user.age+1}}</h3>
        <!-- 在插值表达式中操作数组 -->
        <h3>{{!hobbies[4]}}</h3>
        <!-- 在插值表达式中使用三目运算符 -->
        <h3>{{flag?"是":"否"}}</h3>
    </div>
    <script src="https://cdn.jsdelivr.net/npm/vue/dist/vue.js"></script>
    <script>
        const app=new Vue({
            el:"#app",//表示vue的作用范围,可作用于el指定元素及其子元素
            data:{
                msg:"hello vue",
                user:{name:"tom",age:25},
                flag:true,
                hobbies:["电视","电影","电玩",5,true]
            }
        });
    </script>
</body>
</html>
# 总结:
            1.vue实例(对象)中el属性:     代表Vue的作用范围  日后在Vue的作用范围内都可以使用Vue的语法
            2.vue实例(对象)中data属性: 用来给Vue实例绑定一些相关数据, 绑定的数据可以通过{{变量名}}在Vue作用范围内取出
            3.在使用{{}}进行获取data中数据时,可以在{{}}中书写表达式,运算符,调用相关方法,以及逻辑运算等
            4.el属性中可以书写任意的CSS选择器[jquery选择器],但是在使用Vue开发是推荐使用 id选择器
3. v-text和v-html
3.1 v-text
v-text:用来获取data中数据将数据以文本的形式渲染到指定标签内部 类似于javascript 中 innerText
        <div id="app" class="aa">
        <span >{{ message }}</span>
        <span v-text="message"></span>
    </div>

    <!--引入vue.js-->
    <script src="https://cdn.jsdelivr.net/npm/vue/dist/vue.js"></script>
    <script>
        const app = new Vue({
            el:"#app",
            data:{
                message:"蜗牛欢迎您"
            }
        })
    </script>
# 总结
            1.{{}}(插值表达式)和v-text获取数据的区别在于
                    a.使用v-text取值会将标签中原有的数据覆盖 使用插值表达式的形式不会覆盖标签原有的数据
                    b.使用v-text可以避免在网络环境较差的情况下出现插值闪烁
3.2 v-html
v-html:用来获取data中数据将数据中含有的html标签先解析在渲染到指定标签的内部 类似于javascript中 innerHTML
<div id="app" class="aa">
        <span>{{message}}</span>
        <br>
        <span v-text="message"></span>
        <br>
        <span v-html="message">xxxxxx</span>
    </div>

    <!--引入vue.js-->
    <script src="https://cdn.jsdelivr.net/npm/vue/dist/vue.js"></script>
    <script>
        const app = new Vue({
            el:"#app",
            data:{
                message:"<a href=''>蜗牛欢迎您</a>"
            }
        })
    </script>
4.vue中事件绑定(v-on)
4.1 绑定事件基本语法
    <div id="app">
        <h2>{{message}}</h2>
        <h2 v-text="message"></h2>
        <h2>年龄:{{ age }}</h2>
        <br>
        <input type="button" value="点我改变年龄" v-on:click="changeage">
    </div>
    <!--引入vue.js-->
    <script src="https://cdn.jsdelivr.net/npm/vue/dist/vue.js"></script>
    <script>
        const app = new Vue({
            el:"#app",
            data:{
                message:"hello 欢迎来到蜗牛课堂!",
                age:23,
            },
            methods:{  //methods 用来定义vue中事件
                changeage:function(){
                    alert('点击触发');
                }
            }
        })
    </script>
# 总结:
        事件  事件源:发生事件dom元素  事件: 发生特定的动作  click....  监听器  发生特定动作之后的事件处理程序 通常是js中函数
        1.在vue中绑定事件是通过v-on指令来完成的 v-on:事件名 如  v-on:click
        2.在v-on:事件名的赋值语句中是当前时间触发调用的函数名
        3.在vue中事件的函数统一定义在Vue实例的methods属性中
        4.在vue定义的事件中this指的就是当前的Vue实例,日后可以在事件中通过使用this获取Vue实例中相关数据
4.2 Vue中事件的简化语法
        <div id="app">
        <h2>{{ age }}</h2>
        <input type="button" value="通过v-on事件修改年龄每次+1" v-on:click="changeage">
        <input type="button" value="通过@绑定时间修改年龄每次-1" @click="editage">
    </div>
    <!--引入vue.js-->
    <script src="https://cdn.jsdelivr.net/npm/vue/dist/vue.js"></script>
    <script>
        const app = new Vue({
           el:"#app",  //element: 用来指定vue作用范围
           data:{
               age:23,
           },    //data   : 用来定义vue实例中相关数据
           methods:{
               changeage:function(){
                   this.age++;
               },
               editage:function(){
                   this.age--;
               }

           }  //methods: 用来定义事件的处理函数
        });
    </script>
# 总结:
            1.日后在vue中绑定事件时可以通过@符号形式 简化  v-on 的事件绑定
4.3 Vue事件函数两种写法
        <div id="app">
        <span>{{count}}</span>
        <input type="button" value="改变count的值" @click="changecount">
    </div>
    <!--引入vue.js-->
    <script src="https://cdn.jsdelivr.net/npm/vue/dist/vue.js"></script>
    <script>
        const app = new Vue({
           el:"#app",
           data:{
               count:1,
           },
           methods:{
               /*changecount:function(){
                   this.count++;
               }*/
               changecount(){
                   this.count++;
               }
           }
        });
    </script>
# 总结:
            1.在Vue中事件定义存在两种写法  一种是 函数名:function(){}  推荐    一种是  函数名(){} 推荐
4.4 Vue事件参数传递
    <div id="app">
        <span>{{count}}</span>
        <input type="button" value="改变count为指定的值" @click="changecount(23,'xiaohei')">
    </div>

    <!--引入vue.js-->
    <script src="https://cdn.jsdelivr.net/npm/vue/dist/vue.js"></script>
    <script>
        const app = new Vue({
           el:"#app",
           data:{
               count:1,
           },
           methods:{
               //定义changecount
               changecount(count,name){
                   this.count = count;
                   alert(name);
               }
           }
        });
    </script>
# 总结:
            1.在使用事件时,可以直接在事件调用出给事件进行参数传递,在事件定义出通过定义对应变量接收传递的参数
小案例:使用vue实现购物车中商品数量的增减
    <div id="app">
        <input type="button" value="-" @click="minus">
        <span>{{count}}</span>
        <input type="button" value="+" @click="add">
    </div>
    <script src="https://cdn.jsdelivr.net/npm/vue/dist/vue.js"></script>
    <script>
        const app = new Vue({
            el:"#app",
            data:{
                count:1
            },
            methods:{
                minus(){
                    if (this.count>1)
                        this.count--;
                },
                add(){
                    if (this.count<10)
                        this.count++;
                }
            }
        });
    </script>
5.v-show v-if v-bind
5.1 v-show
v-show:用来控制页面中某个标签元素是否展示 底层使用控制是 display 属性
<div id="app">
    <!--
        v-show: 用来控制标签展示还是隐藏的
    -->
    <h2 v-show="false">蜗牛教育欢迎你的加入!</h2>
    <h2 v-show="show">蜗牛教育欢迎你的加入这是vue中定义变量true!</h2>
    <input type="button" value="展示隐藏标签" @click="showmsg">
</div>
<!--引入vue.js-->
<script src="https://cdn.jsdelivr.net/npm/vue/dist/vue.js"></script>
<script>
    const app = new Vue({
        el:"#app",
        data:{
            show:false,
        },
        methods:{
            //定义时间
            showmsg(){
               this.show =  !this.show;
            }
        }
    })
</script>
# 总结
            1.在使用v-show时可以直接书写boolean值控制元素展示,也可以通过变量控制标签展示和隐藏
            2.在v-show中可以通过boolean表达式控制标签的展示和隐藏
5.2 v-if
v-if: 用来控制页面元素是否展示,底层控制是DOM元素,由于会频繁操作DOM,性能比v-show差。 DOM是网页中用来表示文档中对象的标准模型,通过JavaScript可以对网页中的所有DOM对象进行操作,是由万维网联盟W3C组织制定的标准编程接口。文档对象模型(Document Object Model,简称DOM),是W3C组织推荐的处理可扩展标志语言的标准编程接口。在网页上,组织页面(或文档)的对象被组织在一个树形结构中,用来表示文档中对象的标准模型就称为DOM。
<div id="app">
    <h2 v-if="false">蜗牛教育</h2>
    <h2 v-if="show">蜗牛教育欢迎你的加入</h2>
</div>
<!--引入vue.js-->
<script src="https://cdn.jsdelivr.net/npm/vue/dist/vue.js"></script>
<script>
    const app = new Vue({
        el:"#app",
        data:{
            show:false
        },
        methods:{
        }
    });
</script>
5.3 v-bind
v-bind: 用来绑定标签的属性从而通过vue动态修改标签的属性
<div id="app">
    <img width="300" v-bind:title="msg" src="../images/loading.gif" alt="">
</div>
<!--引入vue.js-->
<script src="https://cdn.jsdelivr.net/npm/vue/dist/vue.js"></script>
<script>
    const app = new Vue({
        el:"#app",
        data:{
            msg:"页面正在加载中......",
            showCss:true,
        },
        methods:{
        }
    })
</script>
5.4 v-bind 简化写法
vue为了方便我们日后绑定标签的属性提供了对属性绑定的简化写法如 `v-bind:属性名` 简化之后 `:属性名`小案例:点击实现图片切换
    <div id="app">
        <input type="button" value="点击实现图片切换" @click="changeImg">
        <img width="150" height="150" :src="src">
    </div>
    <script src="https://cdn.jsdelivr.net/npm/vue/dist/vue.js"></script>
    <script>
        const app = new Vue({
            el:"#app",
            data:{
                srcs:["../images/loading.gif","../images/loadingstatic.jpg"],
                src:"../images/loading.gif",
                index:0
            },
            methods:{
                changeImg(){
                    this.index++;
                    if (this.index > 1) {
                        this.index=0;
                    }
                    this.src=this.srcs[this.index];
                }
            }
        });
    </script>
6.v-for的使用
v-for: 作用就是用来对对象进行遍历的(数组也是对象的一种)
<div id="app">
    <span>{{ user.name }} {{ user.age }}</span>
    <br>
    <!--通过v-for遍历对象-->
    <span v-for="(value,key,index) in user">
        {{index}} : {{key}} : {{value}}
    </span>

    <!--
        通过v-for遍历数组
    -->
    <ul>
        <li v-for="a,index in arr" >
            {{index}} {{a}}
        </li>
    </ul>

    <!--
        通过v-for遍历数组中对象
        :key 便于vue内部做重用和排序
    -->
    <ul>
        <li v-for="user,index in users" :key="user.id">
            {{index+1}} {{ user.name }}  === {{ user.age }} ==== {{ user.content }}
        </li>
    </ul>

</div>
<!--引入vue-->
<script src="https://cdn.jsdelivr.net/npm/vue/dist/vue.js"></script>
<script>
    const app = new Vue({
        el: "#app",
        data: {
            user:{name:"小陈",age:23},
            arr:["北京校区", "天津校区", "河南校区"],
            users:[
                {id:"1",name:"xiaochen",age:23,content:"我曾经也是一个单纯的少年!"},
                {id:"2",name:"小白",age:23,content:"我曾经是一个邪恶的少年!"},
            ]
        },
        methods: {}
    });
</script>
# 总结
    1.在使用v-for的时候一定要注意加入:key 用来给vue内部提供重用和排序的唯一key
7 .v-model 双向绑定
v-model: 作用用来绑定标签元素的值与vue实例对象中data数据保持一致,从而实现双向的数据绑定机制
<div id="app">
    <input type="text" v-model="message">
    <span>{{message}}</span>
    <hr>
    <input type="button" value="改变Data中值" @click="changeValue">
</div>
<!--引入vue-->
<script src="https://cdn.jsdelivr.net/npm/vue/dist/vue.js"></script>
<script>
    const app = new Vue({
        el: "#app",
        data: {
            message:""
        },
        methods: {
            changeValue(){
                this.message='教育!';
            }
        }
    });
</script>
# 总结
        1.使用v-model指令可以实现数据的双向绑定
        2.所谓双向绑定 表单中数据变化导致vue实例data数据变化   vue实例中data数据的变化导致表单中数据变化 称之为双向绑定

# MVVM架构  双向绑定机制
    Model: 数据  Vue实例中绑定数据

    VM:   ViewModel  监听器

    View:  页面  页面展示的数据
8. 事件修饰符
修饰符: 作用用来和事件连用,用来决定事件触发条件或者是阻止事件的触发机制
# 1.常用的事件修饰符
    .stop
    .prevent
    .capture
    .self
    .once
    .passive
8.1 stop事件修饰符
用来阻止事件冒泡
<div id="app">
    <div class="aa" @click="divClick">
        <!--用来阻止事件冒泡-->
        <input type="button" value="按钮" @click.stop="btnClick">
    </div>
</div>
<!--引入vue-->
<script src="https://cdn.jsdelivr.net/npm/vue/dist/vue.js"></script>
<script>
    const app = new Vue({
        el: "#app",
        data: {},
        methods: {
            btnClick(){
                alert('button被点击了');
            },
            divClick(){
                alert('div被点击了');
            }
        }
    });
</script>
8.2 prevent 事件修饰符
用来阻止标签的默认行为
        <!--用来阻止事件的默认行为-->
    <a href="http://www.baizhibest.com/" @click.prevent="aClick">蜗牛教育</a>
8.3 self 事件修饰符
用来针对于当前标签的事件触发 ===========> 只触发自己标签的上特定动作的事件 只关心自己标签上触发的事件 不监听事件冒泡
        <!--只触发标签自身的事件-->
    <div class="aa" @click.self="divClick">
        <!--用来阻止事件冒泡-->
        <input type="button" value="按钮" @click.stop="btnClick">
        <input type="button" value="按钮1" @click="btnClick1">
    </div>
8.4 once 事件修饰符
once 一次 作用: 就是让指定事件只触发一次
    <!--
    .prevent : 用来阻止事件的默认行为
    .once    : 用来只执行一次特定的事件
    -->
    <a href="http://www.baizhibest.com/" @click.prevent.once="aClick">蜗牛教育</a>
9. 按键修饰符
作用: 用来与键盘中按键事件绑定在一起,用来修饰特定的按键事件的修饰符
# 按键修饰符
    .enter
    .tab
    .delete (捕获“删除”和“退格”键)
    .esc
    .space
    .up
    .down
    .left
    .right
9.1 enter 回车键
用来在触发回车按键之后触发的事件
<input type="text" v-model="msg" @keyup.enter="keyups">
9.2 tab 键
用来捕获到tab键执行到当前标签是才会触发
<input type="text" @keyup.tab="keytabs">
10. Axios 基本使用
10.1 引言
Axios是一个异步请求技术,核心作用就是用来在页面中发送异步请求,并获取对应数据在页面中渲染 页面局部更新技术 Ajax
10.2 Axios 第一个程序
中文网站:https://www.kancloud.cn/yunye/axios/234845
安装: https://unpkg.com/axios/dist/axios.min.js
10.2.1 GET方式的请求
      //发送GET方式请求
    axios.get("http://localhost:8888/user/findAll?name=xiaochen").then(function(response){
        console.log(response.data);
    }).catch(function(err){
        console.log(err);
    });
10.2.2 POST方式请求
        //发送POST方式请求
    axios.post("http://localhost:8888/user/save",{
        username:"xiaochen",
        age:23,
        email:"xiaochen@zparkhr.com",
        phone:13260426185
    }).then(function(response){
        console.log(response.data);
    }).catch(function(err){
        console.log(err);
    });
10.2.3 axios并发请求
并发请求: 将多个请求在同一时刻发送到后端服务接口,最后在集中处理每个请求的响应结果
 //1.创建一个查询所有请求
    function findAll(){
        return axios.get("http://localhost:8888/user/findAll?name=xiaochen");
    }

    //2.创建一个保存的请求
    function save(){
        return axios.post("http://localhost:8888/user/save",{
            username:"xiaochen",
            age:23,
            email:"xiaochen@zparkhr.com",
            phone:13260426185
        });
    }

    //3.并发执行
    axios.all([findAll(),save()]).then(
        axios.spread(function(res1,res2){  //用来将一组函数的响应结果汇总处理
            console.log(res1.data);
            console.log(res2.data);
        })
    );//用来发送一组并发请求
11. Vue 生命周期
生命周期钩子====>生命周期函数
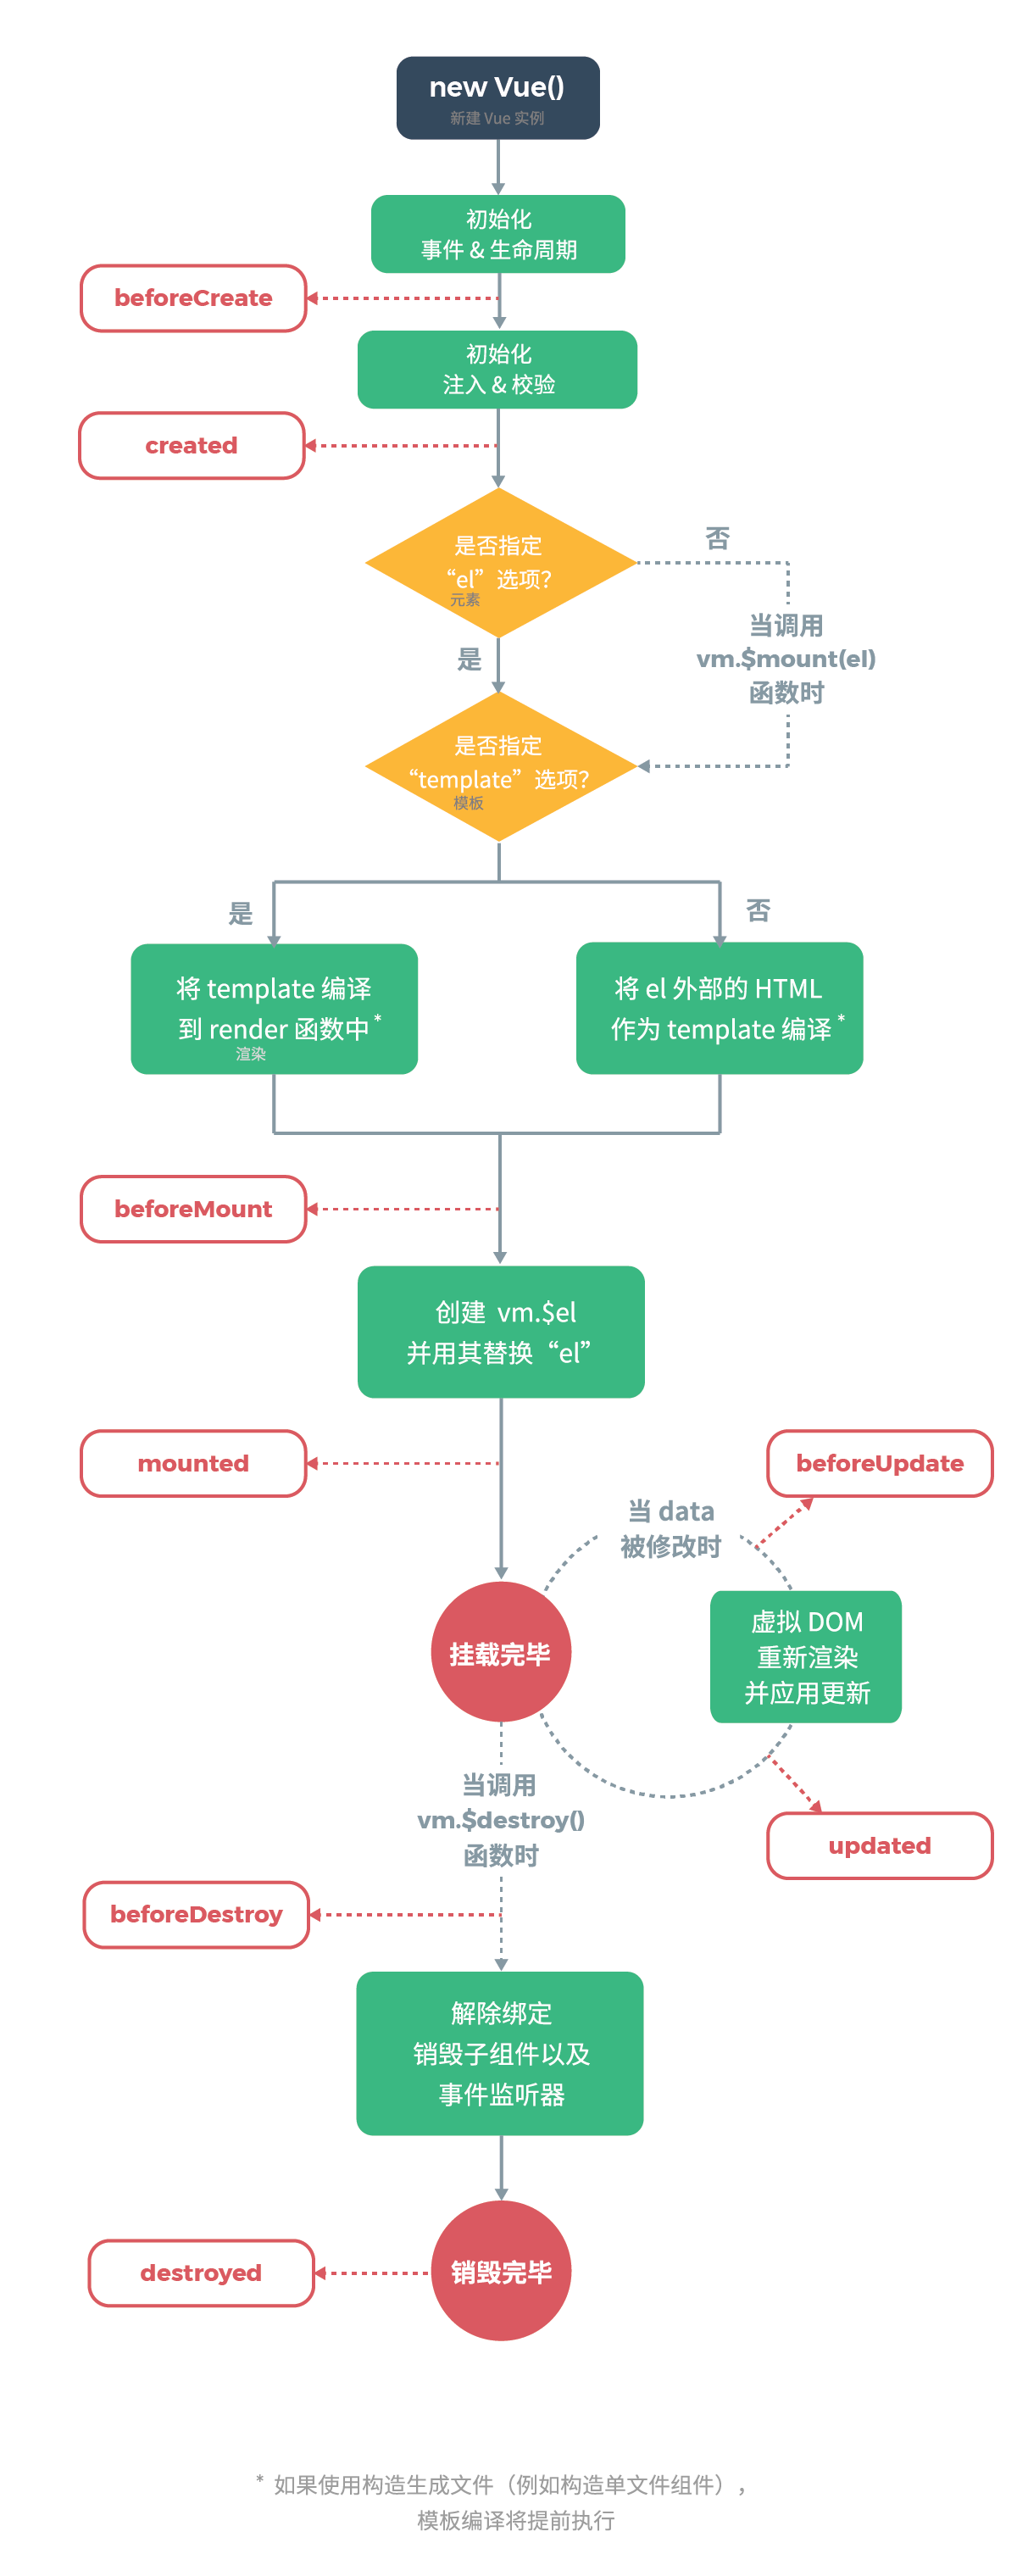
# Vue生命周期总结
        1.初始化阶段
        beforeCreate(){ //1.生命周期中第一个函数,该函数在执行时Vue实例仅仅完成了自身事件的绑定和生命周期函数的初始化工作,Vue实例中还没有 Data el methods相关属性
            console.log("beforeCreate: "+this.msg);
        },
        created(){ //2.生命周期中第二个函数,该函数在执行时Vue实例已经初始化了data属性和methods中相关方法
            console.log("created: "+this.msg);
        },
        beforeMount(){//3.生命周期中第三个函数,该函数在执行时Vue将El中指定作用范围作为模板编译
            console.log("beforeMount: "+document.getElementById("sp").innerText);
        },
        mounted(){//4.生命周期中第四个函数,该函数在执行过程中,已经将数据渲染到界面中并且已经更新页面
            console.log("Mounted: "+document.getElementById("sp").innerText);
        }

        2.运行阶段
                 beforeUpdate(){//5.生命周期中第五个函数,该函数是data中数据发生变化时执行 这个事件执行时仅仅是Vue实例中data数据变化页面显示的依然是原始数据
            console.log("beforeUpdate:"+this.msg);
            console.log("beforeUpdate:"+document.getElementById("sp").innerText);
        },
        updated(){    //6.生命周期中第六个函数,该函数执行时data中数据发生变化,页面中数据也发生了变化  页面中数据已经和data中数据一致
            console.log("updated:"+this.msg);
            console.log("updated:"+document.getElementById("sp").innerText);
        },

        3.销毁阶段
        beforeDestory(){//7.生命周期第七个函数,该函数执行时,Vue中所有数据 methods componet 都没销毁

        },
        destoryed(){ //8.生命周期的第八个函数,该函数执行时,Vue实例彻底销毁

        }
案例:
需求:完成登录注册以及动态查询,熟悉vue基本操作和axios的使用,强化mybatis-plus的使用。
# 1 使用HBuilder创建项目,在js目录中引入vue和axios
# 2 创建index.html、login.html、register.html,并使用vue控制页面在没有登录时自动跳转到login.html,当登录用户尚未注册时,跳转到register.html,登录成功则跳转到index.html。
<!DOCTYPE html>
<html>
    <head>
        <meta charset="utf-8" />
        <title>index</title>
    </head>
    <body>
        <div id="app">

        </div>
        <script type="text/javascript" src="js/vue.js"></script>
        <script type="text/javascript" src="js/axios.min.js"></script>
        <script>
            var app = new Vue({
                el: "#app",
                data: {

                },
                methods: {

                },
                created() {
                    var user = sessionStorage.getItem("loginUser")
                    if (!user) {
                        location.href = "login.html"
                    }
                },
            })
        </script>
    </body>
</html>
<!DOCTYPE html>
<html>
    <head>
        <meta charset="UTF-8">
        <title>login</title>
    </head>
    <body>
        <div id="app">
            <form action="">
                <table>
                    <tr>
                        <td>用户名</td>
                        <td><input type="text" name="username" id="username" v-model="user.username" /></td>
                    </tr>
                    <tr>
                        <td>密码</td>
                        <td><input type="password" name="password" id="password" v-model="user.password" /></td>
                    </tr>
                    <tr>
                        <td colspan="2"><input type="button" value="立即登录" @click="login" /></td>
                    </tr>
                </table>
            </form>
        </div>
        <script type="text/javascript" src="js/vue.js"></script>
        <script type="text/javascript" src="js/axios.min.js"></script>
        <script>
            var app = new Vue({
                el: "#app",
                data: {
                    user: {
                        username: "",
                        password: ""
                    }
                },
                methods: {
                    login() {
                        //前后端分离,存在跨域问题,后台处理
                        //GET:后台无需使用@RequestBody
                        //方式1:路径传参或?传参
//                        axios.get("http://localhost:8888/user/"+this.user.username+"/"+this.user.password).then(function(data) {
//                            console.log(data)
//                        })
                        //方式2:json传参,注意参数名只能是params
                        axios.get("http://localhost:8888/user",{
                            params:{
                                username:this.user.username,
                                password:this.user.password
                            }
                        }).then(function(resp) {
                            console.log(resp)
                            if(resp.data.flag){//登录成功,将用户名存入sessionStorage
                                sessionStorage.setItem("loginUser",resp.data.data.username)
                                location.href="index.html"
                            }else{//登录失败,根据后台返回的值决定跳转到注册页面还是刷新登录页面
                                alert(resp.data.message)
                                if(resp.data.code==20001){
                                    location.href="register.html"
                                }else{
                                    location.href="login.html"
                                }
                            }
                        })
                        //POST:使用json对象传参,后台使用@RequestBody
//                        axios.post("http://localhost:8888/user",this.user).then(function(data){
//                            console.log(data)
//                        })
                    }
                }
            });
        </script>
    </body>
</html>
<!DOCTYPE html>
<html>
    <head>
        <meta charset="UTF-8">
        <title>register</title>
    </head>
    <body>
        <div id="app">
            <form>
                <table>
                    <tr>
                        <td>用户名</td>
                        <td><input type="text" name="username" id="username" v-model="user.username" /></td>
                    </tr>
                    <tr>
                        <td>密码</td>
                        <td><input type="password" name="password" id="password" v-model="user.password" /></td>
                    </tr>
                    <tr>
                        <td colspan="2"><input type="button" value="立即登录" @click="register" /></td>
                    </tr>
                </table>
            </form>
        </div>

        <script type="text/javascript" src="js/vue.js"></script>
        <script type="text/javascript" src="js/axios.min.js"></script>
        <script>
            var app = new Vue({
                el: "#app",
                data: {
                    user: {
                        username: "",
                        password: ""
                    }
                },
                methods: {
                    register() {
                        axios.post("http://localhost:8888/user", this.user).then(function(resp) {
                            console.log(resp)
                            alert(resp.data.message)
                            if (resp.data.flag) {//注册成功,返回登录页面
                                location.href="login.html"
                            } else{//注册失败,刷新注册页面
                                location.href="register.html"
                            }
                        })
                    }
                }
            })
        </script>
    </body>
</html>
@RestController
@RequestMapping("/user")
public class UserController {
    @Resource
    private UserService userService;

    @GetMapping
    public Result login(User user){
        QueryWrapper<User> queryWrapper = new QueryWrapper<>();
        queryWrapper.eq("username",user.getUsername());
        User selectUser = userService.getOne(queryWrapper);
        if (!ObjectUtils.isEmpty(selectUser)) {//不为空,则当前登录用户已注册
            if (selectUser.getPassword().equals(user.getPassword())) {
                return new Result(true, StatusCode.OK,"登录成功!");
            }else{
                return new Result(false,StatusCode.PASSWORDERROR,"密码错误");
            }
        }else{//当前登录的用户未注册
            return new Result(false, StatusCode.MISSUSER,"当前用户尚未注册!");
        }
    }


    @PostMapping
    public Result register(@RequestBody User user){
        int num = userService.register(user);
        if (num > 0) {
            return new Result(true,StatusCode.OK,"注册成功!");
        }else{
            return new Result(false,StatusCode.ACCOUNTEXISTS,"当前用户已存在!");
        }
    }

}
//解决跨域问题的配置类,一次配置即可。使用该配置类后不用在控制器上加@CrossOrigin
@Configuration
public class CrosConfig implements WebMvcConfigurer {
    @Override
    public void addCorsMappings(CorsRegistry registry) {
        registry.addMapping("/**")    //所有路径
                //.allowedOrigins("*")             //授权的源,springboot版本较高时,与allowCredentials(true)冲突
                .allowedOriginPatterns("*")        //授权的源,冲突时使用该配置
                .allowedMethods("GET","POST","PUT","DELETE","HEAD","OPTIONS")//请求方式
                .allowCredentials(true)            //是否开启ajax相关的cookie提交
                .allowedHeaders("*")               //控制哪些header能发送请求
                .maxAge(3600);
    }
}
# 3 登录成功,跳转到首页后,展示相应信息。
<!DOCTYPE html>
<html>
    <head>
        <meta charset="UTF-8">
        <title>首页</title>
        <style>
            li{
                list-style: none;
                display: inline-block;
            }
            ul{
                width: 600px;
                height: 200px;
                margin: 20px auto;
            }
        </style>
        <script type="text/javascript" src="../js/vue.js" ></script>
        <script type="text/javascript" src="../js/axios.min.js" ></script>
    </head>
    <body>
        <div id="app">
            <table align="center">
                <tr>
                    <!--根据城市名称模糊查询-->
                    <td>城市名称:<input type="text" v-model="condition.name"/></td>
                    <!--根据国家代码模糊查询-->
                    <td>国家代码:<input type="text" v-model="condition.countryCode"/></td>
                    <!--根据所属地区模糊查询-->
                    <td>所属地区:<input type="text" v-model="condition.district"/></td>
                    <!--根据人口数量做范围查询-->
                    <td>人口数量:<input type="text" v-model="condition.minPopulation"/>-<input type="text" v-model="condition.maxPopulation"/></td>
                    <td><input type="button" value="搜索"/></td>
                </tr>
            </table>
            <table border="1" cellpadding="0" cellspacing="0" align="center">
                <tr>
                    <td>ID</td>
                    <td>Name</td>
                    <td>CountryCode</td>
                    <td>District</td>
                    <td>Population</td>
                    <td>操作</td>
                </tr>
                <tr v-for="city in page.records">
                    <td>{{city.id}}</td>
                    <td>{{city.name}}</td>
                    <td>{{city.countryCode}}</td>
                    <td>{{city.district}}</td>
                    <td>{{city.population}}</td>
                    <td>
                        <input type="button" value="修改" @click="updateById(city.id)" />
                        <input type="button" value="删除" @click="deleteById(city.id)"/>
                    </td>
                </tr>
            </table>
            <ul>
                <li>总页数:{{page.pages}}</li>
                <li>总条数:{{page.total}}</li>
                <li>当前页码:{{page.current}}</li>
                <li><a href="" @click.prevent="previousPage">上一页</a></li>
                <li><a href="" @click.prevent="nextPage">下一页</a></li>
            </ul>
        </div>
        <script>
            const app=new Vue({
                el:"#app",
                data:{
                    page:{
                        current:1,
                        size:10,
                        total:0,
                        pages:0,
                        records:[]
                    },
                    condition:{
                        name:"",
                        countryCode:"",
                        district:"",
                        minPopulation:"",
                        maxPopulation:""
                    }
                },
                methods:{
                    deleteById(id){
                        axios.delete("http://localhost:9999/city?id="+id).then(function (resp) {
                            alert(resp.data.message)
                            location.href="index.html"
                        })
                    },
                    //根据id修改城市信息
                    updateById(id){
                        sessionStorage.setItem("id",id);
                        location.href="update.html"
                    },
                    //根据条件动态查询
                    findByCondition(){
                        var _this=this
                        axios.get("http://localhost:9999/city/condition",{
                            params:{
                                name:this.condition.name,
                                countryCode:this.condition.countryCode,
                                district:this.condition.district,
                                minPopulation:this.condition.minPopulation,
                                maxPopulation:this.condition.maxPopulation,
                                current:this.page.current,
                                size:10
                            }
                        }).then(function (resp) {
                            _this.page=resp.data.data
                        })
                    },
                    //分页查询
                    find2Page(){
                        var _this=this
                        axios.get("http://localhost:9999/city/page",{
                            params:{
                                current:this.page.current,
                                size:this.page.size
                            }
                        }).then(function (resp) {
                            console.log(resp.data.data)
                            _this.page=resp.data.data
                        })
                    },
                    //上一页
                    previousPage(){
                        if(this.page.current>1){
                            this.page.current-=1
                            this.findByCondition();
                        }
                    },
                    //下一页
                    nextPage(){
                        if(this.page.current<this.page.pages){
                            this.page.current+=1
                            this.findByCondition();
                        }
                    }
                },
                created(){
                    var user=sessionStorage.getItem("loginUser")
                    if(!user){
                        location.href="login.html"
                    }
                    this.find2Page();
                },
                watch:{
                    condition:{
                        handler(){
                            this.findByCondition();
                        },
                        deep:true
                    }
                }
            })
        </script>
    </body>
</html>
@RestController
@RequestMapping("/city")
public class CityController {
    @Resource
    private CityService cityService;

    @GetMapping
    public Result findAll(){
        List<City> cities = cityService.list(null);
        return new Result(true, StatusCode.OK,"查询所有城市信息成功",cities);
    }

    @GetMapping("page")
    public Result find2Page(PageVO pageVO){
        Page<City> cityPage = new Page<>(pageVO.getCurrent(), pageVO.getSize());
        IPage<City> page = cityService.page(cityPage, null);
        return new Result(true,StatusCode.OK,"分页查询成功",page);
    }

    @GetMapping("condition")
    public Result findByCondition(CityVO cityVO){
        Page<City> page = cityService.findByCondition(cityVO);
        return new Result(true,StatusCode.OK,"根据条件分页查询成功",page);
    }


    @GetMapping("/{id}")
    public Result findById(@PathVariable Integer id){
        City city = cityService.getById(id);
        return new Result(true,StatusCode.OK,"根据ID查询城市信息成功",city);
    }

    @PostMapping
    public Result updateCity(@RequestBody City city){

        cityService.updateCity(city);

        return new Result(true,StatusCode.OK,"修改城市信息成功");
    }

    @DeleteMapping
    public Result deleleCity(Integer id){
        cityService.deleteCityById(id);
        return new Result(true,StatusCode.OK,"根据ID删除城市信息成功");
    }
}
@Service
@Transactional
public class CityServiceImpl extends ServiceImpl<CityMapper, City> implements CityService {
    @Resource
    private CityMapper cityMapper;

    @Override
    public Page<City> findByCondition(CityVO cityVO) {
        QueryWrapper<City> wrapper = new QueryWrapper<>();
        //根据cityVO对象的值组织查询条件
        if (StringUtils.hasLength(cityVO.getName())) {
            wrapper.like("name",cityVO.getName());
        }
        if (StringUtils.hasLength(cityVO.getCountryCode())) {
            wrapper.like("countryCode",cityVO.getCountryCode());
        }
        if (StringUtils.hasLength(cityVO.getDistrict())) {
            wrapper.like("district",cityVO.getDistrict());
        }
        if (!ObjectUtils.isEmpty(cityVO.getMinPopulation())) {
            wrapper.ge("population",cityVO.getMinPopulation());
        }
        if (!ObjectUtils.isEmpty(cityVO.getMaxPopulation())) {
            wrapper.le("population",cityVO.getMaxPopulation());
        }
        Page<City> cityPage = new Page<>(cityVO.getCurrent(), cityVO.getSize());
        return (Page<City>) cityMapper.selectPage(cityPage, wrapper);
    }

    @Override
    public int updateCity(City city) {
        return cityMapper.updateById(city);
    }

    @Override
    public int deleteCityById(Integer id) {

        return cityMapper.deleteById(id);
    }
}
# 4 点击修改后,进入修改页面完成修改操作。
<!DOCTYPE html>
<html>
    <head>
        <meta charset="UTF-8">
        <title></title>
        <script type="text/javascript" src="../js/vue.js" ></script>
        <script type="text/javascript" src="../js/axios.min.js" ></script>
    </head>
    <body>
        <div id="app">
            <table>
                <tr>
                    <td>ID</td>
                    <td><input type="text" readonly="readonly" v-model="city.id"/></td>
                </tr>
                <tr>
                    <td>Name</td>
                    <td><input type="text" v-model="city.name"/></td>
                </tr>
                <tr>
                    <td>CountryCode</td>
                    <td><input type="text" v-model="city.countryCode"/></td>
                </tr>
                <tr>
                    <td>District</td>
                    <td><input type="text" v-model="city.district"/></td>
                </tr>
                <tr>
                    <td>Population</td>
                    <td><input type="text" v-model="city.population"/></td>
                </tr>
                <tr>
                    <td colspan="2">
                        <input type="button" value="修改" @click="update1" />
                    </td>
                </tr>
            </table>
        </div>
        <script>
            const app=new Vue({
                el:"#app",
                data:{
                    city:{}
                },
                methods:{
                    findById(id){
                        var _this=this
                        axios.get("http://localhost:9999/city/"+id).then(function (resp) {
                            _this.city=resp.data.data
                        })
                    },
                    update1(){
                        axios.post("http://localhost:9999/city",this.city).then(function (resp) {
                            if(resp.data.code==20000){
                                location.href="index.html"
                            }
                        })
                    }
                },
                created(){
                    this.findById(sessionStorage.getItem("id"));
                }
            })
        </script>
    </body>
</html>
# 5 实现过程中需要使用到的VO、DTO,以及MP的自动代码生成器。
//自动代码生成器
public class AutoCode {
    public static void main(String[] args) {
        //构建代码自动生成器对象
        AutoGenerator autoGenerator = new AutoGenerator();
        //配置自动生成策略

        // 1、全局配置:
        //https://baomidou.com/config/generator-config.html#%E5%85%A8%E5%B1%80%E7%AD%96%E7%95%A5-globalconfig-%E9%85%8D%E7%BD%AE
        GlobalConfig gc = new GlobalConfig();

        String projectPath = System.getProperty("user.dir");   //获取当前项目所在目录
        gc.setOutputDir(projectPath+"/src/main/java");         //自定义代码生成后的存放目录
        gc.setAuthor("hujianying");                            //设置项目作者
        gc.setOpen(false);                                     //代码生成后是否打开文件夹
        gc.setFileOverride(false);                             //是否覆盖
        gc.setServiceName("%sService");                        //去Service的I前缀
        gc.setIdType(IdType.ID_WORKER);                        //自定义主键生成策略
        gc.setDateType(DateType.ONLY_DATE);                    //自定义日期类型
        gc.setSwagger2(true);                                  //实体使用swagger2注解

        autoGenerator.setGlobalConfig(gc);                     //添加全局配置
        //2、设置数据源:
        // https://baomidou.com/config/generator-config.html#%E6%95%B0%E6%8D%AE%E6%BA%90-datasourceconfig-%E9%85%8D%E7%BD%AE
        DataSourceConfig dsc = new DataSourceConfig();
        dsc.setUrl("jdbc:mysql://localhost:3306/rbac?characterEncoding=utf-8");
        dsc.setDriverName("com.mysql.jdbc.Driver");
        dsc.setUsername("root");
        dsc.setPassword("root");
        dsc.setDbType(DbType.MYSQL);                          //指定数据库类型

        autoGenerator.setDataSource(dsc);                     //添加数据源配置
        //3、包名配置:
        // https://baomidou.com/config/generator-config.html#%E5%8C%85%E5%90%8D%E9%85%8D%E7%BD%AE
        PackageConfig pc = new PackageConfig();
        //pc.setModuleName("rbac");                             //指定生成的模块名称
        pc.setParent("com.woniu");                            //设置模块中的父目录名
        pc.setEntity("entity");                               //设置实体类目录名
        pc.setMapper("mapper");                               //设置mapper目录名
        pc.setService("service");                             //设置service目录名
        pc.setController("controller");                       //设置controller目录名

        autoGenerator.setPackageInfo(pc);
        //4、数据库表配置:
        // https://baomidou.com/config/generator-config.html#%E6%95%B0%E6%8D%AE%E5%BA%93%E8%A1%A8%E9%85%8D%E7%BD%AE
        StrategyConfig strategy = new StrategyConfig();
        // 设置要生成的实体类对应映射的表名
        strategy.setInclude("t_user","city");
        strategy.setTablePrefix("t_");                       //去除表名前缀
        //设置表名生成策略,下划线转驼峰
        strategy.setNaming(NamingStrategy.underline_to_camel);
        //设置列名生成策略,下划线转驼峰
        strategy.setColumnNaming(NamingStrategy.underline_to_camel);
        strategy.setEntityLombokModel(true);                 //自动lombok;
        strategy.setLogicDeleteFieldName("deleted");         //设置使用逻辑删除策略的属性名
        // 自动填充配置 TableFill
        TableFill gmtCreate = new TableFill("gmt_create", FieldFill.INSERT);
        TableFill gmtModified = new TableFill("gmt_modified", FieldFill.INSERT_UPDATE);
        ArrayList<TableFill> tableFills = new ArrayList<>();
        tableFills.add(gmtCreate);
        tableFills.add(gmtModified);
        strategy.setTableFillList(tableFills);

        strategy.setVersionFieldName("version");             // 乐观锁
        strategy.setRestControllerStyle(true);               //生成 @RestController 控制器
        strategy.setControllerMappingHyphenStyle(true);      //驼峰转连字符--->localhost:8080/hello_id_2

        autoGenerator.setStrategy(strategy);
        //执行自动生成
        autoGenerator.execute();
    }
}
//分页VO
@Data
public class PageVO {
    private Integer current;
    private Integer size;
}
//动态条件VO
@Data
public class CityVO extends PageVO {
    private String name;
    private String countryCode;
    private String district;
    private Integer minPopulation;
    private Integer maxPopulation;
}
//MP组件注册
@Configuration
public class PageConfig {
    //注册分页组件
    @Bean
    public PaginationInterceptor paginationInterceptor(){
        return new PaginationInterceptor();
    }
}
12. Vue中组件(Component)
12.1 组件作用
组件作用: 用来减少Vue实例对象中代码量,日后在使用Vue开发过程中,可以根据 不同业务功能将页面中划分不同的多个组件,然后由多个组件去完成整个页面的布局,便于日后使用Vue进行开发时页面管理,方便开发人员维护。
12.2 组件使用
12.2.1 全局组件注册
说明:全局组件注册给Vue实例,日后可以在任意Vue实例的范围内使用该组件
//component-all.js
//对于组件来说,就相当于一个独立的Vue对象,Vue对象中可以有的内容,在组件中都可以有。
//全局组件注册至Vue实例中,参数1为组件名称,参数2为组件内容
//注意:组件template用于存放html,里面有且只能有一个root元素
//此外,组件与vue对象不同之处:
//进行数据绑定时,data只能以函数形式出现,真正的返回值在函数中通过return部分进行设置
Vue.component("login",{
    template:"<div><h1>登录</h1><h1 v-text='username'></h1><input type='button' value='改变数据' @click='changeData'/></div>",
    data(){
        return {
            username:"tom"
        }
    },
    methods:{
        changeData(){
            this.username="jack"
        }
    }
})
<!DOCTYPE html>
<html>
    <head>
        <meta charset="UTF-8">
        <title></title>
    </head>
    <body>
        <div id="app">
            <!--在vue范围内使用注册的全局组件-->
            <login></login>
        </div>
        <script type="text/javascript" src="js/vue.js" ></script>
        <!--引入全局组件-->
        <script type="text/javascript" src="js/component-all.js" ></script>
        <script>
            var app=new Vue({
                el:"#app",
                data:{

                }
            })
        </script>
    </body>
</html>
以上方式也可改为如下模式:
<!DOCTYPE html>
<html>
    <head>
        <meta charset="UTF-8">
        <title></title>
    </head>
    <body>
        <div id="app">
            <login></login>
        </div>
        <script type="text/javascript" src="js/vue.js"></script>
        <script>
            Vue.component("login", {
                template: "<div><h1>登录</h1><h1 v-text='username'></h1><input type='button' value='改变数据' @click='changeData'/></div>",
                data() {
                    return {
                        username: "tom"
                    }
                },
                methods: {
                    changeData() {
                        this.username = "jack"
                    }
                }
            })
            var app = new Vue({
                el: "#app",
                data: {
                }
            })
        </script>
    </body>
</html>
# 注意:
            1.Vue.component用来开发全局组件 参数1: 组件的名称  参数2: 组件配置{}  template:''用来书写组件的html代码  template中必须有且只有一个root元素
            2.使用时需要在Vue的作用范围内根据组件名使用全局组件
            3.如果在注册组件过程中使用 驼峰命名组件的方式 在使用组件时 必须将驼峰的所有单词小写加入-线进行使用
12.2.2 局部组件注册
说明:通过将组件注册给对应Vue实例中一个components属性来完成组件注册,这种方式不会对Vue实例造成累加
第一种开发方式
<!DOCTYPE html>
<html>
  <head>
      <meta charset="UTF-8">
      <title></title>
  </head>
  <body>
      <div id="app">
          <login></login>
      </div>
      <script type="text/javascript" src="js/vue.js"></script>
      <script>
          new Vue({
              el: "#app",
              data: {
              },
              //vue的局部组件注册使用components来实现
              components: {
                  login: {
                      template: "<div><h1>登录</h1><h1 v-text='username'></h1><input type='button' value='改变数据' @click='changeData'/></div>",
                      data() {
                          return {
                              username: "tom"
                          }
                      },
                      methods: {
                          changeData() {
                              this.username = "jack"
                          }
                      }
                  }
              }
          })
      </script>
  </body>
</html>
第二种开发方式
<!DOCTYPE html>
<html>
  <head>
      <meta charset="UTF-8">
      <title></title>
  </head>
  <body>
      <div id="app">
          <login></login>
      </div>
      <script type="text/javascript" src="js/vue.js"></script>
      <script>
          const login = {
              template: "<div><h1>登录</h1><h1 v-text='username'></h1><input type='button' value='改变数据' @click='changeData'/></div>",
              data() {
                  return {
                      username: "tom"
                  }
              },
              methods: {
                  changeData() {
                      this.username = "jack"
                  }
              }
          }
          new Vue({
              el: "#app",
              data: {},
              //vue的局部组件注册使用components来实现
              components: {
                  //login:login
                  login //如果名称相同,可省略赋值操作,即只写一个login就可以
              }
          })
      </script>
  </body>
</html>
第三种开发方式
<!DOCTYPE html>
<html>
  <head>
      <meta charset="UTF-8">
      <title></title>
  </head>
  <body>
      <div id="app">
          <login></login>
      </div>
      <template id="loginTemplate">
          <div>
              <h1>登录</h1>
              <h1 v-text="username"></h1>
              <input type="button" value="改变数据" @click="changeData"/>
          </div>
      </template>
      <script type="text/javascript" src="js/vue.js"></script>
      <script>
          const login ={
              template:"#loginTemplate",
              data() {
                  return {
                      username: "tom"
                  }
              },
              methods: {
                  changeData() {
                      this.username = "jack"
                  }
              }
          }
          new Vue({
              el: "#app",
              data: {

              },
              //vue的局部组件注册使用components来实现
              components: {
                  //login:login
                  //如果名称相同,可省略赋值操作,即只写一个login就可以
                  login
              },
              methods:{

              }
          })
      </script>
  </body>
</html>
12.3 Props的使用
12.3.1 通过在组件上声明静态数据传递给组件内部
<!DOCTYPE html>
<html>
  <head>
      <meta charset="UTF-8">
      <title></title>
  </head>
  <body>
      <div id="app">
          <!--props中使用驼峰命名时,真正传参的属性应将驼峰转小写,并在驼峰处使用“-”进行拼接-->
          <login user-name="张三丰" age="88"></login>
      </div>
      <template id="loginTemplate">
          <div>
              <h1>登录</h1>
              <h1 v-text="userName"></h1>
              <h1 v-text="age"></h1>
              <input type="button" value="改变数据" @click="changeData"/>
          </div>
      </template>
      <script type="text/javascript" src="js/vue.js"></script>
      <script>
           const login ={
              template:"#loginTemplate",
              data() {
                  return {
                      username: "tom"
                  }
              },
              methods: {
                  changeData() {
                      this.userName = "jack"
                  }
              },
              props:[
                  "userName",
                  "age"
              ]
          }
          new Vue({
              el: "#app",
              data: {

              },
              //vue的局部组件注册使用components来实现
              components: {
                  //login:login
                  //如果名称相同,可省略赋值操作,即只写一个login就可以
                  login
              },
              methods:{

              }
          })
      </script>
  </body>
</html>
# 总结:
            1.使用组件时可以在组件上定义多个属性以及对应数据
            2.在组件内部可以使用props数组声明多个定义在组件上的属性名 日后可以在组件中通过{{ 属性名 }} 方式获取组件中属性值
12.3.2 通过在组件上声明动态数据传递给组件内部
<!DOCTYPE html>
<html>

    <head>
        <meta charset="UTF-8">
        <title></title>
    </head>

    <body>
        <div id="app">
            <!--
                动态绑定:父组件向子组件传值
            -->
            <login :child="parent"></login>
        </div>
        <template id="loginTemplate">
            <div>
                <h1>登录</h1>
                <h1 v-text="child.username"></h1>
                <h1 v-text="child.age"></h1>
                <input type="button" value="改变数据" @click="changeData"/>
            </div>
        </template>
        <script type="text/javascript" src="js/vue.js"></script>
        <script>
            let login ={
                template:"#loginTemplate",
                data() {
                    return {

                    }
                },
                methods: {
                    changeData() {
                        this.child.username = "jack"
                    }
                },
                //子组件中的值
                props:[
                    "child"
                ]
            }
            new Vue({
                el: "#app",
                data: {
                    parent:{//父组件中的值
                        username:"tom",
                        age:25
                    }
                },
                //vue的局部组件注册使用components来实现
                components: {
                    //login:login
                    //如果名称相同,可省略赋值操作,即只写一个login就可以
                    login
                },
                methods:{

                }
            })
        </script>
    </body>

</html>
12.3.3 props的单向数据流
单向数据流:所有的 prop 都使得其父子 prop 之间形成了一个单向下行绑定:父级 prop 的更新会向下流动到子组件中,但是反过来则不行。
所有的 prop 都使得其父子 prop 之间形成了一个单向下行绑定:父级 prop 的更新会向下流动到子组件中,但是反过来则不行。这样会防止从子组件意外改变父级组件的状态,从而导致你的应用的数据流向难以理解。 额外的,每次父级组件发生更新时,子组件中所有的 prop 都将会刷新为最新的值。这意味着你不应该在一个子组件内部改变 prop。如果你这样做了,Vue 会在浏览器的控制台中发出警告。—-摘自官网
12.4 向子组件中传递事件并在子组件中调用该事件
在子组件中调用传递过来的相关事件必须使用 this.$emit('函数名') 方式调用
<!DOCTYPE html>
<html>
    <head>
        <meta charset="UTF-8">
        <title></title>
    </head>
    <body>
        <div id="app">
            <!--
                动态绑定:父组件向子组件传值
                绑定函数时注意,驼峰要转“-”
            -->
            <login :child="parent" @parent-function="parentFunction"></login>
        </div>
        <template id="loginTemplate">
            <div>
                <h1>登录</h1>
                <h1 v-text="child.username"></h1>
                <h1 v-text="child.age"></h1>
                <input type="button" value="改变数据" @click="changeData"/>
            </div>
        </template>
        <script type="text/javascript" src="js/vue.js"></script>
        <script>
            let login ={
                template:"#loginTemplate",
                data() {
                    return {

                    }
                },
                methods: {
                    changeData() {
                        this.child.username = "jack"
                        this.$emit("parent-function")//子组件中通过$emit()调用父组件函数
                    }
                },
                props:[
                    "child"
                ]
            }
            new Vue({
                el: "#app",
                data: {
                    parent:{
                        username:"tom",
                        age:25
                    }
                },
                components: {
                    login
                },
                methods:{
                    parentFunction(){//定义父组件函数
                        alert("父组件中的函数被执行了")
                    }
                }
            })
        </script>
    </body>
</html>
13.Vue中路由(VueRouter)
13.1 路由
路由:根据请求的路径按照一定的路由规则进行请求的转发从而帮助我们实现统一请求的管理
13.2 作用
13.3 使用路由
引入路由
<script src="https://cdn.jsdelivr.net/npm/vue/dist/vue.js"></script>
<!--路由必须在vue之后引入-->
<script src="https://unpkg.com/vue-router/dist/vue-router.js"></script>
创建组件对象 ```javascript //声明组件模板 const login = { template:’
登录
‘ };
const register = { template:’
注册
‘ };
3. 定义路由对象的规则
```javascript
 //创建路由对象
const router = new VueRouter({
  routes:[
    {path:'/login',component:login},   //path: 路由的路径  component:路径对应的组件
    {path:'/register',component:register}
  ]
});
将路由对象注册到vue实例
const app = new Vue({
el: "#app",
data: {
 username:"小陈",
},
methods: {},
router   //注册路由
});
在页面中显示路由的组件
<!--显示路由的组件-->
<router-view></router-view>
根据连接切换路由
<a href="#/login">点我登录</a>
<a href="#/register">点我注册</a>
13.4 router-link使用
作用:用来替换我们在切换路由时使用a标签切换路由好处:就是可以自动给路由路径加入#不需要手动加入<router-link to="/login" tag="button">我要登录</router-link> <router-link to="/register" tag="button">点我注册</router-link># 总结: 1.router-link 用来替换使用a标签实现路由切换 好处是不需要书写#号直接书写路由路径 2.router-link to属性用来书写路由路径 tag属性:用来将router-link渲染成指定的标签13.5 默认路由
作用:用来在第一次进入界面是显示一个默认的组件const router = new VueRouter({ routes:[ //{ path:'/',component:login}, { path:'/',redirect:'/login'}, //redirect: 用来当访问的是默认路由 "/" 时 跳转到指定的路由展示 推荐使用 { path:'/login', component:login}, { path:'/register', component:register}, ] });
<!DOCTYPE html>
<html>
    <head>
        <meta charset="UTF-8">
        <title></title>
    </head>
    <body>

        <div id="app">
            <!--使用a标签进行路由转发-->
            <a href="#/login">登录</a>
            <a href="#/register">注册</a>
            <!--vue-router提供了router-link标签来代替a标签,tag属性表示以哪种形式来显示-->
            <router-link to="/login" tag="button">立即登录</router-link>
            <router-link to="/register" tag="button">立即注册</router-link>
            <!--使用路由-->
            <router-view></router-view>
        </div>

        <template id="login">
            <form>
                <table>
                    <tr>
                        <td>用户名</td>
                        <td>
                            <input type="text" name="username" />
                        </td>
                    </tr>
                    <tr>
                        <td>密码</td>
                        <td>
                            <input type="password" name="password" />
                        </td>
                    </tr>
                    <tr>
                        <td colspan="2">
                            <input type="button" value="立即登录" />
                        </td>
                    </tr>
                </table>
            </form>
        </template>

        <template id="register">
            <form>
                <table>
                    <tr>
                        <td>用户名</td>
                        <td>
                            <input type="text" name="username" />
                        </td>
                    </tr>
                    <tr>
                        <td>密码</td>
                        <td>
                            <input type="password" name="password" />
                        </td>
                    </tr>
                    <tr>
                        <td>出生日期</td>
                        <td>
                            <input type="password" name="password" />
                        </td>
                    </tr>
                    <tr>
                        <td>手机号码</td>
                        <td>
                            <input type="password" name="password" />
                        </td>
                    </tr>
                    <tr>
                        <td colspan="2">
                            <input type="button" value="立即注册" />
                        </td>
                    </tr>
                </table>
            </form>
        </template>

        <script type="text/javascript" src="js/vue.js" ></script>
        <script type="text/javascript" src="js/vue-router.js" ></script>
        <script>
            //声明组件
            const login={
                template:"#login",
                data(){
                    return {

                    }
                },
                methods:{

                }
            }
            const register={
                template:"#register",
                data(){
                    return {

                    }
                },
                methods:{

                }
            }
            //声明路由
            const router=new VueRouter({
                //定义路由规则
                routes:[
                    //设置默认路由
                    {
                        path:"/",
                        redirect:"/login"
                    },
                    {
                        path:"/login",
                        name:"登录",
                        component:login
                    },
                    {
                        path:"/register",
                        name:"注册",
                        component:register
                    }
                ]
            })
            //创建vue对象
            const app=new Vue({
                el:"#app",
                data:{

                },
                methods:{

                },
                //注册路由
                router:router
            })

        </script>
    </body>
</html>
13.6 路由中参数传递
- 第一种方式传递参数 传统方式
通过?号形式拼接参数
<router-link to="/login?id=21&name=zhangsan">我要登录</router-link>组件中获取参数
const login = {
template:'<h1>用户登录</h1>',
data(){return {}},
methods:{},
created(){
 console.log("=============>"+this.$route.query.id+"======>"+this.$route.query.name);
}
};
- 第二种方式传递参数 restful
- 通过使用路径方式传递参数
```javascript
我要注册
var router = new VueRouter({ routes:[ {path:’/register/:id/:name’,component:register} //定义路径中获取对应参数 ] });
2. 组件中获取参数
```javascript
const register = {
  template:'<h1>用户注册{{ $route.params.name }}</h1>',
  created(){
    console.log("注册组件中id:   "+this.$route.params.id+this.$route.params.name);
  }
};
<!DOCTYPE html>
<html>
    <head>
        <meta charset="UTF-8">
        <title></title>
    </head>
    <body>

        <div id="app">
            <!--url问号传参-->
            <router-link to="/login?username=tom&password=111" tag="button">立即登录</router-link>
            <!--restful路径传参-->
            <router-link to="/register/tom/111" tag="button">立即注册</router-link>
            <!--使用路由-->
            <router-view></router-view>
        </div>

        <template id="login">
            <form>
                <table>
                    <tr>
                        <td>用户名</td>
                        <td>
                            <input type="text" name="username" v-model="user.username" />
                        </td>
                    </tr>
                    <tr>
                        <td>密码</td>
                        <td>
                            <input type="password" name="password" v-model="user.password"/>
                        </td>
                    </tr>
                    <tr>
                        <td colspan="2">
                            <input type="button" value="立即登录" />
                        </td>
                    </tr>
                </table>
            </form>
        </template>

        <template id="register">
            <form>
                <table>
                    <tr>
                        <td>用户名</td>
                        <td>
                            <input type="text" name="username" v-model="user.username" />
                        </td>
                    </tr>
                    <tr>
                        <td>密码</td>
                        <td>
                            <input type="password" name="password" v-model="user.password" />
                        </td>
                    </tr>
                    <tr>
                        <td>出生日期</td>
                        <td>
                            <input type="password" name="password" />
                        </td>
                    </tr>
                    <tr>
                        <td>手机号码</td>
                        <td>
                            <input type="password" name="password" />
                        </td>
                    </tr>
                    <tr>
                        <td colspan="2">
                            <input type="button" value="立即注册" />
                        </td>
                    </tr>
                </table>
            </form>
        </template>

        <script type="text/javascript" src="js/vue.js" ></script>
        <script type="text/javascript" src="js/vue-router.js" ></script>
        <script>
            //声明组件
            const login={
                template:"#login",
                data(){
                    return {
                        //问号传参,通过     this.$route.query.参数名      获取
                        user:{
                            username:this.$route.query.username,
                            password:this.$route.query.password
                        }
                    }
                },
                methods:{

                }
            }
            const register={
                template:"#register",
                data(){
                    return {
                        //路径传参,通过     this.$route.params.参数名      获取
                        user:{
                            username:this.$route.params.username,
                            password:this.$route.params.password
                        }
                    }
                },
                methods:{

                }
            }
            //声明路由
            const router=new VueRouter({
                routes:[
                    {
                        path:"/",
                        redirect:"/login"
                    },
                    {
                        path:"/login",
                        name:"登录",
                        component:login
                    },
                    //路径传参,需要在路由路径上进行对应设置
                    {
                        path:"/register/:username/:password",
                        name:"注册",
                        component:register
                    }
                ]
            })
            //创建vue对象
            const app=new Vue({
                el:"#app",
                data:{

                },
                methods:{

                },
                //注册路由
                router:router
            })

        </script>
    </body>
</html>
13.7 嵌套路由
<!DOCTYPE html>
<html>
    <head>
        <meta charset="UTF-8">
        <title></title>
    </head>
    <body>
        <div id="app">
            <router-view></router-view>
        </div>
        <template id="user">
            <div>
                <table border="1" cellpadding="0" cellspacing="0" align="center">
                    <tr height="200">
                        <td colspan="2"></td>
                    </tr>
                    <tr height="500">
                        <td width="400">
                            <div>用户管理</div>
                            <ul>
                                <li><router-link to="/user/find" tag="button">查询用户</router-link></li>
                                <li><router-link to="/user/add" tag="button">新增用户</router-link></li>
                            </ul>
                        </td>
                        <td width="800">
                            <!--使用router-view指定子路由指向的组件在哪里展示-->
                            <router-view></router-view>
                        </td>
                    </tr>
                </table>
            </div>
        </template>

        <template id="add">
            <div>新增用户</div>
        </template>

        <template id="find">
            <div>查询用户</div>
        </template>

        <script type="text/javascript" src="js/vue.js" ></script>
        <script type="text/javascript" src="js/vue-router.js" ></script>
        <script>
            //声明父组件
            const user={
                template:"#user",
                data(){
                    return {

                    }
                },
                methods:{

                }
            }
            //声明子组件
            const add={
                template:"#add"
            }
            //声明子组件
            const find={
                template:"#find"
            }
            //声明路由
            const router=new VueRouter({
                routes:[
                    {
                        path:"/",
                        redirect:"/user"
                    },
                    {
                        path:"/user",
                        name:"登录",
                        component:user,
                        //使用childredn指定当前路由的子路由,子路path中不再使用“/”绝对路径
                        children:[
                            {
                                path:"add",
                                name:"新增用户",
                                component:add
                            },
                            {
                                path:"find",
                                name:"查询用户",
                                component:find
                            }
                        ]
                    },
                ]
            })
            //创建vue对象
            const app=new Vue({
                el:"#app",
                data:{

                },
                methods:{

                },
                //注册路由
                router:router
            })

        </script>
    </body>
</html>
13.8路由守卫
to:到哪儿去
from:从哪里去
next:下一步应该去哪里,如果不带参数,则之前路经该去哪儿就去哪儿,如果带参数,则代表路由跳转到指定路径
//路由守卫:没有点击登录组件中的登录按钮时,访问其他路由通通会跳转到登录组件
            router.beforeEach((to, from, next) => {
                if (to.path=="/login") {
                    next()
                } else {
                    if(sessionStorage.getItem("user")){
                        next()
                    }else{
                        next("/login")
                    }
                }
            })
14. Vue CLI 脚手架
14.1 什么是CLI
命令行界面(英语:command-line interface,缩写:CLI)是在图形用户界面得到普及之前使用最为广泛的用户界面,它通常不支持鼠标,用户通过键盘输入指令,计算机接收到指令后,予以执行。也有人称之为字符用户界面(CUI)
14.2 什么是Vue CLI
Vue CLI 是一个基于 Vue.js 进行快速开发的完整系统。使用Vue 脚手架之后我们开发的页面将是一个完整系统(项目)。前后端分离
14.3 Vue CLI优势
- 通过
vue-cli搭建交互式的项目脚手架。bootstrap css js jquery js 通过执行命令方式下载相关依赖 - 通过
@vue/cli+@vue/cli-service-global快速开始零配置原型开发 vue页面 vuejs vuerouter axios(一条命令) - 一个运行时依赖 (
@vue/cli-service),该依赖:- 可升级; 一条命令
- 基于 webpack 构建,并带有合理的默认配置; webpack 项目打包方式 编译好的项目源码===>部署到服务器上直接使用
- 可以通过项目内的配置文件进行配置; 默认配置文件,通过修改默认配置文件达到自己想要的项目环境
- 可以通过插件进行扩展。 vue v-charts elementui
- 一个丰富的官方插件集合,集成了前端生态中最好的工具。Nodejs(tomcat) Vue VueRouter webpack yarn
- 一套完全图形化的创建和管理 Vue.js 项目的用户界面
14.4 Vue CLI安装
1. 环境准备
```markdown1.下载nodejs nodejs新版不支持win7
  http://nodejs.cn/download/
    windows系统:   .msi  安装包(exe)指定安装位置   .zip(压缩包)直接解压缩指定目录
    mac os 系统:   .pkg  安装包格式自动配置环境变量  .tar.gz(压缩包)解压缩安装到指定名
2.配置nodejs环境变量
windows系统:
    1.计算上右键属性---->  高级属性 ---->环境变量 添加如下配置:
            NODE_HOME=  nodejs安装目录
               PATH    = xxxx;%NODE_HOME%

2.macos 系统
        推荐使用.pkg安装直接配置node环境
3.验证nodejs环境是否成功
node -v
4.npm介绍
    node package mangager    nodejs包管理工具        前端主流技术  npm 进行统一管理
        maven 管理java后端依赖   远程仓库(中心仓库)      阿里云镜像
        npm   管理前端系统依赖    远程仓库(中心仓库)      配置淘宝镜像
5.配置淘宝镜像
  npm config set registry https://registry.npm.taobao.org
  npm config get registry
6.配置npm下载依赖位置
 windows:
    npm config set cache "E:\nodejs\repository\npm-cache"
    npm config set prefix "E:\nodejs\repository\npm_global"
 mac os:
     npm config set cache "/Users/chenyannan/dev/nodereps"
    npm config set prefix "/Users/chenyannan/dev/nodereps"
7. 配置环境变量
E:\nodejs\repository\npm_global
8.验证nodejs环境配置
npm config ls
<a name="3bf89b90"></a>
##### 2.安装脚手架
```markdown
#0.卸载脚手架
    npm uninstall -g @vue/cli  //卸载3.x版本脚手架
    npm uninstall -g vue-cli  //卸载2.x版本脚手架

#1.Vue Cli官方网站
        https://cli.vuejs.org/zh/guide/

#2.安装vue Cli
        npm install -g vue-cli
3.第一个vue脚手架项目
# 1.创建vue脚手架第一个项目
    vue init webpack 项目名
# 2.创建第一个项目
    hello     ------------->项目名
    -build  ------------->用来使用webpack打包使用build依赖
    -config ------------->用来做整个项目配置目录
    -node_modules  ------>用来管理项目中使用依赖
    -src                     ------>用来书写vue的源代码[重点]
        +assets      ------>用来存放静态资源 [重点]
      components   ------>用来书写Vue组件 [重点]
      router             ------>用来配置项目中路由[重点]
      App.vue      ------>项目中根组件[重点]
      main.js      ------>项目中主入口[重点]
    -static        ------>其它静态
    -.babelrc      ------> 将es6语法转为es5运行
    -.editorconfig ------> 项目编辑配置
    -.gitignore    ------> git版本控制忽略文件
    -.postcssrc.js ------> 源码相关js
    -index.html    ------> 项目主页
    -package.json  ------> 类似与pom.xml 依赖管理  jquery 不建议手动修改
    -package-lock.json ----> 对package.json加锁
    -README.md         ----> 项目说明文件
# 3.如何运行在项目的根目录中执行
        cd 进入项目根目录,然后执行下述命令
        npm run dev                   运行前端系统

# 4.如何访问项目
        http://localhost:8080

# 5.Vue Cli中项目开发方式
     注意: 一切皆组件   一个组件中   js代码  html代码  css样式

         1. VueCli开发方式是在项目中开发一个一个组件对应一个业务功能模块,日后可以将多个组件组合到一起形成一个前端系统
         2. 日后在使用vue Cli进行开发时不再书写html,编写的是一个个组件(组件后缀.vue结尾的文件),日后打包时vue cli会将组件编译成运行的html文件
         3. 一般只需要操作src/asserts、src/components、src/router/index.js、App.vue
             src/assets:存放静态资源
             src/components:存放自定义组件
             src/router/index.js:设置路由
             App.vue:组合组件形成页面

# 6.安装axios
    npm install axios --save-dev

# 7.配置main.js中引入axios
    import axios from 'axios';

    Vue.prototype.$http=axios;

# 8.使用axios
    在需要发送异步请求的位置:
    this.$http.get("url").then((res)=>{})
    this.$http.post("url").then((res)=>{})
4.如何开发Vue脚手架
注意:在Vue cli 中一切皆组件
App.vue
<template>
  <div id="app">
    <a href="#/home">前往系统主页</a>
    <a href="#/user">用户管理</a>
    <router-view/>
  </div>
</template>

<script>
export default {
  name: 'App'
}
</script>

<style>

</style>
main.js
// The Vue build version to load with the `import` command
// (runtime-only or standalone) has been set in webpack.base.conf with an alias.
import Vue from 'vue'
import App from './App'
import router from './router'
import axios from 'axios'    //引入axios

Vue.prototype.$http=axios;   //替换vue提供的异步组件
Vue.config.productionTip = false

/* eslint-disable no-new */
new Vue({
  el: '#app',
  router,
  components: { App },
  template: '<App/>'
})
index.js
import Vue from 'vue'
import Router from 'vue-router'
import Home from '../components/Home'
import User from  '../components/User'
import UserAdd from  '../components/UserAdd'

Vue.use(Router)

export default new Router({
  routes: [
    {path: '/',redirect:"/home"},
    {path: '/home',component: Home},
    {
      path: '/user',component: User,
      children:[//嵌套路由
        {path:'add',component:UserAdd}
      ]
    },

  ]
})
Home.vue
<template>
    <div>
      <h1>系统主页</h1>
    </div>
</template>

<script>
  export default {
    name:"Home"
  }
</script>

<style>

</style>
User.vue
<template>
    <div>
      <h1>用户管理</h1>
      <table border="1">
        <tr>
          <td>编号</td>
          <td>姓名</td>
          <td>最后修改时间</td>
          <td>操作</td>
        </tr>
        <tr v-for="u in users">
          <td>{{u.uid}}</td>
          <td>{{u.username}}</td>
          <td>{{u.lastModifer}}</td>
          <td>
            <a href="" @click.prevent="updateUser(u.uid)">修改</a>
            <a href="" @click.prevent="deleteUser(u.uid)">删除</a>
          </td>
        </tr>
      </table>
      <a href="#/user/add">添加用户</a>
      <router-view/>
    </div>
</template>

<script>
  export default {
    name:"User",
    data(){
      return {
        users:[]
      }
    },
    methods:{

      findAll(){
        const _this=this;
        this.$http.get("http://localhost:8888/users/user/findAll").then(function (response) {
          console.log(response.data);
          _this.users=response.data.users;
        }).catch(function (err) {
          console.log(err);
        })
      },

      deleteUser(uid){
        const _this=this;
        this.$http.get("http://localhost:8888/users/user/deleteUser/"+uid).then(function (response) {
          if(response.data.success){
            alert(response.data.message)
            _this.findAll();
          }
        }).catch(function (err) {
          console.log(err);
        })
      }
    },
    components:{

    },
    created(){

      this.findAll();

    }
  }
</script>

<style>

</style>
UserAdd.vue
<template>
    <div>
      <h1>添加用户</h1>
      <form action="" method="post">
        用户名:<input type="text" v-model="user.username" name="username"/><br>
        <input type="button" value="添加" @click="saveUser"/>
      </form>
    </div>
</template>

<script>
  export default {
    name:"User",
    data(){
      return {
        user:{}
      }
    },
    methods:{
      saveUser(){
        const _this=this;
        this.$http.post("http://localhost:8888/users/user/save",this.user).then(function (response) {
          if(response.data.success){
            _this.$router.push("/user")
          }
        }).catch(function (err) {
          console.log(err);
        })
      }
    },
    components:{

    }
  }
</script>

<style>

</style>
15.Vue Cli脚手架项目打包和部署
# 1.在项目根目录中执行如下命令:
      npm run build

        注意:vue脚手架打包的项目必须在服务器上运行不能直接双击运行

# 2.打包之后当前项目中变化
         在打包之后项目中出现dist目录,dist目录就是vue脚手架项目生产目录或者说是直接部署目录

# 3.使用
        a.将dist目录复制到springboot项目resources目录下的static目录中
        b.启动springboot项目进行访问
            http://localhost:8888/users/dist/index.html
            8888为springboot项目的端口号
            users为springbott项目的context-path
        c.可以正常访问项目,但页面中无内容
            修改index.html内容,将所有路径前加上/context-path/dist即可正常访问
            比如:
            src=/static/js/manifest.2ae2e69a05c33dfc65f8.js
            修改后
            src=/users/dist/static/js/manifest.2ae2e69a05c33dfc65f8.js
        d.修改后重启springboot项目,即可实现正常访问。
elementui
https://element.eleme.cn/#/zh-CN/

若有收获,就点个赞吧
0 人点赞
