一些快捷键
alt+方向键,切换打开文件
shift+n,双shift
ctrl+e 打开最近文件
crtl+左上角波浪线 快速切换代码高亮风格,默认是2
ctrl+shift+n查找文件
tp5

- application统筹管理 模块,mvc.
- thinkphp基本依赖文件,vender第三方类库,public站点文件(其他文件在站点中不可见),extend也是第三方类库(偏向自己写那种,自动注册命名空间)。
php -S localhost:8088 router.php //tp5的自带的web服务器,public目录下
- url就进入时,因为定义了app_path,默认就进入了设定的应用文件,所以才不需要写应用名就跑它那了。
一、数据库中
1.实例化模型使用find与select
当数据库模型实例化后,查询数据库时,会返回一个完整的object,这个时候我们是不能直接使用的,需要使用toArray()。这个时候,会有如下的注意点:
1.使用find()
- 执行错误返回 false
- 查询找不到时,返回null
查询得到时:
object下的: $data =array(数据1,数据2,..);//一维数组
查询不到时:
object下的: $data =null;
注意:查询不到时,由于$data=null,不能够使用toArray(),会报错
2.使用select()
- 执行错误返回 false
- 查询找不到时,返回null
查询得到时:
object下的:$data=array(array(数据),array(数据),..);//一个二维数组
查询不到时:
object下的:$data=array();//空的一维数组
注意:跟find()区别,查不查得到都能使用toArray()
2. 链式操作
1.where
- 接受数组条件
//没写啥判断关系时,默认是等于
$map['name'] = 'thinkphp';
$map['status'] = 1;

$map['id']  = ['>',1];
$map['mail']  = ['like','%thinkphp@qq.com%'];
- 接收字符串条件
Db::table('think_user')->where('type=1 AND status=1')->select();
注意:使用字符串条件的时候,建议配合预处理机制,确保更加安全,例如:
Db::table('think_user')->where("id=:id and username=:name")->bind(['id'=>[1,\PDO::PARAM_INT],'name'=>'thinkphp'])->select();
预处理 bind是用来进行参数绑定的,默认情况下,它是能够自动正确绑定的。
2.field
- 在 查询 时使用,以此获取指定的字段数据
//指定字段
Db::table('think_user')->field('id,title,content')->select();
//还可以起别名
Db::table('think_user')->field('id,nickname as name')->select();
//还可以使用聚合函数
Db::table('think_user')->field('id,SUM(score)')->select();

//支持数组
Db::table('think_user')->field(['id','title','content'])->select();
//数组中的起别名操作
Db::table('think_user')->field(['id','nickname'=>'name'])->select();
//数组中使用聚合函数
Db::table('think_user')->field(['id','concat(name,"-",id)'=>'truename','LEFT(title,7)'=>'sub_title'])->select();
- 字段排除
如果我希望获取排除数据表中的content字段(文本字段的值非常耗内存)之外的所有字段值,我们就可以使用field方法的排除功能,例如下面的方式就可以实现所说的功能:
//排除一个
Db::table('think_user')->field('content',true)->select();
//排除多个,用字符串写一起或者数组
Db::table('think_user')->field('user_id,content',true)->select();
Db::table('think_user')->field(['user_id','content'],true)->select();
- 写入时过滤
除了查询操作之外,field方法还有一个非常重要的安全功能—字段合法性检测。field方法结合数据库的写入方法使用就可以完成表单提交的字段合法性检测,如果我们在表单提交的处理方法中使用了:
//只写入$data中的title,email,content字段
Db::table('think_user')->field('title,email,content')->insert($data);
3.union
- UNION操作用于合并两个或多个 SELECT 语句的结果集。
使用示例:
//接收字符串参数
Db::field('name')
      ->table('think_user_0')
      ->union('SELECT name FROM think_user_1')
      ->union('SELECT name FROM think_user_2')
      ->select();
//接收数组参数
Db::field('name')
      ->table('think_user_0')
      ->union(['SELECT name FROM think_user_1','SELECT name FROM think_user_2'])
      ->select();
//接收闭包
Db::field('name')
      ->table('think_user_0')
      ->union(function($query){
          $query->field('name')->table('think_user_1');
        })
      ->union(function($query){
          $query->field('name')->table('think_user_2');
        })
      ->select();
- 支持UNION ALL 操作(允许重复的值)
//使用第二个参数 true
Db::field('name')
      ->table('think_user_0')
      ->union('SELECT name FROM think_user_1',true)
      ->union('SELECT name FROM think_user_2',true)
      ->select();

Db::field('name')
      ->table('think_user_0')
      ->union(['SELECT name FROM think_user_1','SELECT name FROM think_user_2'],true)
      ->select();
注意:UNION 内部的 SELECT 语句必须拥有相同数量的列。列也必须拥有相似的数据类型。同时,每条 SELECT 语句中的列的顺序必须相同。
4. lock
Lock方法是用于数据库的锁机制,如果在查询或者执行操作的时候使用:
例如:
Db::name('user')->where('id',1)->lock(true)->find();
//加入字符串
Db::name('user')->where('id',1)->lock('lock in share mode')->find();
就会自动在生成的SQL语句最后加上 FOR UPDATE或者FOR UPDATE NOWAIT(Oracle数据库)。
lock方法支持传入字符串用于一些特殊的锁定要求。
5.cache
- 第一次查询结果会被缓存,第二次查询相同的数据的时候就会直接返回缓存中的内容,而不需要再次进行数据库查询操作。默认情况下, 缓存有效期是由默认的缓存配置参数决定的,但
**_cache_**方法可以单独指定
//默认有效时间
Db::table('think_user')->where('id=5')->cache(true)->find();
//自定义有效时间
Db::table('think_user')->cache(true,60)->find();
// 或等效,单位 秒
Db::table('think_user')->cache(60)->find();

//指定缓存标识:
Db::table('think_user')->cache('key',60)->find();
//这样子,即便不执行查询操作,能通过 缓存标识 获取缓存的数据
$data = \think\Cache::get('key');

支持设置缓存标签
Db::table('think_user')->cache('key',60,'tagName')->find();
有缓存标识时,在外部就可以通过\think\Cache类直接获取查询缓存的数据。
- 缓存自动更新
这里的缓存自动更新是指一旦数据更新或者删除后会自动清理缓存(下次获取的时候会自动重新缓存)。
当你删除或者更新数据的时候,可以使用cache方法手动更新(清除)缓存,例如:
Db::table('think_user')->cache('user_data')->select([1,3,5]);
Db::table('think_user')->cache('user_data')->update(['id'=>1,'name'=>'thinkphp']);
Db::table('think_user')->cache('user_data')->select([1,5]);
最后查询的数据不会受第一条查询缓存的影响,确保查询和更新或者删除使用相同的缓存标识才能自动清除缓存。
如果使用find方法并且使用主键查询的情况,不需要指定缓存标识,会自动清理缓存,例如:
Db::table('think_user')->cache(true)->find(1);
Db::table('think_user')->update(['id'=>1,'name'=>'thinkphp']);

Db::table('think_user')->cache(true)->find(1);
6.fetchSql
fetchSql用于直接返回SQL而不是执行查询,适用于任何的CURD操作方法。 例如:
$result = Db::table('think_user')->fetchSql(true)->find(1);
//SELECT * FROM think_user where id = 1
可用来生成sql语句,从而记录一下吧。
7. force
force 方法用于数据集的强制索引操作,例如:
Db::table('think_user')->force('user')->select();
如果数据库中有设置索引的,记住必须是数据表实际创建的索引名称。
8.partition 分表
partition 方法用于是数据库水平分表
partition($data, $field, $rule);
// $data 分表中字段的数据
// $field 分表中字段的名称
// $rule 分表规则
partition 方法用法如下:
// 用于写入
$data = [
    'user_id'   => 110,
    'user_name' => 'think'
];

$rule = [
    'type' => 'mod', // 分表方式
    'num'  => 10     // 分表数量
];

Db::name('log')
    ->partition(['user_id' => 110], "user_id", $rule)
    ->insert($data);

// 用于查询
Db::name('log')
    ->partition(['user_id' => 110], "user_id", $rule)
    ->where(['user_id' => 110])
    ->select();
注意:不要使用任何 SQL 语句中会出现的关键字当表名、字段名,例如 order 等。会导致数据模型拼装 SQL 语句语法错误。
9. strict
方法用于设置是否严格检查字段名,用法如下:
// 关闭字段严格检查
Db::name('user')
    ->strict(false)
    ->insert($data);
检查字段是否存在,可确保插入有效的数据到数据库中
10.failException
设置查询数据为空时是否需要抛出异常,如果不传入任何参数,默认为开启,用于select和find方法,例如:
// 数据不存在的话直接抛出异常
Db::name('blog')
    ->where(['status' => 1])
    ->failException()
    ->select();
// 数据不存在返回空数组 不抛异常
Db::name('blog')
    ->where(['status' => 1])
    ->failException(false)
    ->select();
简便:
// 查询多条
Db::name('blog')
    ->where(['status' => 1])
    ->selectOrFail();

// 查询单条
Db::name('blog')
    ->where(['status' => 1])
    ->findOrFail();
3. 聚合查询

4.时间查询
1.where
- where之中可支持时间比较
其中,第三个参数为第二个参数中的time的值。// 大于某个时间 where('create_time','> time','2016-1-1'); // 小于某个时间 where('create_time','<= time','2016-1-1'); // 时间区间查询 where('create_time','between time',['2015-1-1','2016-1-1']);
支持类型:timestamps datetime date int
2.whereTime
- 有跟where一样的操作
- 除此之外,还提供了一些更便捷的查询(感觉是给了一些内置变量)
简写:// 获取今天的博客 Db::table('think_blog') ->whereTime('create_time', 'today')->select(); // 获取昨天的博客 Db::table('think_blog')->whereTime('create_time', 'yesterday')->select(); // 获取本周的博客 Db::table('think_blog')->whereTime('create_time', 'week')->select(); // 获取上周的博客 Db::table('think_blog')->whereTime('create_time', 'last week')->select(); // 获取本月的博客 Db::table('think_blog')->whereTime('create_time', 'month')->select(); // 获取上月的博客 Db::table('think_blog')->whereTime('create_time', 'last month')->select(); // 获取今年的博客 Db::table('think_blog')->whereTime('create_time', 'year')->select(); // 获取去年的博客 Db::table('think_blog')->whereTime('create_time', 'last year')->select();// 获取今天的博客 Db::table('think_blog')->whereTime('create_time', 'd')->select(); // 获取本周的博客 Db::table('think_blog')->whereTime('create_time', 'w')->select(); // 获取本月的博客 Db::table('think_blog')->whereTime('create_time', 'm')->select(); // 获取今年的博客 Db::table('think_blog')->whereTime('create_time', 'y') ->select();// 查询两个小时内的博客 Db::table('think_blog')->whereTime('create_time','-2 hours')->select();
3.where 高级查询
- where之间是 and , 单个where里面,“ | ”可用于多字段的同条件查询,标识 或
Db::table('think_user')
    ->where('name|title','like','thinkphp%')
    ->where('create_time&update_time','>',0)
    ->find();
| 生成的sql语句 |
|---|
More ActionsSELECT * FROM think_userWHERE ( nameLIKE ‘thinkphp%’ OR titleLIKE ‘thinkphp%’ ) AND ( create_time> 0 AND update_time> 0 ) LIMIT 1 |
区间查询
注意:第二个参数与第三个参数都作用于第一个参数,目测第四个参数设定了第二个参数与第三个参数之间的 是 与还是或的关系。Db::table('think_user') ->where('name',['like','thinkphp%'],['like','%thinkphp']) ->where('id',['>',0],['<>',10],'or') ->find();批量查询:
Db::table('think_user')
->where([
    'name'  =>  ['like','thinkphp%'],
    'title' =>  ['like','%thinkphp'],
    'id'    =>  ['>',0],
    'status'=>  1
])
->select();
闭包查询
Db::table('think_user')->select(function($query){
$query->where('name','thinkphp')
    ->whereOr('id','>',10);
});
query对象
注意:如果使用Query对象的话,select方法之前调用的任何的链式操作都是无效。$query = new \think\db\Query; $query->name('user') ->where('name','like','%think%') ->where('id','>',10) ->limit(10); Db::select($query);混合查询:不冲突下,以上方法可同时使用,不建议这么做。
- 字符串查询:就是where中输入字符串样式的查询条件。
- 快捷:

时间转换小笔记,,,,,(只有七秒的记忆,只好记录一下!)(欢迎补充,嘿嘿~~~)
5. 模型关联
一、关联模型
在关系型数据库中,表之间有一对一、一对多、多对多的关系。在 TP5 中,实现了ORM (Object Relational Mapping) 的思想,通过在模型中建立模型间的关联,实现建立表与表之间的关联。
6.获取器/读取器
借助模型中的语法规则,get字段名Attr即可对数据先进行一个处理。
二、文章中用到的表结构
所用的数据表和数据传到了百度云
链接:http://pan.baidu.com/s/1hrXwEJa 密码:9r98
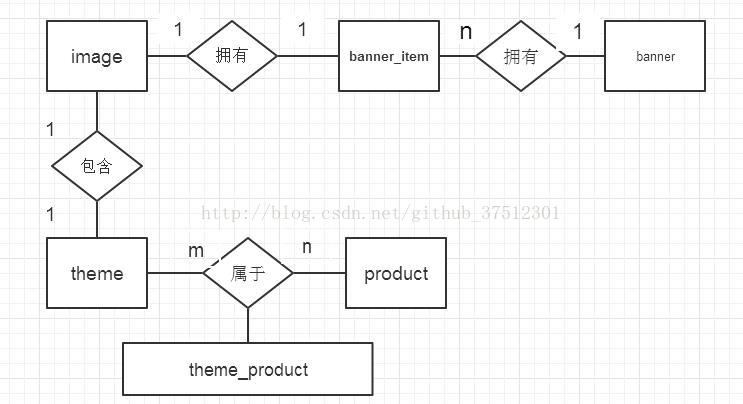
image 表,存储图片的位置信息
banner 推荐位表,存储推荐位的类型
banner_item 表,推荐位中的信息条目,可以看到它拥有外键 img_id
theme 表,商品活动主题,包含头图,主题图
product 表,商品表
theme_product 表, theme 与 product 的中间表
可以建立以下的 E-R图,一个 banner可以用有多个 banner_item,一个banner_iten 拥有一个 image;theme 与 product 是多对多关系,
图1 表之间关系
三、从问题出发讲解关联
(1)查询 banner 并包含其下的 banner_item
由图1可知,我们要在 banner 与 banner_item 之间建立一对多的关联关系
class Banner extends Model
{
    public function items() { //建立一对多关联
        return $this->hasMany('BannerItem','banner_id', 'id'); //关联的模型,外键,当前模型的主键
    }

    public static function getBannerByID($id)
    {
        $banner = self::with('items')->find($id); // 通过 with 使用关联模型,参数为关联关系的方法名
        return $banner;
    }
}
查询数据可得以下结果
{
    "id": 1,
    "name": "首页置顶",
    "description": "首页轮播图",
    "items": [
        {
            "id": 1,
            "img_id": 65,
            "key_word": "6",
            "type": 1,
            "banner_id": 1
        },
        {
            "id": 2,
            "img_id": 2,
            "key_word": "25",
            "type": 1,
            "banner_id": 1
        },
        {
            "id": 3,
            "img_id": 3,
            "key_word": "11",
            "type": 1,
            "banner_id": 1
        },
        {
            "id": 5,
            "img_id": 1,
            "key_word": "10",
            "type": 1,
            "banner_id": 1
        }
    ]
}
可以发现,在 items 下为一个数组,说明一个 banner 包含多个 banner_item ,有一个问题, items下面是 img_id,客户端需要图片路径,不需要 img_id,所以我们还需要建立 BannerItem 与 Image 模型间的关系。这时,Banner 与 BannerItem有一对多关联,BannerItem 与 Image 有一对一关联,这种关联在 TP5 中称为嵌套关联。继续完善代码。
BannerItem.php
class BannerItem extends Model
{
    protected $hidden = ['delete_time', 'update_time'];
    /**
     * 建立与 Image 表的关联模型(一对一)
     * @return \think\model\relation\BelongsTo
     */
    public function img() {
        return $this->belongsTo('Image', 'img_id', 'id'); //关联模型名,外键名,关联模型的主键
    }
}
Banner.php
class Banner extends Model
{
    public function items() {
        return $this->hasMany('BannerItem', 'banner_id', 'id');
    }
    public static function getBannerByID($id)
    {
        $banner = self::with(['items', 'items.img'])->find($id); // with 接收一个数组
        return $banner;
    }
}
这里 items.img 这种语法并不太好理解,我们可以根据语境解释,在一个 Banner 下需要包含多个 BannerItem,而每个 BannerItem 下面又对应一个 Image。
查询结果:
{
    "id": 1,
    "name": "首页置顶",
    "description": "首页轮播图",
    "items": [
        {
            "id": 1,
            "img_id": 65,
            "key_word": "6",
            "type": 1,
            "banner_id": 1,
            "img": {
                "url": "http://z.cn/images/banner-4a.png"
            }
        },
        {
            "id": 2,
            "img_id": 2,
            "key_word": "25",
            "type": 1,
            "banner_id": 1,
            "img": {
                "url": "http://z.cn/images/banner-2a.png"
            }
        },
        {
            "id": 3,
            "img_id": 3,
            "key_word": "11",
            "type": 1,
            "banner_id": 1,
            "img": {
                "url": "http://z.cn/images/banner-3a.png"
            }
        },
        {
            "id": 5,
            "img_id": 1,
            "key_word": "10",
            "type": 1,
            "banner_id": 1,
            "img": {
                "url": "http://z.cn/images/banner-1a.png"
            }
        }
    ]
}
这样的结果就可以被客户端处理了。
(2)hasOne 与 belongsTo 的区别
一对一关系,存在主从关系(主表和从表 ),主表不包含外键,从表包含外键。
hasOne 和 belongsTo 都是一对一关系,区别:
在主表的模型中建立关联关系,用 hasOne
在从表模型中建立关联关系,用 belongsTo
所以,我们在 BannerItem 中建立与 Image 的关系,用的是 belongsTo ,而不是 hasOne。相反,如果想在 Image 中查询到 BannerItem 的内容,需要用 hasOne 。
(3)查询 theme 并包含其下的 product
为了让查询的主题包含图片,所以我们要建立 theme 与 product 和 image 的关联关系,theme 中 topic_img_id 和 head_img_id 与 image 的 id 都是一对一的关系,theme 与 product 是多对多关联。
class Theme extends Model
{
    /**
     * 建立 theme 表中 topic_img_id 与 image 表 id 的一对一关系
     * @return \think\model\relation\BelongsTo
     */
    public function topicImg()
    {
        return $this->belongsTo('Image', 'topic_img_id', 'id');
    }
    public function headImg()
    {
        return $this->belongsTo('Image', 'head_img_id', 'id');
    }

    /**
     * 建立多对多关联模型
     * @return \think\model\relation\BelongsToMany
     */
    public function products()
    {
    //关联模型名,中间表名,外键名,当前模型外键名
        return $this->belongsToMany('Product', 'theme_product', 'product_id', 'theme_id');
    }
         /** * 返回 theme和poducts * @id theme id * @return theme数据模型 */
    public static function getThemeWithProducts($id)
    {
         $theme = self::with('products,topicImg,headImg') ->find($id); return $theme;
    }
}
查询结果为
[
    {
        "id": 1,
        "name": "专题栏位一",
        "description": "美味水果世界",
        "topic_img_id": 16,
        "delete_time": null,
        "head_img_id": 49,
        "update_time": "1970-01-01 08:00:00",
        "topic_img": {
            "url": "http://z.cn/images/1@theme.png"
        },
        "head_img": {
            "url": "http://z.cn/images/1@theme-head.png"
        }
    },
    {
        "id": 2,
        "name": "专题栏位二",
        "description": "新品推荐",
        "topic_img_id": 17,
        "delete_time": null,
        "head_img_id": 50,
        "update_time": "1970-01-01 08:00:00",
        "topic_img": {
            "url": "http://z.cn/images/2@theme.png"
        },
        "head_img": {
            "url": "http://z.cn/images/2@theme-head.png"
        }
    },
    {
        "id": 3,
        "name": "专题栏位三",
        "description": "做个干物女",
        "topic_img_id": 18,
        "delete_time": null,
        "head_img_id": 18,
        "update_time": "1970-01-01 08:00:00",
        "topic_img": {
            "url": "http://z.cn/images/3@theme.png"
        },
        "head_img": {
            "url": "http://z.cn/images/3@theme.png"
        }
    }
]
可以看到,有的属性前端并不需要使用,比如 topic_img_id,delete_time等,所以还需要隐藏字段
在 Theme.php 中加入
protected $hidden = ['topic_img_id', 'head_img_id', 'delete_time', 'update_time'];
二.框架小功能操作
1.时间
- 获取当前时间 :
data['createtime']=time();
- 时间戳转换正常时间格式:
date('Y-m-d H:i:s',time());
- 模板的时间转换:
{$v.createtime|date='y-m-d h:i:s',###}
{$v['createtime']|date='y-m-d h:i:s',###}
2.路由
route.php文件中配置路由,config.php文件中可定义哪些文件为路由配置文件(数组)。
1.俩种方式
①配置式:数组形式的配置,可读性差,书写麻烦。
②动态注册:Route类定义,可读性好。
2.配置式
3.动态注册
Route::rule('路由表达式','路由地址','请求类型','路由参数(数组)','变量规则(数组)')
路由表达式:自定义的url
路由地址:pathInfo下的路由地址
请求类型:GET, POST, DELETE, PUT, 。五种可选值, 默认为 ,可用 | 混合使用。
路由参数:路由参数是指可以设置一些路由匹配的条件参数,主要用于验证当前的路由规则是否有效。当它符合规则时才可以访问,比如是否是https请求。
变量规则:可以写一些隐藏传递的参数,通过路由访问时,这些参数不会显示在url上,但是是有传递的。同时,亦可以定义正则表达式,使得变量符合要求,过滤作用。

- 在url中用到可变参数/:id,那它的接受就得在方法那写名字一样的接收参数或者Request对象中获取 。
3.模块
对于小型的项目来讲,一个模块就够了其实。到了较大型的项目当中,就需要拆分模块以便不混淆。
4.配置虚拟域名
1.通过修改电脑系统中的host文件(随便起个名字指向127.0.0.1)
2.修改xampp里的apache的配置文件httpd-vhost文件,🔺注意啦:主要就俩参数,指向的文件地址详细到项目里的public文件(那么就只作用一个项目了),就能起到隐藏入口文件index.php的做哟个。另一个参数就是域名了。
<VirtualHost *:80>
    ServerAdmin Tedphp.com
    DocumentRoot "E:/xampp/htdocs/hospital/public"
    ServerName Tedphp.com
</VirtualHost>
httpd-vhost是httpd(主文件)配置的子文件
3.当你是多个项目时,在配置完上面的某一个项目后,输入localhost本应该访问htdocs里的文件,却变成访问配置的那个项目了(localhost没被配置,那找到了指向同IP的另一个项目,然后就指向它了)
🔺解决方法:httpd-vhost给localhost配置一下指向(主配置文件虽然有localhost指向了,但好像没了,再显式配置一下)
<VirtualHost *:80>
    ServerAdmin localhost
    DocumentRoot "E:/xampp/htdocs"
    ServerName localhost
</VirtualHost>
三、数据库
1.假删除
- 删除记录的时候不会真的物理删除,反而是为记录设置一个字段,表示记录是否被删除。
- 这样,记录有便于之后做数据分析、数据恢复之类的操作。
2.迭代开发
确实,从头就设计好数据库表格是非常理想的。但是,实际开发过程中,很可能会随着开发的过程而发现数据库表格设计不合理,需要修改。这是一种无法避免的情况,那就可以在一开始的时候初步设计好数据库表格,然后在开发的过程中,一边开发,一边完善数据库表格的结构。
3.事务与锁
在订单(库存量)中,会存在一个并发的情况,为此,可以开启事务,在事务当中检查库存量,不够就回滚。从而解决并发的情况。
四、编程技法
1.Token令牌
tp5自带的token:https://www.kancloud.cn/manual/thinkphp5/193918
通过生成token,①可以用作权限凭证②用作检查信息是否被修改过和请求路径的合法性。
token:①作为键,存信息②作为用户与相关权限加密后的结果。
2.AOP面向切面编程
举例子:上层异常类。再衍生,抛出不同的异常。面向切面编程可提高复用性,减少系统耦合度。
3.ORM(对象关系映射)
将数据库中的每一张表都当成一个对象,包含其相关的信息记录在其中。性能上会比DB操作慢一些,但是可读性更好,同时,性能方面小型的都差不多。
4.CMS
CMS其实就是内容管理系统,可以理解为,CMS帮你把一个网站的程序部分的事全做完了 你要做的只是一shu个网站里面美工的部份,搞几个静态网页模板,一个门户级的网站就出来了!
CMS,大概2004以前,如果想进行网站内容管理,基本上都是靠手工维护,但千变万化的信息流,但没有好的程序支持,还继续靠手工完成是不可能的事,如果有一个好的系统来支撑你的网站,那将节省大量的人力物力,开发者就可能给客户一个软件包,可以用它定期人工修改网站。只要你配置安装好,你的编辑,在线记者,更新员只要定期更新数据,剩下的事就交给CMS去处理。
5.REST
https://www.zhihu.com/question/28557115
看Url就知道要什么
看http method就知道干什么
看http status code就知道结果如何
- REST:(不依赖语言)侧重于用Json描述数据、轻量、无状态。
🔺RESTFul API 是基于REST理论的API设计理论,是一种对它的一种应用。
- 基于资源,curd是对资源状态的改变
- 用http动词(get,post,delete,update)来表示操作。

参考:豆瓣开放API,github API
- 开发资源来讲,面向的用户多,不知道具体需求,所以是用户适配api;但是,我们开发项目,是一种内部资源api,具体需求是知道的,所以不必全部完全rest规范。
6.定义路由
6.1可变参数
Route::get('api/:version/banner/:id', 'api/:version.Banner/getBanner');
- version接收api的版本号,使得原来要写俩个route变成写一个,动态变化。
- 第二参数固定写模块/控制器/行为,tp5对控制器中出现二级目录的情况解决:参数的控制器写目标控制器的路径,用 . 隔开。(可小写或按命名规则走)
- 它的第四个参数,可以定义路由匹配的参数的规则限制(正则表达式),只有参数符合规则时,才匹配当前的路由。
6.2分组路由
Route::group('api/:version/product', function(){
    Route::get('by_category', 'api/:version.Product/getAllProduct');
    Route::post();
});
- group():第一个参数,他们共有的路由部分;第二个参数,闭包函数。
- 闭包函数里,接着写路由 不同的部分:第一个参数为剩余不同的部分;第二个参数依旧为真实的路由地址。
7.通用方法
在common.php文件写方法
function fangfaming(){}
这里面写的方法默认会被对应的 有效范围内的类 继承。
8.验证器
🔺永远不要相信用户的输入信息
所以要多用验证器对参数进行一个验证
- 在调用check前先调用banch()批量验证,即可解决一次只验证了一个字段的情况,可以全部验证一遍。
9.异常
一种是当前产生了异常,立刻解决掉;另一种解决不掉以及没预知到,继续向上抛出,这就需要有全局最顶层的异常。
- 比较好的做法就是封装定义异常类
9.1异常分类说明
①用户行为导致的异常(比如没有通过验证器):通常不记录日志,向用户返回具体信息。如果用户每次都记录,那日志体量会很巨大。
②服务器自身异常(代码错误,调用外部接口错误):通常记录日志,不向客户端返回具体原因 。
9.2定义异常类
通过继承的方式,重新定义异常类,使得异常跟控制层能够分离。
- 如果是按 接口访问错误信息的,就包括 错误码,错误描述信息,自定义错误码。
- 普通的,可以直接错误信息即可。
为了异常类的共性和通用,命名BaseException,其继承Exception。其他的异常类再继承BaseException
9.3异常处理类handle
原因的处理类,无法处理显示我们新增加的字段,所以。
所有的抛出异常都会走render方法,通过它进行渲染(看到的报错页面就是啦),再给到控制层。
- 通过继承,重写抛出的结果格式。
需要修改默认配置,写成自定义的处理异常的handle的命名空间
// 异常处理handle类 留空使用 \think\exception\Handle
 'exception_handle'       => 'app\exception\ExceptionHandle',
可灵活根据debug配置,使之在不同环境下的异常处理不同。
<?php


namespace app\exception;


use think\exception\Handle;
use think\Request;


//自定义的异常处理器
class ExceptionHandle extends Handle
{
    public function render(\Exception $e)
    {
        if ($e instanceof HtmlException) {
            //echo $this->responseToHtmlError($e->getMessage());
            die;
        } else if ($e instanceof JsonException) {
            $url = Request::instance()->url();
            $result = [
                'status' => $e->code,
                'message' => $e->message,
                'data' => $e->data,
            ];
            return json($result);
        } else {
            return parent::render($e);
        }
    }

    public  function responseToHtmlError($message,$url = "")
    {
        $html =
            <<<START
        <!DOCTYPE html PUBLIC "-//W3C//DTD XHTML 1.0 Transitional//EN" "http://www.w3.org/TR/xhtml1/DTD/xhtml1-transitional.dtd">
        <html xmlns="http://www.w3.org/1999/xhtml">
        <head>
            <meta http-equiv="Content-Type" content="text/html; charset=utf-8" />
            <meta name="viewport" content="width=device-width,initial-scale=1.0,minimum-scale=1.0,maximum-scale=1.0,user-scalable=no"/>
            <title>跳转提示</title>
            <style type="text/css">
                *{ padding: 0; margin: 0; }
                body{ background: #fff; font-family: "Microsoft Yahei","Helvetica Neue",Helvetica,Arial,sans-serif; color: #333; font-size: 16px; }
                .system-message{ padding: 24px 48px; }
                .system-message h1{ font-size: 100px; font-weight: normal; line-height: 120px; margin-bottom: 12px; }
                .system-message .jump{ padding-top: 10px; }
                .system-message .jump a{ color: #333; }
                .system-message .success,.system-message .error{ line-height: 1.8em; font-size: 36px; }
                .system-message .detail{ font-size: 12px; line-height: 20px; margin-top: 12px; display: none; }
            </style>
        </head>
        <body>
            <div class="system-message">
                            <h1>:(</h1>
                    <p class="error">{$message}</p>
                            <p class="detail"></p>
                <p class="jump">
                    页面自动 <a id="href" href="javascript:history.back(-1);">跳转</a> 等待时间: <b id="wait">3</b>
                </p>
            </div>
            <script type="text/javascript">
                (function(){
                    var wait = document.getElementById('wait'),
                        href = document.getElementById('href').href;
                    var interval = setInterval(function(){
                        var time = --wait.innerHTML;
                        if(time <= 0) {
                            location.href = href;
                            clearInterval(interval);
                        };
                    }, 1000);
                })();
            </script>
        </body>
        </html>
START;
        return $html;
    }
}
- 使用\Exception 即根目录下的Exception,它是所有异常类的起始类。这样子才可以区分开不继承自think\Exception(如htmlException异常)
- else之后的,就可以使得非自定义异常仍按照原来的处理器执行。
10.日志记录
tp5的日志记录,入口文件index.php中可重新定义日志文件存储的位置。其引入的start.php文件中,默认设置了未定义时的路由位置。
- 在服务器上部署时,注意权限问题。
- 设置log的type为test,即可关闭日志的自动记录 。默认设置成关闭时,每次实例初始化一次记录日志,都需要手动动态更改配置,将日志开启。
//写作某一处方法中,作用域局部
Log::init([
 'type' => 'File',
 'path' => 'LOG_PATH',
 'level' => ['error']
]);
Log::record($e->getMessage(), 'error');

若有收获,就点个赞吧
0 人点赞
