spring Boot 链路追踪(sleuth+zipkin)
参考官网
springCloud的使用08——-服务链路追踪(sleuth+zipkin)(包含存入mysql数据库)
spring cloud sleuth 服务链路追踪(写的不错的帖子)
sleuth与Zipkin关系?
spring cloud提供了spring-cloud-sleuth-zipkin来方便集成zipkin实现(指的是Zipkin Client,而不是Zipkin服务器),该jar包可以通过spring-cloud-starter-zipkin依赖来引入。
介绍
sleuth主要功能是在分布式系统中提供追踪解决方案,并且兼容支持了zipkin(提供了链路追踪的可视化功能)
zipkin原理:在服务调用的请求和响应中加入ID,表明上下游请求的关系。
利用这些信息,可以可视化地分析服务调用链路和服务间的依赖关系。
sleuth是对zipkin的封装,对应Span,Trace等信息的生成、接入http request,以及向Zipkin server发送采集信息等全部自动化完成。
目前主流的链路追踪组件有:google的Dapper,Twitter的zipkin和阿里的Eagleeye(鹰眼)。
现在 搭建 zipkin 服务器 现在都是 (官方推荐2.0之后)直接下载 jar 没必要和 eurkea 进行整合
原理:
Sleuth 默认采用 Http 方式将 span 传输给 Zipkin
那么问题就来了占用资源
我的github: https://github.com/tianliuzhen/springCloud
测试这里的位置是:已经实现了 rabbitmq 和 mysql 且版本比较新
| zipkin | 服务器 |
|---|---|
| customer | 消费者 |
| provider2 | 提供者 |
实战:
1、搭建 zipkin 服务器
pom依赖
<dependency><groupId>org.springframework.boot</groupId><artifactId>spring-boot-starter-web</artifactId></dependency><dependency><groupId>org.springframework.cloud</groupId><artifactId>spring-cloud-starter-netflix-eureka-server</artifactId></dependency><!--引入的zipkinServer依赖--><dependency><groupId>io.zipkin.java</groupId><artifactId>zipkin-server</artifactId><version>2.11.13</version></dependency><dependency><groupId>io.zipkin.java</groupId><artifactId>zipkin-autoconfigure-ui</artifactId><version>2.11.13</version></dependency>
启动器注解
@SpringBootApplication@EnableZipkinServer@EnableEurekaClientpublic class ZipkinApplication {public static void main(String[] args) {SpringApplication.run(ZipkinApplication.class, args);}}
yml配置
eureka:client:service-url:defaultZone: http://localhost:7082/eureka/#解决IllegalArgumentException: Prometheus requires that all meters with the same name have the same set of tag keys.management:metrics:web:server:auto-time-requests: falseserver:port: 8094spring:application:name: cloud-zipkin-demo#解决The bean 'characterEncodingFilter', defined in class path resource [zipkin/autoconfigure/ui/ZipkinUiAutoConfiguration.class],#could not be registered. A bean with that name has already been defined#in class path resource [org/springframework/boot/autoconfigure/web/servlet/HttpEncodingAutoConfiguration.class] and overriding is disabled.Action:main:allow-bean-definition-overriding: true
2、搭建 zipkin 客户端 (其他服务调用的)
pom依赖
<!-- 配置服务链路追踪 --><dependency><groupId>org.springframework.cloud</groupId><artifactId>spring-cloud-sleuth-zipkin</artifactId></dependency><dependency><groupId>org.springframework.cloud</groupId><artifactId>spring-cloud-starter-sleuth</artifactId></dependency>或者,下面这个 spring-cloud-starter-zipkin 包含了 上面两个依赖。<dependency><groupId>org.springframework.cloud</groupId><artifactId>spring-cloud-starter-zipkin</artifactId></dependency>
yml配置
spring:zipkin:base-url: http://localhost:8094注:有时候可能在zipkin服务器中看不到数据,那是因为默认sleuth收集信息的比率是0.1 ,针对于这个问题有两种解决方法:a 在配置文件中配置 spring.sleuth.sampler.percentage=1b 在代码中声明//100%的来采集日志,和在配置文件中配置spring.sleuth.sampler.percentage=1是一样的@Beanpublic AlwaysSampler defaultSampler(){return new AlwaysSampler();}
3、优化
针对以上的问题的解决方法:
a 采用socket或高效率的通信方式
b 采用异步方式发送信息数据
c 在客户端和zipkin之间增加缓存类的中间件,如redis,mq等,即时zipkin server重启过程中,客户端依然可以将数据发送成功
解决方案 地址如下:
下面三个帖子可结合,有我想要的效果,待测试,因为新的版本升级导致变化很大,而且springBoot建议
2.x 以上的版本,下载 服务器的jar启动部署
https://blog.csdn.net/liubenlong007/article/details/87885154 (推荐:新的方案)1(采用它的rabbitmq入库)
spring Cloud Sleuth 服务链路跟踪,集成RabbitMq(旧的方案:过时)(采用它的mysql入库)
https://www.520mwx.com/view/64733 (采用它的zipkin客户端配置)
mysql存储链路数据( 采用它的mysql入库)
优化一、 整合 rabbitMq(已经测试)
1、sleuth服务端修改 zipkin
1.1、在服务端增加原有的基础之上增加依赖
<dependency><groupId>io.zipkin.java</groupId><artifactId>zipkin-autoconfigure-collector-rabbitmq</artifactId><version>2.11.13</version></dependency>
1.2、修改服务端配置yml
zipkin:collector:rabbitmq:addresses: 47.98.253.2:5672password: guestqueue: zipkinusername: guest
2、sleuth客户端修改
2.1、在客户端增加原有的基础之上增加依赖
<dependency><groupId>org.springframework.amqp</groupId><artifactId>spring-rabbit</artifactId></dependency>
2.2、修改客户端配置yml
spring:application:name: xxxxzipkin:# base-url: http://localhost:9411 #http方式提交到zipkinsender:type: rabbit # 切换到rabbitmqsleuth:sampler:#应采样的请求的概率。 例如。 应该对1.0 - 100%的请求进行抽样。 精度仅为整数(即不支持0.1%的迹线)。probability: 1.0rabbitmq:host: 47.98.253.2port: 5672username: guestpassword: guestlistener: # 这里配置了重试策略direct:retry:enabled: truesimple:retry:enabled: true
优化二、 整合mysql 入库(已经测试)
zipkin +rabbit +mysql完整的依赖
<zipkin.version>2.11.13</zipkin.version><mysql-connector.version>8.0.13</mysql-connector.version><jooq.version>3.11.11</jooq.version>########################################<dependency><groupId>org.springframework.boot</groupId><artifactId>spring-boot-starter</artifactId></dependency><dependency><groupId>io.zipkin.java</groupId><artifactId>zipkin-server</artifactId><version>${zipkin.version}</version></dependency><dependency><groupId>io.zipkin.java</groupId><artifactId>zipkin-autoconfigure-ui</artifactId><version>${zipkin.version}</version></dependency><dependency><groupId>io.zipkin.java</groupId><artifactId>zipkin-autoconfigure-collector-rabbitmq</artifactId><version>${zipkin.version}</version></dependency><dependency><groupId>org.springframework.boot</groupId><artifactId>spring-boot-starter-jdbc</artifactId></dependency><!-- 一个新型的orm框架,zipkin需要依赖 --><dependency><groupId>org.jooq</groupId><artifactId>jooq</artifactId><version>${jooq.version}</version></dependency><dependency><groupId>io.zipkin.java</groupId><artifactId>zipkin-autoconfigure-storage-mysql</artifactId><version>${zipkin.version}</version></dependency><dependency><groupId>mysql</groupId><artifactId>mysql-connector-java</artifactId><version>${mysql-connector.version}</version></dependency>
yml配置
spring:application:name: cloud-zipkin-demo#解决The bean 'characterEncodingFilter', defined in class path resource [zipkin/autoconfigure/ui/ZipkinUiAutoConfiguration.class],#could not be registered. A bean with that name has already been defined#in class path resource [org/springframework/boot/autoconfigure/web/servlet/HttpEncodingAutoConfiguration.class] and overriding is disabled.Action:main:allow-bean-definition-overriding: truedatasource: #配置msyql 连接#schema[0]: classpath:/zipkin.sql #数据库创建脚本,可以到官网下载url: jdbc:mysql://localhost:3306/zipkin?characterEncoding=UTF-8&serverTimezone=UTCusername: rootpassword: 123456driver-class-name: com.mysql.cj.jdbc.Driverzipkin:collector:rabbitmq:addresses: 47.98.253.2:5672password: guestqueue: zipkinusername: gueststorage:type: mysql
4、测试成功的webui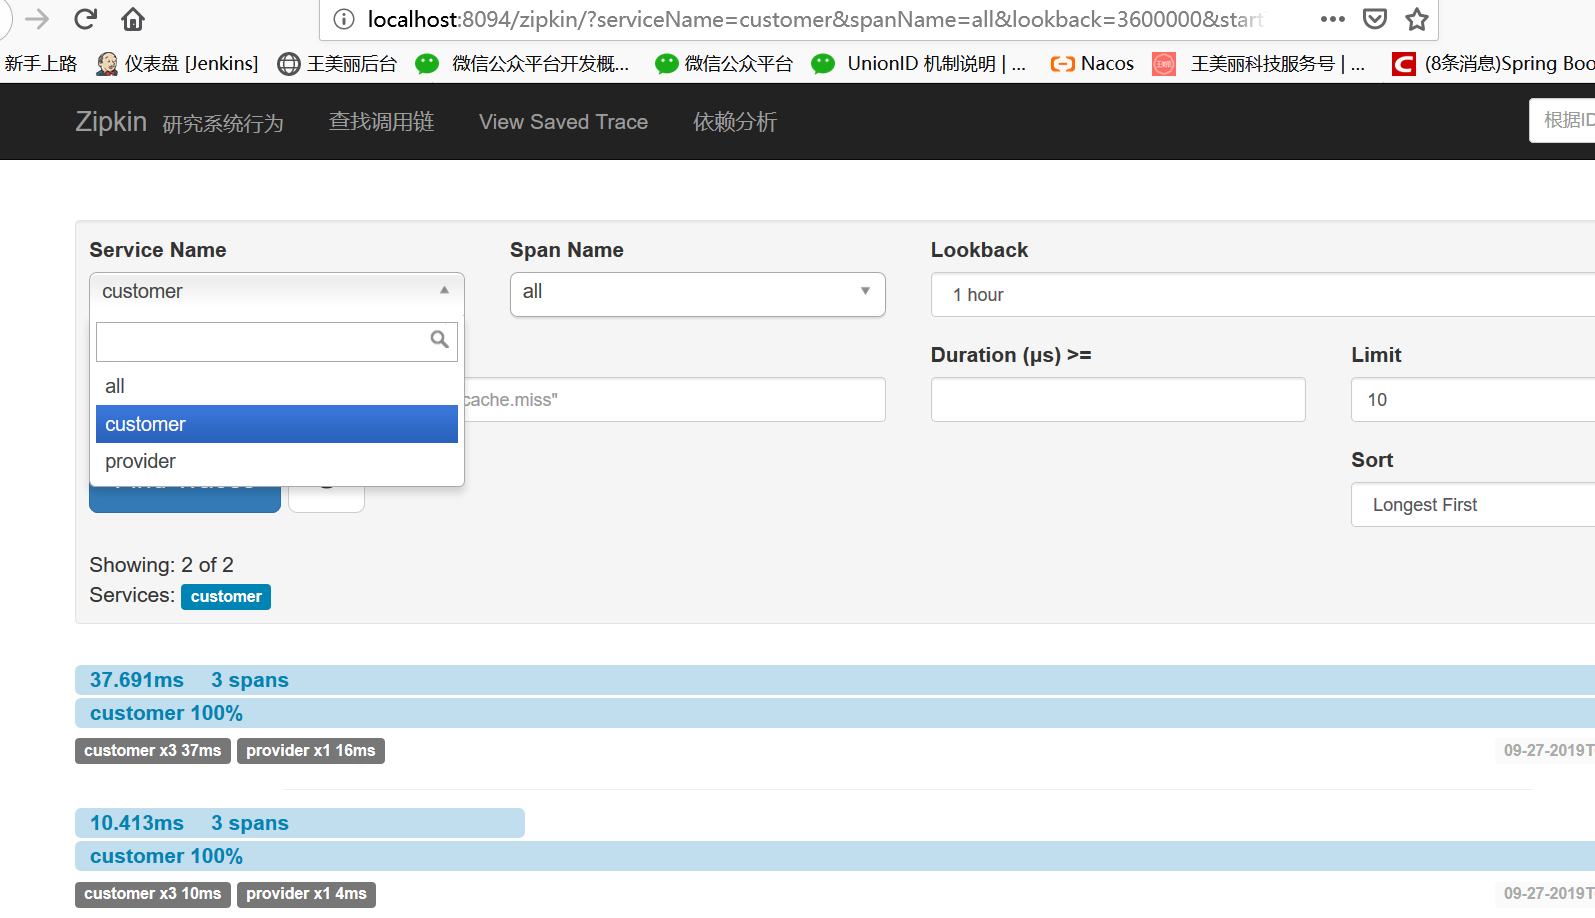
采坑:
1、 spring.sleuth.sampler.percentage=1不生效问题
自己学习Spring-Cloud结合zipkin跟踪请求的例子,发现设置spring.sleuth.sampler.percentage=1之后没有生效,
后来百度发现需要设置为spring.sleuth.sampler.probability=1,这是由于我使用的spring-cloud版本太新的原因。

若有收获,就点个赞吧
0 人点赞
