安装docker环境
登录root账户,查看内核版本
[viktor@viktor ~]$ uname -aLinux viktor 3.10.0-957.27.2.el7.x86_64 #1 SMP Mon Jul 29 17:46:05 UTC 2019 x86_64 x86_64 x86_64 GNU/Linux
把yum更新到最新
[root@viktor viktor]# yum updateLoaded plugins: fastestmirrorLoading mirror speeds from cached hostfile* base: mirrors.usc.edu* epel: mirrors.sonic.net* extras: mirrors.oit.uci.edu* updates: repos.lax.quadranet.comNo packages marked for update
安装需要的软件包, yum-util 提供yum-config-manager功能,另外两个是devicemapper驱动依赖的
[root@viktor viktor]# yum install -y yum-utils device-mapper-persistent-data lvm2Loaded plugins: fastestmirrorLoading mirror speeds from cached hostfile* base: mirror.scalabledns.com* epel: mirrors.sonic.net* extras: mirrors.oit.uci.edu* updates: mirror.scalabledns.com....
设置yum源
[root@viktor viktor]# yum-config-manager --add-repo https://download.docker.com/linux/centos/docker-ce.repoLoaded plugins: fastestmirroradding repo from: https://download.docker.com/linux/centos/docker-ce.repograbbing file https://download.docker.com/linux/centos/docker-ce.repo to /etc/yum.repos.d/docker-ce.reporepo saved to /etc/yum.repos.d/docker-ce.repo
可以查看所有仓库中所有docker版本,并选择特定版本安装
[root@viktor viktor]# yum list docker-ce --showduplicates | sort -r* updates: mirror.scalabledns.comLoading mirror speeds from cached hostfileLoaded plugins: fastestmirror* extras: mirrors.oit.uci.edu* epel: mirrors.sonic.netdocker-ce.x86_64 3:19.03.1-3.el7 docker-ce-stabledocker-ce.x86_64 3:19.03.0-3.el7 docker-ce-stabledocker-ce.x86_64 3:18.09.8-3.el7 docker-ce-stabledocker-ce.x86_64 3:18.09.7-3.el7 docker-ce-stabledocker-ce.x86_64 3:18.09.6-3.el7 docker-ce-stabledocker-ce.x86_64 3:18.09.5-3.el7 docker-ce-stabledocker-ce.x86_64 3:18.09.4-3.el7 docker-ce-stabledocker-ce.x86_64 3:18.09.3-3.el7 docker-ce-stabledocker-ce.x86_64 3:18.09.2-3.el7 docker-ce-stabledocker-ce.x86_64 3:18.09.1-3.el7 docker-ce-stabledocker-ce.x86_64 3:18.09.0-3.el7 docker-ce-stabledocker-ce.x86_64 18.06.3.ce-3.el7 docker-ce-stabledocker-ce.x86_64 18.06.2.ce-3.el7 docker-ce-stabledocker-ce.x86_64 18.06.1.ce-3.el7 docker-ce-stabledocker-ce.x86_64 18.06.0.ce-3.el7 docker-ce-stabledocker-ce.x86_64 18.03.1.ce-1.el7.centos docker-ce-stabledocker-ce.x86_64 18.03.0.ce-1.el7.centos docker-ce-stabledocker-ce.x86_64 17.12.1.ce-1.el7.centos docker-ce-stabledocker-ce.x86_64 17.12.0.ce-1.el7.centos docker-ce-stabledocker-ce.x86_64 17.09.1.ce-1.el7.centos docker-ce-stabledocker-ce.x86_64 17.09.0.ce-1.el7.centos docker-ce-stabledocker-ce.x86_64 17.06.2.ce-1.el7.centos docker-ce-stabledocker-ce.x86_64 17.06.1.ce-1.el7.centos docker-ce-stabledocker-ce.x86_64 17.06.0.ce-1.el7.centos docker-ce-stabledocker-ce.x86_64 17.03.3.ce-1.el7 docker-ce-stabledocker-ce.x86_64 17.03.2.ce-1.el7.centos docker-ce-stabledocker-ce.x86_64 17.03.1.ce-1.el7.centos docker-ce-stabledocker-ce.x86_64 17.03.0.ce-1.el7.centos docker-ce-stable* base: mirror.scalabledns.comAvailable Packages
安装Docker,命令:yum install docker-ce-版本号,我选的是17.12.1.ce,如下
[root@viktor viktor]# yum install docker-ce-17.12.1.ceLoaded plugins: fastestmirrorLoading mirror speeds from cached hostfile* base: mirror.scalabledns.com* epel: mirrors.sonic.net* extras: mirrors.oit.uci.edu* updates: mirror.scalabledns.com...
启动Docker,命令:systemctl start docker,然后加入开机启动,如下
[root@viktor viktor]# systemctl start docker[root@viktor viktor]# systemctl enable dockerCreated symlink from /etc/systemd/system/multi-user.target.wants/docker.service to /usr/lib/systemd/system/docker.service.
验证安装是否成功(有client和service两部分表示docker安装启动都成功了) ```shell [root@viktor viktor]# docker version Client: Version: 17.12.1-ce API version: 1.35 Go version: go1.9.4 Git commit: 7390fc6 Built: Tue Feb 27 22:15:20 2018 OS/Arch: linux/amd64
Server: Engine: Version: 17.12.1-ce API version: 1.35 (minimum version 1.12) Go version: go1.9.4 Git commit: 7390fc6 Built: Tue Feb 27 22:17:54 2018 OS/Arch: linux/amd64 Experimental: false
- docker常用命令```shell# 查看当前正在运行的容器docker ps# 查看所有容器的状态docker ps -a# 启动/停止某个容器docker start/stop id/name# 进入某个容器(使用exit退出后容器也跟着停止运行)docker attach id# 启动一个伪终端以交互式的方式进入某个容器(使用exit退出后容器不停止运行)docker exec -ti id# 查看本地镜像docker images# 删除某个容器docker rm id/name# 删除某个镜像docker rmi id/name# 复制ubuntu容器并且重命名为test且运行,然后以伪终端交互式方式进入容器,运行bashdocker run --name test -ti ubuntu /bin/bash# 通过当前目录下的Dockerfile创建一个名为soar/centos:7.1的镜像docker build -t soar/centos:7.1 .# 以镜像soar/centos:7.1创建名为test的容器,并以后台模式运行,并做端口映射到宿主机2222端口,P参数重启容器宿主机端口会发生改变docker run -d -p 2222:22 --name test soar/centos:7.1
安装Docker-Compose
下载Docker-Compose:
sudo curl -L https://github.com/docker/compose/releases/download/1.23.0-rc3/docker-compose-`uname -s`-`uname -m` -o /usr/local/bin/docker-compose
安装Docker-Compose:
sudo chmod +x /usr/local/bin/docker-compose
查看版本 :
docker-compose version
flink环境准备
本文教程是基于 Docker 进行的,因此你只需要安装了 Docker 即可。不需要依赖 Java、Scala 环境、或是IDE。
注意:Docker 默认配置的资源可能不太够,会导致运行 Flink Job 时卡死。因此推荐配置 Docker 资源到 3-4 GB,3-4 CPUs。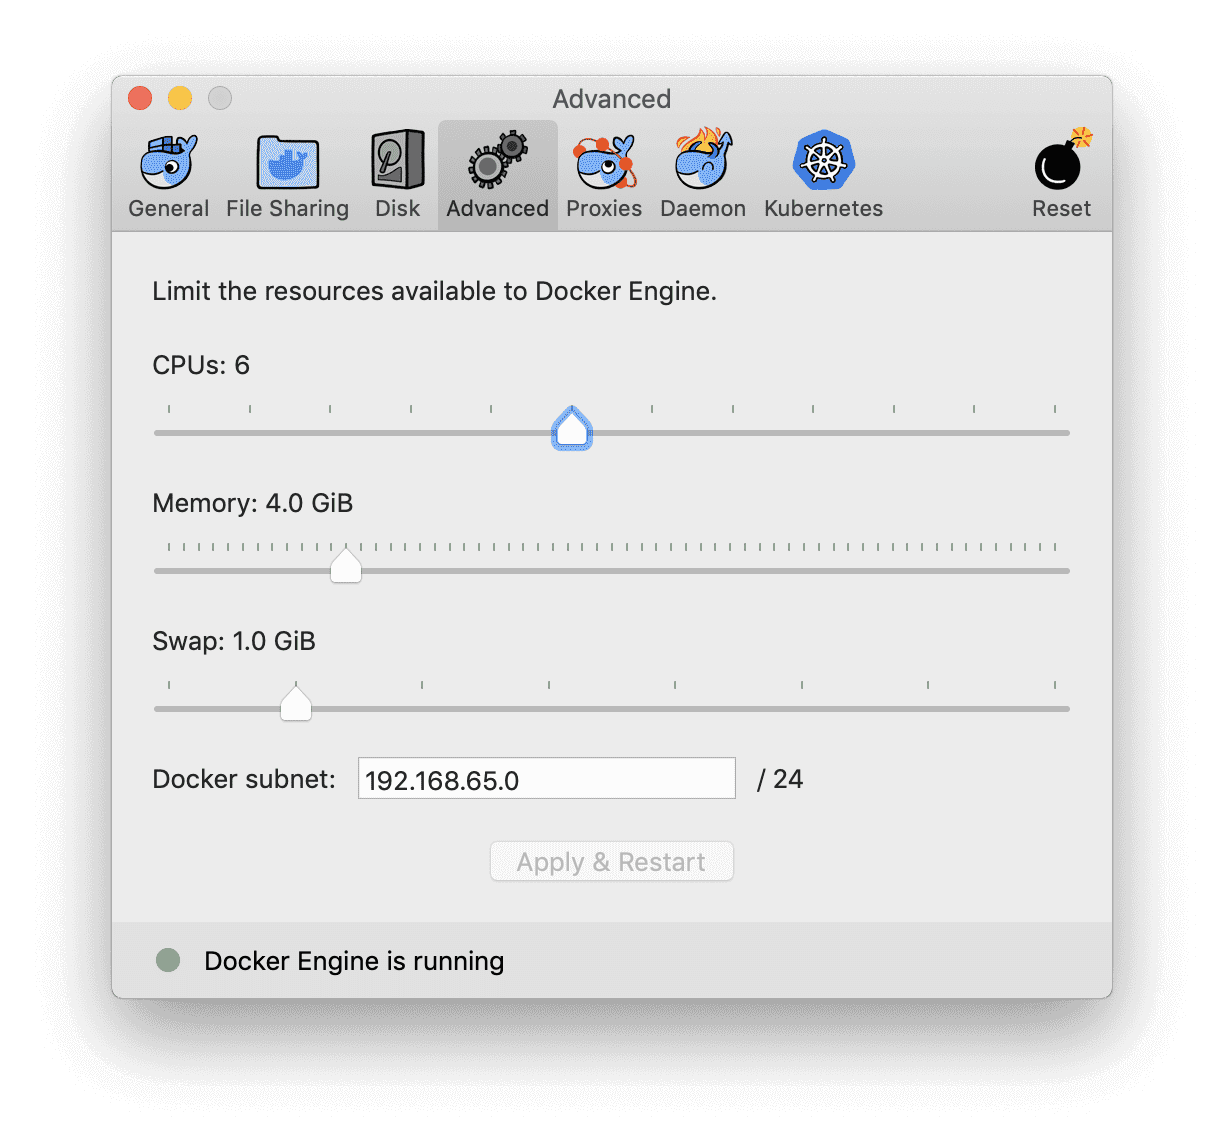
本次教程的环境使用 Docker Compose 来安装,包含了所需的各种服务的容器,包括:
- Flink SQL Client:用来提交query,以及可视化结果
- Flink JobManager 和 TaskManager:用来运行 Flink SQL 任务。
- Apache Kafka:用来生成输入流和写入结果流。
- Apache Zookeeper:Kafka 的依赖项
- ElasticSearch:用来写入结果
以下是Docker Compose 配置文件:
version: '2'services:sql-client:image: fhueske/flink-sql-client-training-1.7.2:latestdepends_on:- kafka- jobmanager- elasticsearchenvironment:FLINK_JOBMANAGER_HOST: jobmanagerZOOKEEPER_CONNECT: zookeeperKAFKA_BOOTSTRAP: kafkaES_HOST: elasticsearchjobmanager:image: flink:1.7.2-scala_2.12hostname: "jobmanager"expose:- "6123"ports:- "8081:8081"command: jobmanagerenvironment:- JOB_MANAGER_RPC_ADDRESS=jobmanagertaskmanager:image: flink:1.7.2-scala_2.12expose:- "6121"- "6122"depends_on:- jobmanagercommand: taskmanagerlinks:- jobmanager:jobmanagerenvironment:- JOB_MANAGER_RPC_ADDRESS=jobmanagerzookeeper:image: wurstmeister/zookeeperports:- "2181:2181"kafka:image: wurstmeister/kafka:0.11.0.1ports:- "9092"depends_on:- zookeeperenvironment:HOSTNAME_COMMAND: "route -n | awk '/UG[ \t]/{print $$2}'"KAFKA_ZOOKEEPER_CONNECT: zookeeper:2181volumes:- /var/run/docker.sock:/var/run/docker.sockelasticsearch:image: docker.elastic.co/elasticsearch/elasticsearch-oss:6.3.1environment:- cluster.name=docker-cluster- bootstrap.memory_lock=true- "ES_JAVA_OPTS=-Xms512m -Xmx512m"- discovery.type=single-nodeports:- "9200:9200"- "9300:9300"ulimits:memlock:soft: -1hard: -1nofile:soft: 65536hard: 65536
然后打开命令行窗口,进入存放 docker-compose.yml 文件的目录,然后运行以下命令:
[root@viktor docker]# docker-compose up -dCreating network "docker_default" with the default driverPulling jobmanager (flink:1.7.2-scala_2.12)...1.7.2-scala_2.12: Pulling from library/flink9cc2ad81d40d: Pull completee6cb98e32a52: Pull completeae1b8d879bad: Pull complete2383fa4462e7: Pull complete7ac3ce9f2067: Pull completece9a16d8ddcb: Pull completed0078391b205: Pull completecb7d61aa945e: Pull complete5dcb8e0f7236: Pull completef3f880699fcf: Pull completeffa37d915f80: Pull complete0b51594f6132: Pull completePulling taskmanager (flink:1.7.2-scala_2.12)...1.7.2-scala_2.12: Pulling from library/flink...
运行flink SQL Client
运行下面命令进入 Flink SQL CLI 。docker-compose exec sql-client ./sql-client.sh
该命令会在容器中启动 Flink SQL CLI 客户端。然后你会看到如下的欢迎界面。
您可以通过键入quit或离开SQL CLI客户端exit。
关闭训练环境。docker-compose down
注意:如果训练环境无响应,请重新启动Docker引擎,并为Docker提供更多资源。
我们在使用3-4 GB内存和3-4个CPU内核运行Docker方面取得了很好的经验。

若有收获,就点个赞吧
0 人点赞
