背景
客户的业务系统老旧,无法为实时计算提供实时消息。如何保证mysql的插入或者更新的数据能实时发送到flink提供计算?
解决方案

在调研(百度)一番后,发现maxwell和canal可以实现监控mysql的binlog并发送到kafka。
- 我们这里选择maxwell来监控binlog。
- maxwell:https://github.com/zendesk/maxwell
- maxwell是一个读取MySQL binlog并将行更新作为JSON写入Kafka,Kinesis或者其它流数据平台的应用程序。Maxwell的操作开销很低,只需要mysql和写入的地方。其常见应用包括ETL,缓存构建/到期,度量收集,搜索索引和服务间通信。Maxwell为您提供了事件订阅的一些好处,而无需重新构建整个平台。
- 如上图,整体是:利用maxwell监控mysql的binlog将更新或者插入的数据以json格式发送的kafka的某个topic,flink程序消费该topic并计算实时指标,最后flink将计算结果sink到mysql。
实操过程
配置maxwell监控binlog
安装maxwell
- 下载二进制发行版: https://github.com/zendesk/maxwell/releases/download/v1.22.0/maxwell-1.22.0.tar.gz
- Github 上有源代码和 bug 跟踪: https://github.com/zendesk/maxwell
- 复制/粘贴到终端执行:
curl -sLo - https://github.com/zendesk/maxwell/releases/download/v1.22.0/maxwell-1.22.0.tar.gz \| tar zxvf -cd maxwell-1.22.0#or get the docker image:docker pull zendesk/maxwell#or on Mac OS X with homebrew installed:brew install maxwell
配置mysql
服务器配置: 确保配置了 server_id,并且打开了基于行的复制。
$ vi my.cnf[mysqld]server_id=1log-bin=masterbinlog_format=row
或者在正在运行的服务上:
mysql> set global binlog_format=ROW;mysql> set global binlog_row_image=FULL;
注意: binlog_format 是基于会话的属性。要完全转换,您需要关闭所有活动连接到基于行的复制。
权限: Maxwell需要数据库指定的schema_database指定的选项(默认 maxwell)的存储状态的权限。
mysql> CREATE USER 'maxwell'@'%' IDENTIFIED BY 'maxwell';mysql> GRANT ALL ON maxwell.* TO 'maxwell'@'%';mysql> GRANT ALL ON maxwell.* TO 'maxwell'@'localhost';mysql> GRANT SELECT, REPLICATION CLIENT, REPLICATION SLAVE ON . TO 'maxwell'@'%';mysql> flush privileges;# 或者本地运行maxwell:mysql> CREATE USER 'maxwell'@'localhost' IDENTIFIED BY 'maxwell';mysql> GRANT ALL ON maxwell.* TO 'maxwell'@'localhost';mysql> GRANT SELECT, REPLICATION CLIENT, REPLICATION SLAVE ON . TO 'maxwell'@'localhost';
运行maxwell
输出结果到命令行
$ cd MAXWELL_HOME$ bin/maxwell --user='maxwell' --password='maxwell' --host='127.0.0.1' --producer=stdout
输出结果到kafka
启动kafka,并创建相应topic。
$ cd MAXWELL_HOME$ bin/maxwell --user='maxwell' --password='maxwell' --host='127.0.0.1' --producer=kafka --kafka.bootstrap.servers=localhost:9092 --kafka_topic=maxwell
测试
- 首先在业务mysql中新建如下测试表:
``sql DROP TABLE IF EXISTSmaxwell_test; CREATE TABLEmaxwell_test(idint(11) DEFAULT NULL,namevarchar(255) CHARACTER SET latin1 DEFAULT NULL,address` varchar(255) CHARACTER SET latin1 DEFAULT NULL ) ENGINE=InnoDB DEFAULT CHARSET=utf8 COLLATE=utf8_bin;
SET FOREIGN_KEY_CHECKS = 1;
2.启动zookeeper和kafka:```shell# 启动ZK$ cd $ZOOKEEPER_HOME$ bin/zkServer.sh start# 查看ZK是否正常启动$ bin/zkServer.sh statusZooKeeper JMX enabled by defaultUsing config: /opt/zookeeper-3.4.14/bin/../conf/zoo.cfgMode: standalone# ZK已经启动了单节点# 启动kafka$ cd KAFKA_HOME$ bin/kafka-server-start.sh config/server.properties# 查看kafka进程$ jps22141 Kafka# 创建测试topic$ bin/kafka-topics.sh --create --zookeeper localhost:2181 --replication-factor 1 --partitions 1 --topic maxwell# 查看topic-list$ bin/kafka-topics.sh --list --zookeeper localhost:2181__consumer_offsetsmaxwell
启动maxwell
# 启动maxwell往kafka发送数据$ cd MAXWELL_HOME$ bin/maxwell --user='maxwell' --password='maxwell' --host='127.0.0.1' --producer=kafka --kafka.bootstrap.servers=localhost:9092 --kafka_topic=maxwell
改动数据查看结果 ```shell
启动一个kafka的消费者,用于观察maxwell的输出
$ cd KAFKA_HOME $ bin/kafka-console-consumer.sh —bootstrap-server localhost:9092 —topic maxwell
向mysql测试表新增一条数据 id=1,name=’test’,address=’test’
kafka消费者接收到的数据如下:
{“database”:”guiyi_tset”,”table”:”maxwell_test”,”type”:”insert”,”ts”:1557453039,”xid”:81408,”commit”:true,”data”:{“id”:1,”name”:”test”,”address”:”test”}}
修改测试表数据
kafka消费者接收到的数据如下:
{“database”:”guiyi_tset”,”table”:”maxwell_test”,”type”:”update”,”ts”:1557453200,”xid”:81624,”commit”:true,”data”:{“id”:1,”name”:”test”,”address”:”hangzhou”},”old”:{“address”:”test”}} ```
至此maxwell监控mysql的binlog并发送到kafka的这部分都走通了。
编写flink程序
应用数据库建表
新建应用数据库表,用于flink sink计算结果。
DROP TABLE IF EXISTS `bas_tech_charge_station`;CREATE TABLE `bas_tech_charge_station` (`StationID` int(255) NOT NULL COMMENT '充电站ID',`charge_num` float DEFAULT NULL COMMENT '充电量',`ctime` datetime DEFAULT NULL COMMENT '创建时间',`mtime` datetime DEFAULT NULL COMMENT '修改时间') ENGINE=InnoDB DEFAULT CHARSET=latin1;SET FOREIGN_KEY_CHECKS = 1;
实体类
package com.dtwave.binlog;/*** @author : 恋晨* Date : 2019/5/9 11:37 AM* 功能 :*/public class bas_tech_charge_station {private int StationID;private float charge_num;private String ctime;private String mtime;public bas_tech_charge_station() {}public bas_tech_charge_station(int stationID, float charge_num, String ctime, String mtime) {StationID = stationID;this.charge_num = charge_num;this.ctime = ctime;this.mtime = mtime;}public int getStationID() {return StationID;}public void setStationID(int stationID) {StationID = stationID;}public float getCharge_num() {return charge_num;}public void setCharge_num(float charge_num) {this.charge_num = charge_num;}public String getCtime() {return ctime;}public void setCtime(String ctime) {this.ctime = ctime;}public String getMtime() {return mtime;}public void setMtime(String mtime) {this.mtime = mtime;}@Overridepublic String toString() {return "bas_tech_charge_station{"+"StationID=" + StationID +",charge_num=" + charge_num +",ctime=" + ctime +",mtime=" + ctime +"}";}}
自定义sink
由于flink没有定义好的sinkToMysql的类,需要我们自己实现。这个类就是Sink Function,继承了RichSinkFunction,然后重写了里面的方法。在invoke方法中将数据插入到mysql中。
package com.dtwave.binlog;import org.apache.flink.configuration.Configuration;import org.apache.flink.streaming.api.functions.sink.RichSinkFunction;import java.sql.Connection;import java.sql.DriverManager;import java.sql.PreparedStatement;/*** @author : 恋晨* Date : 2019/5/9 11:35 AM* 功能 :*/public class SinkToMysql extends RichSinkFunction<bas_tech_charge_station>{PreparedStatement ps;private Connection connection;/*** open()方法中建立连接,这样不用* 每次invoke的时候都要建立连接和释放连接** @param parameters* @throws Exception*/@Overridepublic void open(Configuration parameters) throws Exception{super.open(parameters);connection = getConnection();String sql = "insert into bas_tech_charge_station(StationID , charge_num , ctime , mtime) value( ? , ? , ? ,?);";ps = this.connection.prepareStatement(sql);}/****/@Overridepublic void close() throws Exception{super.close();/** 关闭连接和释放资源*/if(connection != null){connection.close();}if(ps !=null){ps.close();}}/*** 每条数据的插入都要调用一次 invoke()方法** @param value* @param context* @throws Exception*/@Overridepublic void invoke(bas_tech_charge_station value, Context context) throws Exception {/**组装数据,执行插入操作*/ps.setInt(1 , value.getStationID());ps.setFloat(2 , value.getCharge_num());ps.setString(3 , value.getCtime() );ps.setString(4 , value.getMtime());ps.executeUpdate();}private static Connection getConnection(){Connection con = null;try{Class.forName("com.mysql.jdbc.Driver");con = DriverManager.getConnection("jdbc:mysql://localhost:3306/test?useUnicode=true&characterEncoding=UTF-8", "root", "123456");}catch (Exception e){System.out.println("-----------mysql get connect has exception, msg=" + e.getMessage());}return con;}}
Flink主程序
package com.dtwave.binlog;import com.alibaba.fastjson.JSON;import com.alibaba.fastjson.JSONObject;import org.apache.flink.api.common.functions.FilterFunction;import org.apache.flink.api.common.functions.MapFunction;import org.apache.flink.api.common.serialization.SimpleStringSchema;import org.apache.flink.api.java.tuple.Tuple2;import org.apache.flink.streaming.api.datastream.DataStream;import org.apache.flink.streaming.api.datastream.DataStreamSource;import org.apache.flink.streaming.api.environment.StreamExecutionEnvironment;import org.apache.flink.streaming.connectors.kafka.FlinkKafkaConsumer011;import java.text.SimpleDateFormat;import java.util.Date;import java.util.Properties;/*** @author : 恋晨* Date : 2019/5/8 8:14 PM* 功能 :*/public class AnalyzeBinlog {public static void main(String[] args) throws Exception{Properties props = new Properties();props.put("bootstrap.servers" , "47.98.227.169:9092");props.put("zookeeper.connect" , "47.98.227.169:2181");props.put("group.id" , "test");/**key 反序列化*/props.put("key.deserializer" , "org.apache.kafka.common.serialization.StringDeserializer");/**value 反序列化*/props.put("value.deserializer" , "org.apache.kafka.common.serialization.StringDeserializer");props.put("auto.offset.reset" , "latest");final StreamExecutionEnvironment env = StreamExecutionEnvironment.getExecutionEnvironment();/***创建kafkaSource*从tpoic maxwell中创建数据流*/DataStreamSource<String> kafkaSource = env.addSource(new FlinkKafkaConsumer011<String>("maxwell",new SimpleStringSchema(),props));/***自定义filter方法,过滤掉其他不相关的表的更新和插入操作。这里是用于maxwell是监控整个mysql的更新和插入操作。*自定义map方法,取出每一条数据中的ConnectorID作为key,原数据作为value,拼成一个Tuple2*/DataStream<Tuple2<Long , Float>> filterStream = kafkaSource.filter(new FilterFunction<String>() {@Overridepublic boolean filter(String s) throws Exception {if(s.matches("^\\{\"database\":\"guiyi_tset\",\"table\":\"ChargeOrder\".*")){return true;}return false;}}).map(new MapFunction<String, Tuple2<Long , Float>>() {@Overridepublic Tuple2<Long , Float> map(String s) throws Exception {JSONObject jsonObject = JSON.parseObject(s);JSONObject data = JSONObject.parseObject(jsonObject.get("data").toString());return new Tuple2<>(Long.valueOf(data.get("ConnectorID").toString()) , Float.valueOf(data.get("TotalPower").toString()));}}).keyBy(0).sum(1);/****自定义map方法,将上面结果中的Tuple2转化成需要的bas_tech_charge_station类,便于sink。*/DataStream<bas_tech_charge_station> outStream = filterStream.map(new MapFunction<Tuple2<Long, Float>, bas_tech_charge_station>() {@Overridepublic bas_tech_charge_station map(Tuple2<Long, Float> value) throws Exception {SimpleDateFormat df = new SimpleDateFormat("yyyy-MM-dd HH:mm:ss");return new bas_tech_charge_station(Integer.parseInt(value.f0.toString()) , value.f1 , df.format(new Date()).toString() , df.format(new Date()).toString());}});outStream.addSink(new SinkToMysql());env.execute("sink maxwell to mysql");}}
结果
启动maxwell、zookeeper、kafka。
然后运行flink主程序。向表ChargeOrder插入数据。
查看结果表: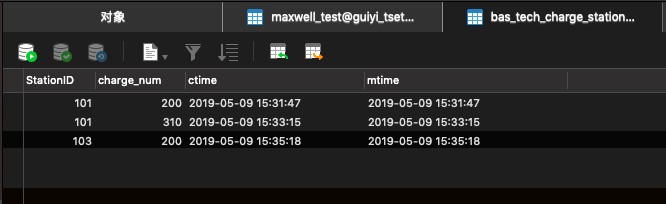
结果表中成功累计了订单表中的充电量。

若有收获,就点个赞吧
0 人点赞
