首先我们先部署Openresty服务,事实上就是继承了安全组件的nginx服务。
一、安装Openresty服务
rz -E 上传openresty的源码包, 接下来进行编译源码包yum -y install gcc make yum -y install pcre pcre-devel zlib zlib-devel openssl-devel readline-devel | 安装相关插件服务tar -xvf openresty-1.15.8.3.tar.gz | 进行解压openrestry的操作./configure --prefix=/usr/local/openresty --with-http_stub_status_module --with-http_ssl_module --with-stream && make -j 5 && make install | 进行编译操作 --with stream 调用stream模块 实现四层负载均衡。配置环境变量vi + /etc/profile,加入PATH=$PATH:/usr/local/openrestry/nginx/sbin :wq之后,执行source /etc/profile启动openrestry服务 /usr/local/openresty/nginx/sbin调整nginx的服务参数
(2) yum -y install gcc make yum -y install pcre pcre-devel zlib zlib-devel openssl-devel readline-devel | 其实也就readline -devel插件未安装。
(4) ./configure —prefix=/usr/local/openresty —with-http_stub_status_module —with-http_ssl_module —with-stream && make -j 5 && make install | 编译 并进行相应模块调用。
(5)配置环境变量vi + /etc/profile,加入PATH=$PATH:/usr/local/openrestry/nginx/sbin :wq之后,执行source /etc/profile.
(6)cd /usr/local/openresty/nginx/sbin 
查看是否正常启动了openrestry服务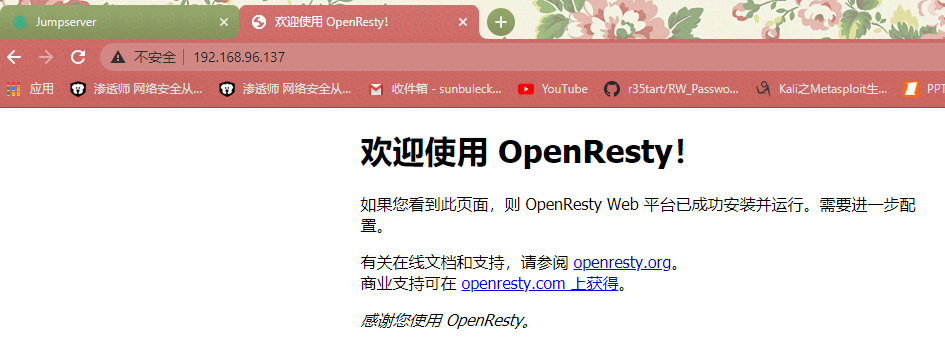
(7)将nginx放入到systemctl进行管理
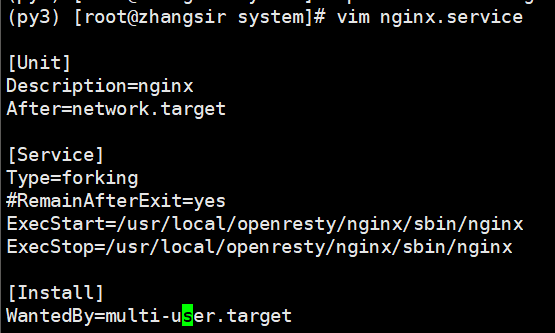
py3) [root@zhangsir system]# cd /usr/lib/systemd/system | 切入到 system目录下
(py3) [root@zhangsir system]# cp vdo.service nginx.service | 复制一个文件,变成nginx的文件
(py3) [root@zhangsir system]# vim nginx.service | 编辑文件然后将下列信息放入到文件中
[Unit]Description=nginxAfter=network.target | 网络服务器启动后,在启动nginx服务[Service]Type=forking#RemainAfterExit=yesExecStart=/usr/local/openresty/nginx/sbin/nginxExecStop=/usr/local/openresty/nginx/sbin/nginx[Install]WantedBy=multi-user.target
#nginx服务的操作nginx -t 查看nginx的语法nginx -s stop 基于nginx 关闭nginxnginx 基于nginx 启动nginx -v 查看版本nginx -V 查看编译之前配置信息
接下来调整nginx.conf的参数
在配置nginx.conf里面写入
proxy_pass http://localhost:8080; | 开启反向代理参数 代理到jumpserver中。
server {listen 80;server_name localhost;location / {root html;index index.html index.htm;proxy_pass http://localhost:8080;}error_page 500 502 503 504 /50x.html;location = /50x.html {root html;
#Openresty安装ca证书服务
首先我们先找到证书的目录位置
[root@zhangsir ~]# cd /usr/local/src/ctf/
在nginx.conf配置文件中放入CA证书。
# HTTPS serverserver {listen 443 ssl;server_name localhost;ssl_certificate /usr/local/src/ctf/upwen.crt;ssl_certificate_key /usr/local/src/ctf/upwen.key;location / {root html;index index.html index.htm;# proxy_pass http://localhost:443}}}

[root@zhangsir sbin]# lsof -i:443
访问web网页测试: https://192.168.96.137https://192.168.96.137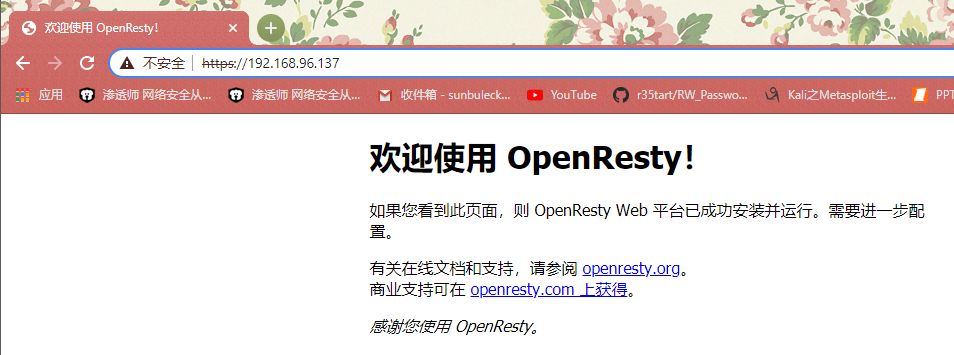

若有收获,就点个赞吧
0 人点赞
