首先先检查编译环境和安装环境
yum -y install gcc gcc-c++ zlib zlib-devel | 安装 gcc编译环境 和 zlib 环境。yum -y install openssl-devel | 安装 openssl 证书服务。yum -y install update openssl | 升级ssl证书服务。
安装apr服务
安装包我已经放入到linux 操作系统中tar -xvf apr-1.5.2.tar.bz2 -C /usr/local/src/
(1)将arp等安装包通过 rz -y 命令上传到apache2目录下
(2)执行解压apr命令
解压完成后目录效果
(3)接下来进行编译 make
make -j 5 | 开启多线程编译make install | 编译后安装./configure --prefix=/opt/apache/apr && make -j5 && make install | 进行配置文件的编译,编译到 /opt/apache/apr目录下。
(3)执行命令进行编译 | 执行完命令后等到相关组件
(4)安装apr-util模块
tar -xvf apr-util-1.5.4.tar.bz2 -C /usr/local/src/make -j 5 | 开启多线程编译make install | 编译后安装./configure --prefix=/opt/apache/apr-util --with-apr=/opt/apache/apr && make -j5 && make install | 进行配置文件的编译,编译到 /opt/apache/apr目录下。--with-apr 的意思是:因为apr-util是apr的组件包,所以--with-apr是将apr-util关联到 apr组件中去。
(4)执行./configure命令
三、prce安装和部署
tar -xvf pcre-8.37.tar.bz2 -C /usr/local/src/make -j 5 | 开启多线程编译make install | 编译后安装./configure --prefix=/opt/apache/pcre && make -j5 && make install
(4)执行命令 ./configure —prefix=/opt/apache/pcre && make -j5 && make install 
四、Apache下载和安装部署
tar -xvf httpd-2.4.17.tar.bz2 -C /usr/local/src/ | 将http解压到/src/的目录下。cd /usr/local/src/httpd-2.4.17./configure --prefix=/opt/apache/httpd --enable-rewrite --enable-so --enable-headers --enable-expires --enable-modules=most --enable-deflate --enable-rewrite=shared --enable-deflate=shared --enable-expires=shared --enable-static-support --with-mpm=worker --with-apr=/opt/apache/apr --with-apr-util=/opt/apache/apr-util --with-pcre=/opt/apache/pcre --enable-ssl --enable-ssl-staticlib-deps && make -j5 && make installcd /opt/apache/httpd/bin./apachectl -k start | stop
(3)执行完参数后,查看http服务。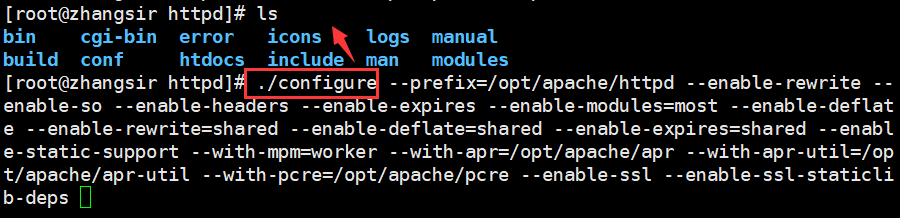
执行apache启动服务。
cd /opt/apache/httpd/bin
./apachectl -k start | stop
查看80 端口 lsof -i:80
Apache配置HTTPS服务
创建证书:1,openssl genrsa -des3 -out upwen.key 1024私钥去除密码:2,cp upwen.key upwen.key.org。openssl rsa -in upwen.key.org -out upwen.key创建证书请求文件(CSR)3.openssl req -new -key upwen.key -out upwen.csr生成证书(certificate)4.openssl x509 -req -days 100 -in upwen.csr -signkey upwen.key -out upwen.crt
1,openssl genrsa -des3 -out upwen.key 1024 | 密码 redhat
生成一个upwen.key
2.私钥去除密码:
cp upwen-server.key upwen-server.key.org
openssl rsa -in upwen-server.key.org -out upwen-server.key
3.创建证书请求文件 csr
opnssl req -new -key upwen.key -out upwen.csr
使用upwen.key 创建 upwen.csr证书请求文件。
4.生成证书文件
openssl x509 -req -days 100 -in upwen.csr -signkey upwen.key -out upwen.crt
证书生成完毕,接下来在http中放入证书文件。
在httpd.conf中修改如下内容
编辑httpd.conf文件找到 # LoadModule ssl_module/mod_ssl.so 和 # Includeconf/extra/httpd-ssl.conf 去掉前面的#号
# LoadModule ssl_module/mod_ssl.soIncludeconf/extra/httpd-ssl.conf
1.# LoadModule ssl_module/mod_ssl.so 
2.# Includeconf/extra/httpd-ssl.conf
3.cd /opt/apache/httpd/conf/extra/http-ssl.conf
配置ssl证书的路径
配置key的路径
执行重启apache操作
查看80:443端口是否正常启动
进入web测试 https://192.168.96.137
https成功配置完成。
Apache安全配置
伪装apache版本号ServerTokens ProdServerSignature Off在httpd.conf中添加这两条配置参数。

重启服务 ./apachectl -k stop && ./apachectl -k start | 必须关闭后,在重新启动。
禁止使用目录索引:
在httpd.conf中配置相关参数

若有收获,就点个赞吧
0 人点赞
