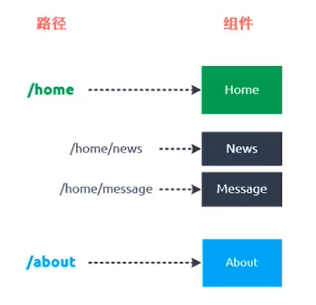
API
安装vue-router
在项目文件夹目录下安装router
npm install vue-router --save#安装指定版本npm i vue-router@3.2.0
配置vue-router
通过脚手架安装的,一般在src目录下新建一个文件夹,里面新建一个index.js文件
vue-router3.x的配置
//配置路由相关的信息import VueRouter from 'vue-router'import Vue from 'vue'//1.通过 Vue.use(插件) ,安装插件Vue.use(VueRouter);//vue2.x版本的路由注册//现在这个路由的数字是空的const routes=[];//!!!!!!这个名字绝对不能取错!!!!!!!!!!!!!//2.创建路由对象//和new Vue()是一样的,VueRouter一样要传一个对象进去const router = new VueRouter({//routers是配置路径和组件之间的映射关系routes,mode:"history" //模式});//3.将router对象传入到Vue实例中//这时候就要导出router对象export default router;
vue-router4.x的配置
和上面差不多,如下不同
import {createRouter,createWebHistory} from 'vue-router'//不使用new VueRouter了const history =createWebHistory();const router = createRouter({routes, //这里面的名字千万不能打错了history});//在vue3.x版本,这么注册路由,如果上面的router在不同的文件,导出到这个文件使用createApp(App).use(router).mount('#app')
然后在root组件的选项里面加入上面导出的router对象
<script>import HelloWorld from './components/HelloWorld.vue'import router from './router/index.js'export default {name: 'App',components: {HelloWorld},router //语法简写加入router对象}</script>
使用vue-router
创建好路由组件,一个页面,url路径改变,其实还是在这个页面的,只是不同的url路由,使用不同的组件。这时候就需要把这些需要的组件全部创建好
.vue文件
组件创建都是.vue文件,模板写在template里面,组件的其他就写在script标签里面
<template><h2>这是关于页面</h2></template><script>export default {}</script><!-- Add "scoped" attribute to limit CSS to this component only --><style scoped></style>
映射路由
然后在上面配置路由的.js文件里面导入刚才创建的组件,然后把路径和组件一一映射
import cpnHome from '../components/home.vue'import cpnAbout from '../components/about.vue'const Default ={path:'',redirect:"/home",//重定向,路径为空,默认显示主页component:cpnHome};const Home ={path:'/home',component:cpnHome};const About ={path:'/about',component:cpnAbout};const routes=[Home,About,Default];
标签跳转路由
在使用这个路由的组件模板中创建路由标签
router-link最终会被渲染成a标签
router-link的属性 更多router-link的api
to:用来跳转路由的 tag:默认是渲染成a标签,用tag可以指定渲染(vue-router4.x版本失效) replace:加入这个属性,用户就不能点击浏览器自带到的前进后退按钮了 active-class:设置点击激活的类名,不设置有磨人的 点击记过类名
<div id="app">//路由方式<router-link to="/home" tag='button' replace active-class='a'>首页</router-link><router-link to="/about" replace>关于</router-link>//路由到的组件放在这里面<router-view></router-view></div>
代码跳转路由
<button @click="click_home">首页</button><button @click="click_about">关于</button>
<script>import router from './router/index.js'export default {name: 'App',components: {},router,methods:{click_home(){//this指向当前组件,$router是vue-router加的//push方法用户可以点击浏览器的返回前进按钮,replace方法不能点击浏览器的前进返回//this.$router.push('/home');this.$router.replace('/home');},click_about(){//this.$router.push('/about');this.$router.replace('/about');}}}</script>
动态路由/传递参数
params方式
在映射路由里面后面加上/:变量名变量名随便写
const User ={path:'/user/:user_id',component:cpnUser};
跳转的路由后面拼接动态的数据
click_user(){this.$router.replace('/user/10001');}
获取参数
子组件要获取父组件路由跳转过来的参数$route.params.参数名
<template><h2>这是用户页面</h2><p>我的名字是:{{name}}</p><p>我的用户id是:{{getID}}</p></template><script>export default {data(){return{name:"张三"}},computed:{getID(){//通过这个$route.params.参数名 获取父组件路由过来的参数return this.$route.params.user_id;}}}</script>
query方式
<template><div id="app"><button @click="click_user">用户</button><router-view></router-view></div></template><script>import router from './router/index.js'export default {name: 'App',components: {},data(){return{//主要就是路由和参数写成一个对象,query就是参数对象datas:{path:'/user',query:{name:"张总",age:32}}}},router,methods:{click_user(){//由代码跳转,参入路由和参数对象this.$router.replace(this.datas);}}}</script>
获取参数
<template><h2>这是用户页面</h2><p>我的名字是:{{$route.query.name}}</p><p>我的年龄是:{{$route.query.age}}</p></template>
路由懒加载
当打包构建项目时,会把自己写的全部js打包到一个文件里面,这个js文件就会变得很大,一次性加载过来就会很耗费时间,js加载不出来页面还会出现空白。这时候用路由懒加载,就把这些不同路由的js打包成单独的js文件,只有在路由访问时才加载对应的js文件
//import cpnAbout from '../components/about.vue'//import cpnUser from '../components/user.vue'//路由懒加载不用写上面的import,用下面这种写法const About ={path:'/about',component:()=>import('../components/about.vue')};const User ={path:'/user/:user_id',component:()=>import('../components/user.vue')};
用了路由懒加载,当你使用这个路由的时候,会加载一个单独的js文件。把路由下的功能封装在一个文件里面
嵌套路由/子路由

创建对应的子组件,并在对应的路由映射中路由映射中配置相应的子路由
//这是子路由,是个对象,赋值到一个常量Newsconst News ={path:'news',component:()=>import('../components/news.vue')}//Home是一个父路由const Home ={path:'/home',component:cpnHome,//在对应的路由里面写上他的子路由children:[News]};
子路由的组件肯定是显示到父路由的组件里面,在父路由的组件模板里面加上
router-view,用来显示子路由组件。<template><h1>欢迎来到首页</h1><router-link to="/home/news">新闻</router-link><router-view></router-view></template>
注意:路由后面跟了动态参数的,在给他弄一个子路由,会冲突,子路由直接被当成路由后面的动态参数
全局导航守卫
每一步路由都会被记录。
首先在路由对象里面加一个属性meta,一般在里面放一些这个路由的信息。最好在每个路由对象创建时就加入这些属性,方便后来使用。
const About ={path:'/about',component:()=>import('../components/about.vue'),meta:{title:"关于"//当然还可以定义图标之类的}};
const history =createWebHistory();const router = createRouter({routes,history});//用这个方法,在vue-router4.x版本最多传2参数,不通版本可以看源码。//to和from都是一个路由对象,to表示目标跳转的路由,from表示从哪个路由跳转过去的router.beforeEach((to,from)=>{document.title=to.meta.title;//设置当前页面的浏览器标题console.log("目标:"+to.meta.title);console.log("从哪里来:"+from.meta.title);})

