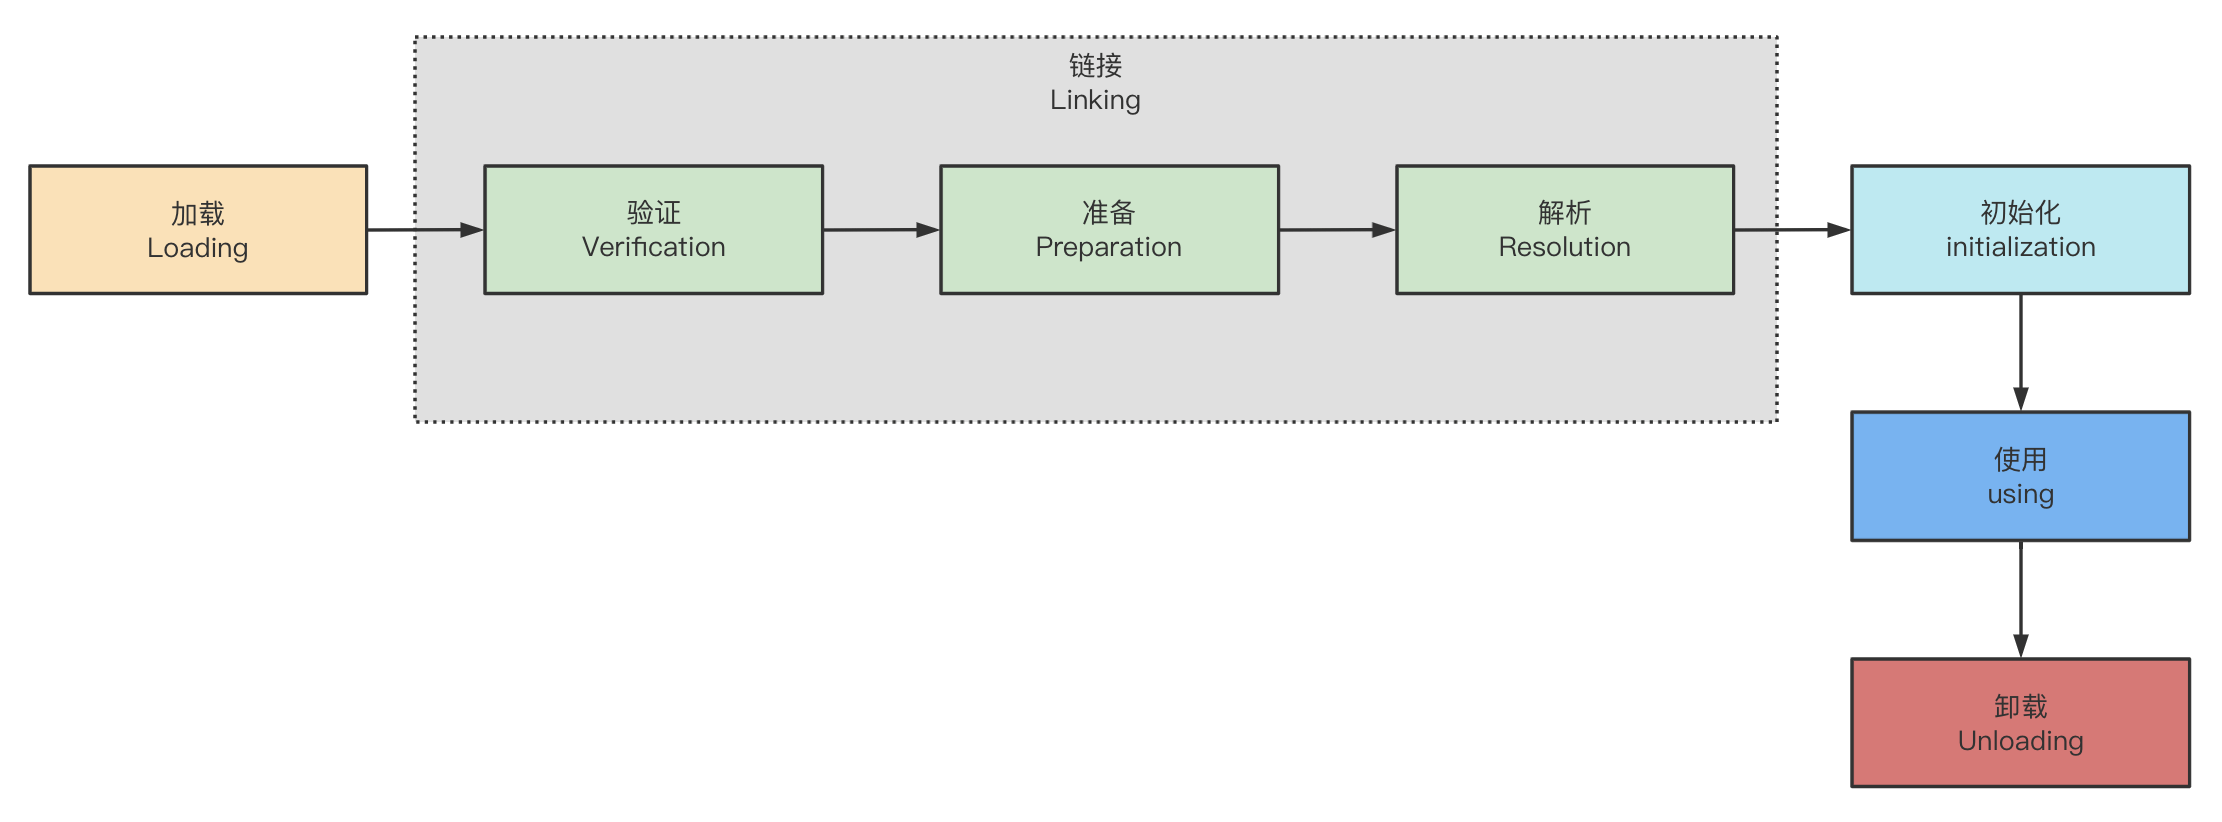
1. 类加载阶段
1.1 加载
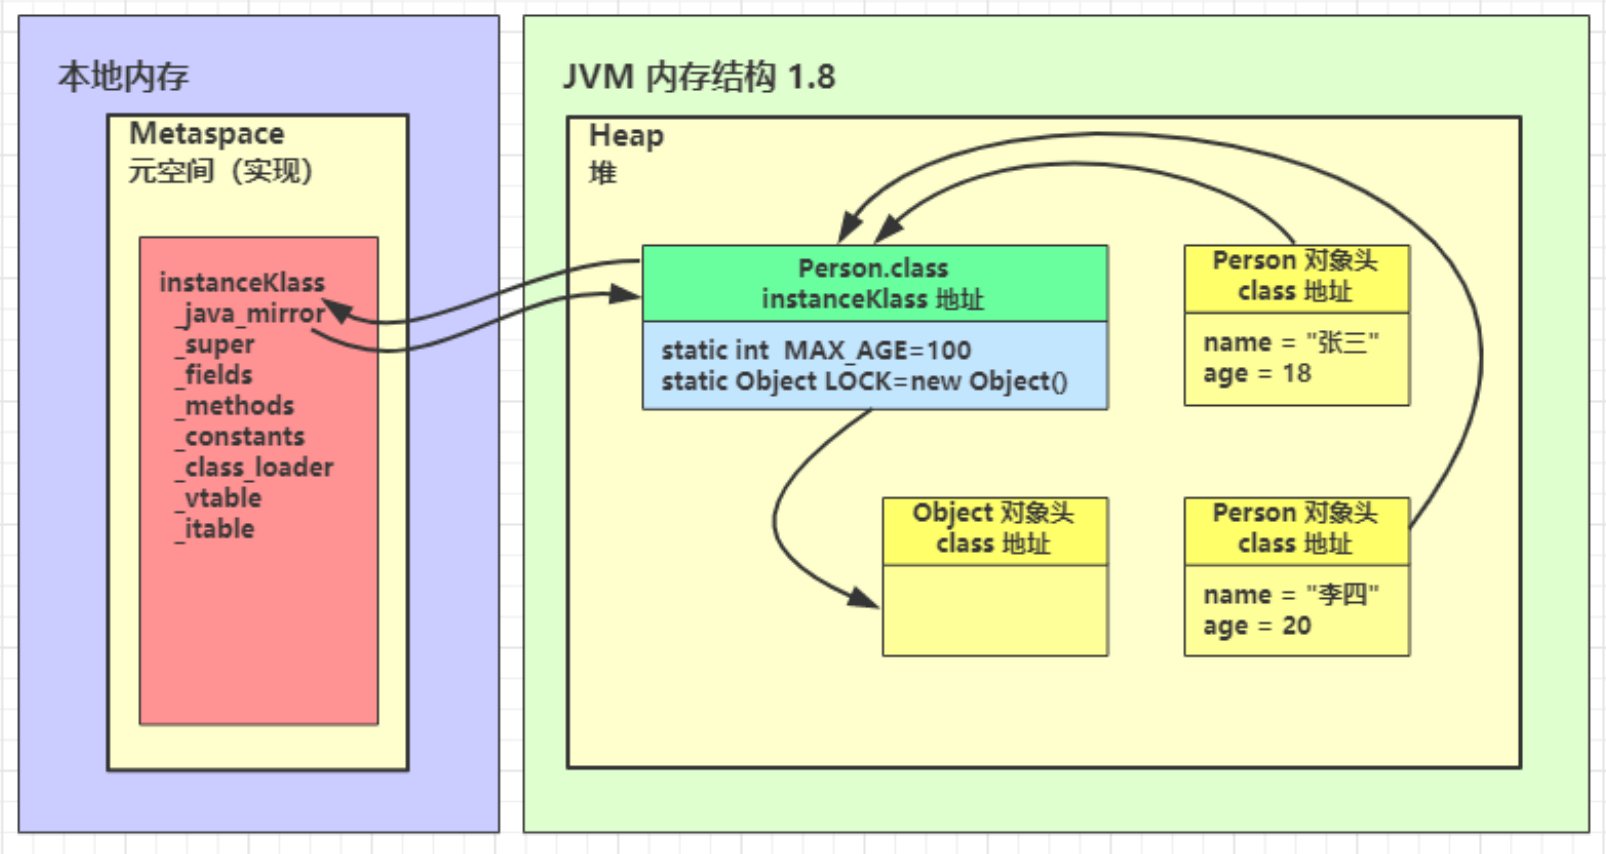
将类的字节码载入方法区中,内部采用 C++ 的 instanceKlass 描述 java 类,它的重要 field 有:
- _java_mirror 即 java 的类镜像,例如对 String 来说,就是 String.class,作用是把 klass 暴露给 java 使用
- _super 即父类
- _fifields 即成员变量
- _methods 即方法
- _constants 即常量池
- _class_loader 即类加载器
- _vtable 虚方法表
- _itable 接口方法表
如果这个类还有父类没有加载,先加载父类
1.2 链接
1.2.1 验证
1.2.2 准备
为 static 变量分配空间,设置默认值
- static 变量在 JDK 7 之前存储于 instanceKlass 末尾,从 JDK 7 开始,存储于 _java_mirror 末尾
- static 变量分配空间和赋值是两个步骤,分配空间在准备阶段完成,赋值在初始化阶段完成
- 如果 static 变量是 final 的基本类型,以及字符串常量,那么编译阶段值就确定了,赋值在准备阶段完成
如果 static 变量是 final 的,但属于引用类型,那么赋值也会在初始化阶段完成
1.2.3 解析
将常量池中的符号引用解析为直接引用,如果会有个标记 UnresolvedClass,表示未经过解析
1.3 初始化
1.3.1
<cinit>()V初始化阶段编译器会将类文件声明的静态赋值变量和静态区域合并生成
<cinit>()V方法并进行调用,虚拟机会保证它的线程安全1.3.2 发生时机
类初始化是【懒惰的】
main 方法所在的类,总会被首先初始化
- 首次访问这个类的静态变量或静态方法时
- 子类初始化,如果父类还没初始化,会引发
- 子类访问父类的静态变量,只会触发父类的初始化
Class.forName()- new 会导致初始化
不会导致类初始化的情况
- 访问类的 static final 静态常量(基本类型和字符串)不会触发初始化
- 类对象.class 不会触发初始化
- 创建该类的数组不会触发初始化
- 类加载器的
loadClass()方法 Class.forName()的参数 2 为 false 时2. 类加载器
| 名称 | 加载路径 | 说明 | | —- | —- | —- | | Bootstrap ClassLoader | JAVA_HOME/jre/lib | 无法直接访问 | | Extension ClassLoader | JAVA_HOME/jre/lib/ext | 上级为 Bootstrap,显示为 null | | Application ClassLoader | classpath | 上级为 Extension | | 自定义类加载器 | 自定义 | 上级为 Application |
2.1 启动类加载器
public class A {static {System.out.println("A init");}}public class BootClassLoaderDemo {public static void main(String[] args) throws Exception {Class<?> a = Class.forName("org.masteryourself.tutorial.jvm.classloader.boot.A");// sun.misc.Launcher$AppClassLoader@18b4aac2, 正常使用 IDEA 启动,这个类是交给 AppClassLoader 加载System.out.println(a.getClassLoader());}}
# 将当前目录追加到 Bootstrap ClassLoader 中的加载路径ruanrenzhao@MacBook-Pro classes % java -Xbootclasspath/a:. org.masteryourself.tutorial.jvm.classloader.boot.BootClassLoaderDemoA initnull
-Xbootclasspath 表示设置 bootclasspath
其中 /a:. 表示将当前目录追加至 bootclasspath 之后
可以用这个办法替换核心类
- java -Xbootclasspath:
- java -Xbootclasspath/a:<追加路径>
- java -Xbootclasspath/p:<追加路径>
2.2 扩展类加载器
如果 classpath 和JAVA_HOME/jre/lib/ext下有同名类,加载时会使用拓展类加载器加载
当应用程序类加载器发现拓展类加载器已将该同名类加载过了,则不会再次加载
2.3 双亲委派
双亲委派模式,即调用类加载器 ClassLoader 的 loadClass 方法时,查找类的规则
protected Class<?> loadClass(String name, boolean resolve)throws ClassNotFoundException{synchronized (getClassLoadingLock(name)) {// 1. 检查该类是否已经加载Class<?> c = findLoadedClass(name);//如果没有被加载过if (c == null) {long t0 = System.nanoTime();try {// 2. 有上级的话,委派上级 loadClassif (parent != null) {c = parent.loadClass(name, false);} else {// 3. 如果没有上级了(ExtClassLoader),则委派 BootstrapClassLoaderc = findBootstrapClassOrNull(name);}} catch (ClassNotFoundException e) {// ClassNotFoundException thrown if class not found// from the non-null parent class loader// 捕获异常,但不做任何处理}if (c == null) {// 4. 每一层找不到,调用 findClass 方法(每个类加载器自己扩展)来加载long t1 = System.nanoTime();c = findClass(name);// 5. 记录时间sun.misc.PerfCounter.getParentDelegationTime().addTime(t1 - t0);sun.misc.PerfCounter.getFindClassTime().addElapsedTimeFrom(t1);sun.misc.PerfCounter.getFindClasses().increment();}}if (resolve) {resolveClass(c);}return c;}}
2.4 线程上下文类加载器
我们在使用 JDBC 时,都需要加载 Driver 驱动,但如果不写 Class.forName("com.mysql.jdbc.Driver") 这行代码,也是可以让 com.mysql.jdbc.Driver 正确加载的
System.out.println(DriverManager.class.getClassLoader()) 的打印结果为 null,表示它的类加载器是 Bootstrap ClassLoader,会从 JAVA_HOME/jre/lib 下搜索类,但 JAVA_HOME/jre/lib 下显然没有 mysql-connector-java-xxx.jar 驱动包,这样问题来了,在 DriverManager 的静态代码块中,怎么能正确加载 com.mysql.jdbc.Driver 呢
public class DriverManager {// List of registered JDBC driversprivate final static CopyOnWriteArrayList<DriverInfo> registeredDrivers = new CopyOnWriteArrayList<>();/*** Load the initial JDBC drivers by checking the System property* jdbc.properties and then use the {@code ServiceLoader} mechanism*/static {// 主要是这行代码loadInitialDrivers();println("JDBC DriverManager initialized");}}
private static void loadInitialDrivers() {String drivers;try {drivers = AccessController.doPrivileged(new PrivilegedAction<String>() {public String run() {return System.getProperty("jdbc.drivers");}});} catch (Exception ex) {drivers = null;}// If the driver is packaged as a Service Provider, load it.// Get all the drivers through the classloader// exposed as a java.sql.Driver.class service.// ServiceLoader.load() replaces the sun.misc.Providers()// 1. 使用 ServiceLoader 机制加载驱动,即 SPIAccessController.doPrivileged(new PrivilegedAction<Void>() {public Void run() {ServiceLoader<Driver> loadedDrivers = ServiceLoader.load(Driver.class);Iterator<Driver> driversIterator = loadedDrivers.iterator();/* Load these drivers, so that they can be instantiated.* It may be the case that the driver class may not be there* i.e. there may be a packaged driver with the service class* as implementation of java.sql.Driver but the actual class* may be missing. In that case a java.util.ServiceConfigurationError* will be thrown at runtime by the VM trying to locate* and load the service.** Adding a try catch block to catch those runtime errors* if driver not available in classpath but it's* packaged as service and that service is there in classpath.*/try{while(driversIterator.hasNext()) {driversIterator.next();}} catch(Throwable t) {// Do nothing}return null;}});println("DriverManager.initialize: jdbc.drivers = " + drivers);// 2. 使用 jdbc.drivers 定义的驱动名加载驱动if (drivers == null || drivers.equals("")) {return;}String[] driversList = drivers.split(":");println("number of Drivers:" + driversList.length);for (String aDriver : driversList) {try {println("DriverManager.Initialize: loading " + aDriver);// 这里的 ClassLoader.getSystemClassLoader() 就是应用程序类加载Class.forName(aDriver, true,ClassLoader.getSystemClassLoader());} catch (Exception ex) {println("DriverManager.Initialize: load failed: " + ex);}}}
public static <S> ServiceLoader<S> load(Class<S> service) {// 获取当前线程上下文类加载器ClassLoader cl = Thread.currentThread().getContextClassLoader();return ServiceLoader.load(service, cl);}
线程上下文类加载器是当前线程使用的类加载器,默认就是应用程序类加载器,它内部又是由 Class.forName() 调用了线程上下文类加载器完成类加载,具体代码在 ServiceLoader 的内部类 LazyIterator.nextService() 中
private S nextService() {if (!hasNextService())throw new NoSuchElementException();String cn = nextName;nextName = null;Class<?> c = null;try {// class.forName 时使用到了传入的线程上下文类加载器(默认就是 App ClassLoader)c = Class.forName(cn, false, loader);} catch (ClassNotFoundException x) {fail(service,"Provider " + cn + " not found");}if (!service.isAssignableFrom(c)) {fail(service,"Provider " + cn + " not a subtype");}try {S p = service.cast(c.newInstance());providers.put(cn, p);return p;} catch (Throwable x) {fail(service,"Provider " + cn + " could not be instantiated",x);}throw new Error(); // This cannot happen}
2.5 自定义类加载器
什么时候需要自定义类加载器
- 想加载非 classpath 随意路径中的类文件
- 都是通过接口来使用实现,希望解耦时,常用在框架设计
- 这些类希望予以隔离,不同应用的同名类都可以加载,不冲突,常见于 tomcat 容器
开发步骤:
- 继承 ClassLoader 父类
- 要遵从双亲委派机制,重写
findClass()方法,注意不是重写loadClass()方法,否则不会走双亲委派机制 - 读取类文件的字节码
- 调用父类的
defineClass()方法来加载类 使用者调用该类加载器的
loadClass()方法 ```java public class CustomClassLoader extends ClassLoader {@Override protected Class<?> findClass(String name) throws ClassNotFoundException {
String path = "file/tutorial-jvm/" + name + ".class";try {ByteArrayOutputStream os = new ByteArrayOutputStream();Files.copy(Paths.get(path), os);// 得到字节数组byte[] bytes = os.toByteArray();// 将字节数组转成 class 对象return defineClass(name, bytes, 0, bytes.length);} catch (Exception e) {throw new ClassNotFoundException(name + "未找到");}
}
}
```javapublic class CustomClassLoaderTest {public static void main(String[] args) throws Exception{CustomClassLoader loader1 = new CustomClassLoader();Class<?> b1 = loader1.loadClass("B");Class<?> b2 = loader1.loadClass("B");CustomClassLoader loader2 = new CustomClassLoader();Class<?> b3 = loader2.loadClass("B");// trueSystem.out.println(b1 == b2);// falseSystem.out.println(b1==b3);}}
3. 运行期优化
3.1 即时编译
3.1.1 分层编译
public class TieredCompilation {public static void main(String[] args) {for (int i = 0; i < 200; i++) {long start = System.nanoTime();for (int j = 0; j < 1000; j++) {new Object();}long end = System.nanoTime();System.out.printf("%d\t%d\n", i, (end - start));}}}
执行速度会越来越快,为什么呢
JVM 将执行状态分成了 5 个层次:
- 0 层,解释执行(Interpreter)
- 1 层,使用 C1 即时编译器编译执行(不带 profiling)
- 2 层,使用 C1 即时编译器编译执行(带基本的 profiling)
- 3 层,使用 C1 即时编译器编译执行(带完全的 profiling)
- 4 层,使用 C2 即时编译器编译执行
profiling 是指在运行过程中收集一些程序执行状态的数据,例如【方法的调用次数】,【循环的回边次数】等
即时编译器(JIT)与解释器的区别
- 解释器是将字节码解释为机器码,下次即使遇到相同的字节码,仍会执行重复的解释
- JIT 是将一些字节码编译为机器码,并存入 Code Cache,下次遇到相同的代码,直接执行,无需再编译
- 解释器是将字节码解释为针对所有平台都通用的机器码
- JIT 会根据平台类型,生成平台特定的机器码
对于占据大部分的不常用的代码,我们无需耗费时间将其编译成机器码,而是采取解释执行的方式运行;另一方面,对于仅占据小部分的热点代码,我们则可以将其编译成机器码,以达到理想的运行速度。 执行效率上简单比较一下 Interpreter < C1 < C2,总的目标是发现热点代码(hotspot 名称的由来),优化之
刚才的一种优化手段称之为【逃逸分析】,发现新建的对象是否逃逸。可以使用 -XX:-DoEscapeAnalysis 关闭逃逸分析,再运行刚才的示例观察结果
3.1.2 方法内联
public class MethodInline {public static void main(String[] args) {int x = 0;for (int i = 0; i < 500; i++) {long start = System.nanoTime();for (int j = 0; j < 1000; j++) {x = square(9);}long end = System.nanoTime();System.out.printf("%d\t%d\t%d\n", i, x, (end - start));}}private static int square(final int i) {return i * i;}}
如果发现 square 是热点方法,并且长度不太长时,会进行内联,所谓的内联就是把方法内代码拷贝、粘贴到调用者的位置:
x = 9 * 9;
3.2 反射优化
public class ReflectDemo {public static void foo() {System.out.println("foo...");}public static void main(String[] args) throws Exception {Method foo = ReflectDemo.class.getMethod("foo");for (int i = 0; i <= 16; i++) {System.out.printf("%d\t", i);foo.invoke(null);}System.in.read();}}
foo.invoke 前面 0 ~ 15 次调用使用的是 MethodAccessor的 NativeMethodAccessorImpl 实现
public Object invoke(Object var1, Object[] var2) throws IllegalArgumentException, InvocationTargetException {// 这里的膨胀阈值默认是 15if (++this.numInvocations > ReflectionFactory.inflationThreshold() && !ReflectUtil.isVMAnonymousClass(this.method.getDeclaringClass())) {// 超过这个值之后会使用 ASM 动态生成新的实现来替换此实现,速度较本地实现快 20 倍左右MethodAccessorImpl var3 = (MethodAccessorImpl)(new MethodAccessorGenerator()).generateMethod(this.method.getDeclaringClass(), this.method.getName(), this.method.getParameterTypes(), this.method.getReturnType(), this.method.getExceptionTypes(), this.method.getModifiers());// 替换本地实现this.parent.setDelegate(var3);}// 调用本地实现return invoke0(this.method, var1, var2);}
sun.reflect.noInflation 可以用来禁用膨胀(直接生成 GeneratedMethodAccessor 类,但首次生成比较耗时,如果仅反射调用一次,不划算)sun.reflect.inflationThreshold 可以修改膨胀阈值


