一、线程间通信方式
1.volatile关键字
2.使用wait()和notiry()方法
3.使用countDownLatch(倒计时器)
CountDownLatch是一个同步工具类,它允许一个或多个线程一直等待,直到其他线程的操作执行完后再执行。
原理如下:
内部类Sync直接继承自AQS,并重写了tryAcquireShare和tryReleaseShare方法。实现了当state不为零时将线程入队挂起,在tryReleaseShare执行减一后,如果state为0则,逐个将入队的线程唤醒的操作 当有多个线程调用await时候,当countDown到0的时候,所有调用await的线程都会被唤醒
使用方法如下:
一些线程执行countDownLatch.await(); 另一些线程执行countDownLatch.countDown(); 当countDownLatch倒计时到0的时候从countDownLatch.await();处继续执行
//线程B等待计数器倒计时完成之后才继续向下执行public class CountDownTest {static CountDownLatch countDownLatch=new CountDownLatch(2);public static void main(String[] args) {new MyThread("B",countDownLatch).start();new MyThread("A",countDownLatch).start();new MyThread("A",countDownLatch).start();}}class MyThread extends Thread{CountDownLatch countDownLatch;String name;MyThread(String name,CountDownLatch countDownLatch){this.name=name;this.countDownLatch=countDownLatch;}@Overridepublic void run() {try {if(!"A".equals(this.name)){countDownLatch.await();}} catch (InterruptedException e) {e.printStackTrace();}System.out.println(this.name+" "+"执行");countDownLatch.countDown();}}//输出结果:A 执行A 执行B 执行
4.ReentrantLock和Condition
4.1 ReentrantLock和Synchronized的区别
1.Synchronized是JVM的锁,ReentrantLock是一个类
2.Synchronized加解锁自动进行,ReentrantLock加解锁手动进行,比较麻烦,但是比较灵活
通过lock()加锁,通过unlock()解锁,解锁操作最好放在finally块中
3.Synchronized是不可中断锁,获取不到一个锁就会一直等待,
ReentrantLock是可中断锁,可以设置等待多久返回去做其他事情
4.ReentrantLock可以初始化为公平锁,Synchronized只能是非公平锁。
4.2 抽象队列同步器(AQS)
AQS定义了多线程对临界资源的访问,可以基于AQS定制不同的同步访问逻辑来定制各种锁,是一种模板设计模式
资源的访问可以分为独占式或共享式
AQS的核心思想是,如果被请求的资源空闲,就将请求资源的线程设置为工作线程,将共享资源设置为锁定状态
如果请求的资源已经在锁定状态,那么就使用一个双向链表维护等待队列
要访问的资源的同步状态state(为一个整数)使用volatile修饰,使用CAS方式去更新state:
不同的锁只需要实现如何获取(acquire)资源的部分即可,等待队列已经由AQS实现好了
4.3 基于AQS的ReentrantLock
ReentrantLock只实现了Lock和Serializeable接口,其内部类Sync 继承了AbstractQueuedSynchronizer
利用了AQS框架来实现加锁机制:
//AQS类的逻辑,使用acquire函数来获取锁,核心是tryAcquire//tryAcquire获取锁成功了就什么的都不干,失败了就acquireQueued入队public final void acquire(int arg) {if (!tryAcquire(arg) &&acquireQueued(addWaiter(Node.EXCLUSIVE), arg))selfInterrupt();}//非公平锁对获取锁的实现final void lock() {if (compareAndSetState(0, 1))setExclusiveOwnerThread(Thread.currentThread());elseacquire(1);}//非公平锁的tryAcquire调用nonfairTryAcquirefinal boolean nonfairTryAcquire(int acquires) {final Thread current = Thread.currentThread();int c = getState();//当资源空闲(c=0),直接通过CAS操作独占if (c == 0) {if (compareAndSetState(0, acquires)) {setExclusiveOwnerThread(current);return true;}}//否则判断占据的线程是否是自身,是则可重入锁,不是则获取失败else if (current == getExclusiveOwnerThread()) {int nextc = c + acquires;if (nextc < 0) // overflowthrow new Error("Maximum lock count exceeded");setState(nextc);return true;}return false;}// 公平锁对tryAcquire实现final void lock() {acquire(1);}//公平锁的tryAcquire调用tryAcquireprotected final boolean tryAcquire(int acquires) {final Thread current = Thread.currentThread();int c = getState();if (c == 0) {//这里和非公平锁的区别是,非公平锁cas修改成功就行,这里还要判断是否有等待队列if (!hasQueuedPredecessors() &&compareAndSetState(0, acquires)) {setExclusiveOwnerThread(current);return true;}}//重入机制和非公平锁是一样的else if (current == getExclusiveOwnerThread()){int nextc = c + acquires;if (nextc < 0)throw new Error("Maximum lock count exceeded");setState(nextc);return true;}return false;}
解锁的unlock过程对于公平锁和非公平锁都是一样的
unlock将状态减去一定数值,当状态为0则表示线程释放锁
public void unlock() {sync.release(1);}protected final boolean tryRelease(int releases) {int c = getState() - releases;if (Thread.currentThread() != getExclusiveOwnerThread())throw new IllegalMonitorStateException();boolean free = false;if (c == 0) {free = true;setExclusiveOwnerThread(null);}setState(c);return free;}
流程如下: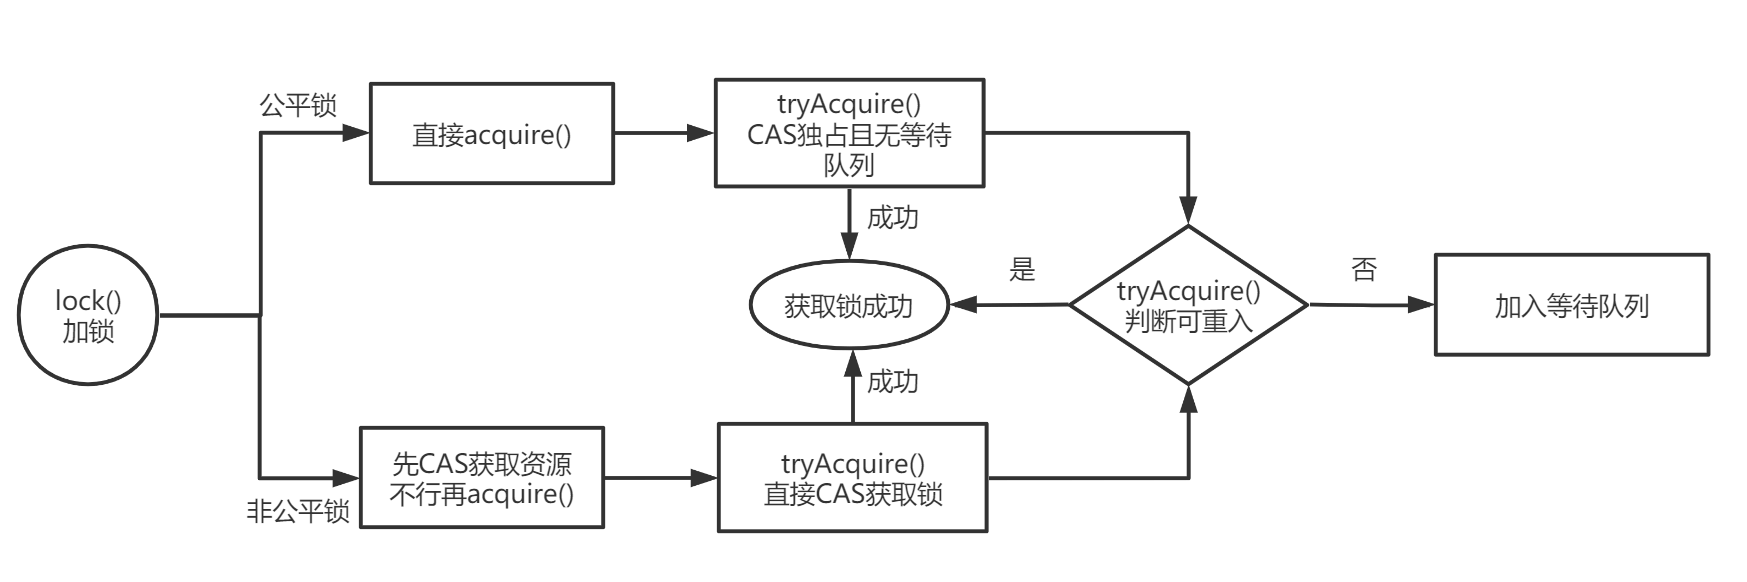
4.4 结合Condition
Condition通过Lock.newCondition()获取,相比Synchronized的wait()和notify()来说,condition的await()和signal()更灵活,因为一个Lock可以新建多个Condition,实现有选择的线程通知
condition的await()和signal()更灵活也需要在lock()和unlock()之间执行
下面是一个使用condition的await()和signal()实现生产者和消费者的示例,缓冲区大小为5,满了就停止生产,为0就停止消费,中间过程可以消费和生产:
注意:使用两个condition分别控制空了和满了的停止消费和生产:
public class ConditionTest {public static void main(String[] args) {Queue<Integer> buffer=new LinkedList<>();ReentrantLock lock=new ReentrantLock();Condition empty=lock.newCondition();Condition full=lock.newCondition();new Thread(new Producer(empty,full,buffer,lock)).start();new Thread(new Producer(empty,full,buffer,lock)).start();new Thread(new Consumer(empty,full,buffer,lock)).start();}}class Producer implements Runnable{Condition empty,full;Queue<Integer> buffer;Lock lock;Producer(Condition empty,Condition full,Queue<Integer> buffer,Lock lock){this.empty=empty;this.full=full;this.buffer=buffer;this.lock=lock;}public void produce(){lock.lock();if(buffer.size()<5){buffer.offer(1);System.out.println(Thread.currentThread().getName()+"生产了一个,buffer有"+buffer.size());empty.signal();}else{try {full.await();} catch (InterruptedException e) {e.printStackTrace();}}lock.unlock();}@Overridepublic void run() {for (int i = 0; i < 10; i++) {produce();}}}class Consumer implements Runnable {Condition empty,full;Queue<Integer> buffer;Lock lock;Consumer(Condition empty,Condition full,Queue<Integer> buffer,Lock lock){this.empty=empty;this.full=full;this.buffer=buffer;this.lock=lock;}public void consume(){while (true){lock.lock();if(buffer.size()>0){buffer.poll();System.out.println(Thread.currentThread().getName()+"消费了一个,buffer有"+buffer.size());full.signal();}else {try {empty.await();} catch (InterruptedException e) {e.printStackTrace();}}lock.unlock();}}@Overridepublic void run() {consume();}}
5.使用CyclicBarrier
CyclicBarrier构造函数:
//代表要阻塞多少个线程(需要多少个线程到达了这里再执行后续)private int count;//代表屏障出阻塞的线程数量public CyclicBarrier(int parties)//barrierAction可以指定所有线程都到达屏障后执行的函数public CyclicBarrier(int parties, Runnable barrierAction)
CyclicBarrier一般作为成员变量传入线程,线程调用CyclicBarrier的await方法代表已经到达了阻塞点
await()方法中对count减1,当不为0说明还要等待其他线程,就使用ReentrantLock变量的condition.await()方法阻塞自身,当为0的时候说明所有线程都已经到达,使用ReentrantLock变量的condition.signalAll()方法通知唤醒其余等待的线程继续执行,具体逻辑如下:
private int dowait(boolean timed, long nanos)throws InterruptedException, BrokenBarrierException,TimeoutException {final ReentrantLock lock = this.lock;lock.lock();try {final Generation g = generation;if (g.broken)throw new BrokenBarrierException();if (Thread.interrupted()) {breakBarrier();throw new InterruptedException();}int index = --count;if (index == 0) { // trippedboolean ranAction = false;try {final Runnable command = barrierCommand;if (command != null)command.run();ranAction = true;nextGeneration();//里面会调用signalAll唤醒所有阻塞线程return 0;} finally {if (!ranAction)breakBarrier();}}// loop until tripped, broken, interrupted, or timed outfor (;;) {try {if (!timed)trip.await();else if (nanos > 0L)nanos = trip.awaitNanos(nanos);} catch (InterruptedException ie) {if (g == generation && ! g.broken) {breakBarrier();throw ie;} else {// We're about to finish waiting even if we had not// been interrupted, so this interrupt is deemed to// "belong" to subsequent execution.Thread.currentThread().interrupt();}}if (g.broken)throw new BrokenBarrierException();if (g != generation)return index;if (timed && nanos <= 0L) {breakBarrier();throw new TimeoutException();}}} finally {lock.unlock();}}
6.CyclicBarrier和CountDownLatch的区别
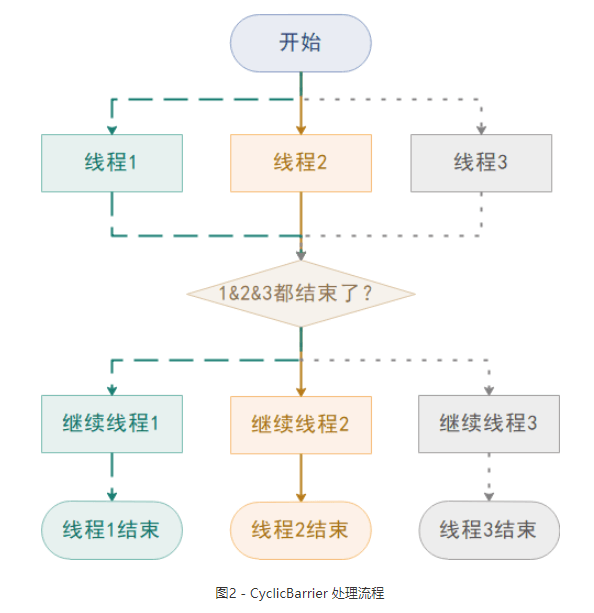
(1)countDownLatch是等待事件到达后执行后续事件,CyclicBarrier是等待一组线程到达之后执行各自线程的 后续部分。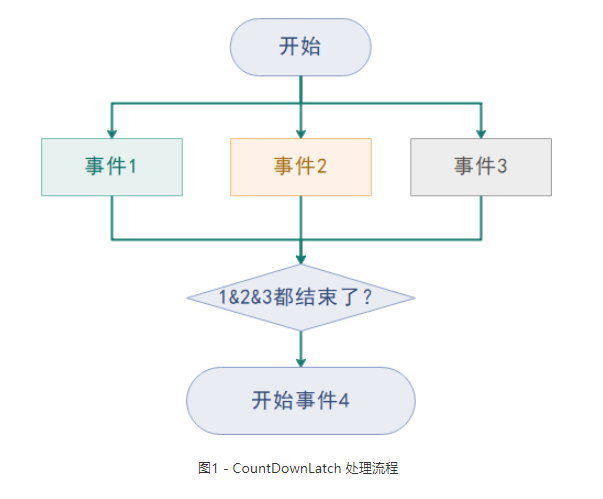
(2)countDownLatch是一次性的,计数器倒计时到0下一次就不会有屏障了,除非手动设置;
但是CyclicBarrier会循环设置屏障阻碍线程
(3)调用countDownLatch的countDown()之后,线程并不会阻塞,调用CyclicBarrier的await()方法,会阻塞当前线程,直到CyclicBarrier指定的线程全部都到达了指定点的时候,才能继续往下执行
7.ThreadLocal内存溢出
每个线程维护一个ThreadLocalMap,其中的每个Enrty的key是一个指向ThreadLocal变量的弱引用,当ThreadLocal变量被回收之后,这个key就会指向空,直到线程结束才会被回收,ThreadLocal解决方法是在每次set,remove方法中都判断当前key是否为空,为空则删除,并遍历整个ThreadLocalMap,将所有key为空的entry的value指向null

若有收获,就点个赞吧
0 人点赞
