我们经常会遇到有大量的数据需要使用表格的形式展示在界面上的场景,通常一些表格组件会提供虚拟滚动的能力来解决这个场景中出现的性能问题。那么你是否有想过,虚拟滚动是如何实现的吗?今天笔者就带一起尝试写一个这样的组件。
交互效果图: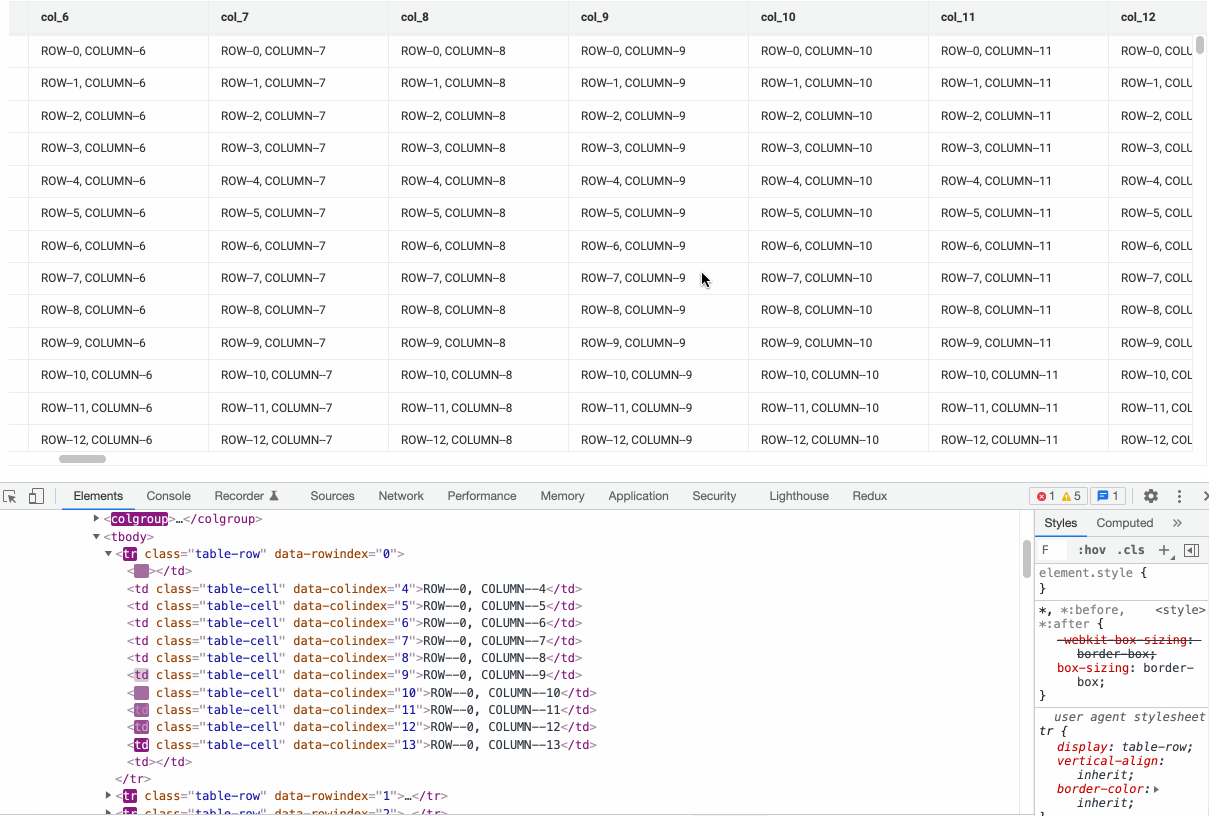
定义属性
Table 组件可以定义的属性很多,但在本示例中我们只看虚拟滚动的实现,故暂且把其他的属性都放到一边不理。但有两个是表格组件的基础,是不能不理会的,那就是 dataSource 和 columns。同样的,columns 在本文中也是最简配置。简单说明如下:
- dataSource:用于显示的表格内数据,数据结构为对象数组;
- columns: 用于定义表格列信息,数据结构也为对象数组;对象必须包含 code, name, width 三个字段
- code: 用于显示数据的字段Key,对应 dataSource 对象中的Key
- name: 列标题名称,展示在表头中
- width: 列的宽度,每个列可以设置自己的宽度;
根据以上定义,构建以下测试数据:
// 因为要模拟大数据量,真的一条一条 mock 数据是不现实的,写两个小函数吧// 构建 dataSource 数据const createDataSource = (rows, cols) => {const result = [];for (let i = 0; i < rows; i++) {const item = {};for (let j = 0; j < cols; j++) {item[`col_${j}`] = `ROW--${i}, COLUMN--${j}`;}result.push(item);}return result;};// 构建 columns 列信息const createColumns = (data) => {const item = data[0];const columns = [];Object.keys(item).forEach((key) => {columns.push({code: key,name: key,width: 180,});});return columns;};
构建基本表格
先构建一个表格头部固定,内容区域可以进行横向、纵向滚动的基本组件来。直接使用一个 table 标签是无法达到这个效果的。所以我们需要把 Header 和 Body 放在两个容器中,并配上相应的样式。代码如下:
UseVirtualTable.jsx
import React, { PureComponent } from 'react';import './UseVirtualTable.less';class UseVirtualTable extends PureComponent {tableHeaderRender = () => {const { columns } = this.props;const cols = [];const ths = [];columns.forEach((col, i) => {const { code, name, width = 160 } = col;const key = `${key}-${i}`;cols.push(<col key={key} width={`${width}px`} />);ths.push(<th key={key} className="table-header-cell">{name}</th>);});return (<div className="table-header" ref={this.getTableHeaderDom}><table><colgroup>{cols}</colgroup><thead><tr className='table-header-row'>{ths}</tr></thead></table></div>);};tableBodyRender = () => {const { columns, dataSource = [] } = this.props;const cols = [];columns.forEach((col, i) => {const { code, width = 160 } = col;cols.push(<col key={`${code}-${i}`} width={`${width}px`} />);});return (<div className="table-body"><table><colgroup>{cols}</colgroup><tbody>{dataSource.map((row, i) => {return (<tr className="table-row" key={i} data-rowindex={i}>{columns.map(({ code }, j) => {return <td className="table-cell" key={`${code}-${j}`} data-colindex={j}>{row[code]}</td>;})}</tr>);})}</tbody></table></div>);};render() {return (<div className="use-virtual-table"><div className="use-virtual-table-body">{this.tableHeaderRender()}{this.tableBodyRender()}</div></div>);}}export default UseVirtualTable;
UseVirtualTable.less
.use-virtual-table {--border-color: #eee;--th-background-color: #f5f5f5;--table-header-height: 34px;position: relative;height: 100%; // 与容器高度保持一致width: 100%;.use-virtual-table-body {display: flex;flex-direction: column;width: 100%;height: 100%;background-color: var(--th-background-color);overflow-y: hidden; // 这个表格区域实现横向滚动overflow-x: auto;}table {table-layout: fixed;width: 100%;border-collapse: separate;border-spacing: 0;}.table-header {flex-shrink: 0;height: var(--table-header-height);th.table-header-cell {border-top: 1px solid var(--border-color);border-left: 1px solid var(--border-color);border-bottom: 1px solid var(--border-color);background-color: var(--th-background-color);padding: 8px 12px;text-align: left;}}.table-body {flex: 1;width: fit-content;background-color: #fff;overflow-y: auto; // 内容区域实现纵向滚动td.table-cell {border-left: 1px solid var(--border-color);border-top: 1px solid var(--border-color);padding: 8px 12px;}tr:last-child td.table-cell {border-bottom: 1px solid var(--border-color);}}}
此处使用 Flex 实现了整个表格的内容高度可以随容器自由伸缩,且内容区域纵向滚动,表格头部和内容同时进行横向滚动。效果如图: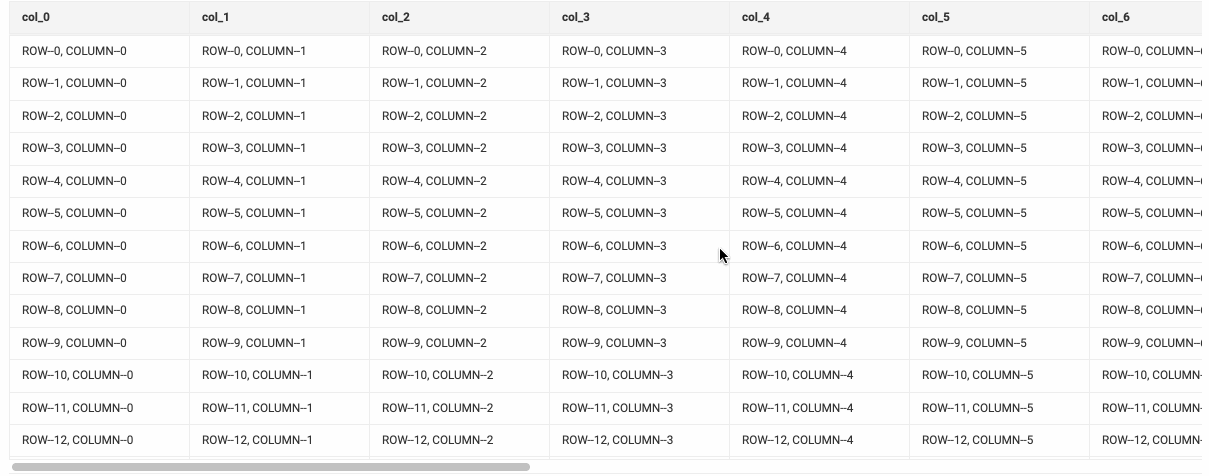
虚拟滚动
虚拟滚动的本质是仅渲染可视区域的内容,所以需要实现的逻辑是:
- 计算可视区域的 width 和 height
- 再依据 scrollTop 或 scrollLeft 推算出可视区域显示那几行及那几列
- 在滚动时,实时计算第2步
- 计算出表格内容的总高度,scrollTop 隐藏的部分使用 paddingTop 表示
- 计算出表格内容的总宽度,分别用两个 td 标签表示前、后未被渲染的部分
第4步在 HTML 中的呈现: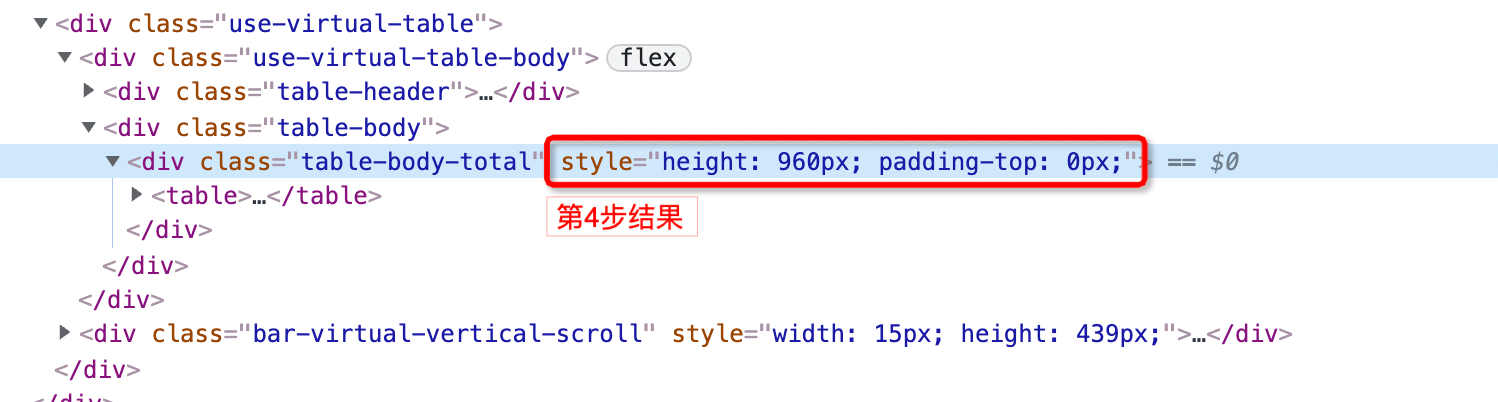
第5步在 HTML 中的呈现: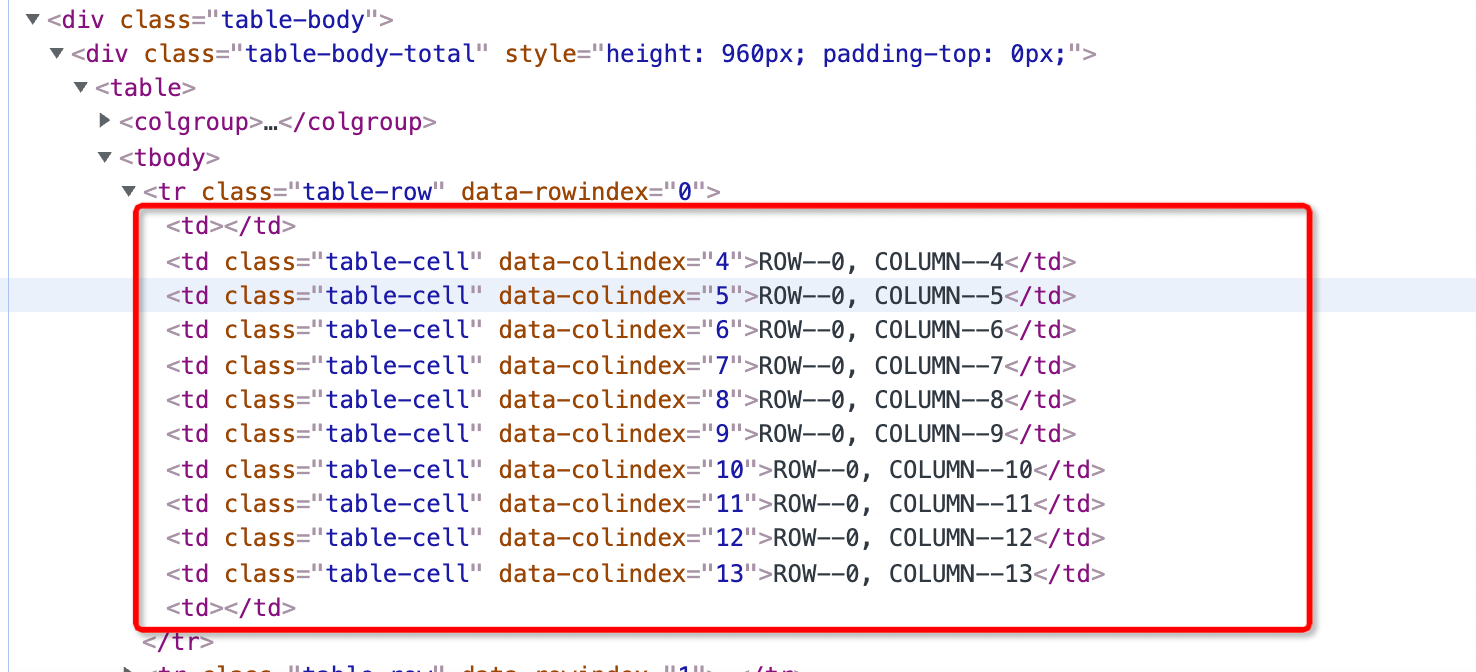
还有一个问题是纵向滚动条藏在最右侧,只有横向滚动条滚动到底之后才能看的到 —— 这显然是不符合预期的。所以我们要放一个“假的滚动条”始终显示在可视区域的右侧。如此一来“假滚动条”需要与内容滚动条保持一致。“假滚动条”在 HTML 中的呈现:
UseVirtualTable.jsx (完整代码)
// 计算出滚动条的宽度;用于“假滚动条”function getScrollbarWidth() {const scrollDiv = document.createElement('div');scrollDiv.style.cssText = 'width: 99px; height: 99px; overflow: scroll; position: absolute; top: -9999px;';document.body.appendChild(scrollDiv);const scrollbarWidth = scrollDiv.offsetWidth - scrollDiv.clientWidth;document.body.removeChild(scrollDiv);return scrollbarWidth;}const DEFAULT_ROW_HEIGHT = 32; // 默认表格单行高度const OFFSET_HORIZONTAL = 300; // 横向滚动前、后偏移量const OFFSET_VERTICAL = 120; // 纵向滚动上、下偏移量const POSITION_TABLE_BODY = 'tableBody'; // 表示纵向滚动响应位置在表格内容上const POSITION_VERTICAL_BAR = 'verticalBar'; // 表示纵向滚动响应位置在假滚动条上class UseVirtualTable extends PureComponent {virtualTable = null;virtualTableHeight = 0; // 虚拟表格高度virtualTableWidth = 0; // 虚拟表格宽度scrollBarWidth = getScrollbarWidth(); // 滚动条宽度scrollDom = null; // 纵向假滚动条节点horizontalDom = null; // 横向滚动节点verticalDom = null; // 纵向滚动节点mousePosition = ''; // 鼠标所在位置,用于区别纵向滚动由哪个节点相应的state = {totalHeight: 0, // 表格内容区域总高度totalWidth: 0, // 表格内容区域总宽度hiddenTopStyle: { // 顶部隐藏样式height: `0px`,},hiddenLeftStyle: { // 左侧隐藏样式width: `0px`,},hiddenRightStyle: { // 右侧隐藏样式width: `0px`,},rowSize: [0, 0], // 可视区域显示的行号colSize: [0, 0], // 可视区域显示的列号};componentDidMount() {this.setVirtualSize();this.setVerticalData();this.setHorizontalData();}// 设置虚拟表格高度、宽度setVirtualSize = (dom) => {const virtualTable = dom || this.virtualTable;const height = virtualTable?.clientHeight;const width = virtualTable?.clientWidth;if (height && width) {this.virtualTableHeight = height;this.virtualTableWidth = width;}};getVirtualTableRef = (dom) => {this.virtualTable = dom || this.virtualTable;this.setVirtualSize(dom);};getTableHeaderDom = (dom) => {this.tableHeader = dom || this.tableHeader;};getScrollDom = (dom) => {this.scrollDom = dom || this.scrollDom;};getHorizontalDom = (dom) => {this.horizontalDom = dom || this.horizontalDom;};getVerticalDom = (dom) => {this.verticalDom = dom || this.verticalDom;};// 设置虚拟表格纵向数据;在纵向滚动时使用setVerticalData = () => {const scrollTop = this.verticalDom && this.verticalDom.scrollTop;const { dataSource = [], columns = [] } = this.props;const { rowSize: oRowSize, colSize: oColSize } = this.state;// 计算表格头部所占用的高度const headerHeight = this.tableHeader?.clientHeight;// 计算表格内容可视区域高度const height = this.virtualTableHeight - headerHeight;const rowSize = [];let totalHeight = 0;let hiddenTopHeight = 0; // 计算顶部隐藏区域的高度let hiddenButtomHeight = 0;let currentStep = 0; // 0: 顶部被隐藏阶段;1: 可视区域阶段if (!height) {return;}dataSource.forEach((item, i) => {// 获取行高,目前这里是最简化的,可以根据需要进行扩展const rowHeight = DEFAULT_ROW_HEIGHT;totalHeight += rowHeight;if (currentStep === 0) {if (totalHeight >= scrollTop - OFFSET_VERTICAL) {// 根据 scrollTop 算出可视区域起始行号rowSize[0] = i;currentStep += 1;} else {hiddenTopHeight += rowHeight;}} else if (currentStep === 1) {if (totalHeight > scrollTop + height + OFFSET_VERTICAL) {// 计算出可视区域结束行号rowSize[1] = i;currentStep += 1;}}});if (oRowSize.join() !== rowSize.join()) {// 可视区域的行号有了变化才重新进行渲染this.setState({hiddenTopStyle: { height: `${hiddenTopHeight}px` },rowSize,totalHeight,});}};// 设置虚拟表格横向数据;在横向滚动时使用setHorizontalData = () => {const scrollLeft = this.horizontalDom && this.horizontalDom.scrollLeft;const { columns = [] } = this.props;const { colSize: oColSize } = this.state;// 表格内容可视区域的宽度const width = this.virtualTableWidth;const colSize = [];let totalWidth = 0;let hiddenLeftWidth = 0; // 左侧隐藏未被渲染的宽度let hiddenRigthWidth = 0; // 右侧隐藏未被渲染的宽度let currentStep = 0; // 0: 前面被隐藏阶段;1: 可视区域阶段;2: 后面不可见区域if (!width) {return;}columns.forEach((item, i) => {const { width: colWidth = 160 } = item;totalWidth += colWidth;if (currentStep === 0) {if (totalWidth >= scrollLeft - OFFSET_HORIZONTAL) {// 根据 scrollLeft 算出可视区域起始行号colSize[0] = i;currentStep += 1;} else {hiddenLeftWidth += colWidth;}}if (currentStep === 1 && totalWidth > scrollLeft + width + OFFSET_HORIZONTAL) {// 计算出可视区域结束列号colSize[1] = i;currentStep += 1;}if (currentStep === 2) {hiddenRigthWidth += colWidth;}});if (oColSize.join() !== colSize.join()) {// 可视区域的列号有了变化才重新进行渲染this.setState({hiddenLeftStyle: { width: `${hiddenLeftWidth}px` },hiddenRightStyle: { width: `${hiddenRigthWidth}px` },colSize,totalWidth,});}};handleVerticalScroll = (e) => {const scrollTop = e.target.scrollTop;// 内容区域纵向滚动逻辑,仅在“内容区域”滚动时执行if (this.mousePosition === POSITION_TABLE_BODY) {// 同步假滚动条 scrollTop 值this.scrollDom && (this.scrollDom.scrollTop = scrollTop);this.verticalTop = scrollTop;this.setVerticalData(scrollTop);}};handleScroll = (e) => {const scrollTop = e.target.scrollTop;// 假滚动条纵向滚动逻辑,仅在“假滚动条”滚动时执行if (this.mousePosition === POSITION_VERTICAL_BAR) {// 同步内容区域 scrollTop 值this.verticalDom && (this.verticalDom.scrollTop = scrollTop);this.verticalTop = scrollTop;this.setVerticalData();}};handleHorizontalScroll = (e) => {e.stopPropagation();const scrollLeft = e.target.scrollLeft;this.scrollDom && (this.scrollDom.scrollLeft = scrollLeft);this.setHorizontalData();};handleBodyMouseEnter = () => {this.mousePosition = POSITION_TABLE_BODY;};handleVerScrollMouseEnter = () => {this.mousePosition = POSITION_VERTICAL_BAR;};tableHeaderRender = () => {const { columns } = this.props;const cols = [];const ths = [];columns.forEach((col, i) => {const { code, name, width = 160 } = col;const key = `${key}-${i}`;cols.push(<col key={key} width={`${width}px`} />);ths.push(<th key={key} className="table-header-cell">{name}</th>);});return (<div className="table-header" ref={this.getTableHeaderDom}><table><colgroup>{cols}</colgroup><thead><tr className='table-header-row'>{ths}</tr></thead></table></div>);};tableBodyRender = () => {const { hiddenTopStyle, hiddenBottomStyle, hiddenLeftStyle, hiddenRightStyle, rowSize, colSize, totalHeight } = this.state;const { columns, dataSource = [] } = this.props;const showData = dataSource.slice(...rowSize);const showCols = columns.slice(...colSize);const cols = [];if (colSize[0]) {cols.push(<col key="first" width={hiddenLeftStyle.width} />);}showCols.forEach((col, i) => {const { code, width = 160 } = col;cols.push(<col key={`${code}-${colSize[0] + i}`} width={`${width}px`} />);});if (colSize[1]) {cols.push(<col key="last" width={hiddenRightStyle.width} />);}return (<div className="table-body" ref={this.getVerticalDom} onScroll={this.handleVerticalScroll} onMouseEnter={this.handleBodyMouseEnter}><div className="table-body-total" style={{ height: `${totalHeight}px`, paddingTop: `${hiddenTopStyle?.height}` }}><table><colgroup>{cols}</colgroup><tbody>{showData.map((row, i) => {const index = rowSize[0] + i;return (<tr className="table-row" key={index} data-rowindex={index} ref={this.getTrRef.bind(null, index)}>{colSize[0] ? <td /> : null}{showCols.map(({ code }, j) => {const colIndex = colSize[0] + j;return <td className="table-cell" key={`${code}-${colIndex}`} data-colindex={colIndex}>{row[code]}</td>;})}{colSize[1] ? <td /> : null}</tr>);})}</tbody></table></div></div>);};render() {const { totalHeight } = this.state;return <div className="use-virtual-table" ref={this.getVirtualTableRef} onScroll={this.handleHorizontalScroll}><div className="use-virtual-table-body" ref={this.getHorizontalDom}>{this.tableHeaderRender()}{this.tableBodyRender()}</div><divclassName="bar-virtual-vertical-scroll"style={{ height: `${this.virtualTableHeight - (this.tableHeader?.clientHeight || 34)}px`, width: `${this.scrollBarWidth}px` }}onScroll={this.handleScroll}ref={this.getScrollDom}onMouseEnter={this.handleVerScrollMouseEnter}><div className='bar-body' style={{ height: `${totalHeight}px` }} /></div></div>}}export default UseVirtualTable;
补充“假滚动条”的样式(只要整合前面基本表格的样式就完整了):
.use-virtual-table {// ...... 省略已有样式代码// 表格内容容器.table-body-total {width: 100%;overflow: hidden;}.bar-virtual-vertical-scroll {position: absolute;top: 0;right: 0;height: 100%;margin-top: var(--table-header-height);overflow: auto;.bar-body {width: 1px;}}}
调用组件
前面组件的逻辑已经比较完整了,这里在完整的补充一下调用逻辑,这份代码就完整了:
import ReactDOM from 'react-dom';import UseVirtualTable from './UseVirtualTable';const createDataSource = (rows, cols) => {const result = [];for (let i = 0; i < rows; i++) {const item = {};for (let j = 0; j < cols; j++) {item[`col_${j}`] = `ROW--${i}, COLUMN--${j}`;}result.push(item);}return result;};const dataSource = createDataSource(30, 15);const createColumns = (data) => {const item = data[0];const columns = [];Object.keys(item).forEach((key) => {columns.push({code: key,name: key,width: 180,});});return columns;};const columns = createColumns(dataSource);ReactDOM.render([<UseVirtualTable dataSource={dataSource} columns={columns} useVirtual />],document.getElementById('root'));
整个组件只要捋清楚虚拟滚动、假滚动条的 HTML 结构及 CSS,然后配上滚动逻辑之后还是比较简单的。

若有收获,就点个赞吧
0 人点赞
