随着产品的不断演化发展,整个应用常常不可避免的变得越来越庞大,此时首屏渲染时间或者首次加载时间都会加长。然后性能优化就会被排上日程。在众多的性能优化方案中,对模块做按需加载,无疑是最有效的方法之一。使用 webpack 的 import() 方法即可轻松实现模块的按需加载。
我们先使用一个最简单的示例来对 webpack 如何实现模块的按需加载有一个整体的认识。
最简单的示例
第一步:定义一个需要按需加载的模块 a.js
export default function a() {console.log('我是模块 a');}
第二步:在主模块(index.js)中引入模块 a
import('./a').then(({ default: a }) => {console.log(a);});
第三步:使用如“npm run start”(不同的配置可能略有不同)启动服务
笔者在这里启动了 webpack-dev-server ,使用 localhost 浏览可以看下在浏览器的 Console 版面输出一下内容:

然后在浏览器的 Network 版面,使用 JS 筛选后会看到加载了两个 js 文件。一个是 index.js (主模块),另一个是
0.async.js (按需加载文件)。如此就轻松实现了模块的按需加载,无特殊需求无需修改 webpack 配置,直接用即可。如何在 React 中使用 Component 的按需加载,请参阅 React.Lazy 方法的使用。
注:载入的js文件名,会因 webpack 的配置而有所不同。
我们的需求总是千变万化,基本的使用方法常常无法满足我们产品经理丰富的想象力。下面带大家一起看看 import() 还有什么更有趣的用法,然后可以跟产品经理自信满满的说“OK,没问题”。
import() 使用方法
动态文件名(路径)
前面的示例采用的是静态文件名(‘./a’,没有变量),但现实需求中常常需要使用动态文件名。比如页面加载的模块是可配置的,配置结果由服务端返回。庆幸的是,webpack 支持动态文件名。但在使用时,我们需要注意两点:
一、 至少需要部分文件的路径信息
webpack 不支持完全的动态文件名,也就是说使用下面语句编译后会出现异常。
const path = './a';import(path).then(({ default: a }) => {console.log(a);});
服务请求找不到 ‘./a’ 模块:
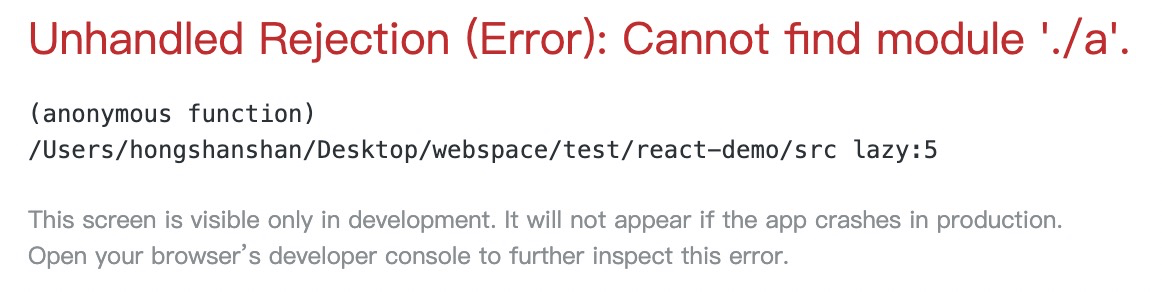
编译出现以下警告信息,编译结果中缺少按需请求文件 “0.async.js”:

不支持完全的动态文件名的原因是,webpack 的工作原理是对文件进行静态扫描,然后根据一定规则处理的。webpack 在扫描到“import()”语法时,会将变量转换成正则表达式的“.*”,然后根据这个规则匹配文件名,对匹配上的文件独立 chunk 输出。如果文件路径名只有一个变量,那么就是匹配目录下的所有文件,这明显是不合理的,所以 webpack 直接就输出了 WARNING 并且不做处理。
二、动态文件名规则匹配到的文件必须是可能被使用到的
有了前面的解释做铺垫,那么理解这条注意点就容易得多了,我们顺着前面的内容继续往下说。如果扫描到的语句是 import(./locale/${language}.json) ,那么 ‘./locale/‘ 目录下的 .json 文件编译后都会生成一个独立的按需请求文件。也就是如果匹配生成的文件不会被使用到,那么就浪费了。所以我们写文件名,将变量转换成“.*”后所匹配到的文件都必须是可能被使用到的。
配置编译后的文件名
通常情况下使用按需加载模块是不用做配置的,但有些时候我们可能对编译生成的文件名有所要求(比如为了方便识别),这时我们就可能需要调整一些配置了。
在 webpack 中,可以通过 output 的 chunkFileName 子项来调整输出的文件名。chunkFileName 的命名方式是和 filename 是一样的,但为了保证输出文件名的唯一性,推荐使用 [name]、[id] 或 [chunkhash] 其中之一的变量。这里的 [name] 通常情况下和 [id] 表现一直,只有在 import 设置 webpackChunkName 才表现不一致。定义方式如下:
import(// 通过定义 webpackChunkName 可以调整 [name] 值/* webpackChunkName: "a-async" */// webpackMode 可同选择的值有多个,有兴趣的小伙伴请自行前往帮助文档进一步了解:// https://www.webpackjs.com/api/module-methods/#import-/* webpackMode: "lazy" */'./a').then(({ default: a }) => {console.log(a);});
这时再配合下面 chunkFileName 的配置内容,就能输出 a-async.js 文件名了,如下:
const path = require('path');module.exports = {entry: './src/index.js',output: {filename: 'bundle.js',path: path.resolve(__dirname, 'dist'),chunkFilename: `[name].js`,}};
如果没有配置 chunkFilename,将根据 filename 导出按需加载文件名的规则。具体规则如下:
- 如果 filename 规则可以保证生成的文件名唯一,则按照 filename 的规则生成;
- 如果 filename 规则不能保证生成的文件名唯一,则会在 filename 规则前统一加上“[id].”来保证唯一
例如配置内容如下:
const path = require('path');module.exports = {entry: './src/index.js',output: {filename: 'bundle.js',path: path.resolve(__dirname, 'dist'),}};
那么实际生成按需加载的文件名为 [id].bundle.js 。
如何实现按需加载
webpack 扫描源文件识别 import/export ,再根据识别结果重新打包组装生成新的文件,新生成的文件代码就已经按照浏览器能识别的方式重新组装了。所以想要弄清楚 import() 是如何实现按需加载的,那么只要阅读 weipack 处理之后生成的代码即可。现在我们从按需加载 ‘./a’ 文件开始理解:
/*!**********************!*\!*** ./src/index.js ***!\**********************//*! dynamic exports provided *//*! all exports used *//***/ (function(module, exports, __webpack_require__) {__webpack_require__.e/* import() */(0/*! a-async */).then(__webpack_require__.bind(null, /*! ./a */ 82)).then(function (_ref) {var a = _ref.default;console.log(a);});/***/ })
上面代码的含义是:
- webpack_require.e 对应 import() 方法,即异步加载的主体方法;参数是 0 对应 a-async 这个chunk
- 异步加载之后首先执行 webpack_require 方法,第一个入参是 82 对应 ‘./a’ 文件。然后执行的就是自己的代码了
接下来一起来看下webpack_require.e 的方法体内容(解释请看中文注释):
/******/ // This file contains only the entry chunk./******/ // The chunk loading function for additional chunks/******/ __webpack_require__.e = function requireEnsure(chunkId) {/******/ var installedChunkData = installedChunks[chunkId];// 0 表示已经加载成功,无需再做任何处理/******/ if(installedChunkData === 0) {/******/ return new Promise(function(resolve) { resolve(); });/******/ }/******//******/ // a Promise means "currently loading".// 正在加载中/******/ if(installedChunkData) {/******/ return installedChunkData[2];/******/ }/******//******/ // setup Promise in chunk cache// 将 promise 对象的相关内容存入 installedChunks[chunkId],待后面使用/******/ var promise = new Promise(function(resolve, reject) {/******/ installedChunkData = installedChunks[chunkId] = [resolve, reject];/******/ });/******/ installedChunkData[2] = promise;/******//******/ // start chunk loading// 生成一个 script 标签,用于异步加载 js 文件/******/ var head = document.getElementsByTagName('head')[0];/******/ var script = document.createElement('script');/******/ script.type = "text/javascript";/******/ script.charset = 'utf-8';/******/ script.async = true;/******/ script.timeout = 120000;/******//******/ if (__webpack_require__.nc) {/******/ script.setAttribute("nonce", __webpack_require__.nc);/******/ }// __webpack_require__.p 就是 __webpack_public_path__ 对应的地址/******/ script.src = __webpack_require__.p + "" + ({"0":"a-async"}[chunkId]||chunkId) + ".async.js";// 超时之后执行 onScriptComplete/******/ var timeout = setTimeout(onScriptComplete, 120000);/******/ script.onerror = script.onload = onScriptComplete;/******/ function onScriptComplete() {/******/ // avoid mem leaks in IE./******/ script.onerror = script.onload = null;/******/ clearTimeout(timeout);/******/ var chunk = installedChunks[chunkId];// 如果文件加载成功,chunk就被设置为 0;后面只处理了加载失败的情况/******/ if(chunk !== 0) {/******/ if(chunk) {/******/ chunk[1](new Error('Loading chunk ' + chunkId + ' failed.'));/******/ }/******/ installedChunks[chunkId] = undefined;/******/ }/******/ };/******/ head.appendChild(script);/******//******/ return promise;/******/ };
动态创建的 script 标签生成加载成功后是先执行标签对应的文件内容,然后再执行 onload 事件的。所以 onScriptComplete 主要处理的是加载失败的情况。
script 标签对应的 ‘./a’ 文件内容:
webpackJsonp([0],{/***/ 34:/*!******************!*\!*** ./src/a.js ***!\******************//*! exports provided: default *//*! all exports used *//***/ (function(module, __webpack_exports__, __webpack_require__) {"use strict";Object.defineProperty(__webpack_exports__, "__esModule", { value: true });/* harmony export (immutable) */ __webpack_exports__["default"] = a;console.log('加载文件 a');function a() {console.log('我是模块 a');}/***/ })});
‘./a’ 文件一进来就执行了 webpackJsonp 方法,并将自身文件内容作为第二个入参值传入。webpackJsonp 方法的定义如下:
/******/ window["webpackJsonp"] = function webpackJsonpCallback(chunkIds, moreModules, executeModules) {/******/ // add "moreModules" to the modules object,/******/ // then flag all "chunkIds" as loaded and fire callback/******/ var moduleId, chunkId, i = 0, resolves = [], result;/******/ for(;i < chunkIds.length; i++) {/******/ chunkId = chunkIds[i];/******/ if(installedChunks[chunkId]) {/******/ resolves.push(installedChunks[chunkId][0]);/******/ }/******/ installedChunks[chunkId] = 0;/******/ }/******/ for(moduleId in moreModules) {/******/ if(Object.prototype.hasOwnProperty.call(moreModules, moduleId)) {/******/ modules[moduleId] = moreModules[moduleId];/******/ }/******/ }/******/ if(parentJsonpFunction) parentJsonpFunction(chunkIds, moreModules, executeModules);/******/ while(resolves.length) {/******/ resolves.shift()();/******/ }/******//******/ };
webpackJsonp 方法依次做了三件事情:
- 将 installedChunks[chunkId] 设置为0,标识加载成功 (L5-11)
- 执行 ‘./a’ 文件内的内容 (L12-16)
- 执行异步加下文件后的内容 (L18-20)
至此整个加载过程就完成了。
异常情况 Webpack 的表现
上面我们看的是最最简单的按需加载情况,如果一个公共模块即被主文件引用了,又被异步加载模块引用时 webpack 是如何处理的呢?请看下面的示例:
模块 a, 同时被模块 b 和 c 引用,b 以同步方式被主文件引入,c 以异步加载的形式被引入。
// 主文件内容 index.jsimport b from './b';b();import(/* webpackChunkName: "c-async" *//* webpackMode: "lazy" */'./c').then(({ default: c }) => {console.log('异步加载 c', c);});// b 模块内容 b.jsimport a from './a';export default function b() {a();console.log('我是模块 b');}// c 模块内容 c.jsimport a from './a';export default function c() {a();console.log('我是模块 c');}// a 模块内容 a.jsconsole.log('加载文件 a');export default function a() {console.log('我是模块 a');}
执行结果:
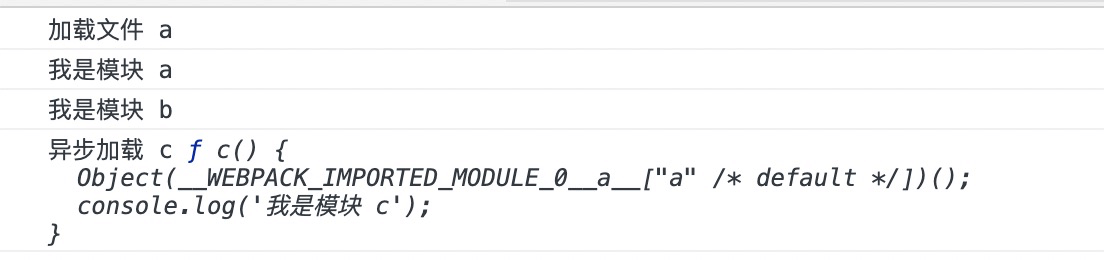
我们看到 “加载文件 a” 只被输出了一次,也就是 a 模块只被加载了一次,符合预期。我们查阅 webpack 生成的模块 b 和 模块 c 的代码:
/* 83 *//*!******************!*\!*** ./src/b.js ***!\******************//*! exports provided: default *//*! exports used: default *//***/ (function(module, __webpack_exports__, __webpack_require__) {"use strict";/* harmony export (immutable) */ __webpack_exports__["a"] = b;/* harmony import */ var __WEBPACK_IMPORTED_MODULE_0__a__ = __webpack_require__(/*! ./a */ 34);function b() {Object(__WEBPACK_IMPORTED_MODULE_0__a__["a" /* default */])();console.log('我是模块 b');}/***/ })/***/ 84:/*!******************!*\!*** ./src/c.js ***!\******************//*! exports provided: default *//*! all exports used *//***/ (function(module, __webpack_exports__, __webpack_require__) {"use strict";Object.defineProperty(__webpack_exports__, "__esModule", { value: true });/* harmony export (immutable) */ __webpack_exports__["default"] = c;/* harmony import */ var __WEBPACK_IMPORTED_MODULE_0__a__ = __webpack_require__(/*! ./a */ 34);function c() {Object(__WEBPACK_IMPORTED_MODULE_0__a__["a" /* default */])();console.log('我是模块 c');}/***/ })
上面两段代码我们很容易在第11和第32找到加载模块 a 都使用了 webpack_require,然后我们找到 _webpack _require 方法体:
/******/ // The require function/******/ function __webpack_require__(moduleId) {/******//******/ // Check if module is in cache/******/ if(installedModules[moduleId]) {/******/ return installedModules[moduleId].exports;/******/ }/******/ // Create a new module (and put it into the cache)/******/ var module = installedModules[moduleId] = {/******/ i: moduleId,/******/ l: false,/******/ exports: {},/******/ hot: hotCreateModule(moduleId),/******/ parents: (hotCurrentParentsTemp = hotCurrentParents, hotCurrentParents = [], hotCurrentParentsTemp),/******/ children: []/******/ };/******//******/ // Execute the module function/******/ modules[moduleId].call(module.exports, module, module.exports, hotCreateRequire(moduleId));/******//******/ // Flag the module as loaded/******/ module.l = true;/******//******/ // Return the exports of the module/******/ return module.exports;/******/ }
以上代码的含义是:
- 如果模块已经加载就直接返回 (L5-7)
- 如果模块未加载,则构建模块对象数据,并执行模块内容并输出 (L9-25);注:这里的模块都是同步加载的(已经加载进来),所以没有加载过程。
所以 a 模块被再次执行到时,就直接返回了,不会走到 _webpack _require 方法的第二步(L9)。
以上为 weibpack import() 相关的一些内容,笔者如有表述不当之处请批评指正。

若有收获,就点个赞吧
0 人点赞
