1. Postgresql
1.1 解压版安装
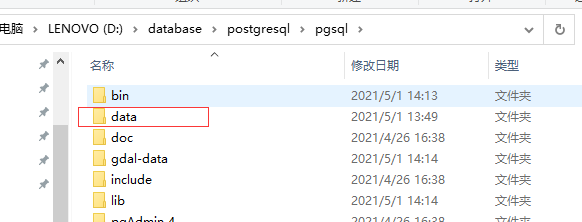
- 1、创建 data 文件夹

- 2、初始化data目录
initdb.exe -U postgres -W --locale=C -E UTF8 -D "E:\database\pgsql\data"参数:-U, --username=NAME 数据库超级用户名-W, --pwprompt 对于新的超级用户提示输入口令--locale=C 为新数据库设置默认语言环境-E, --encoding=ENCODING 为新数据库设置默认编码-D, --pgdata=DATADIR 当前数据库簇的位置
- 3、安装服务
pg_ctl.exe register -D "E:\database\pgsql\data"# 可以通过-N 指定生成的服务名字,如# pg_ctl.exe register -N "pgsql" -D "D:\database\postgresql\pgsql\data"
2.MySQL
2.1解压版安装(8.0.~)
1、创建一个名为 my.ini 的文件
[mysql]# 设置mysql客户端默认字符集default-character-set=utf8[mysqld]# 设置3306端口port = 3306# 设置mysql的安装目录basedir = D:\\database\\mysql-8.0.21-winx64# 设置mysql数据库的数据的存放目录datadir =D:\\database\\mysql-8.0.21-winx64\\data# 允许最大连接数max_connections=20# 服务端使用的字符集默认为8比特编码的latin1字符集character-set-server=utf8# 创建新表时将使用的默认存储引擎default-storage-engine=INNODB# 创建模式sql_mode = NO_ENGINE_SUBSTITUTION,STRICT_TRANS_TABLES
2、在bin目录执行 mysqld —initialize 命令,此时会生成一个新目录 data,查看 xxx .err 文件,可以看到 root 用户生成的随机密

- 3、执行 mysqld —install 命令,安装 mysql 服务
- 4、执行 net start mysql 命令,启动 mysql 服务
- 5、执行 mysql -u root -p 命令,连接 mysql 数据库,输入上述随机生成的密码;
- 6、执行以下 SQL 重置 root 密码
alter user 'root'@'localhost' identified with mysql_native_password by '新密码';
备注:
- mysqld –initialize-insecure 自动生成无密码的 root 用户;
- mysqld –initialize 自动生成带随机密码的 root 用户;
- mysqld -remove 移除自己的 mysql 服务;
- net stop mysq 命令,停止 mysql 服务
- 如果报错,清空 data 文件夹,最好还是删掉 data 文件,重新执行 remove—initialize—install—start(这些不是命令)流程即可
2.2 MySQL忘记密码(8.0.~)
1.打开cmd窗口(管理员身份),停止mysql服务
net stop mysql
2.开启跳过验证密码的mysql服务
mysqld --console --skip-grant-tables --shared-memory
3.打开一个新的cmd窗口,启动mysql服务
mysql -u root -p
4.输入密码—直接回车
5.将密码置空
use mysqlupdate user set authentication_string=‘’ where user=‘root’;exit
6.重新开启mysql服务,无密码登陆,修改密码
ALTER USER ‘root’@‘localhost’ IDENTIFIED WITH mysql_native_password BY ‘123456’;flush privileges
2.3 mysql 5.7
3.Redis
3.1 Windows安装
- 安装服务
redis-server.exe --service-install redis.windows.conf
卸载服务:redis-server —service-uninstall
开启服务:redis-server —service-start
停止服务:redis-server —service-stop
重命名服务:redis-server —service-name name,需要写在前三个参数之后,eg:
redis-server --service-install --service-name redisService1 --port 10001redis-server --service-start --service-name redisService1
4. ElasticSearch
4.1 添加密码 7.11
- 1、修改 elasticsearch.yml,加上以下配置项:
xpack.security.enabled: truexpack.license.self_generated.type: basicxpack.security.transport.ssl.enabled: true
- 2、设置密码,elasticsearch/bin 目录下,执行命令: ./elasticsearch-setup-passwords interactive
# 修改指定账号的密码 --- 把 elastic 密码改成 123456curl -H "Content-Type:application/json" -XPOST -u elastic 'http://localshot:9200/_xpack/security/user/elastic/_password' -d '{ "password" : "123456" }'## 执行之后,输入一遍原始密码,即可以成功修改成新的密码
- 3、修改Kibana配置 —— kibana.yml
elasticsearch.username: "kibana_system"elasticsearch.password: "953598751"
- 4、修改 logstash 配置
##### logstash.ymlxpack.monitoring.enabled: truexpack.monitoring.elasticsearch.username: logstash_systemxpack.monitoring.elasticsearch.password: 953598751xpack.monitoring.elasticsearch.hosts: ["http://ip:9200"]##### xxxxx.confelasticsearch {hosts => ["localhost:9200"]index => "xxxxx"document_id => "%{id}"user => "elastic"password => "953598751"}
4.2 添加密码 8.x
./bin/elasticsearch.bat## 设置密码elasticsearch-reset-password --username elastic -i# Enable encryption for HTTP API client connections, such as Kibana, Logstash, and Agentsxpack.security.http.ssl:## 关闭 HTTP API客户端连接加密,enabled: falsekeystore.path: certs/http.p12## 设置 kibana 链接密码elasticsearch-reset-password --username kibana_system -i### kibana.yamlelasticsearch.username: "kibana_system"elasticsearch.password: "password"## kibaba 中文i18n.locale: "zh-CN"

