一、前端新键品牌管理
1.1 引入&修改逆向生成的代码
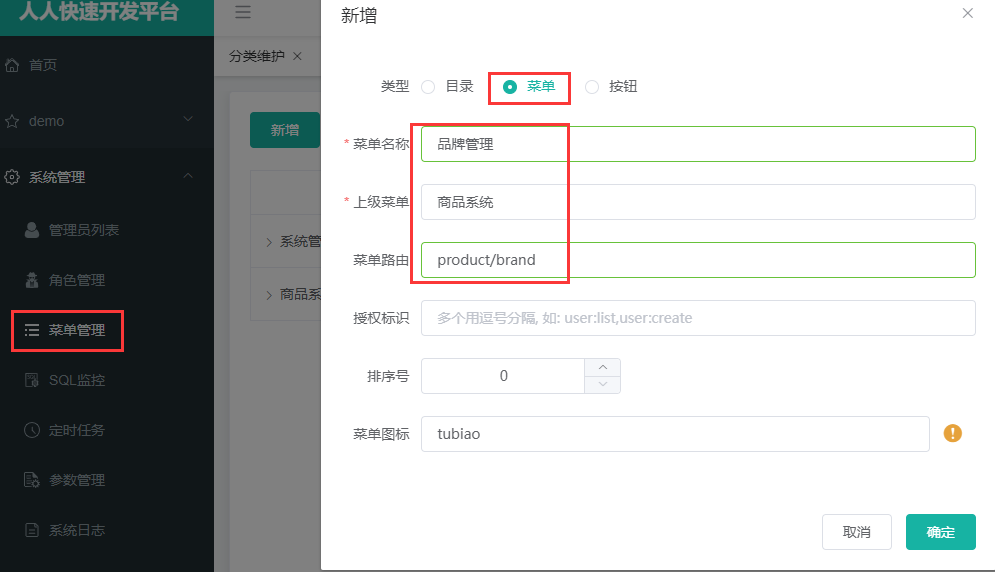
将逆向生成的品牌展示以及修改添加前端模块放到我们的当前路径下(renren-fast-vue\src\views\modules\product)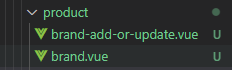
brand.vue ——品牌列表
brand-add-or-update.vue —— 品牌增加修改
现在我们重启项目,发现我们并不能管理品牌,这是因为brand.vue中的新增删除按钮有一个认证,我们需要修改这个认证函数使其永远返回true
1.2 修改品牌显示状态
使用开关的方式来开启/关闭品牌显示。这里仅修改前端代码,不需要修改后端代码。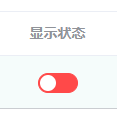
踩坑
前端改变显示状态时,需要更新数据库中的show_status字段,我使用的是mybatis-plus 3.4.2,结果一致报SQL语法错误。最终解决办法,因为mybatis-plus 3.4.2 在配置逻辑删除时,配置文件中可以设置全局逻辑删除的实体字段名。关键就在于mybatis-plus如果某个字段开启了逻辑删除,就无法使用update来更新这个字段(自己试验出来的,具体原因还没有弄明白,如果有大佬知道还请解释一下,谢谢)。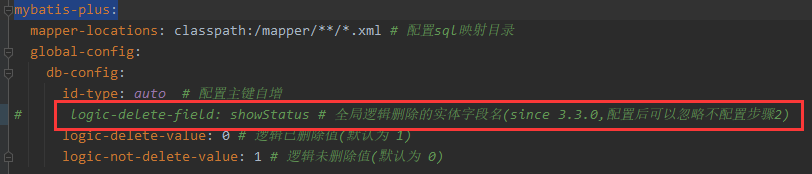
而视频里面用的是mybatis-plus 3.2.0 其没有全局逻辑删除,而是通过@TableLogic注解来开启特定entity字段的逻辑删除,所以这里将全局逻辑删除注释即可。(后面删除品牌的时候可能会与更新产生冲突)
1.3 文件上传——管理品牌
1.3.1 阿里云OSS
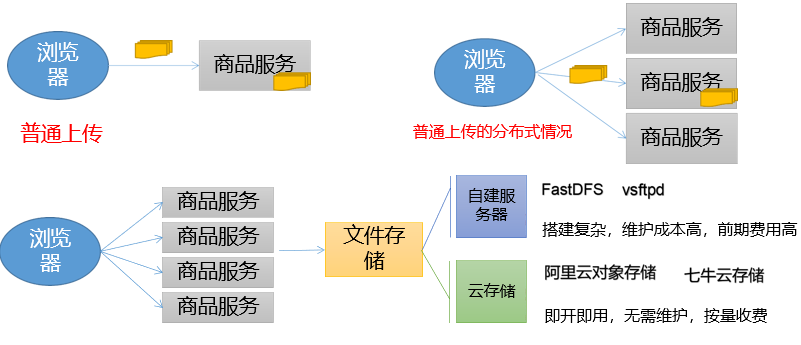
和传统的单体应用不同,这里我们选择将数据上传到分布式文件服务器上。这里我们选择将图片放置到阿里云上,使用阿里云提供的对象存储服务(OSS,Object Storage Service)。
对象存储服务是一种海量、安全、低成本、高可靠的云存储服务,适合存放任意类型的文件。容量和处理能力弹性扩展,多种存储类型供选择,全面优化存储成本。

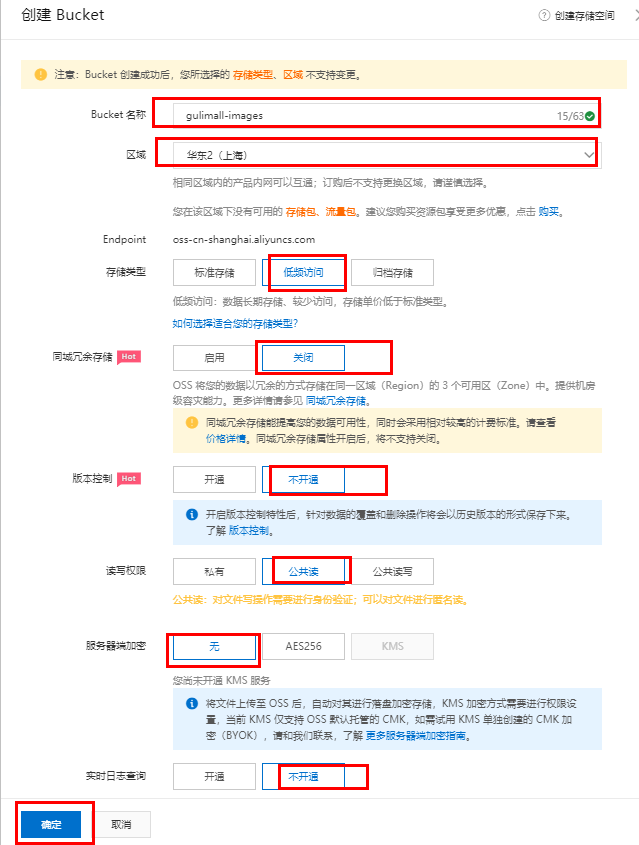 (第二张图是用的别人的,名字自己取,地区就近选择)
进入bucket列表->文件管理->点击上传文件即可上传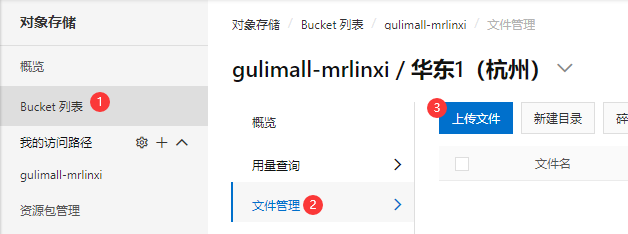
上传完成后,点击详情->复制文件URL即可远程获取到文件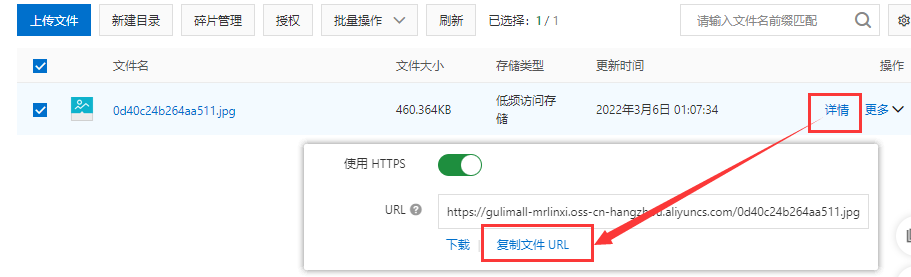
实际上我们可以在程序中设置自动上传图片到阿里云对象存储。
1.3.2 上传模型
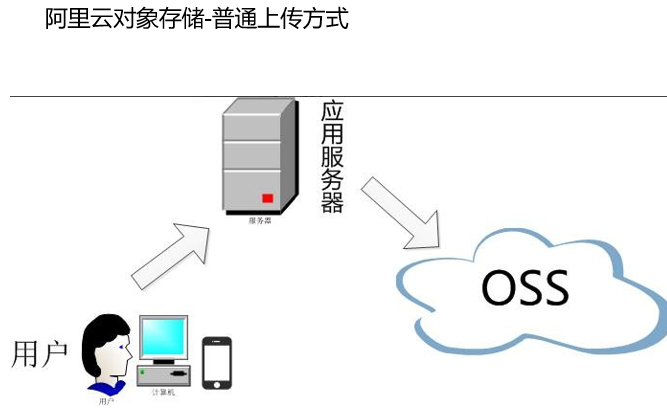
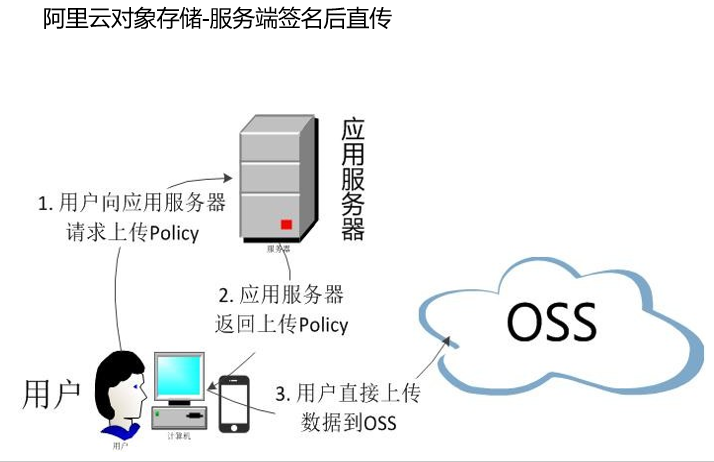
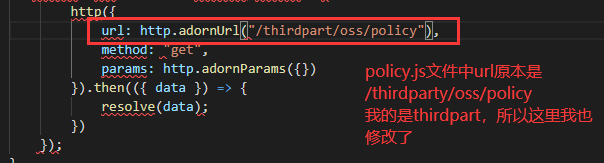
这里为了安全,我们通过第二种方式上传:浏览器向服务器请求上传policy->服务器利用阿里云账号密码生成一个防伪policy->前端携带防伪policy上传到OSS
1.3.3 OSS SDK快速开发
我们可以参考SDK(Java)文档(一定要看)。
引入依赖
添加oss-sdk依赖
<dependency><groupId>com.aliyun.oss</groupId><artifactId>aliyun-sdk-oss</artifactId><version>3.10.2</version></dependency>
文件流上传代码:注意导入的package
// Endpoint以华东1(杭州)为例,其它Region请按实际情况填写。String endpoint = "https://oss-cn-hangzhou.aliyuncs.com";// 阿里云账号AccessKey拥有所有API的访问权限,风险很高。强烈建议您创建并使用RAM用户进行API访问或日常运维,请登录RAM控制台创建RAM用户。String accessKeyId = "yourAccessKeyId";String accessKeySecret = "yourAccessKeySecret";// 填写Bucket名称,例如examplebucket。String bucketName = "examplebucket";// 填写Object完整路径,例如exampledir/exampleobject.txt。Object完整路径中不能包含Bucket名称。// 如果没有文件夹就不需要写String objectName = "exampledir/exampleobject.txt";// 填写本地文件的完整路径,例如D:\\localpath\\examplefile.txt。// 如果未指定本地路径,则默认从示例程序所属项目对应本地路径中上传文件流。String filePath= "D:\\localpath\\examplefile.txt";// 创建OSSClient实例。OSS ossClient = new OSSClientBuilder().build(endpoint, accessKeyId, accessKeySecret);try {InputStream inputStream = new FileInputStream(filePath);// 创建PutObject请求。ossClient.putObject(bucketName, objectName, inputStream);} catch (OSSException oe) {System.out.println("Caught an OSSException, which means your request made it to OSS, "+ "but was rejected with an error response for some reason.");System.out.println("Error Message:" + oe.getErrorMessage());System.out.println("Error Code:" + oe.getErrorCode());System.out.println("Request ID:" + oe.getRequestId());System.out.println("Host ID:" + oe.getHostId());} catch (ClientException ce) {System.out.println("Caught an ClientException, which means the client encountered "+ "a serious internal problem while trying to communicate with OSS, "+ "such as not being able to access the network.");System.out.println("Error Message:" + ce.getMessage());} finally {if (ossClient != null) {ossClient.shutdown();}}
配置阿里云
endpoint需要进入创建的bucket中查看,点击概览查看: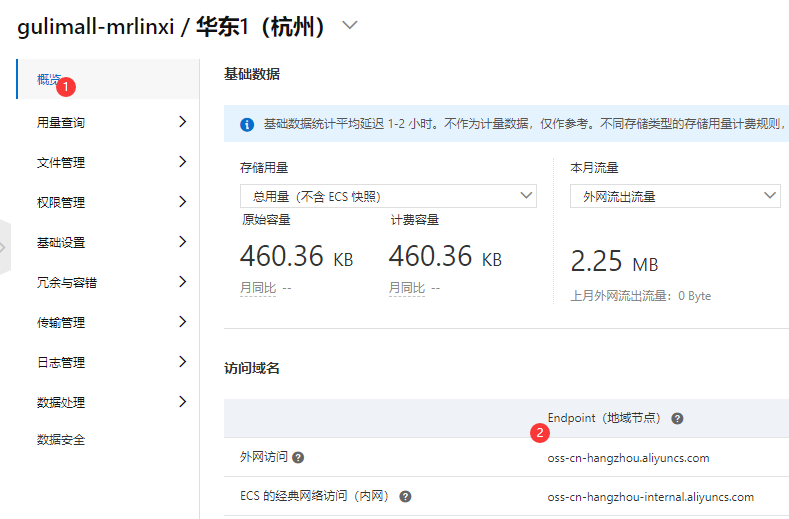
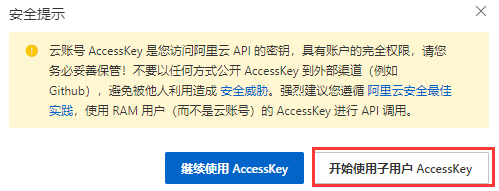
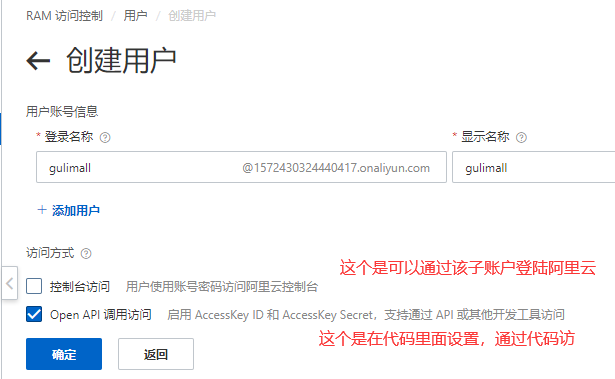
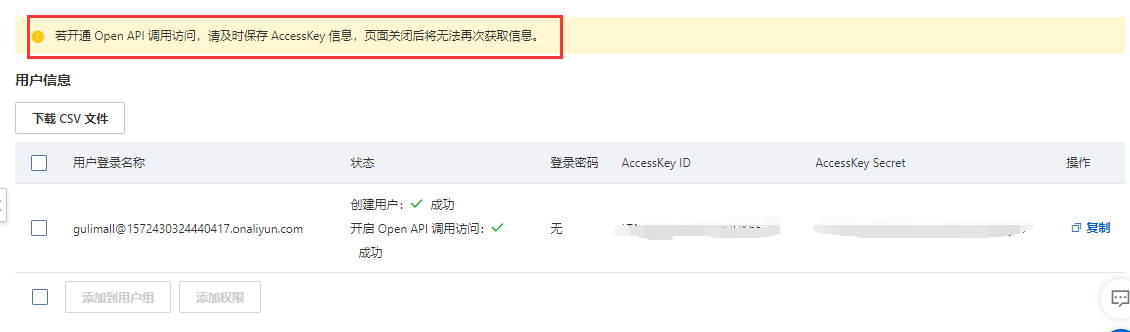
创建AccessKeyId和AccessKeySecret:
进入AccessKey管理->选择开始使用子用户->创建用户->得到key跟密码 记得保存key跟密码!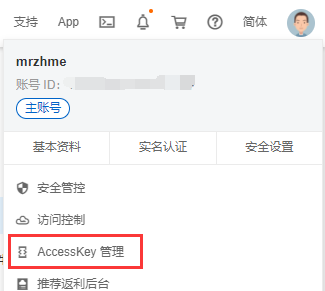
在使用之前,还需要给子账户添加权限: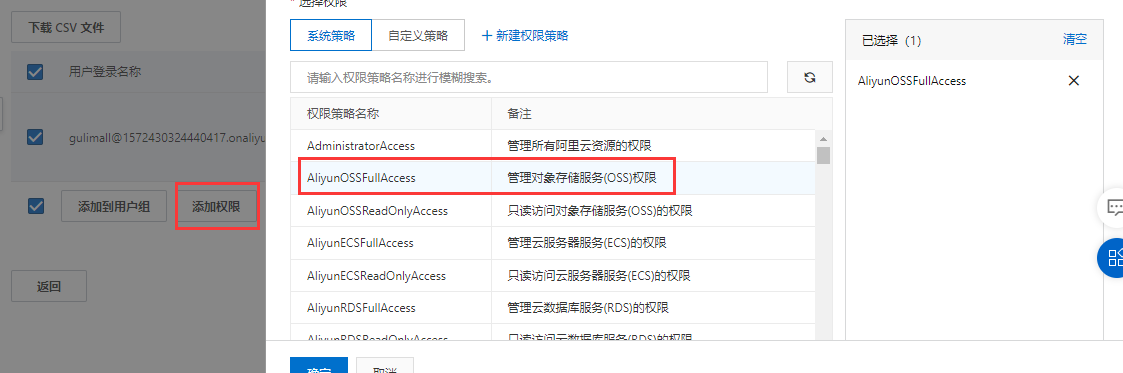
测试
package com.atguigu.gilumall.gulimallproduct;import com.aliyun.oss.ClientException;import com.aliyun.oss.OSS;import com.aliyun.oss.OSSClientBuilder;import com.aliyun.oss.OSSException;import com.atguigu.gulimall.gulimallproduct.GulimallProductApplication;import com.atguigu.gulimall.gulimallproduct.entity.BrandEntity;import com.atguigu.gulimall.gulimallproduct.service.BrandService;import com.baomidou.mybatisplus.core.conditions.query.QueryWrapper;import org.junit.jupiter.api.Test;import org.springframework.beans.factory.annotation.Autowired;import org.springframework.boot.test.context.SpringBootTest;import java.io.FileInputStream;import java.io.FileNotFoundException;import java.io.InputStream;import java.util.List;@SpringBootTest(classes = GulimallProductApplication.class)class GulimallProductApplicationTests {@AutowiredBrandService brandService;@Testpublic void testUpload() {// Endpoint以华东1(杭州)为例,其它Region请按实际情况填写。String endpoint = "https://oss-cn-hangzhou.aliyuncs.com";// 阿里云账号AccessKey拥有所有API的访问权限,风险很高。强烈建议您创建并使用RAM用户进行API访问或日常运维,请登录RAM控制台创建RAM用户。String accessKeyId = "xxxxx";String accessKeySecret = "xxxxxx";// 填写Bucket名称,例如examplebucket。String bucketName = "gulimall-mrlinxi";// 填写Object完整路径,例如exampledir/exampleobject.txt。Object完整路径中不能包含Bucket名称。// 这里我没有文件夹,所以直接写文件名称就行,这个名称就是你上传到bucket后的文件名String objectName = "huawei.png";// 填写本地文件的完整路径,例如D:\\localpath\\examplefile.txt。// 如果未指定本地路径,则默认从示例程序所属项目对应本地路径中上传文件流。String filePath= "E:\\A尚硅谷课件\\项目&面试\\Guli Mall\\课件和文档(老版)\\基础篇\\资料\\pics\\huawei.png";// 创建OSSClient实例。OSS ossClient = new OSSClientBuilder().build(endpoint, accessKeyId, accessKeySecret);try {InputStream inputStream = new FileInputStream(filePath);// 创建PutObject请求。ossClient.putObject(bucketName, objectName, inputStream);} catch (OSSException oe) {System.out.println("Caught an OSSException, which means your request made it to OSS, "+ "but was rejected with an error response for some reason.");System.out.println("Error Message:" + oe.getErrorMessage());System.out.println("Error Code:" + oe.getErrorCode());System.out.println("Request ID:" + oe.getRequestId());System.out.println("Host ID:" + oe.getHostId());} catch (ClientException ce) {System.out.println("Caught an ClientException, which means the client encountered "+ "a serious internal problem while trying to communicate with OSS, "+ "such as not being able to access the network.");System.out.println("Error Message:" + ce.getMessage());} catch (FileNotFoundException e) {e.printStackTrace();} finally {if (ossClient != null) {ossClient.shutdown();System.out.println("上传完成");}}}}

1.3.4 SpringCloud Alibaba-OSS
更为简单的方式是直接使用SpringCloud Alibaba提供的OSS Github README-zh 阿里云帮助文档
- 修改 pom.xml 文件,引入 aliyun-oss-spring-boot-starter。(我们直接放到common下面)
aliyun-oss-spring-boot-starter搜索不到依赖,我去maven仓库找了,只有spring-cloud-starter-alicloud-oss可以用,记得指定版本
这个有问题,加了版本号也导不进去<dependency><groupId>com.alibaba.cloud</groupId><artifactId>aliyun-oss-spring-boot-starter</artifactId></dependency>用下面这个<!--OSS 对象存储服务--><dependency><groupId>com.alibaba.cloud</groupId><artifactId>spring-cloud-starter-alicloud-oss</artifactId><version>2.2.0.RELEASE</version></dependency>
在配置文件中配置 OSS 服务对应的 accessKey、secretKey 和 endpoint。
# 配置阿里云OSSalicloud:access-key: LTAI5t6fKvdMW3JwHHKb5vF9secret-key: 2PVwPqcLf1fQw5dHmhHShuSPmPAgS6oss:endpoint: oss-cn-hangzhou.aliyuncs.com
注入 OSSClient 并进行文件上传下载等操作(这一步只是个示例)。
@Servicepublic class YourService {@Autowiredprivate OSSClient ossClient;public void saveFile() {// download file to localossClient.getObject(new GetObjectRequest(bucketName, objectName), new File("pathOfYourLocalFile"));}}
测试: ```java @Autowired OSSClient ossClient;
@Test public void testUpload() { // Endpoint以华东1(杭州)为例,其它Region请按实际情况填写。 // String endpoint = “https://oss-cn-hangzhou.aliyuncs.com“; // 阿里云账号AccessKey拥有所有API的访问权限,风险很高。强烈建议您创建并使用RAM用户进行API访问或日常运维,请登录RAM控制台创建RAM用户。 // String accessKeyId = “LTAI5t6fKvdMW3JwHHKb5vF9”; // String accessKeySecret = “2PVwPqcLf1fQw5dHmhHShuSPmPAgS6”; // 填写Bucket名称,例如examplebucket。 String bucketName = “gulimall-mrlinxi”; // 填写Object完整路径,例如exampledir/exampleobject.txt。Object完整路径中不能包含Bucket名称。 // 这里我没有文件夹,所以直接写文件名称就行,这个名称就是你上传到bucket后的文件名 String objectName = “xiaomi.png”; // 填写本地文件的完整路径,例如D:\localpath\examplefile.txt。 // 如果未指定本地路径,则默认从示例程序所属项目对应本地路径中上传文件流。 String filePath= “E:\A尚硅谷课件\项目&面试\Guli Mall\课件和文档(老版)\基础篇\资料\pics\xiaomi.png”;
// 创建OSSClient实例。
// OSS ossClient = new OSSClientBuilder().build(endpoint, accessKeyId, accessKeySecret);
try {InputStream inputStream = new FileInputStream(filePath);// 创建PutObject请求。ossClient.putObject(bucketName, objectName, inputStream);} catch (OSSException oe) {System.out.println("Caught an OSSException, which means your request made it to OSS, "+ "but was rejected with an error response for some reason.");System.out.println("Error Message:" + oe.getErrorMessage());System.out.println("Error Code:" + oe.getErrorCode());System.out.println("Request ID:" + oe.getRequestId());System.out.println("Host ID:" + oe.getHostId());} catch (ClientException ce) {System.out.println("Caught an ClientException, which means the client encountered "+ "a serious internal problem while trying to communicate with OSS, "+ "such as not being able to access the network.");System.out.println("Error Message:" + ce.getMessage());} catch (FileNotFoundException e) {e.printStackTrace();} finally {if (ossClient != null) {ossClient.shutdown();System.out.println("上传完成");}}
}
但是这样来做还是比较麻烦,我们可以单独创建一个微服务用于文件上传<a name="Mxhgr"></a>### 1.3.5 gulimai-third-part<a name="k3aXV"></a>#### 新建第三方微服务gulimall-third-part视频使用的是Spring initialnizr初始化,选中了spring-web和openfeign,其他nacos的注册和配置直接继承common;因为我之前是直接把spring-web和openfeign都放在了common中,所以我直接通过maven初始化微服务继承common。<a name="hiTZM"></a>#### pom引入common(将mybatis排除),和oss;将common中的oss删除```xml<?xml version="1.0" encoding="UTF-8"?><project xmlns="http://maven.apache.org/POM/4.0.0"xmlns:xsi="http://www.w3.org/2001/XMLSchema-instance"xsi:schemaLocation="http://maven.apache.org/POM/4.0.0 http://maven.apache.org/xsd/maven-4.0.0.xsd"><parent><artifactId>gulimall</artifactId><groupId>com.atguigu.gulimall</groupId><version>0.0.1-SNAPSHOT</version></parent><modelVersion>4.0.0</modelVersion><artifactId>gulimall-third-part</artifactId><properties><maven.compiler.source>8</maven.compiler.source><maven.compiler.target>8</maven.compiler.target></properties><dependencies><dependency><groupId>com.atguigu.gulimall</groupId><artifactId>gulimall-common</artifactId><version>0.0.1-SNAPSHOT</version></dependency><!--OSS 对象存储服务--><dependency><groupId>com.alibaba.cloud</groupId><artifactId>spring-cloud-starter-alicloud-oss</artifactId><version>2.2.0.RELEASE</version></dependency></dependencies></project>
配置文件
在nacos中创建gulimall-third-part的命名空间;在该命名空间下创建如下配置问价oss.yaml
spring:cloud:alicloud:access-key: LTAI5t6fKvdMW3JwHHKb5vF9secret-key: 2PVwPqcLf1fQw5dHmhHShuSPmPAgS6oss:endpoint: https://oss-cn-hangzhou.aliyuncs.com
spring:application:name: gulimall-third-partcloud:nacos:config:server-addr: localhost:8848namespace: 84cba3ed-1257-4f80-9bc7-b4267ac0e9d5file-extension: yaml
使用服务端签名直传
package com.atguigu.gulimall.gulimallthirdpart.controller;import com.aliyun.oss.OSS;import com.aliyun.oss.common.utils.BinaryUtil;import com.aliyun.oss.model.MatchMode;import com.aliyun.oss.model.PolicyConditions;import org.springframework.beans.factory.annotation.Autowired;import org.springframework.beans.factory.annotation.Value;import org.springframework.web.bind.annotation.RequestMapping;import org.springframework.web.bind.annotation.RestController;import java.text.SimpleDateFormat;import java.time.LocalDate;import java.util.Date;import java.util.LinkedHashMap;import java.util.Map;/*** 对象存储专用controller* @author mrlinxi* @create 2022-03-06 16:51*/@RestControllerpublic class OSSController {@AutowiredOSS ossClient; // 自动注入OSSClient@Value("${spring.cloud.alicloud.oss.endpoint}")private String endpoint;@Value("${spring.cloud.alicloud.oss.bucket}")private String bucket;@Value("${spring.cloud.alicloud.access-key}")private String accessId;/*** 获取policy*/@RequestMapping("/oss/policy")public Map<String, String> policy() {// https://gulimall-mrlinxi.oss-cn-hangzhou.aliyuncs.com/xiaomi.png// String bucket = "gulimall-mrlinxi"; // 请填写您的 bucketname 。String host = "https://" + bucket + "." + endpoint; // host的格式为 bucketname.endpoint// callbackUrl为上传回调服务器的URL,请将下面的IP和Port配置为您自己的真实信息。// String callbackUrl = "http://88.88.88.88:8888";// 我们将前缀设置为系统当前年月日String simpleDateFormat = new SimpleDateFormat("yyyy-MM-dd").format(new Date());// String localDate = LocalDate.now().toString();String dir = simpleDateFormat; // 用户上传文件时指定的前缀。Map<String, String> respMap = null;try {long expireTime = 30;long expireEndTime = System.currentTimeMillis() + expireTime * 1000;Date expiration = new Date(expireEndTime);// PostObject请求最大可支持的文件大小为5 GB,即CONTENT_LENGTH_RANGE为5*1024*1024*1024。PolicyConditions policyConds = new PolicyConditions();policyConds.addConditionItem(PolicyConditions.COND_CONTENT_LENGTH_RANGE, 0, 1048576000);policyConds.addConditionItem(MatchMode.StartWith, PolicyConditions.COND_KEY, dir);String postPolicy = ossClient.generatePostPolicy(expiration, policyConds);byte[] binaryData = postPolicy.getBytes("utf-8");String encodedPolicy = BinaryUtil.toBase64String(binaryData);String postSignature = ossClient.calculatePostSignature(postPolicy);respMap = new LinkedHashMap<String, String>();respMap.put("accessid", accessId);respMap.put("policy", encodedPolicy);respMap.put("signature", postSignature);respMap.put("dir", dir);respMap.put("host", host);respMap.put("expire", String.valueOf(expireEndTime / 1000));// respMap.put("expire", formatISO8601Date(expiration));} catch (Exception e) {// Assert.fail(e.getMessage());System.out.println(e.getMessage());} finally {ossClient.shutdown();}return respMap;}}
测试: http://localhost:30000/oss/policy
修改网关路由规则
规定通过:localhost:88/api/thirdpart/oss/policy 访问第三方服务获取policy,我们修改一下网关的路由规则,添加如下规则:
- id: third_part_routeuri: lb://gulimall-third-part # lb://服务名 进行负载均衡转发predicates: # 对包含有/api/gulimallproduct的url请求进行路径重写- Path=/api/thirdpart/**filters:- RewritePath=/api/thirdpart/(?<segment>.*), /$\{segment}
测试:localhost:88/api/thirdpart/oss/policy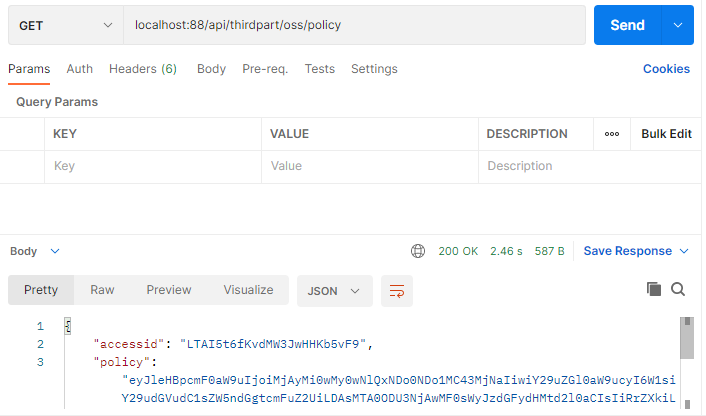
1.3.6 前端后端联调—完成文件上传功能
1)图片上传
放置项目提供的upload文件夹到components目录下。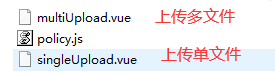
然后将两个vue文件中el-upload组件中action的地址替换成自己阿里云的bucket地址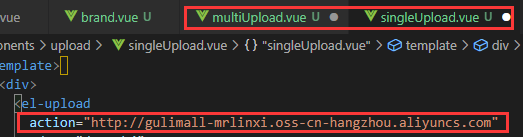
在brand-add-or-update.vue中导入singleUplaod组件,在品牌logo地址处使用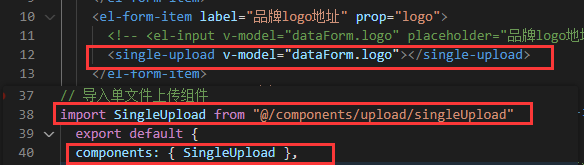
在上传过程中,发现出现了跨域问题:
Access to XMLHttpRequest at ‘http://gulimall-mrlinxi.oss-cn-hangzhou.aliyuncs.com/‘ from origin ‘http://localhost:8001‘ has been blocked by CORS policy: Response to preflight request doesn’t pass access control check: No ‘Access-Control-Allow-Origin’ header is present on the requested resource.
所以我们需要将OSS的bucket设置成可以跨域访问:帮助文档中也说了需要设置跨域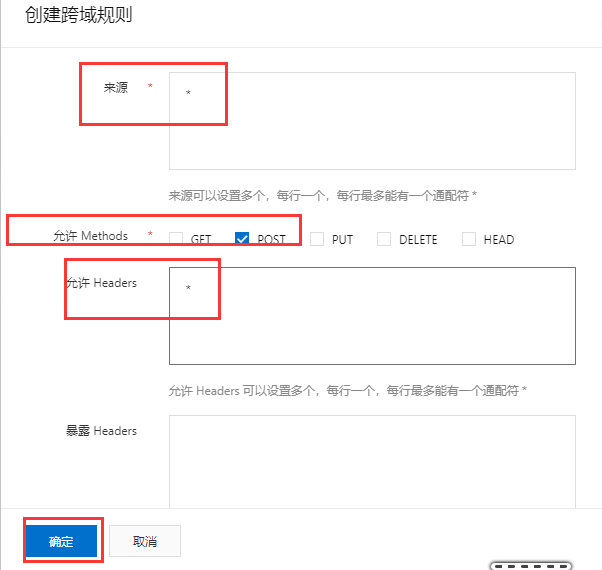
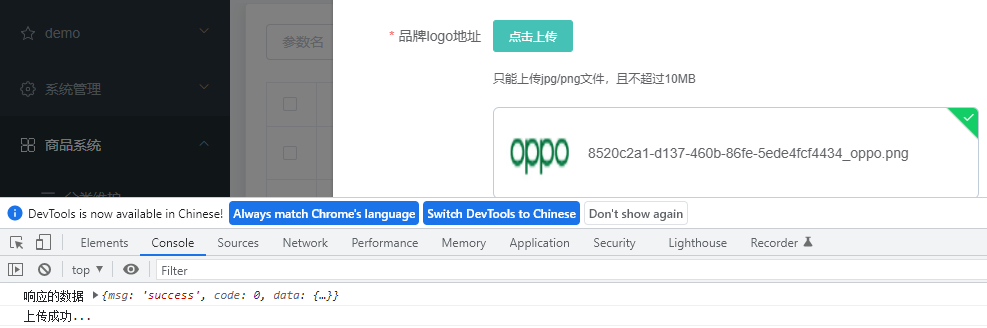 再测试,发现上传成功。
现在我们添加一个品牌,发现品牌logo地址显示的是图片在阿里云OSS服务器上的地址: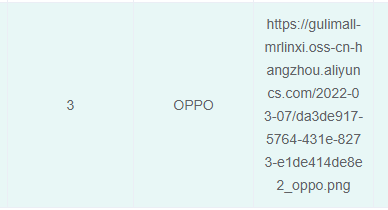 ,现在需求是显示图片。
我们修改brand.vue中”品牌logo地址”的el-tale-colum,如下:
<el-table-columnprop="logo"header-align="center"align="center"label="品牌logo地址"><!-- scope 是当前列对象, scope.row获取当前列的信息那么scope.row.logo可以获取到logo的地址再通过el-image组件即可显示图片--><template slot-scope="scope"><!-- <el-imagestyle="width: 100px; height: 80px":src="scope.row.logo"fit="contain"></el-image> --><!-- 使用原生的image组件 el显示不了太大的图片--><img :src="scope.row.logo" style="width: 100px; height: 80px"></template></el-table-column>
二、JRS303数据校验
我们发现前端填写检索首字母字段的时候,不写会提示必填字段,但是却可以填写一段字符串,这显然不满足要求。所以需要使用到el的form验证功能。
但是前端的校验是很容易规避的,比如使用postman,因此我们还需要在后端进行数据校验!
使用方法:
- 直接给需要校验的数据加上校验注解(不同注解表示不同规则,可以自定义message)
- 告诉SpringMVC进行校验(@Valid注解,加在controller的入参处)
- 给校验的bean后紧跟一个BindingResult就可以获取校验结果
注:spring-boot2.3及以上版本将不再内部依赖hibernate-validator做参数验证,需要手动添加依赖
这里我用的是2.3.12版本,所以我在common中添加了spring-boot-starter-validation依赖
<!--validation--><dependency><groupId>org.springframework.boot</groupId><artifactId>spring-boot-starter-validation</artifactId></dependency>
2.1 单独处理异常
步骤一:使用校验注解规定校验规则
package com.atguigu.gulimall.gulimallproduct.entity;import com.baomidou.mybatisplus.annotation.TableId;import com.baomidou.mybatisplus.annotation.TableLogic;import com.baomidou.mybatisplus.annotation.TableName;import java.io.Serializable;import lombok.Data;import org.hibernate.validator.constraints.URL;import javax.validation.constraints.*;/*** 品牌** @author mrlinxi* @email mrzheme@vip.qq.com* @date 2021-12-07 19:17:01*/@Data@TableName("pms_brand")public class BrandEntity implements Serializable {private static final long serialVersionUID = 1L;/*** 品牌id*/@TableIdprivate Long brandId;/*** 品牌名*/@NotBlank(message = "品牌名不能为空")private String name;/*** 品牌logo地址*/@NotEmpty@URL(message = "logo必须是一个合法的url地址")private String logo;/*** 介绍*/private String descript;/*** 显示状态[0-不显示;1-显示]*/// @TableLogic(value = "1", delval = "0")private Integer showStatus;/*** 检索首字母*/// @Pattern可以自定义规则 这里正则表达式需要去掉/ /^[a-zA-Z]$/@Pattern(regexp = "^[a-zA-Z]$", message = "检索首字母必须是一个字母")@NotEmptyprivate String firstLetter;/*** 排序*/@Min(value = 0, message = "排序必须大于等于0")@NotNullprivate Integer sort;}
步骤二:在请求方法中,使用校验注解@Valid开启校验;
步骤三:如果需要获取到校验结果,在校验的Bean后紧跟一个BindingResult即可。之后就可以自定义封装
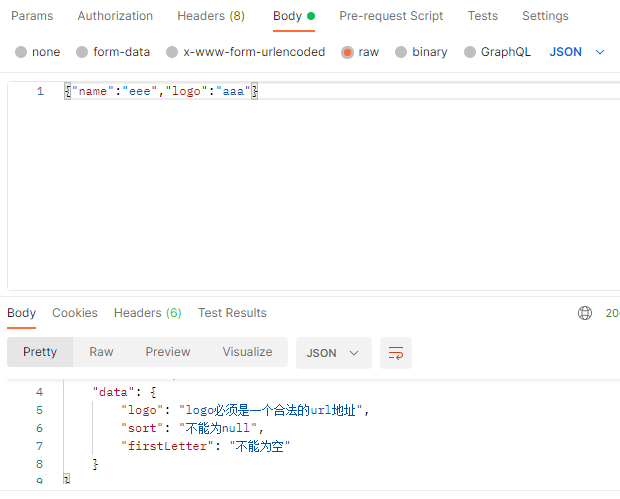
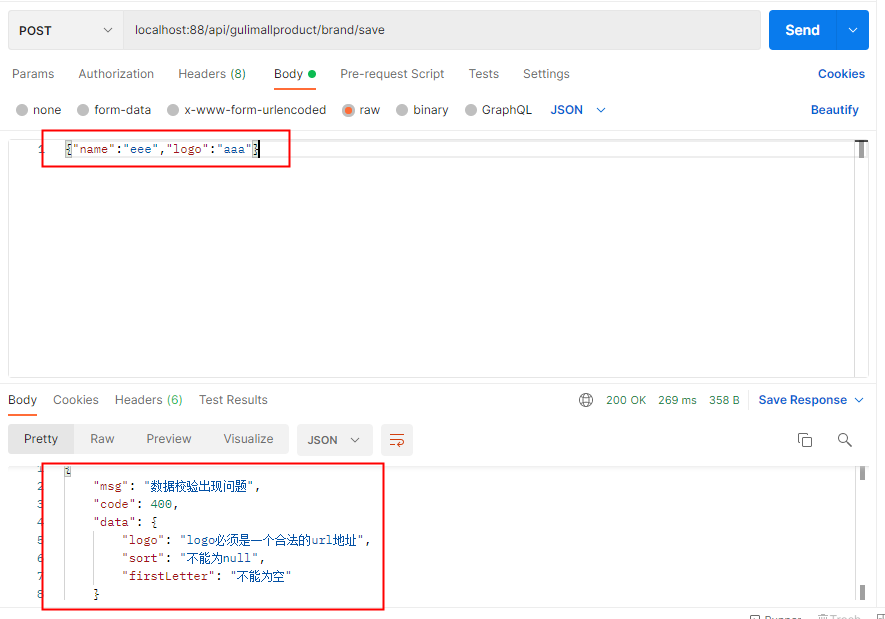
@RequestMapping("/save")//@RequiresPermissions("gulimallproduct:brand:save")public R save(@Valid @RequestBody BrandEntity brand, BindingResult result){if (result.hasErrors()) {Map<String, String> map = new HashMap<>();// 1.获取校验的错误结果result.getFieldErrors().forEach((item) -> {//FieldError 获取到错误提示String message = item.getDefaultMessage();// 获取错误的属性的名字String field = item.getField();map.put(field, message);});return R.error(400, "提交的数据不合法").put("data", map);}else {brandService.save(brand);}return R.ok();}
2.2 统一处理异常
显然,单独处理异常非常不方便,同时代码的复用不友好。可以使用SpringMvc所提供的@ControllerAdvice,通过“basePackages”能够说明处理哪些路径下的异常。
@RestControllerAdvice=ControllerAdvice+RestBody
2.2.1 抽取一个异常处理类
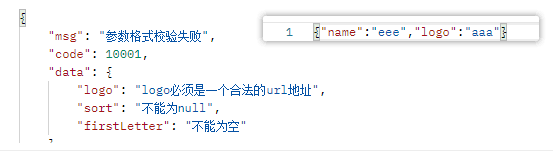
package com.atguigu.gulimall.gulimallproduct.exception;import com.atguigu.common.utils.R;import lombok.extern.slf4j.Slf4j;import org.springframework.validation.BindingResult;import org.springframework.web.bind.MethodArgumentNotValidException;import org.springframework.web.bind.annotation.ControllerAdvice;import org.springframework.web.bind.annotation.ExceptionHandler;import org.springframework.web.bind.annotation.ResponseBody;import org.springframework.web.bind.annotation.RestControllerAdvice;import java.util.HashMap;import java.util.Map;/*** @author MrLinxi* @Description 集中处理所有异常* @create 2022-03-07-15:52*/@Slf4j//@ResponseBody//@ControllerAdvice(basePackages = "com.atguigu.gulimall.gulimallproduct.controller")@RestControllerAdvice(basePackages = "com.atguigu.gulimall.gulimallproduct.controller")public class GulimallExceptionControllerAdvice {// ExceptionHandler注解可以指定可以处理什么异常@ExceptionHandler(value = MethodArgumentNotValidException.class)public R handleValidException(MethodArgumentNotValidException e) {Map<String, String> map = new HashMap<>();BindingResult bindingResult = e.getBindingResult();bindingResult.getFieldErrors().forEach(fieldError -> {String message = fieldError.getDefaultMessage();String field = fieldError.getField();map.put(field, message);});log.error("数据校验出现问题{},异常类型{}", e.getMessage(), e.getClass());return R.error(400,"数据校验出现问题").put("data",map);}}
2.2.2 错误代码规范
上面代码中,针对于错误状态码,是我们进行随意定义的,然而正规开发过程中,错误状态码有着定义规范,如该在项目中我们的错误状态码定义如下: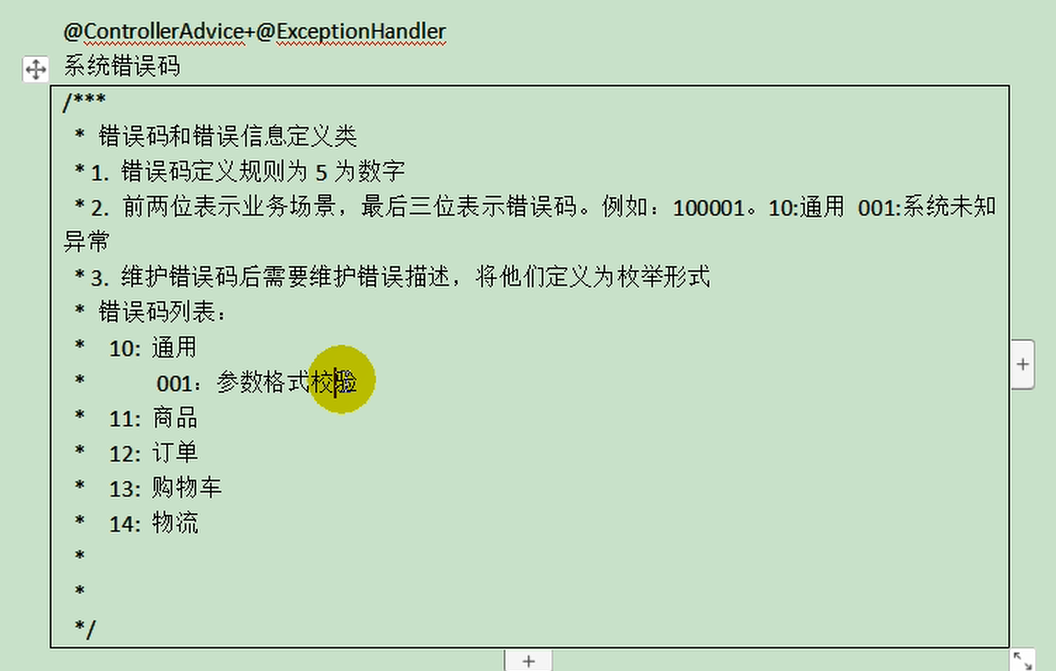
异常代码枚举类
我们可以在common中定义一个枚举类,用来存储这些错误代码;
枚举在类上加两个注解,可以不用自己手写get方法和构造方法(注意要有lombok依赖):@Getter @AllArgsConstructor
package com.atguigu.common.exception;/**** 错误码和错误信息定义类* 1. 错误码定义规则为5为数字* 2. 前两位表示业务场景,最后三位表示错误码。例如:100001。10:通用 001:系统未知异常* 3. 维护错误码后需要维护错误描述,将他们定义为枚举形式* 错误码列表:* 10: 通用* 001:参数格式校验* 11: 商品* 12: 订单* 13: 购物车* 14: 物流*/public enum BizCodeEnum {UNKNOW_EXEPTION(10000, "系统未知异常"),VALIAD_EXCEPTION(10001, "参数格式校验失败");private int code;private String msg;BizCodeEnum(int code, String msg) {this.code = code;this.msg = msg;}public int getCode() {return code;}public String getMsg() {return msg;}}
处理其他异常
在GulimallExceptionControllerAdvice定义一个默认异常处理,使用上面定义的异常枚举类获得code和message
/*** 处理其他任意异常* @return*/@ExceptionHandler(value = Throwable.class)public R handleException() {return R.error(BizCodeEnum.UNKNOW_EXEPTION.getCode(), BizCodeEnum.UNKNOW_EXEPTION.getMsg());}
2.2.3 测试
2.3 分组校验(多场景复杂校验)
假设如下场景:在新增或者修改品牌的时候,我们想要校验的字段、规则不同,应该如何进行校验?
给校验注解,标注上groups,指定什么情况下才需要进行校验
@NotNull(message = "修改必须指定品牌ID", groups = {UpdateGroup.class})@Null(message = "新增不能指定ID", groups = {AddGroup.class})@TableIdprivate Long brandId;
UpdateGroup与AddGroup只需要定义一个接口就行,我们在common的valid包下定义这两个接口。
在Controller的方法上标注@Validated注解
之前我们使用的是@Valid注解,其提供了一种规范,@Validated注解是spring框架提供的。Validated可以指定一个或者多个校验分组,以表明该方法在什么校验分组下以什么规则进行校验
/*** 保存*/@RequestMapping("/save")//@RequiresPermissions("gulimallproduct:brand:save")// public R save(@Valid @RequestBody BrandEntity brand/*, BindingResult result*/){public R save(@Validated(AddGroup.class) @RequestBody BrandEntity brand/*, BindingResult result*/){brandService.save(brand);return R.ok();}
我们测试一下: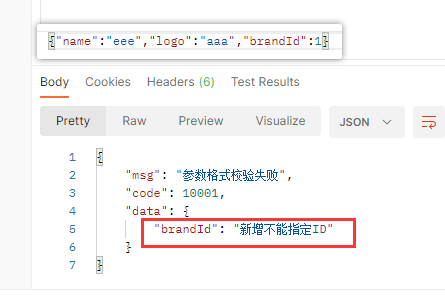 ,发现没有指定分组的校验规则失效了。
在分组校验情况下,没有指定分组的校验规则注解将不会生效,其只会在不分组的情况下生效。
2.4 自定义校验
- 编写一个自定义的校验注解
- 编写一个自定义的校验器
-
2.4.1 编写一个自定义的校验注解
common的valid包下:
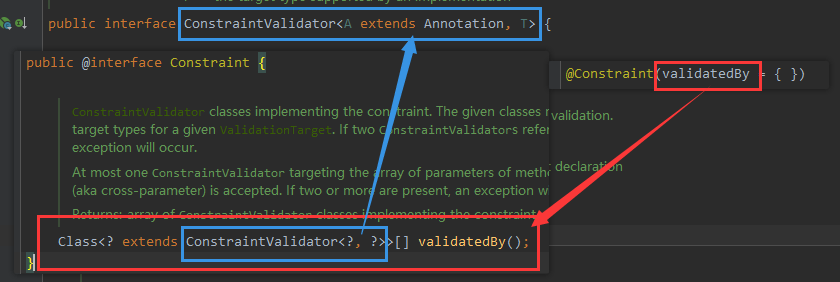
@Documented@Constraint(validatedBy = { ListValueConstraintValidator.class }) // 这里绑定校验器@Target({ METHOD, FIELD, ANNOTATION_TYPE, CONSTRUCTOR, PARAMETER, TYPE_USE })@Retention(RUNTIME)public @interface ListValue {String message() default "{com.atguigu.common.valid.ListValue.message}";Class<?>[] groups() default { };Class<? extends Payload>[] payload() default { };int[] values() default { };}
这里message的默认值可以通过配置文件来配置:
com.atguigu.common.valid.ListValue.message=必须提交指定的值
2.4.2 编写一个自定义的校验器
校验器是通过指定@Constraint注解中的validatedBy设定的,validatedBy是一个数组,其中存放校验器,每个校验器均是实现了ConstraintValidator接口的类。ConstraintValidator中的两个泛型,分别代表校验器需要绑定的注解和需要校验的数据类型。
 ```java
package com.atguigu.common.valid;
```java
package com.atguigu.common.valid;
import javax.validation.ConstraintValidator; import javax.validation.ConstraintValidatorContext; import java.util.HashSet; import java.util.Set;
public class ListValueConstraintValidator implements ConstraintValidator
private Set<Integer> set = new HashSet<>();// 初始化方法@Overridepublic void initialize(ListValue constraintAnnotation) {ConstraintValidator.super.initialize(constraintAnnotation);int[] values = constraintAnnotation.values();for (int value : values) {set.add(value);}}/*** 判断是否校验成功* @param value 这个就是浏览器提交过来需要校验的值* @param context* @return*/@Overridepublic boolean isValid(Integer value, ConstraintValidatorContext context) {return set.contains(value);}
}
<a name="H42tm"></a>### 2.4.3 关联自定义校验器和自定义校验注解在validateBy中指定校验器:<br />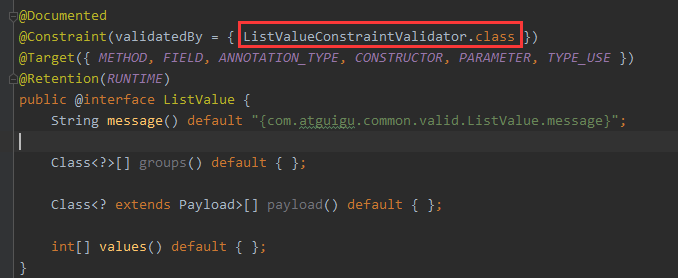<br />**注**:一个校验注解可以适配多个校验器,会自动匹配最佳校验器进行校验。可以查看ConstraintValidator的实现类来查看其他校验器或者自定义多个校验器与注解关联<a name="FMeB4"></a>### 2.4.4 测试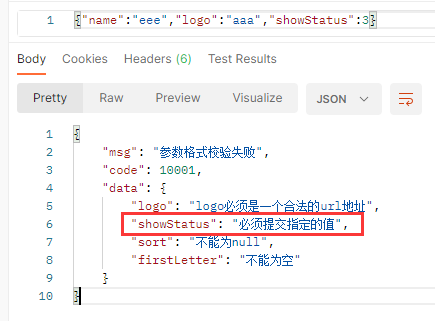在测试修改显示状态的时候,发现报错:<br />这是因为品牌名(name)属性设置了更新跟添加时的非空校验,但是这两个分组又是必要的,所以修改showStatus的校验分组,针对showStatus新建一个校验分组UpdateStatusGroup替换掉原来的UpdateGroup。同时新建一个针对修改状态的方法:```java/*** 修改状态*/@RequestMapping("/update/status")//@RequiresPermissions("gulimallproduct:brand:update")public R updateStatus(@Validated(UpdateStatusGroup.class) @RequestBody BrandEntity brand){brandService.updateById(brand);return R.ok();}
同时记得修改前端项目的修改状态请求地址。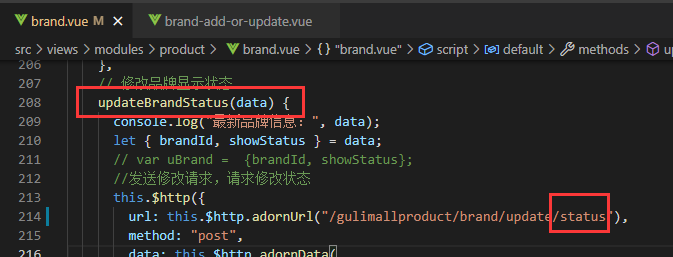

若有收获,就点个赞吧
0 人点赞
