1、产生原因
例如在viewController中创建一个NSTimer定时器:
self.timer = [NSTimer scheduledTimerWithTimeInterval:1 target:self selector:@selector(timerTest) userInfo:nil repeats:YES];
timer需要设置一个target,target对self产生了强引用,self又对timer强引用,这样就造成了一个循环引用,使得viewController和timer都无法释放。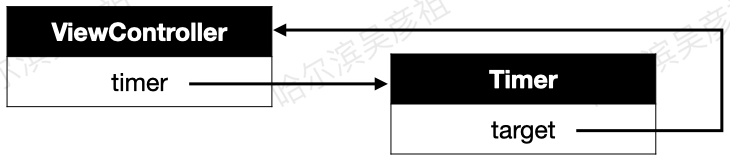
2、解决方案
2.1、方案一:使用Block
在创建timer时,使用block执行任务:
__weak typeof(self)weakSelf = self;self.timer = [NSTimer scheduledTimerWithTimeInterval:1 repeats:YES block:^(NSTimer * _Nonnull timer) {[weakSelf timerTest];}];
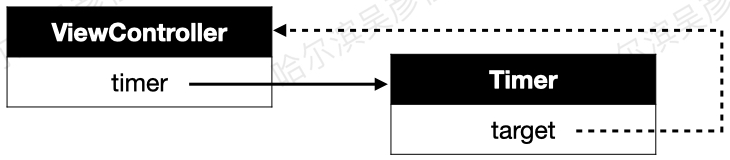
这样创建后self对timer是强引用,timer对self是弱引用,不会造成循环引用。
*target方式传入weakSelf还是会循环引用,因为weakSelf不影响timer内部对self地址的引用方式。
2.2、方案二:消息转发
循环引用原因是ViewController和timer之间的相互强引用,可以使用一个中间变量,打断强引用关系,又能传递消息,就可以解决循环引用的问题,这里可以使用Proxy来实现,引用关系如下: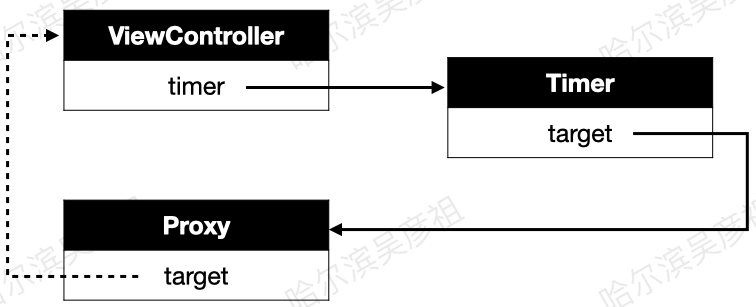
步骤一:创建proxy对象,将proxy的target设置成viewController(弱引用)
@interface XLProxy : NSObject@property (nonatomic, weak) id target;+ (instancetype)proxyWithTarget:(id)target;@end
步骤二:在创建timer时,将target设置成proxy对象
- (void)initTimer {XLProxy *proxy = [XLProxy proxyWithTarget:self];self.timer = [NSTimer scheduledTimerWithTimeInterval:1 target:proxy selector:@selector(timerTest) userInfo:nil repeats:YES];}
步骤三:在proxy内部实现消息转发逻辑,将消息接收者设置成proxy的target(proxy继承于NSObject)
+ (instancetype)proxyWithTarget:(id)target {XLProxy *proxy = [[XLProxy alloc] init];proxy.target = target;return proxy;}// 消息转发接收者- (id)forwardingTargetForSelector:(SEL)aSelector {return self.target;}
为了提高效率,应该使用NSProxy类,NSProxy是专门用于消息转发的,不继承于NSObject,在接收到消息时,如果自己没有实现方法,不会去父类搜索方法,会直接进入消息转发调用流程,所以效率比较高,内部实现如下:
+ (instancetype)proxyWithTarget:(id)target {// NSProxy没有init方法XLProxy2 *proxy = [XLProxy2 alloc];proxy.target = target;return proxy;}// 接收到消息会直接进入方法签名方法- (NSMethodSignature *)methodSignatureForSelector:(SEL)sel {return [self.target methodSignatureForSelector:sel];}// 调用方法- (void)forwardInvocation:(NSInvocation *)invocation {[invocation invokeWithTarget:self.target];}
2.3、方案三:GCD定时器
NSTimer依赖于RunLoop,如果RunLoop的任务过于繁重,可能会导致NSTimer不准时,而GCD的定时器会更加准时,使用举例:
// 获取队列dispatch_queue_t queue = dispatch_get_main_queue();// 创建定时器dispatch_source_t timer = dispatch_source_create(DISPATCH_SOURCE_TYPE_TIMER, 0, 0, queue);// 设置开始时间 2秒后dispatch_time_t start = dispatch_time(DISPATCH_TIME_NOW, 2 * NSEC_PER_SEC);// 设置定时器,参数:1、timer 2、开始时间 3、间隔(纳秒) 4、误差(纳秒)dispatch_source_set_timer(timer, start, 1 * NSEC_PER_SEC, 0 * NSEC_PER_SEC);// 设置回调(block)dispatch_source_set_event_handler(timer, ^{NSLog(@"111");});// 启动定时器dispatch_resume(timer);// 保住定时器的命self.timer = timer;
也可以通过函数设置回调:
// 设置回调(函数)dispatch_source_set_event_handler_f(timer, timerFire);void timerFire(void *param) {NSLog(@"222");}
如果设置的队列不是主队列,会自动进入子线程执行回调:
为了方便调用可以自己封装一个基于GCD的定时器 XLGCDTimer :
@interface XLGCDTimer : NSObject+ (NSString *)execTask:(XLTaskBlock)task start:(NSTimeInterval)start interval:(NSTimeInterval)interval repeats:(BOOL)repeats async:(BOOL)async;+ (NSString *)execTask:(id)target selector:(SEL)selecctor start:(NSTimeInterval)start interval:(NSTimeInterval)interval repeats:(BOOL)repeats async:(BOOL)async;+ (void)cancleTask:(NSString *)name;@end
*封装时需要保存创建的timer,并且要保证线程安全。

若有收获,就点个赞吧
0 人点赞
