JavaScript 是通过原型来实现继承的,实际上呢,Class 就是一个语法糖(我感觉手动实现的并没有 Class 实现的优雅)
接下来我们来看各种继承
先了解组合继承
继承的方案
组合继承,解释一下,是由两种继承的方式组合而成的。一个继承的方式称为原型链继承,另一种方式被称为盗用构造函数。
接下来我们一点一点来看。
原型链继承
我们都知道,JavaScript 是通过原型链来实现继承的,而所谓原型链继承就是最简单的一种继承。
// 原型链继承function FatherClass(name, age) {this.name = name;this.age = age;this.hobby = ['reading', 'gaming'];}FatherClass.prototype.sayHi = function() {console.log('hi');}function ChildClass(name, age) {this.subName = name;this.subAge = age;this.subHobby = ['reading', 'gaming'];}ChildClass.prototype = new FatherClass();ChildClass.prototype.sayHi = function() {console.log('hi');}const ins = new ChildClass('meakle', 12);
这上面就是一个简单的原型继承。我打算使用原型图来描述试一下。
我们一点一点来看
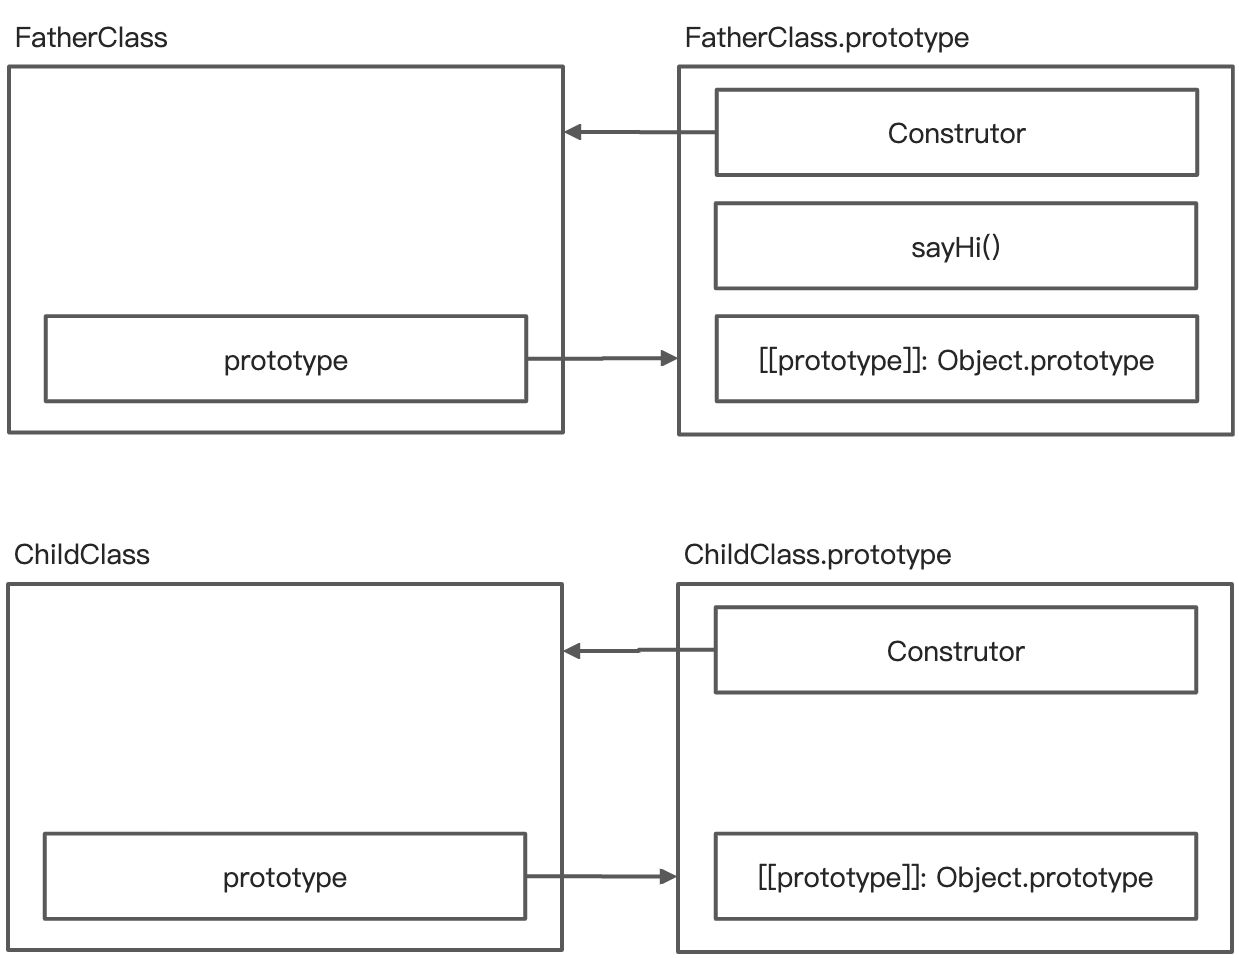
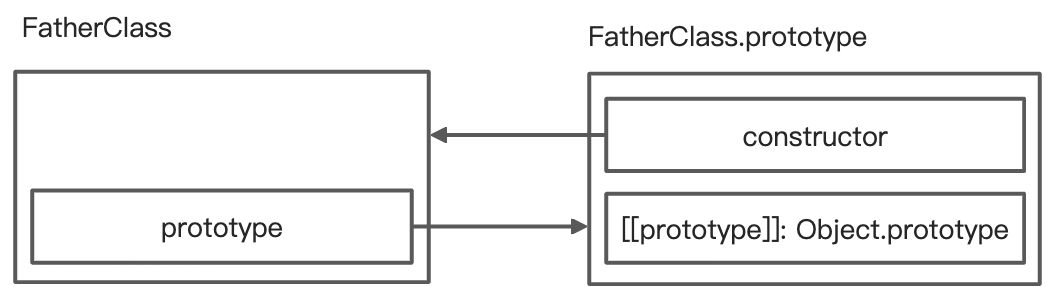
function FatherClass(name, age) {this.name = name;this.age = age;this.hobby = ['reading', 'gaming'];}FatherClass.prototype.sayHi = function() {console.log('hi');}
此时,示意图如下
接着
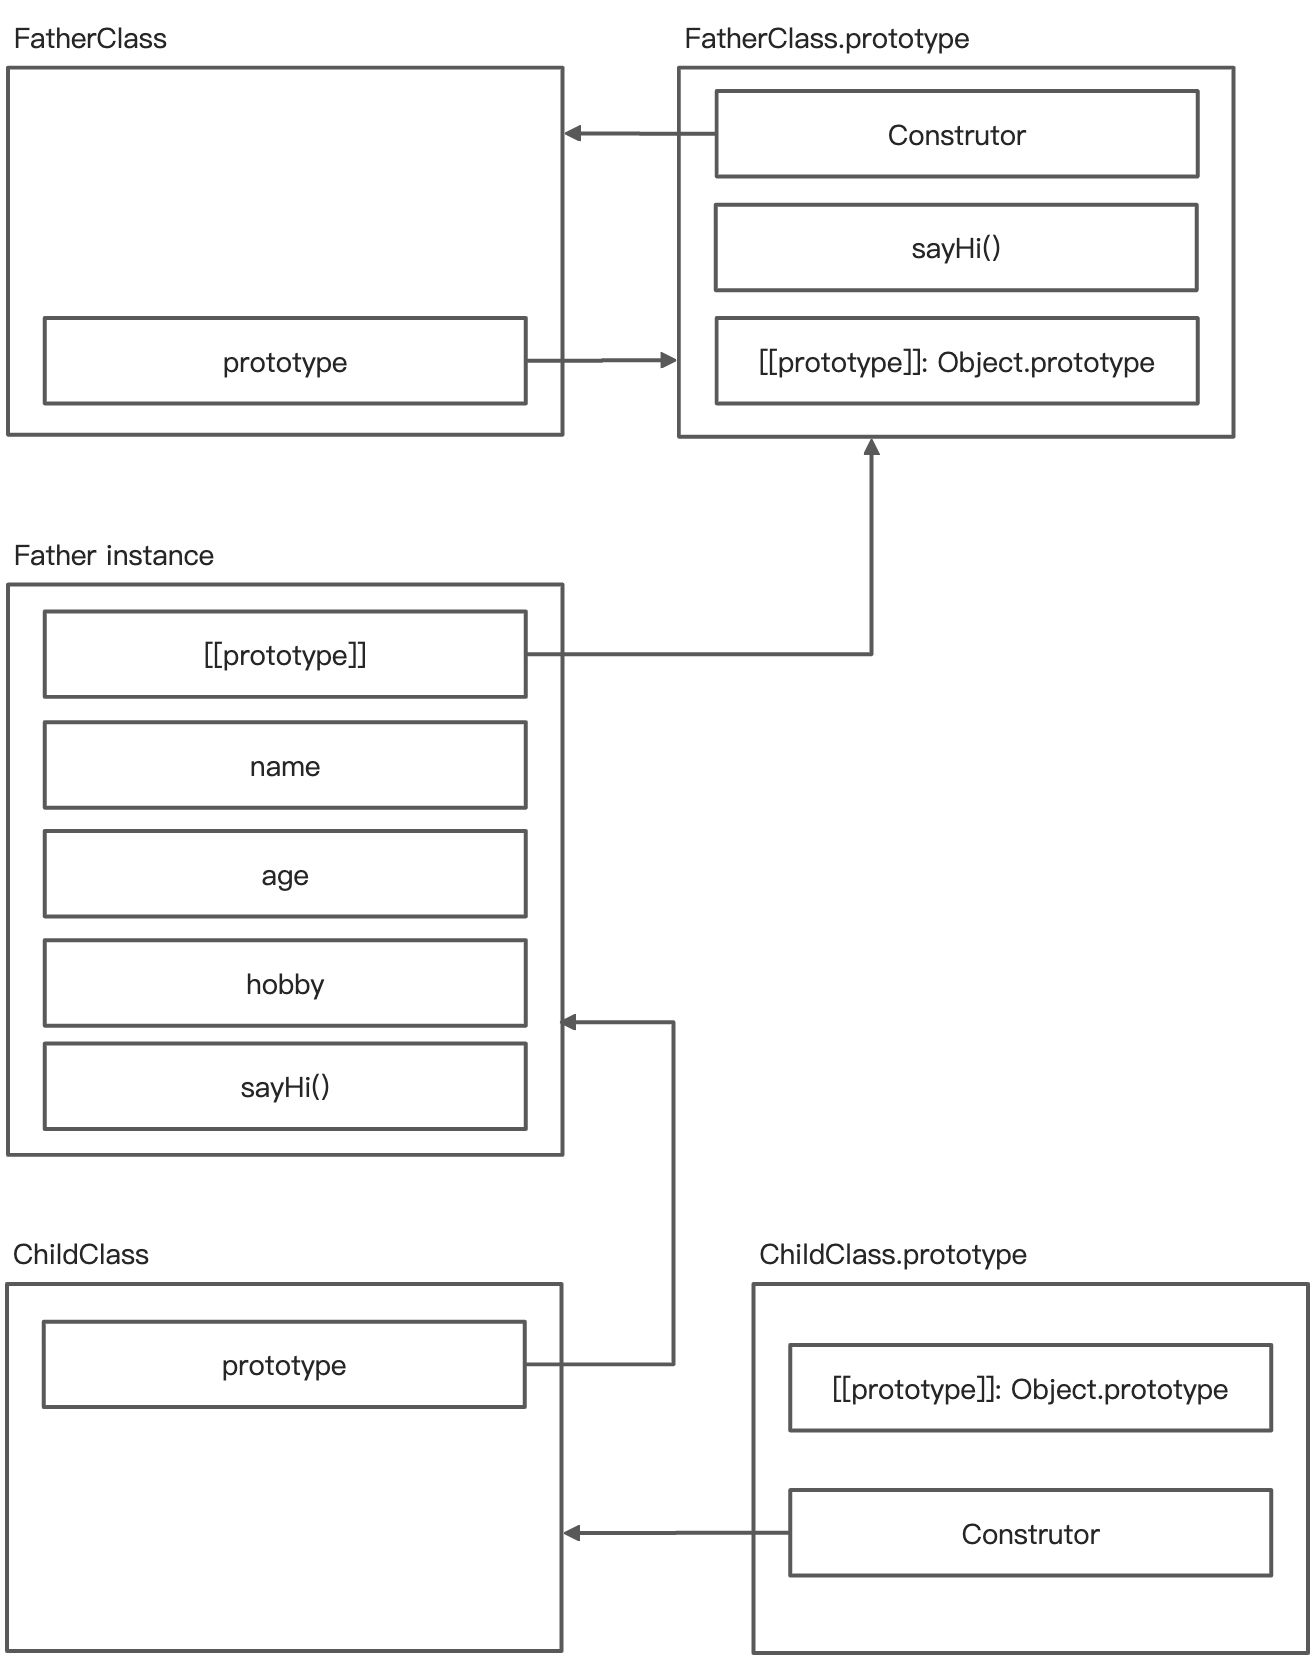
// ...// 代码中新增function ChildClass(name, age) {this.childName = name;this.childAge = age;this.childHobby = ['reading', 'gaming'];}
继续新增代码
ChildClass.prototype = new FatherClass();

接着来看:
ChildClass.prototype.sayHi = function() {console.log('hi');}
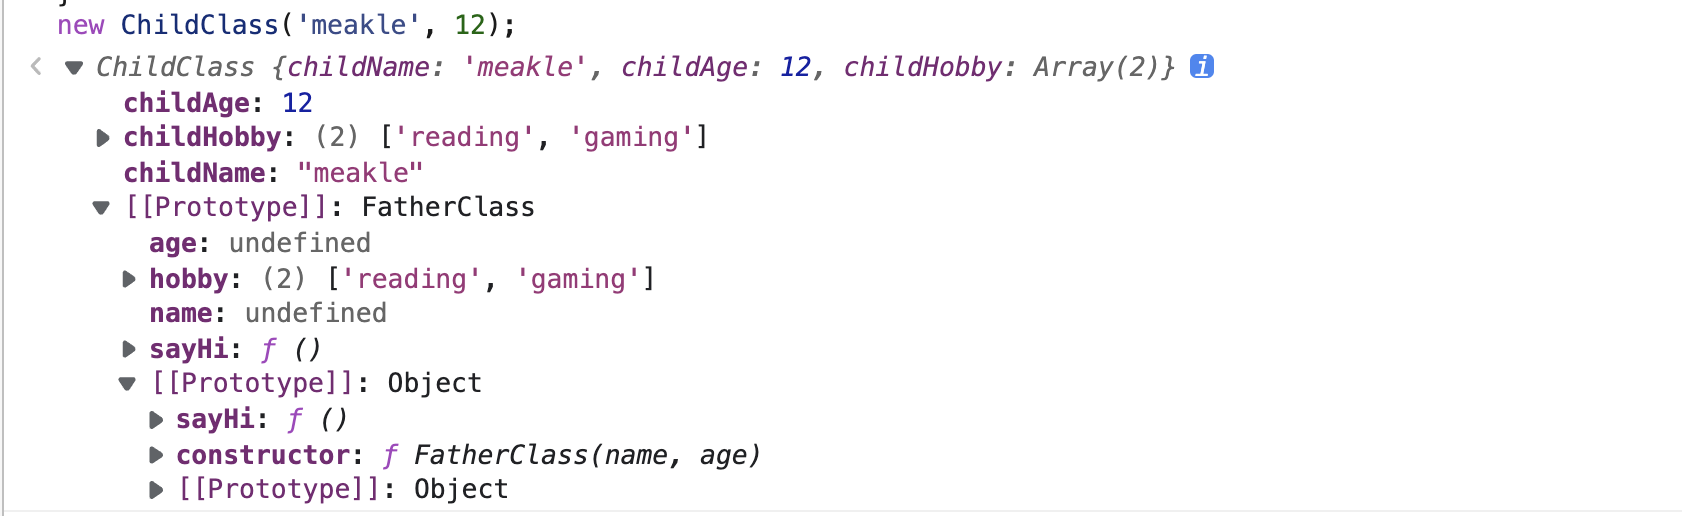
打印出的结果,符合预期
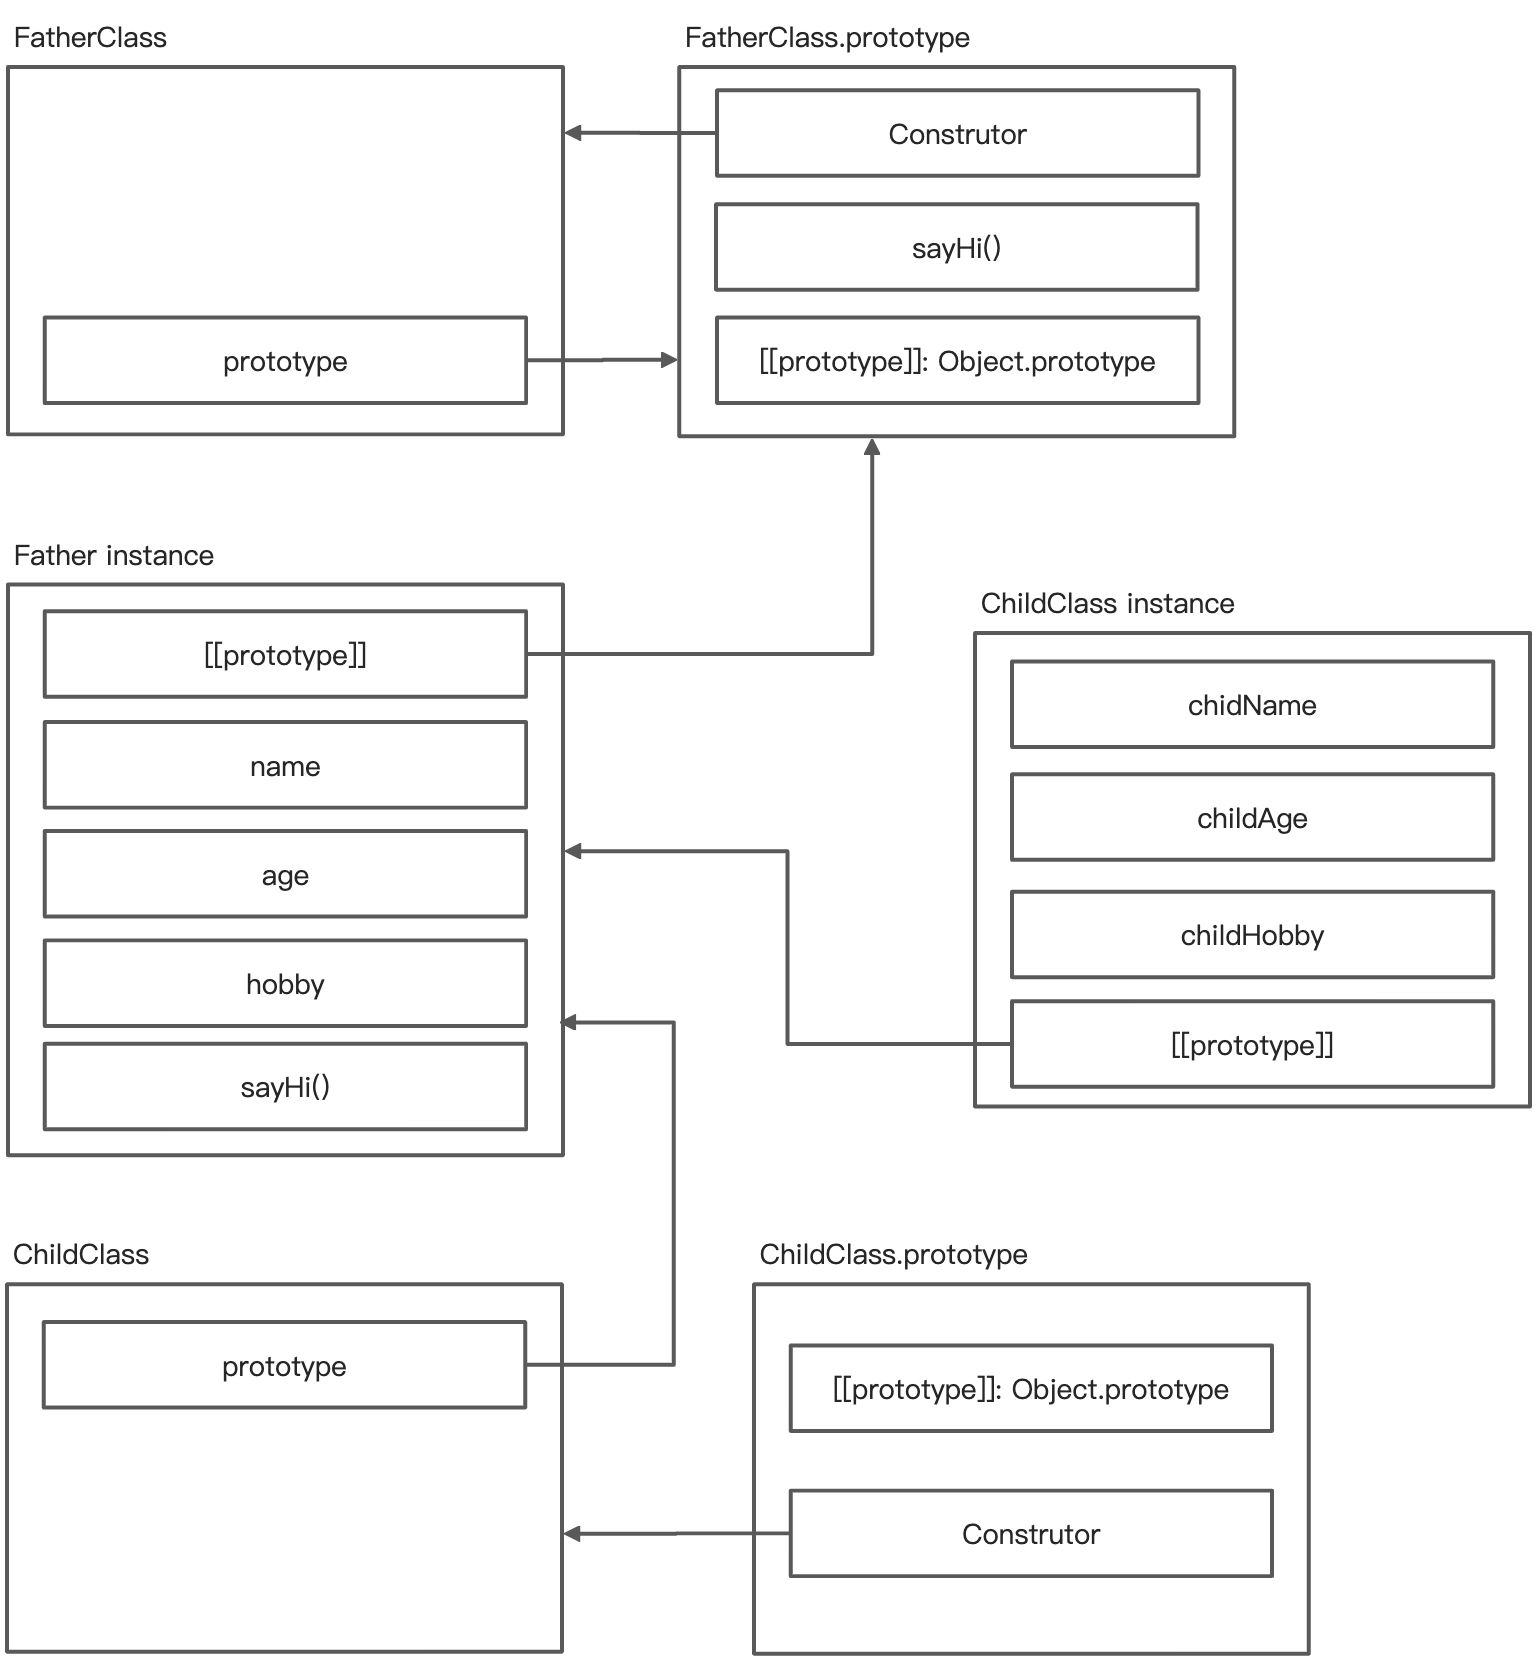
const ins = new ChildClass('meakle', 12);
缺点
- 无法在使用子类构造函数时,给父类属性赋值。
- 修改某一实例的父类,将会影响其它子类实例
第一点是功能改进,第二点算是 bug 了,我们复现一下
const ins1 = new ChildClass('meakle', 12);const ins2 = new ChildClass('fang', 11);Object.getPrototypeOf(ins1).age = 20;
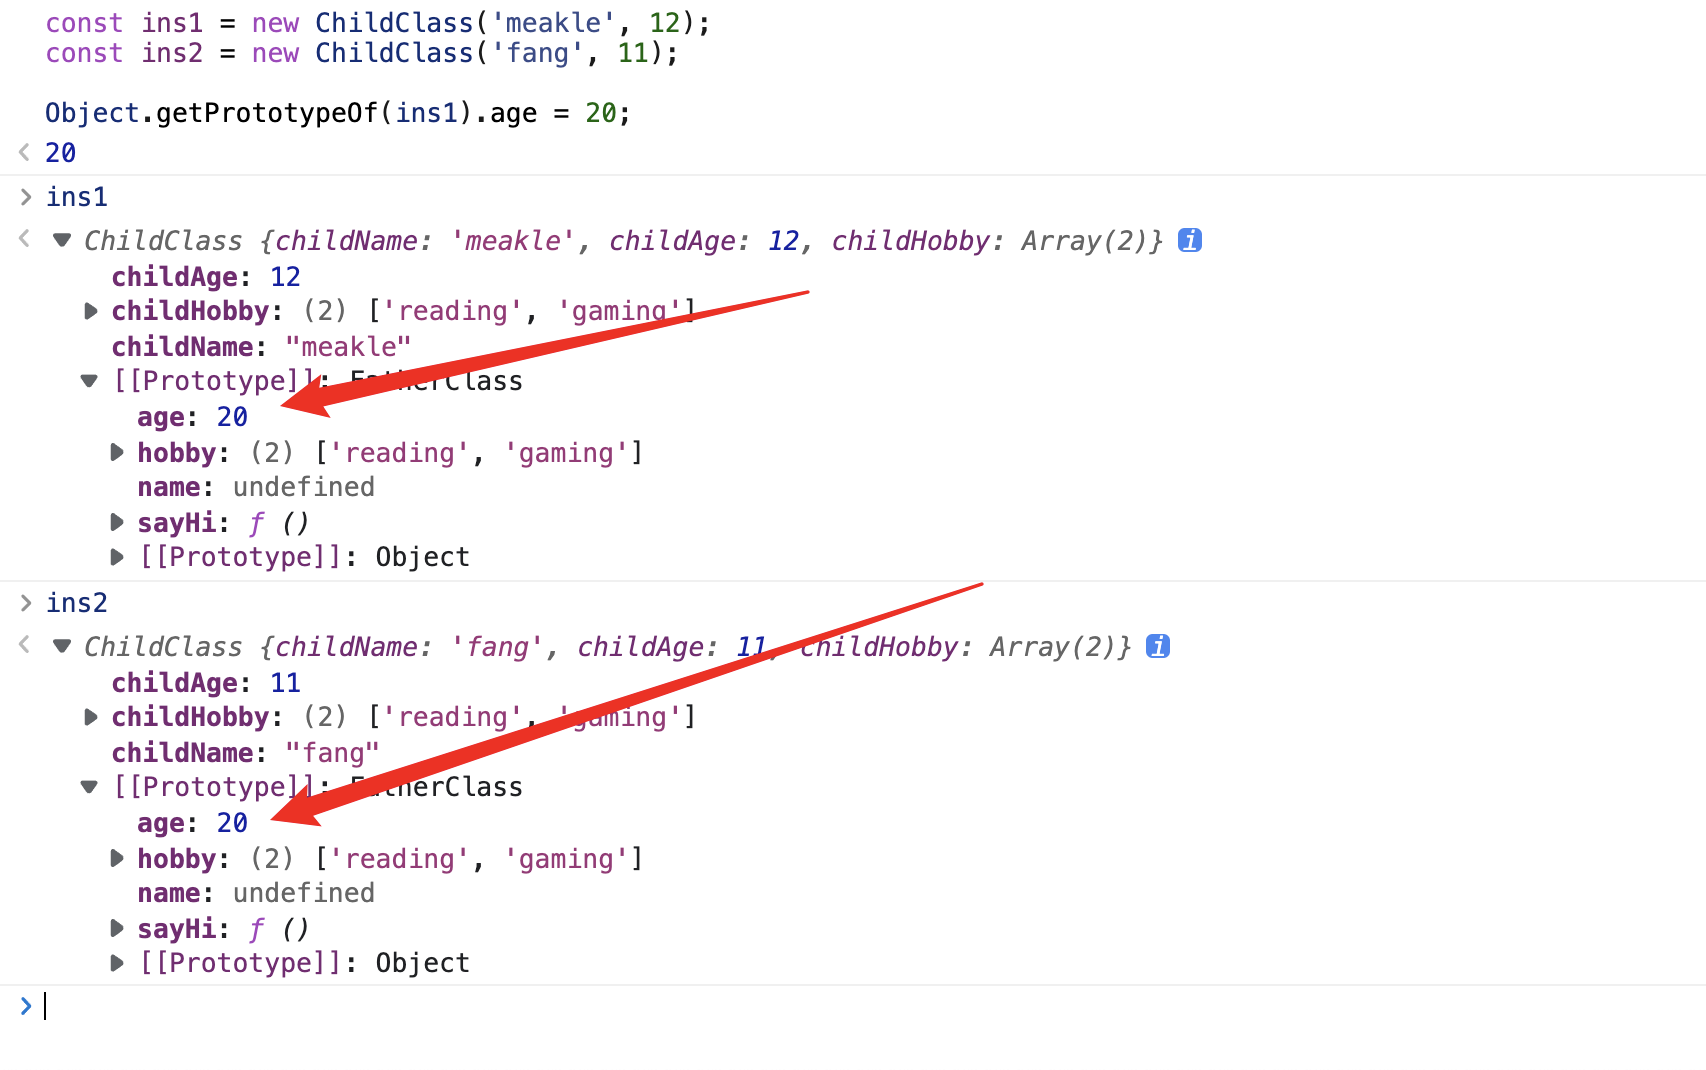
通过刚刚画出来的原型图也可以看出来,我们每一次生成的实例的 [[prototype]] 实际指向的都是同一个对象。
这是一个经典的错误了,知识点也是关于引用值,如果你了解所谓引用值,以及能够在脑子里想到内存图的模型,我想这个问题,应该是迎刃而解了。
盗用构造函数
接下来我们观察另一种继承的实现。
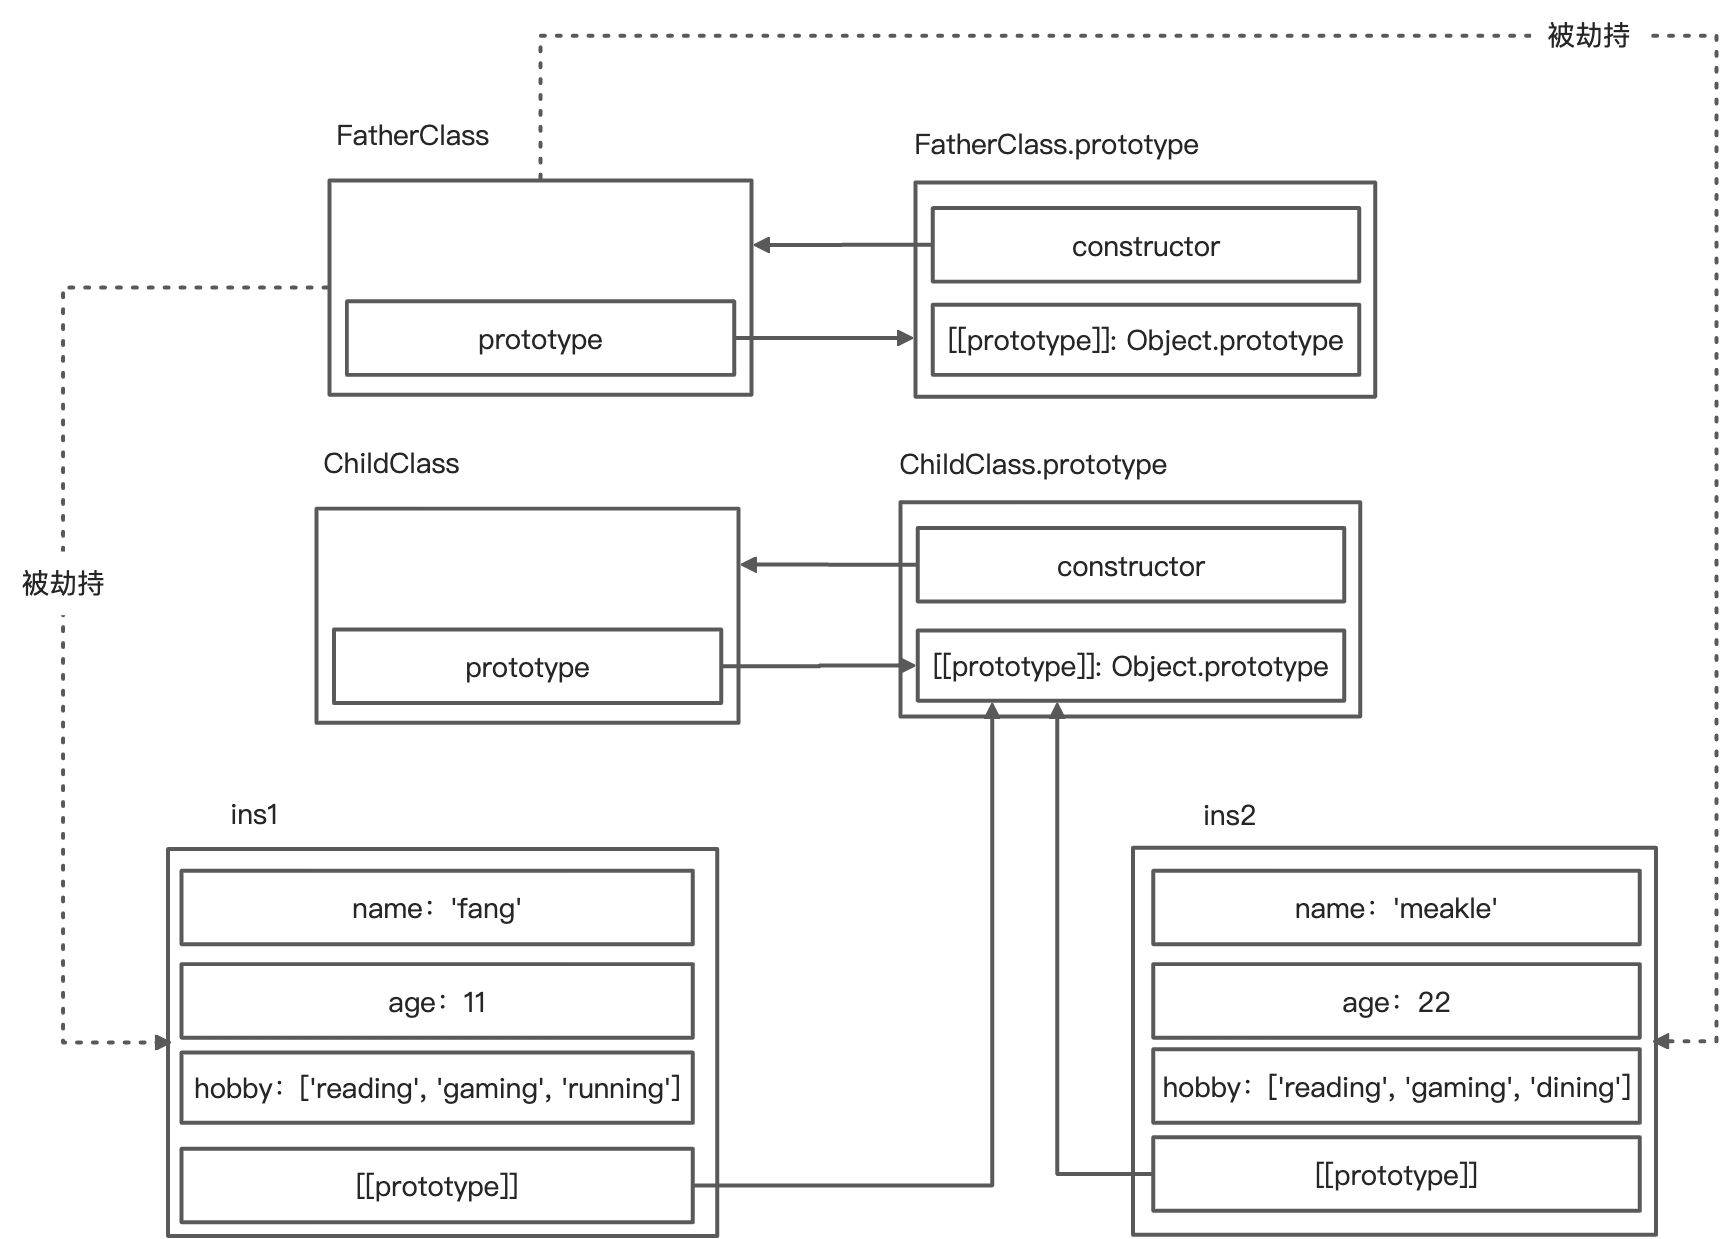
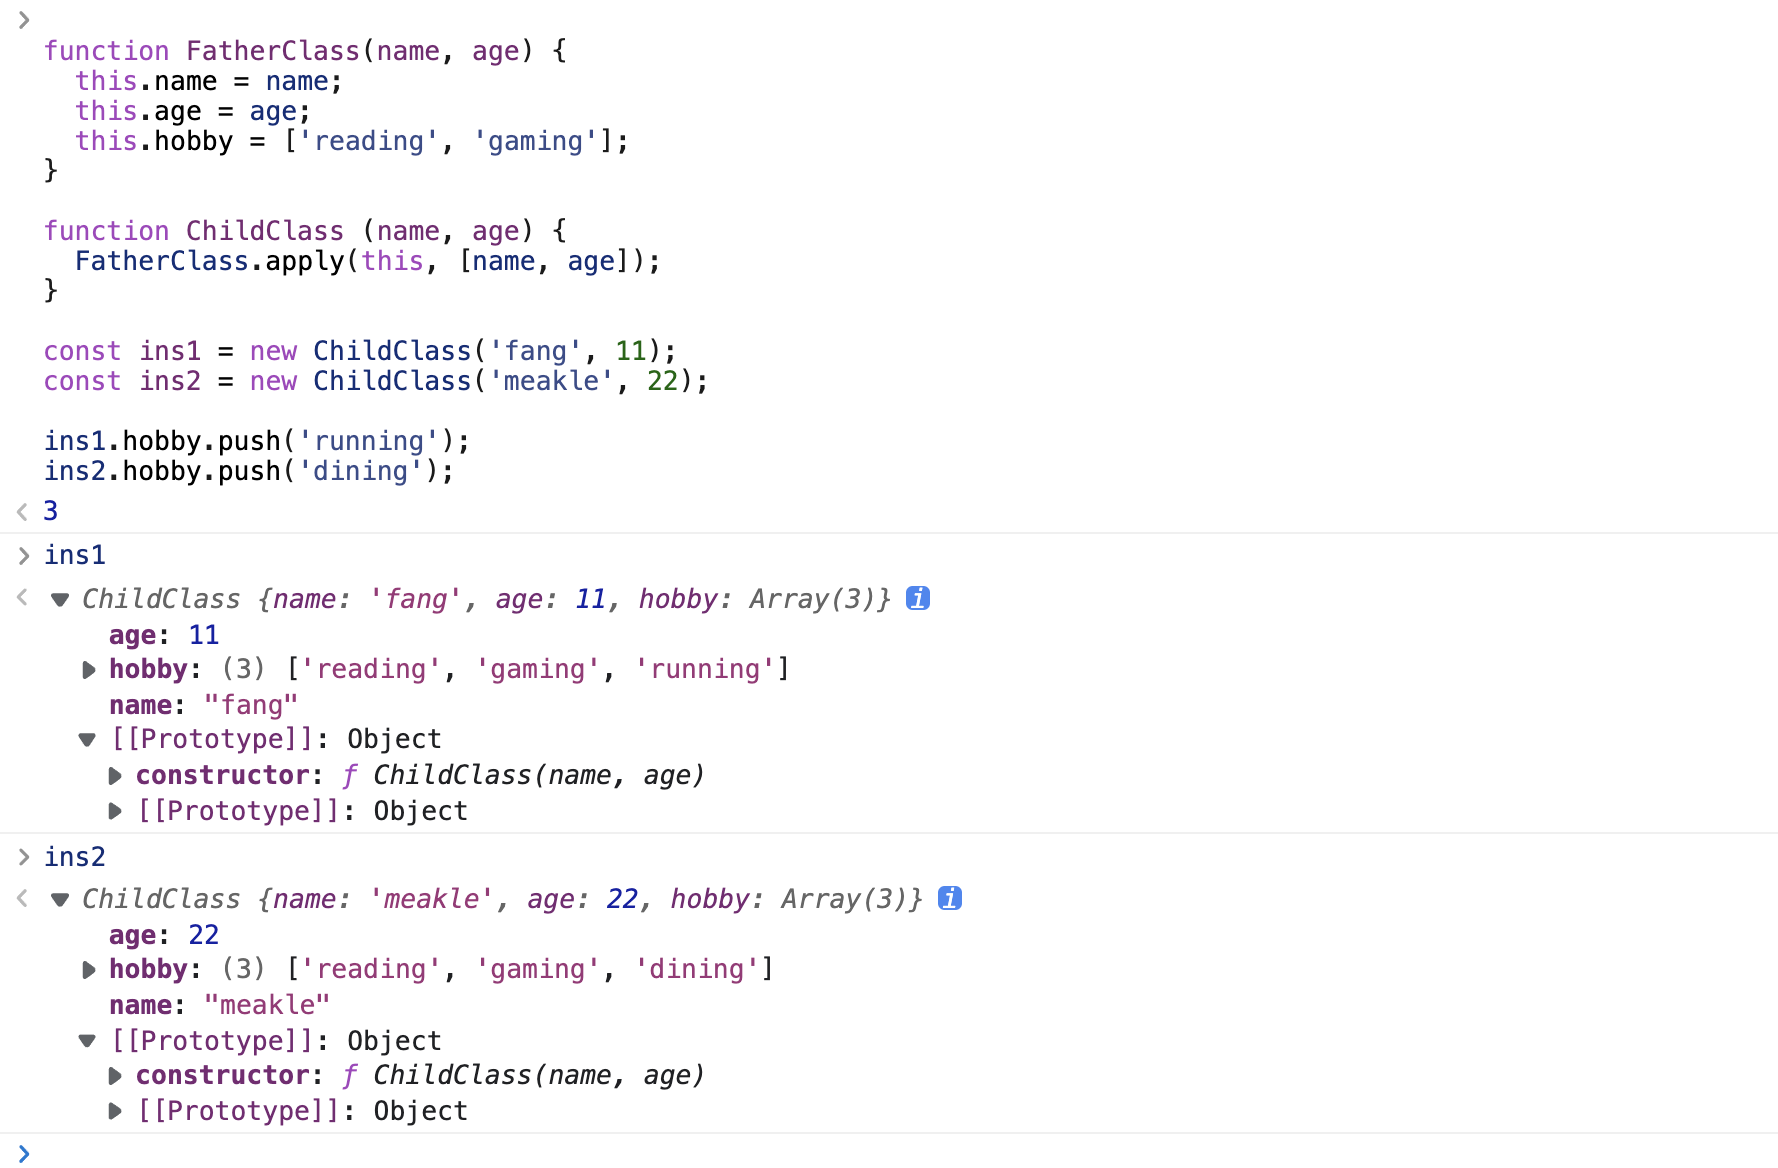
function FatherClass(name, age) {this.name = name;this.age = age;this.hobby = ['reading', 'gaming'];}function ChildClass (name, age) {FatherClass.apply(this, [name, age]);}const ins1 = new ChildClass('fang', 11);const ins2 = new ChildClass('meakle', 22);ins1.hobby.push('running');ins2.hobby.push('dining');
我解释一下,什么叫做盗用构造函数。首先分清楚,代码中存在两个构造函数,一个父类构造函数,一个子类构造函数。我们在子类中,调用了父类构造函数,你看这就叫盗用,而且我们盗用的还相当彻底,我们把 this 也给劫持了(使用 apply 或者 bind)。
接着,我们分步骤看内存图
function FatherClass(name, age) {this.name = name;this.age = age;this.hobby = ['reading', 'gaming'];}
function ChildClass (name, age) {FatherClass.apply(this, [name, age]);}const ins1 = new ChildClass('fang', 11);
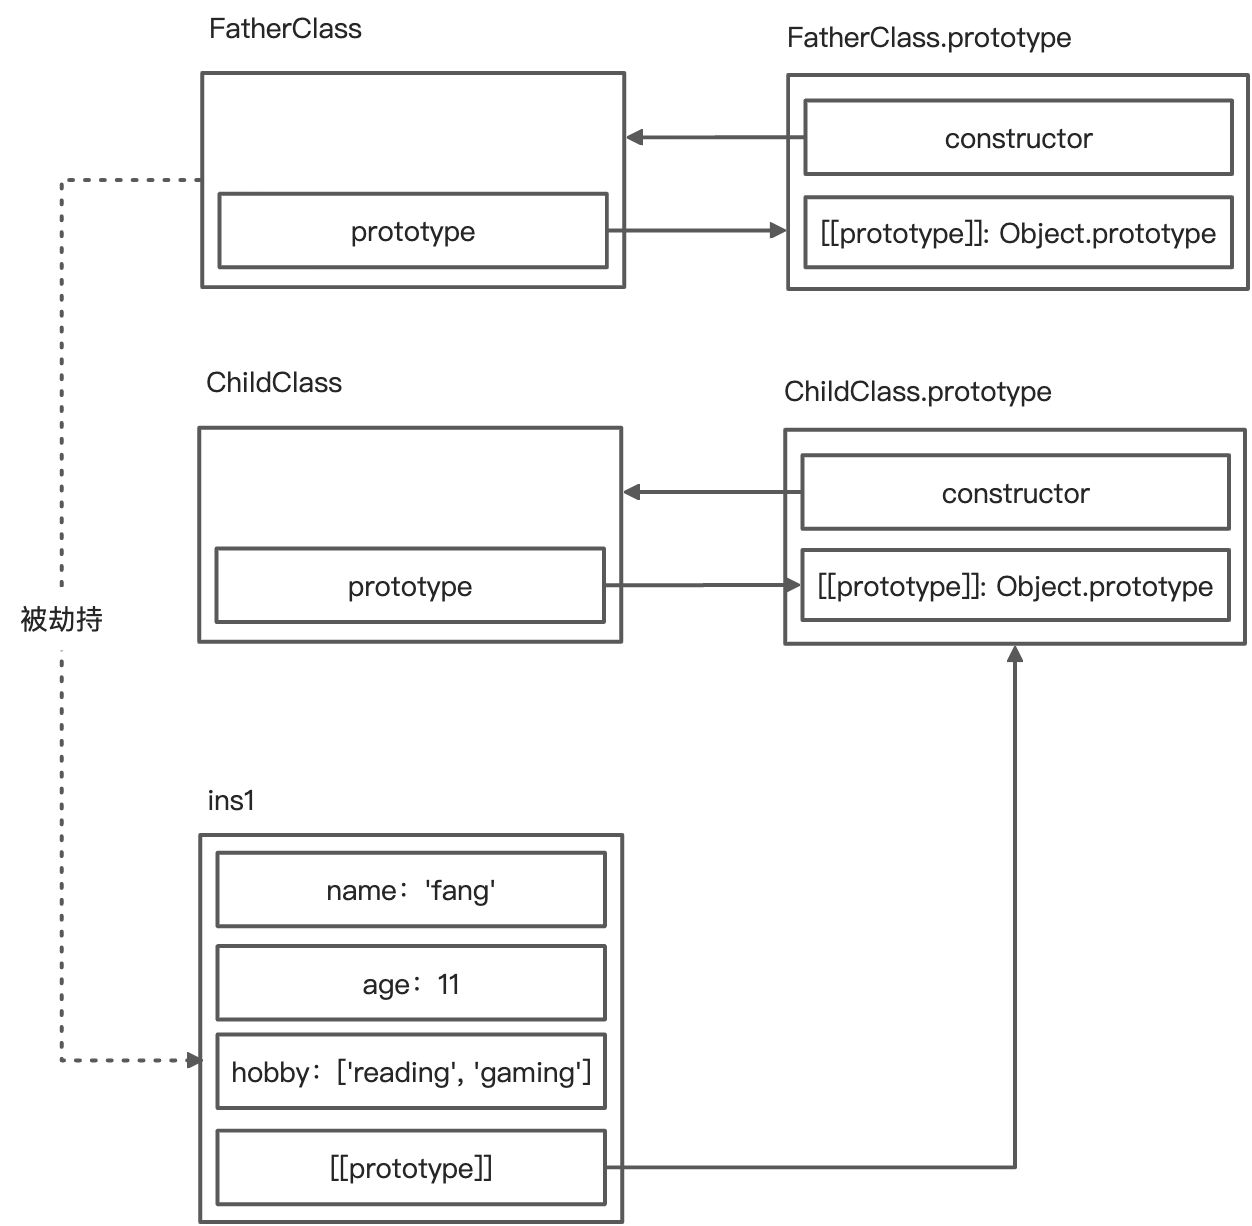
const ins2 = new ChildClass('meakle', 22);
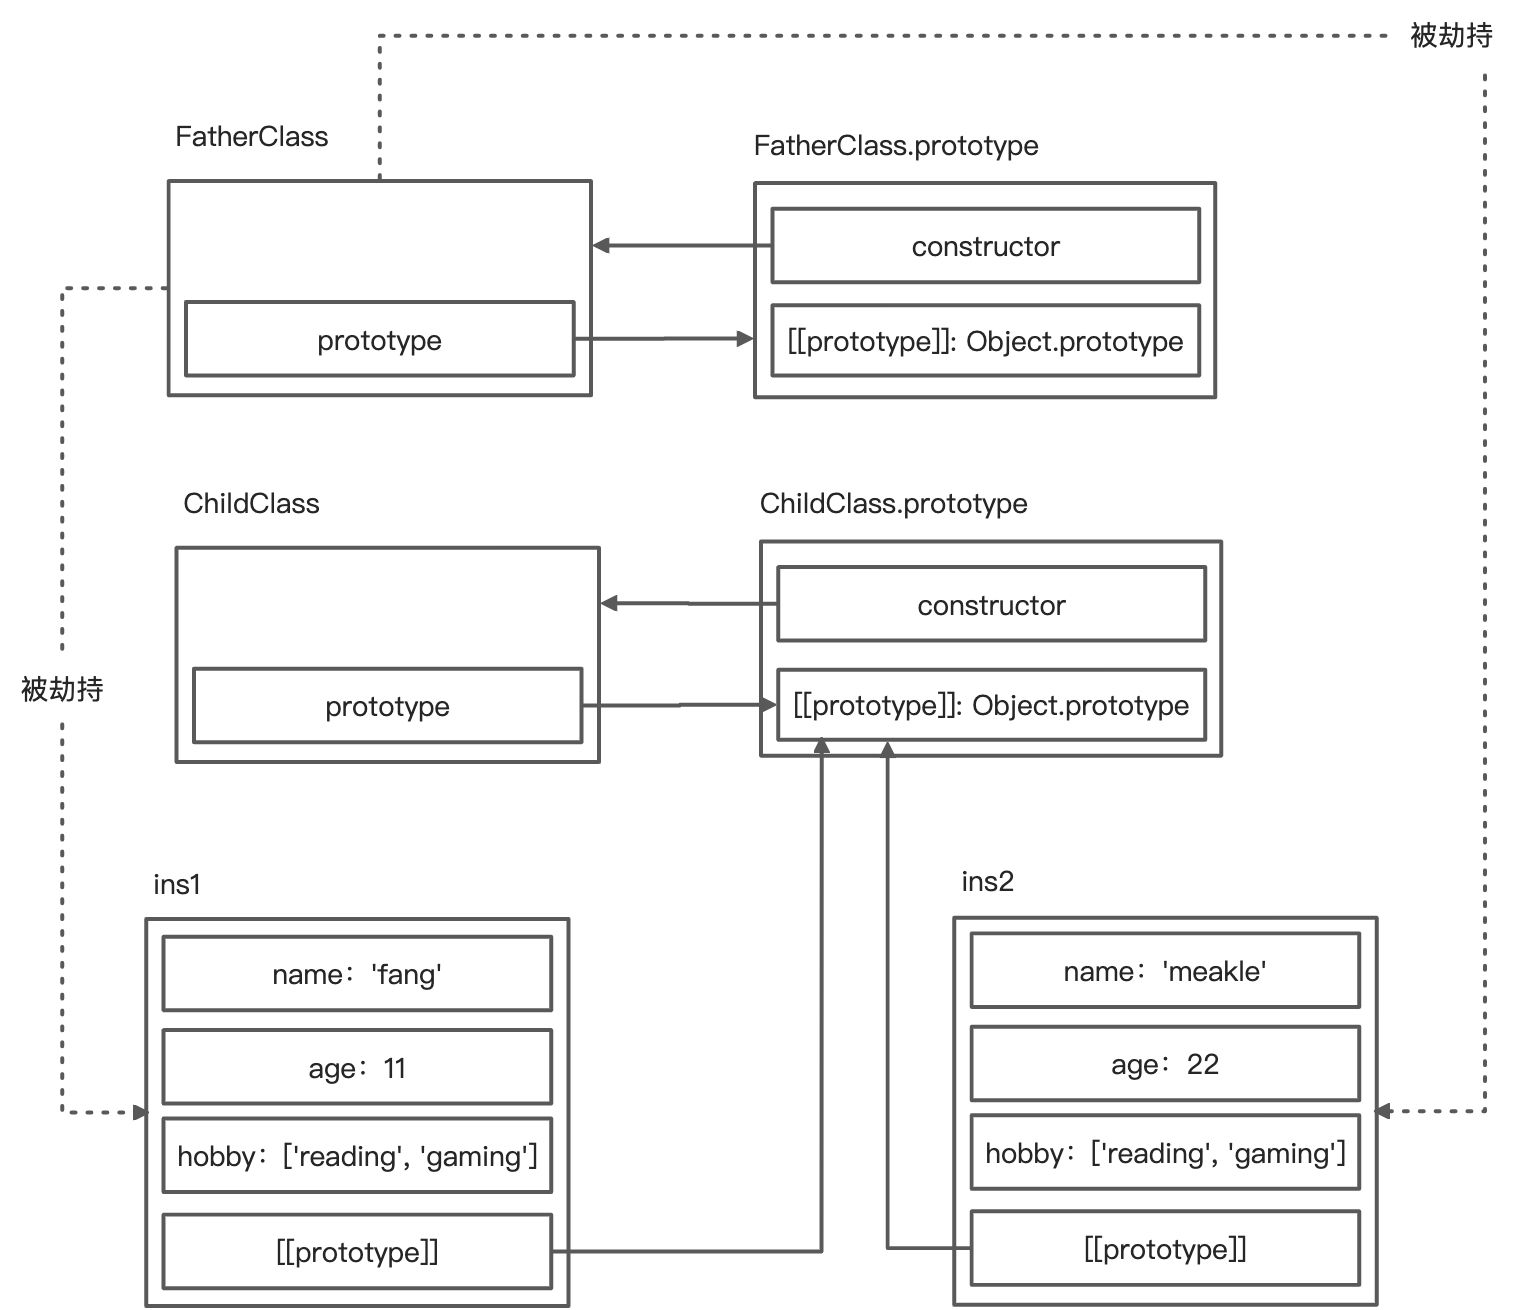
ins1.hobby.push('running');ins2.hobby.push('dining');
这种方式,就是劫持父构造函数,然后将父构造函数上的东西,放入子构造函数的实例中。
缺点
我们可以看到,虽然说,我们实现了所谓的继承,但是我们没有办法获取到父构造函数上的东西。因此,我们只能通过在父类的构造函数内部写方法的方式存储方法,也就是说,方法将无法复用。这样也不是一个好的方式。
组合继承
实际上,我们只需要把原型链继承和组合继承相结合,就可以得到一个还不错的实践。
上代码
function FatherClass(name, age) {this.name = name;this.age = age;this.hobby = ['reading', 'gaming'];}FatherClass.prototype.sayHi = function() {console.log(`${this.name} and ${this.age}`);}function ChildClass(name, age) {// 盗用构造函数FatherClass.apply(this, [name, age]);}// 原型链继承ChildClass.prototype = new FatherClass();ChildClass.prototype.constructor = ChildClass;const ins1 = new ChildClass('meakle', 12);const ins2 = new ChildClass('fang', 33);
如果你理解了上面两种继承方式,你应该会非常快的理解,这里是如何做到的。我将以盗用构造函数中最后一张图为基础,描述这段代码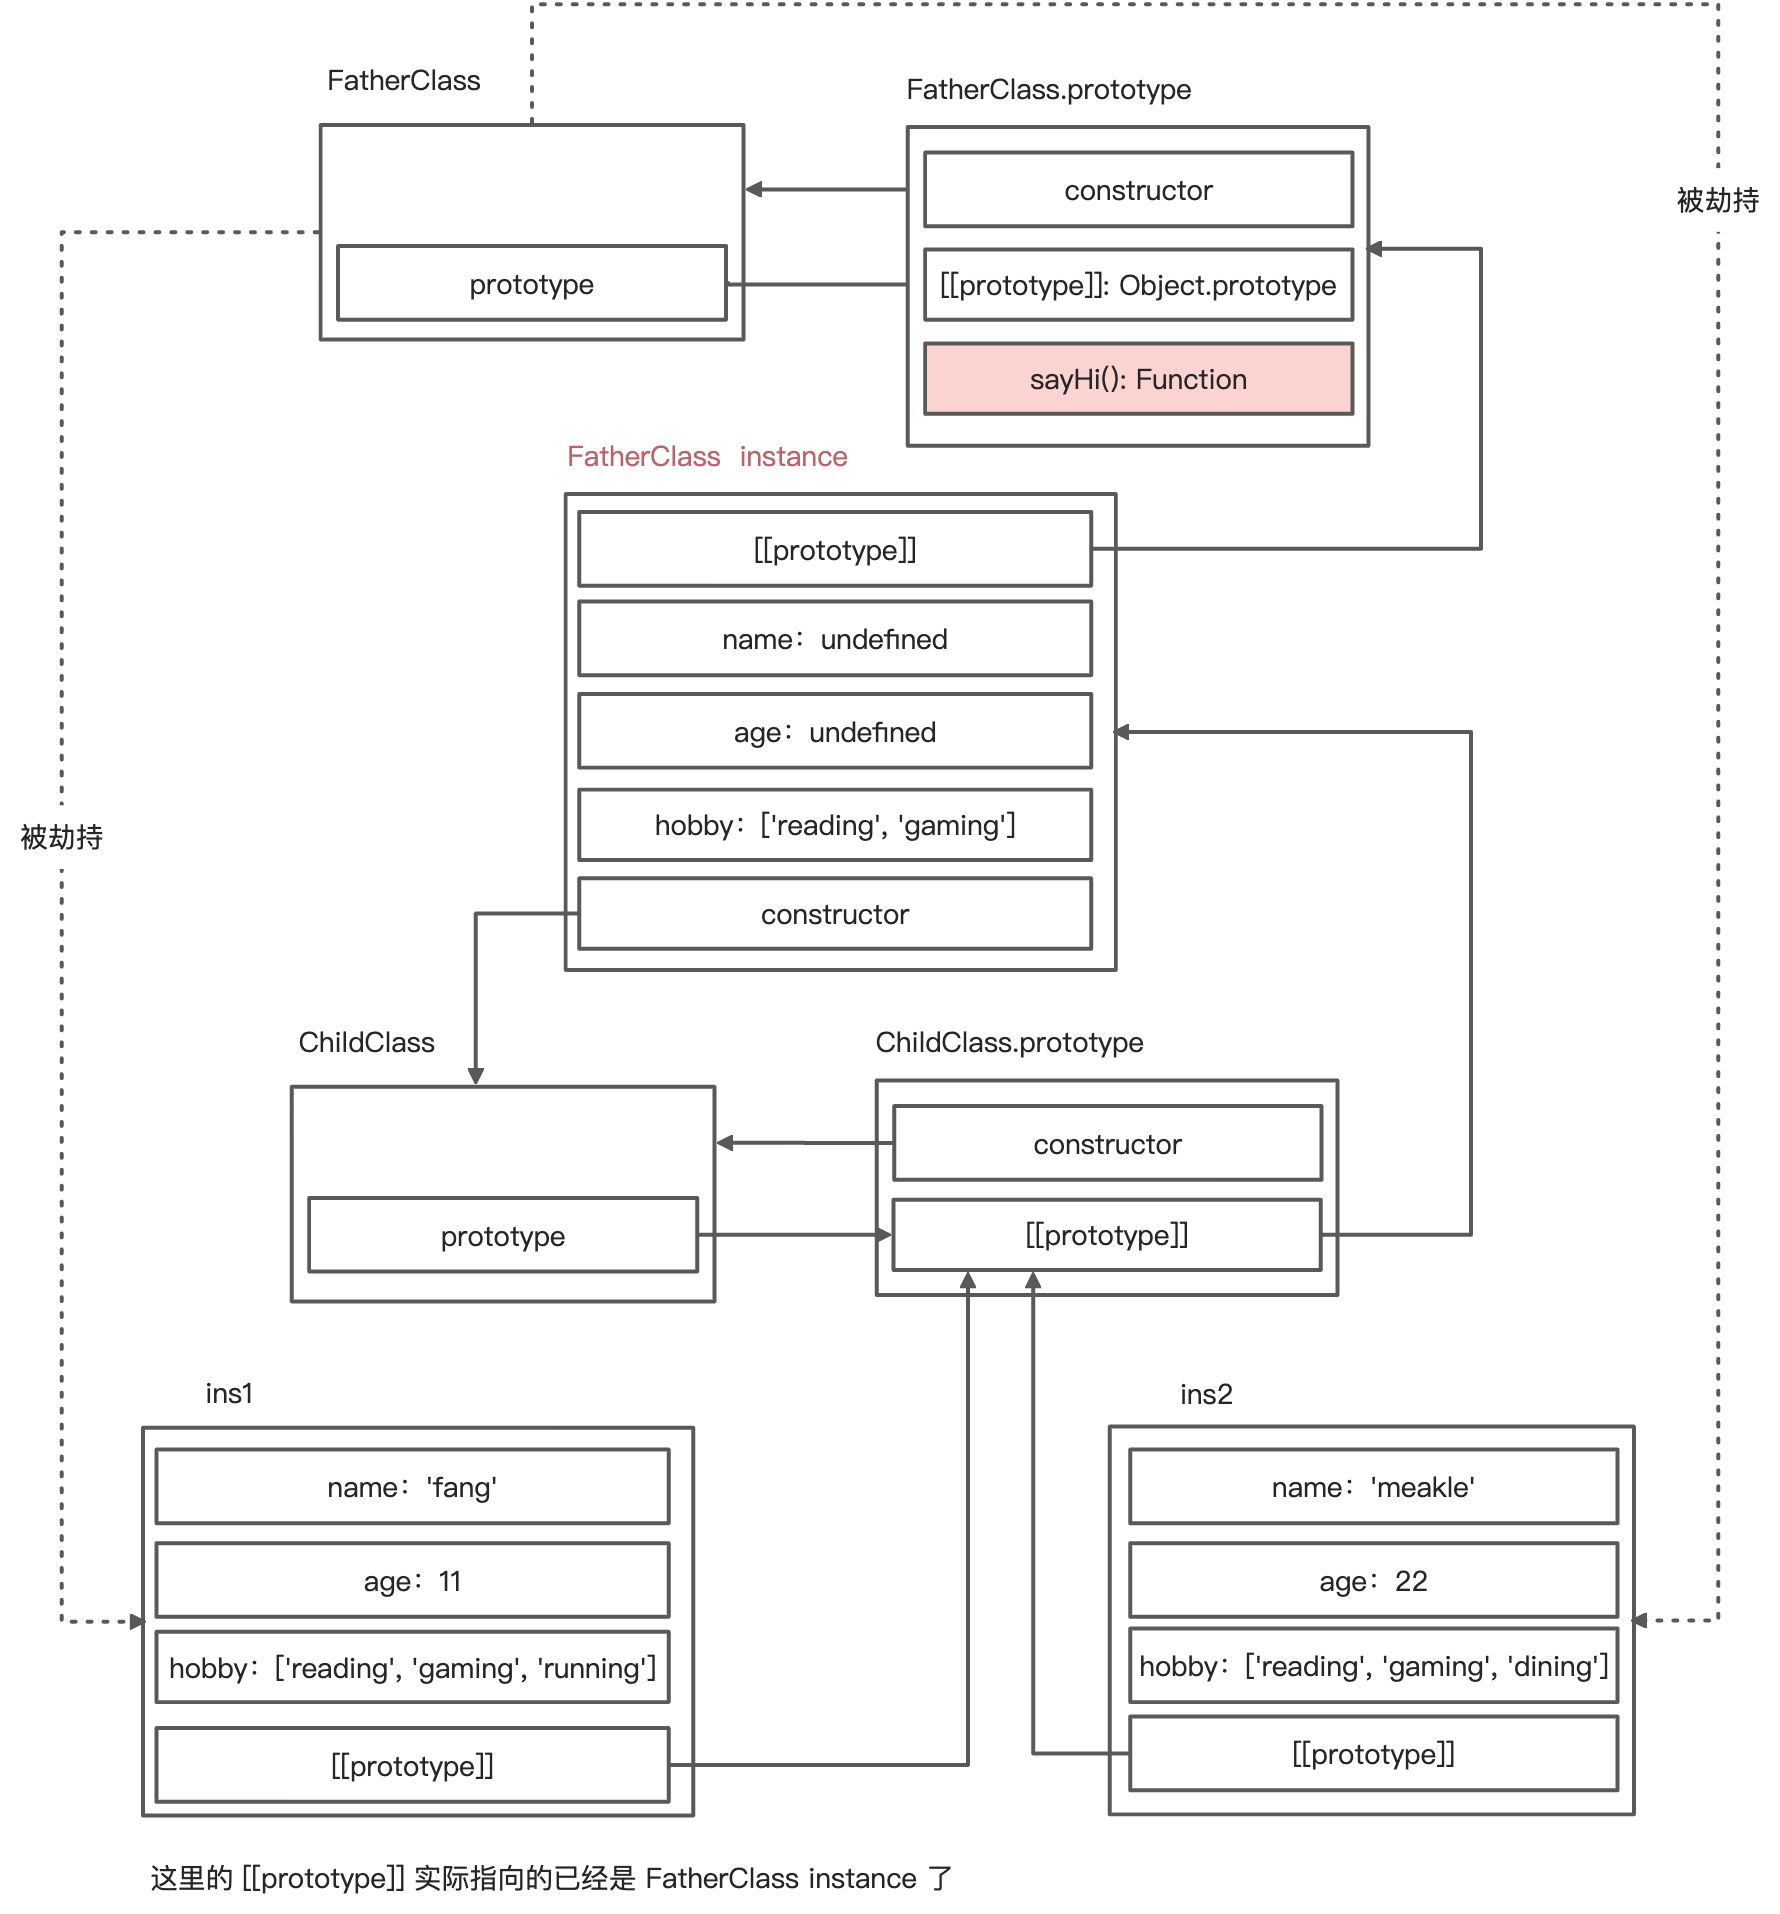
结果与预期相符合。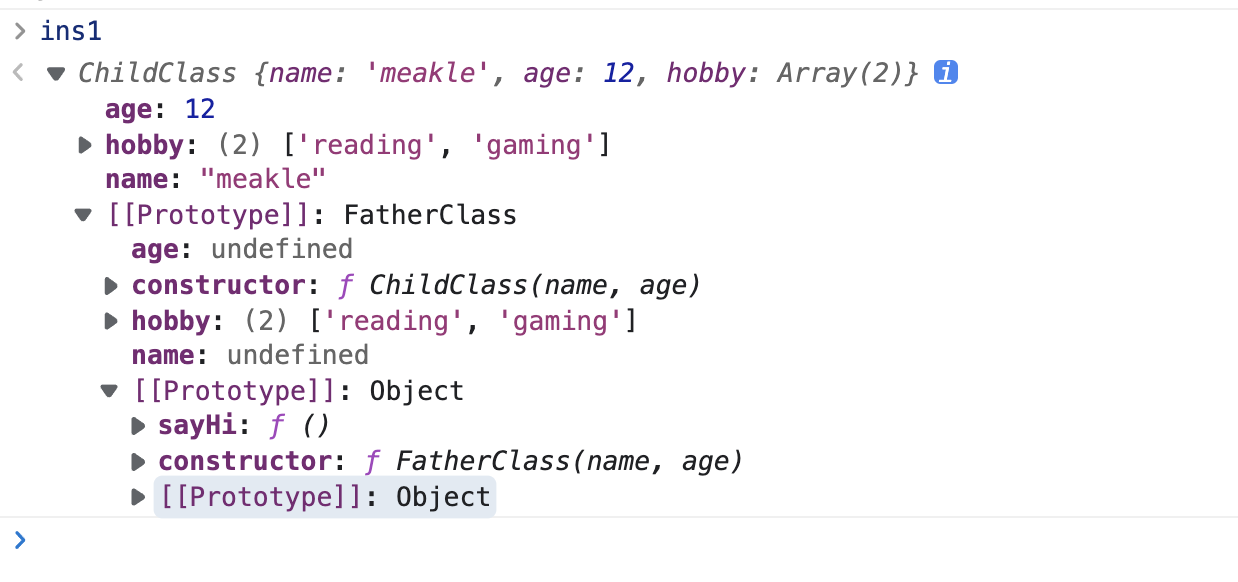
原型式继承
所谓继承,就是通过 [[prototype]] 实现的原型链,那实际上,我们创造出一个对象,并且让那个对象的 [[prototype]] 指向某一个原型是不是就是实现了继承呢?
这个例子不够好。
原型式继承,实际上就是手写一个 Object.create
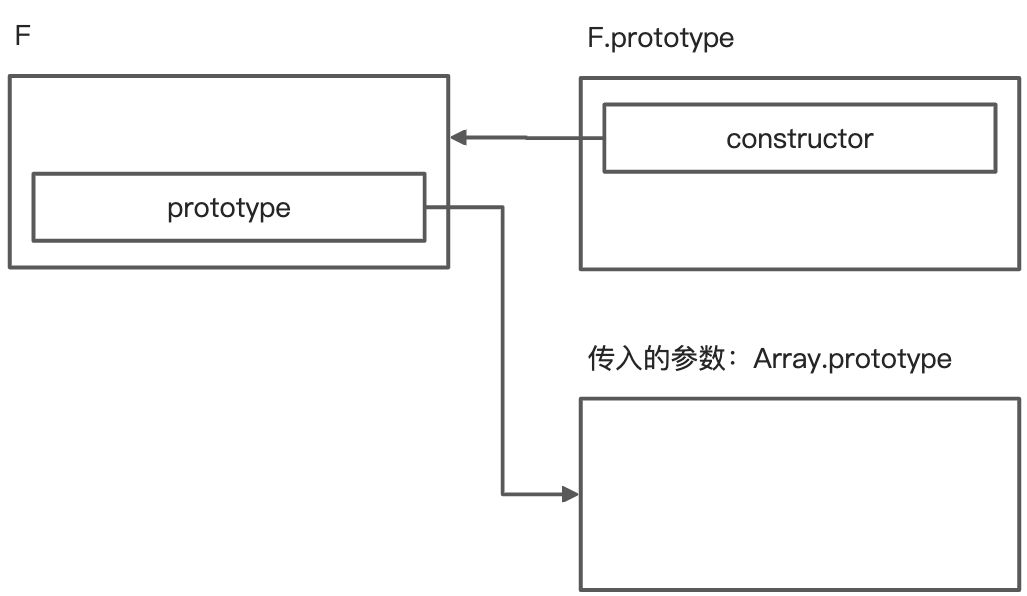
function fakeCreate(instance) {const F = function(){};F.prototype = instance;return new F();}const ins = fakeCreate(Array.prototype);
一个对象中的 [[prototype]] 指向的是构造该对象的构造函数的 prototype。
在上面的例子中,我们将 Array.prototype 传入函数,并且我们创建了一个名为 F 的构造函数
const F = function(){};

接着,我们将构造函数 F 的 prototype 指向了传入的参数,也就是 Array.prototype
F.prototype = instance;
最后,我们再使用 new 关键字,创造出一个新的对象,并且返回改对象
return new F();
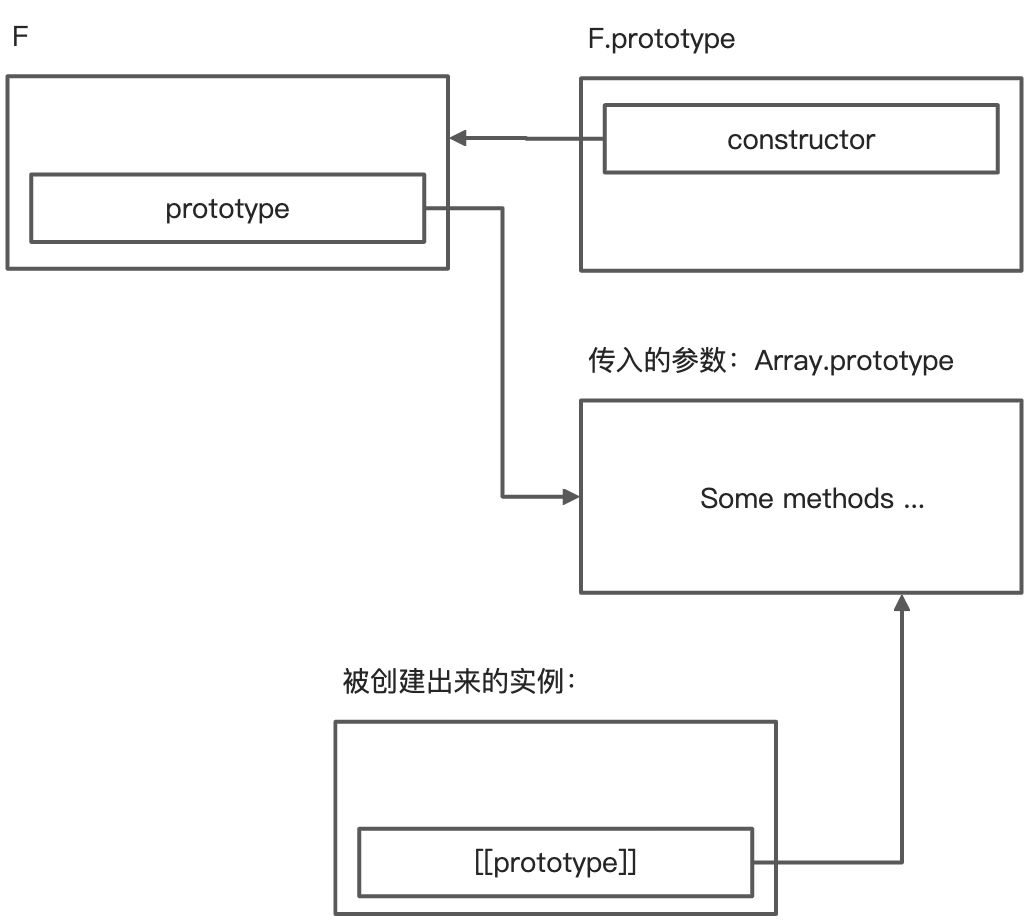
打印出的结果,依旧符合预期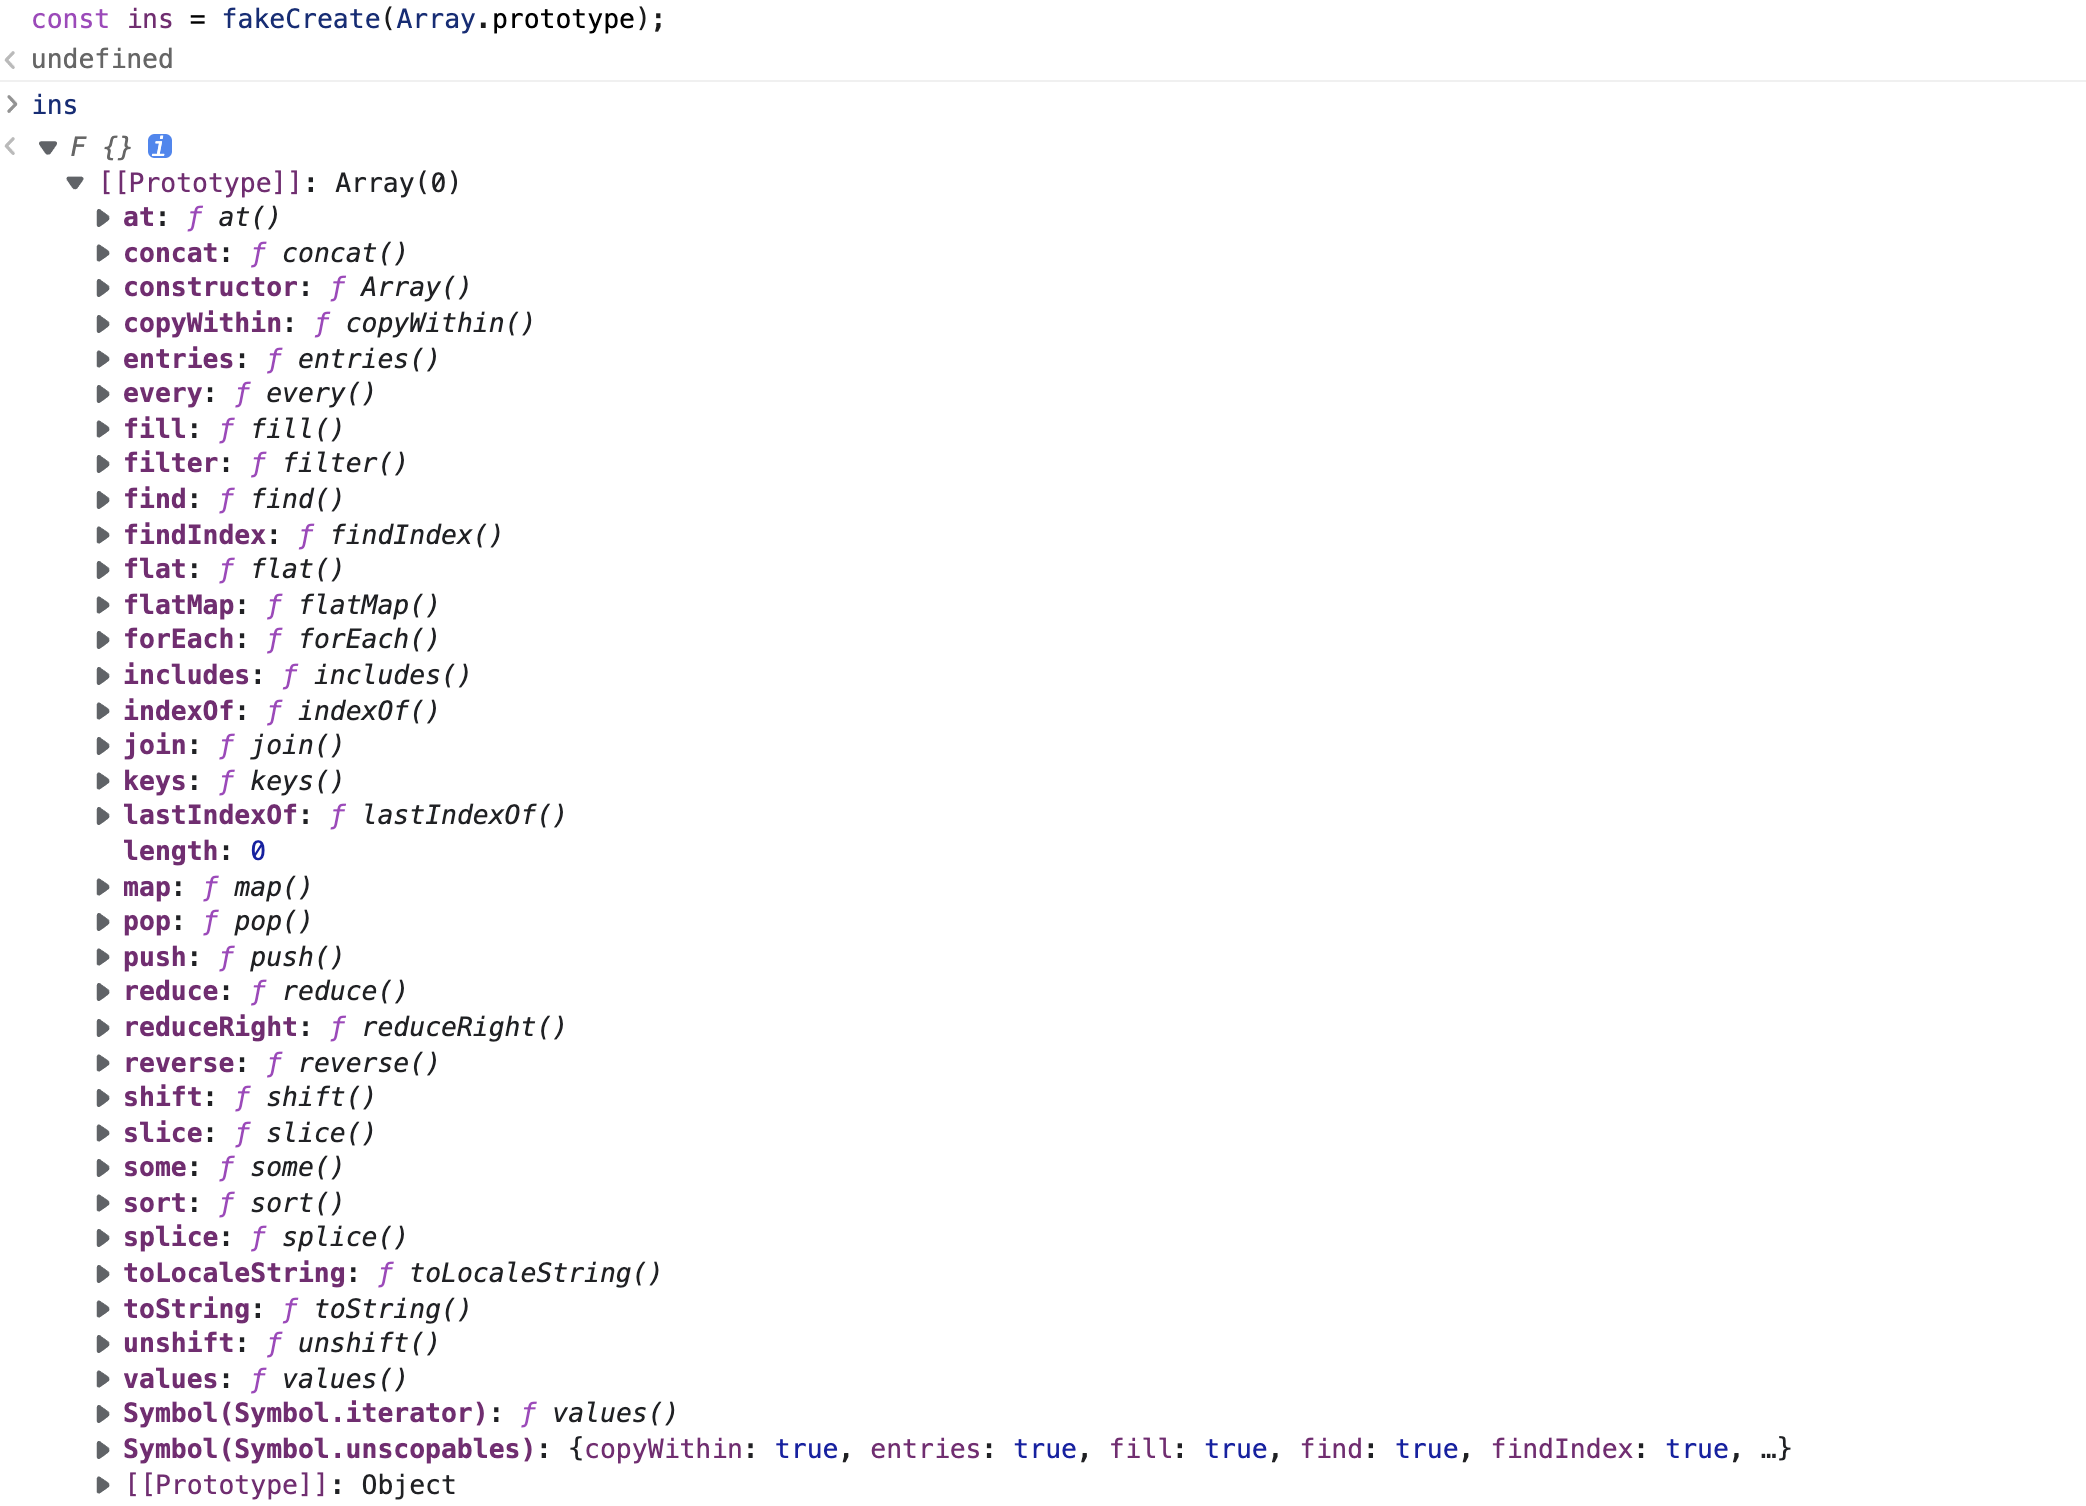
缺点
依然存在变量共享的问题。
寄生式继承
直接上代码吧,其实这个就是比在原型式继承的基础上添加了一点点东西而已。
function fakeCreate(instance) {const F = function () {};F.prototype = instance;return new F();}const ChildClass = fakeCreate(Object.prototype);function createAnother(instance) {const ins = fakeCreate(instance);// 通过这种方式, 增强了一下生成的对象, 这就是寄生...ins.sayHi = function () {console.log("hi");};return ins;}let person = { name: "Nicholas", friends: ["Shelby", "Court", "Van"] };createAnother(person);
组合寄生继承
说实话,看到这个名字,感觉很高大上,其实并不是,这种继承,其实就是对于组合继承的一种完善。
组合继承在功能上已经没有什么太大的问题了,但是组合继承所生成的原型链比较占用空间。为什么这么说呢。
我们来看看组合继承
function FatherClass(name, age) {this.name = name;this.age = age;this.hobby = ['reading', 'gaming'];}FatherClass.prototype.sayHi = function() {console.log(`${this.name} and ${this.age}`);}function ChildClass(name, age) {// 盗用构造函数FatherClass.apply(this, [name, age]);}// 原型链继承/** ========主要看这里======== **/ChildClass.prototype = new FatherClass();/** ========主要看这里======== **/ChildClass.prototype.constructor = ChildClass;const ins1 = new ChildClass('meakle', 12);const ins2 = new ChildClass('fang', 33);
new FatherClass() 生成了一个新的对象,我们再将 ChildClass.prototype 指向过去,这样做最大的问题就是,浪费了空间。
当我们生成 ChildClass 实例的时候,其对象的结构。

现在你来看这个图,你不觉得,FatherClass instance 有点多余吗…
我们为了消除共享变量的问题,劫持构造函数,将父构造函数中的变量放在子构造函数中。这个时候,由于作用域链的原因,FatherClass instance 中的变量完全不需要了,实际上我们需要的是 FatherClass.prototype。
换句话说,我们需要的是一个干净的对象,这个对象的 [[prototype]] 指向的是 FatherClass.prototype。
那么怎么做呢?很简单,就是用 Object.create()
接下来,我们来看完整的代码
function FatherClass(name, age) {this.name = name;this.age = age;this.hobby = ['reading', 'gaming'];}FatherClass.prototype.sayHi = function() {console.log('hi');}function ChildClass(name, age) {FatherClass.apply(this, [name, age]);}ChildClass.prototype = Object.create(FatherClass.prototype);// 我们修改了 prototype 的指向, 指向了一个新的对象// 而这个新对象没有 constructor, 因此我们要手动添加ChildClass.prototype.constructor = ChildClass;ChildClass.prototype.childSayHi = function() {console.log('child hi');}const ins = new ChildClass('meakle', 11);
怎么样,是不是很简单…

若有收获,就点个赞吧
0 人点赞
