1、Pipeline简介
- 概念 Pipeline,简单来说,就是一套运行在 Jenkins 上的工作流框架,将原来独立运行于单个或者多个节点 的任务连接起来,实现单个任务难以完成的复杂流程编排和可视化的工作。
- 使用Pipeline有以下好处(来自翻译自官方文档): 代码:Pipeline以代码的形式实现,通常被检入源代码控制,使团队能够编辑,审查和迭代其传送流 程。 持久:无论是计划内的还是计划外的服务器重启,Pipeline都是可恢复的。 可停止:Pipeline可接 收交互式输入,以确定是否继续执行Pipeline。 多功能:Pipeline支持现实世界中复杂的持续交付要 求。它支持fork/join、循环执行,并行执行任务的功能。 可扩展:Pipeline插件支持其DSL的自定义扩 展 ,以及与其他插件集成的多个选项。
- 如何创建 Jenkins Pipeline呢? Pipeline 脚本是由 Groovy 语言实现的,但是我们没必要单独去学习 Groovy Pipeline 支持两种语法:Declarative(声明式)和 Scripted Pipeline(脚本式)语法 Pipeline 也有两种创建方法:可以直接在 Jenkins 的 Web UI 界面中输入脚本;也可以通过创建一 个 Jenkinsfile 脚本文件放入项目源码库中(一般我们都推荐在 Jenkins 中直接从源代码控制(SCM) 中直接载入 Jenkinsfile Pipeline 这种方法)。
2、 Pipeline语法快速入门
1、 Declarative声明式-Pipeline
流水线->选择HelloWorld模板 
pipeline {agent anystages {stage('Hello') {steps {echo 'Hello World'}}}}
stages:代表整个流水线的所有执行阶段。通常stages只有1个,里面包含多个stage
stage:代表流水线中的某个阶段,可能出现n个。一般分为拉取代码,编译构建,部署等阶段。
steps:代表一个阶段内需要执行的逻辑。steps里面是shell脚本,git拉取代码,ssh远程发布等任意内 容。
编写一个简单声明式Pipeline:
pipeline {agent anystages {stage('拉取代码') {steps {echo '拉取代码'}}stage('编译构建') {steps {echo '编译构建'}}stage('项目部署') {steps {echo '项目部署'}}}}
2、Scripted Pipeline脚本式-Pipeline
这次选择”Scripted Pipeline” 
node {def mvnHomestage('Preparation') { // for display purposes}stage('Build') {}stage('Results') {}}
- Node:节点,一个 Node 就是一个 Jenkins 节点,Master 或者 Agent,是执行 Step 的具体运行 环境,后续讲到Jenkins的Master-Slave架构的时候用到。
- Stage:阶段,一个 Pipeline 可以划分为若干个 Stage,每个 Stage 代表一组操作,比如: Build、Test、Deploy,Stage 是一个逻辑分组的概念。
Step:步骤,Step 是最基本的操作单元,可以是打印一句话,也可以是构建一个 Docker 镜像, 由各类 Jenkins 插件提供,比如命令:sh ‘make’,就相当于我们平时 shell 终端中执行 make 命令 一样。
编写一个简单的脚本式Pipeline
```groovy node { def mvnHome stage(‘拉取代码’) { // for display purposesecho '拉取代码'
} stage(‘编译构建’) {
echo '编译构建'
} stage(‘项目部署’) {
echo '项目部署'
} }
<a name="PyOsY"></a>## 3、Pipeline的一些模板语法<a name="C2mt9"></a>### 1、 拉取代码```groovypipeline {agent anystages {stage('拉取代码') {steps {checkout([$class: 'GitSCM', branches: [[name: '*/master']],doGenerateSubmoduleConfigurations: false, extensions: [], submoduleCfg: [],userRemoteConfigs: [[credentialsId: '68f2087f-a034-4d39-a9ff-1f776dd3dfa8', url:'git@192.168.66.100:itheima_group/web_demo.git']]])}}}}
2、 编译打包
pipeline {agent anystages {stage('拉取代码') {steps {checkout([$class: 'GitSCM', branches: [[name: '*/master']],doGenerateSubmoduleConfigurations: false, extensions: [], submoduleCfg: [],userRemoteConfigs: [[credentialsId: '68f2087f-a034-4d39-a9ff-1f776dd3dfa8', url:'git@192.168.66.100:itheima_group/web_demo.git']]])}}stage('编译构建') {steps {sh label: '', script: 'mvn clean package'}}}}
3、 部署 / 远程Tomcat
pipeline {agent anystages {stage('拉取代码') {steps {checkout([$class: 'GitSCM', branches: [[name: '*/master']],doGenerateSubmoduleConfigurations: false, extensions: [], submoduleCfg: [],userRemoteConfigs: [[credentialsId: '68f2087f-a034-4d39-a9ff-1f776dd3dfa8', url:'git@192.168.66.100:itheima_group/web_demo.git']]])}}stage('编译构建') {steps {sh label: '', script: 'mvn clean package'}}stage('项目部署') {steps {deploy adapters: [tomcat8(credentialsId: 'afc43e5e-4a4e-4de6-984fb1d5a254e434', path: '', url: 'http://192.168.66.102:8080')], contextPath: null,war: 'target/*.war'}}}}
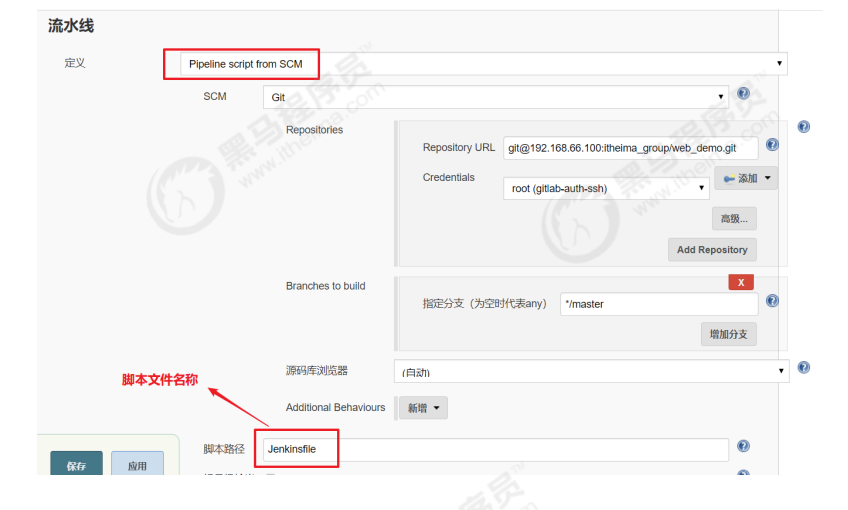
4、 Pipeline Script from SCM / Pipeline脚本语法远程维护
刚才我们都是直接在Jenkins的UI界面编写Pipeline代码,这样不方便脚本维护,建议把Pipeline脚本放 在项目中(一起进行版本控制)
1、 在项目根目录建立Jenkinsfile文件,把内容复制到该文件中
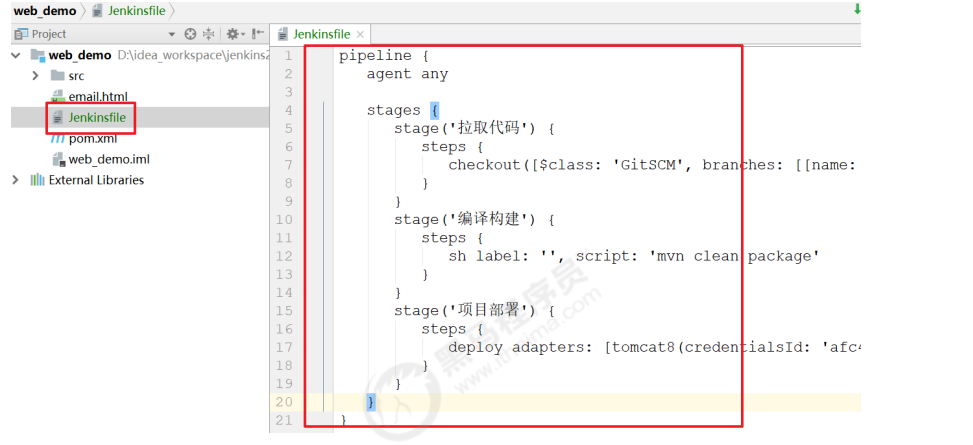
2、在项目中引用该文件
5、 Jenkins的参数化构建
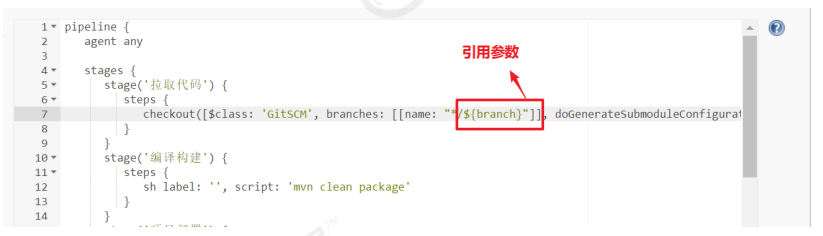
有时在项目构建的过程中,我们需要根据用户的输入动态传入一些参数,从而影响整个构建结果,这时 我们可以使用参数化构建。 Jenkins支持非常丰富的参数类型 
接下来演示通过输入gitlab项目的分支名称来部署不同分支项目。

改动pipeline流水线代码

点击Build with Parameters

6、企业级流水线模板
1、部署SpringBoot微服务脚本\deploy.yaml
pipeline {parameters {string(name: 'BRANCH_NAME', defaultValue: 'dev', description: '')}agent {node {label 'maven'}}stages {stage('拉取代码') {agent nonesteps {container('maven') {git(url: "$APP_REPO", credentialsId: 'gitlab-id', branch: "$BRANCH_NAME", changelog: true, poll: false)}}}stage('项目编译') {agent nonesteps {container('maven') {sh 'ls -al'sh 'cd afterloan-batch && mvn clean install -Dmaven.test.skip=true'}}}stage('构建镜像') {agent nonesteps {container('maven') {sh 'ls $JAR_PATH/target'sh "cd $JAR_PATH && docker build -t $APP_NAME:latest -f ./Dockerfile ."}}}stage('推送镜像') {agent nonesteps {container('maven') {withCredentials([usernamePassword(credentialsId : 'harbor-id' ,usernameVariable : 'DOCKER_USER_VAR' ,passwordVariable : 'DOCKER_PWD_VAR' ,)]) {sh 'echo "$DOCKER_PWD_VAR" | docker login $REGISTRY -u "$DOCKER_USER_VAR" --password-stdin'sh "docker tag $APP_NAME:latest $REGISTRY/$DOCKERHUB_NAMESPACE/$APP_NAME:$BRANCH_NAME-$BUILD_NUMBER"sh "docker push $REGISTRY/$DOCKERHUB_NAMESPACE/$APP_NAME:$BRANCH_NAME-$BUILD_NUMBER"}}}}stage('部署') {agent nonesteps {container ("maven") {// 这种方式启k8s是官方推荐的sh "envsubst < $JAR_PATH/k8s/deploy.yml | kubectl apply -f -"}}}}environment {// 固定的变量DOCKER_CREDENTIAL_ID = 'dockerhub'KUBECONFIG_CREDENTIAL_ID = 'kubeconfig'REGISTRY = 'k8s-habor:30002'DOCKERHUB_NAMESPACE = 'afterloan'SONAR_CREDENTIAL_ID = 'sonar-token'// JOB_BASE_NAME,这个变量,是jenkins自带的变量,会用到// 值要做更改的变量APP_NAME = 'afterloan-batch'JAR_PATH = 'afterloan-batch/afterloan-start'APP_REPO = 'http://192.168.50.11:9091/after_load/yusp-afterloan-batch.git'K8S_NAMESPACE = "afterloan-project"}}
apiVersion: apps/v1kind: Deploymentmetadata:labels:app: $APP_NAMEname: $APP_NAMEnamespace: ${K8S_NAMESPACE} #一定要写名称空间spec:progressDeadlineSeconds: 600replicas: 1selector:matchLabels:app: $APP_NAMEstrategy:rollingUpdate:maxSurge: 50%maxUnavailable: 50%type: RollingUpdatetemplate:metadata:labels:app: $APP_NAMEspec:imagePullSecrets:- name: harbor-id #提前在项目下配置访问阿里云的账号密码containers:- image: $REGISTRY/$DOCKERHUB_NAMESPACE/$APP_NAME:$BRANCH_NAME-$BUILD_NUMBER# readinessProbe:# httpGet:# path: /actuator/health# port: 8080# timeoutSeconds: 10# failureThreshold: 30# periodSeconds: 5imagePullPolicy: Alwaysname: appports:- containerPort: 8080protocol: TCPresources:requests:cpu: 100mmemory: 512Milimits:cpu: 1000mmemory: 1024MiterminationMessagePath: /dev/termination-logterminationMessagePolicy: FilednsPolicy: ClusterFirstrestartPolicy: AlwaysterminationGracePeriodSeconds: 30---apiVersion: v1kind: Servicemetadata:labels:app: $APP_NAMEname: $APP_NAMEnamespace: ${K8S_NAMESPACE}spec:ports:- name: httpport: 8080protocol: TCPtargetPort: 8080# nodePort: 32608selector:app: $APP_NAMEsessionAffinity: Nonetype: NodePort
FROM pig4cloud/java:8-jreENV JAR_NAME="jenkins-one"ENV TZ=Asia/ShanghaiENV JAVA_OPTS="-Xms512m -Xmx512m -Djava.security.egd=file:/dev/./urandom"RUN ln -sf /usr/share/zoneinfo/$TZ /etc/localtime \&& echo $TZ > /etc/timezone \&& mkdir -p /jenkins-oneWORKDIR /$JAR_NAME#EXPOSE 9000ADD ./target/$JAR_NAME.jar ./CMD java $JAVA_OPTS -jar $JAR_NAME.jar
2、部署前端npm项目脚本\deploy.yaml
FROM nginx#将dist目录内容复制到nginx容器html内部COPY dist /usr/share/nginx/html/COPY default.conf /etc/nginx/conf.d/COPY dns.sh /docker-entrypoint.d/dns.shRUN chmod +x /docker-entrypoint.d/dns.shEXPOSE 80
#!/usr/bin/env bashexport NAME_SERVER=`awk '/^nameserver/{print $2}' /etc/resolv.conf`sed -i "s#{NAME_SERVER}#${NAME_SERVER}#g" /etc/nginx/conf.d/default.conf
apiVersion: apps/v1kind: Deploymentmetadata:labels:app: $APP_NAMEname: $APP_NAMEnamespace: $K8S_NAMESPACE #一定要写名称空间spec:progressDeadlineSeconds: 600replicas: 1selector:matchLabels:app: $APP_NAMEstrategy:rollingUpdate:maxSurge: 50%maxUnavailable: 50%type: RollingUpdatetemplate:metadata:labels:app: $APP_NAMEspec:imagePullSecrets:- name: harbor-id #提前在项目下配置harbor私服的账号密码containers:- image: $REGISTRY/$DOCKERHUB_NAMESPACE/$APP_NAME:$BRANCH_TAG_NAME-$BUILD_NUMBER# readinessProbe:# httpGet:# path: /actuator/health# port: 8080# timeoutSeconds: 10# failureThreshold: 30# periodSeconds: 5imagePullPolicy: Alwaysname: appports:- containerPort: 80protocol: TCPresources:limits:cpu: 512mmemory: 512MiterminationMessagePath: /dev/termination-logterminationMessagePolicy: FilednsPolicy: ClusterFirstrestartPolicy: AlwaysterminationGracePeriodSeconds: 30---apiVersion: v1kind: Servicemetadata:labels:app: $APP_NAMEname: $APP_NAMEnamespace: $K8S_NAMESPACEspec:ports:- name: httpport: 80protocol: TCPtargetPort: 80# nodePort: 32609selector:app: $APP_NAMEsessionAffinity: Nonetype: NodePort
server {listen 80;listen [::]:80;server_name localhost;resolver {NAME_SERVER} valid=10s;resolver_timeout 3s;client_max_body_size 0;set $proxy_url "http://afterloan-service.afterloan-project.svc.cluster.local:8080";#gzip配置gzip on;gzip_min_length 1k;gzip_buffers 4 16k;gzip_http_version 1.1;gzip_comp_level 5;gzip_types text/xml text/plain text/css text/javascript application/x-javascript application/javascript application/css application/xml application/vnd.ms-fontobject font/ttf font/opentype font/x-woff image/svg+xml;gzip_vary on;gzip_disable "MSIE [1-6]\.";location / {root /usr/share/nginx/html;index index.html index.htm;}location ~ ^/(api|oauth|business) {proxy_pass $proxy_url;proxy_set_header Host $host;proxy_set_header X-Real-IP $remote_addr;proxy_set_header X-Forwarded-For $proxy_add_x_forwarded_for;}error_page 500 502 503 504 /50x.html;location = /50x.html {root /usr/share/nginx/html;}}
pipeline {parameters {string(name: 'BRANCH_NAME', defaultValue: 'dev-二批次', description: '')string(name: 'BRANCH_TAG_NAME', defaultValue: 'dev-batch2', description: '解决镜像标签无法使用中文的问题')}agent {node {label 'nodejs'}}stages {stage('拉取代码') {agent nonesteps {container('nodejs') {git(url: 'http://192.168.50.11:9091/after_load/yusp-afterloan-web.git', credentialsId: 'gitlab-id', branch: "$BRANCH_NAME", changelog: true, poll: false)}}}stage('构建') {agent nonesteps {container('nodejs') {script {sh 'npm config delete proxy'sh 'yarn'sh 'yarn build'}}}}// stage("代码质量扫描") {// agent none// steps {// container('nodejs') {// script {// withCredentials([string(credentialsId: 'sonar-token', variable: 'SONAR_TOKEN',)]) {// withSonarQubeEnv('sonar') {// sh 'ls -al'// sh "sonar-scanner -Dsonar.projectName=$JOB_BASE_NAME -Dsonar.projectKey=$JOB_BASE_NAME -Dsonar.projectBaseDir=./$JOB_BASE_NAME -Dsonar.exclusions=**/node_modules/**,**/tests/**,**/html/**,**/public/**,**/mocks/** -Dsonar.host.url=http://192.168.35.42:9000/ -Dsonar.login=$SONAR_TOKEN"// }// }// timeout(unit: 'MINUTES', activity: true, time: 5) {// waitForQualityGate 'false'// }// }// }// }// }stage('构建镜像') {agent nonesteps {container('nodejs') {sh 'pwd && ls'sh "docker build -t $APP_NAME:latest -f ./Dockerfile ."}}}stage('推送镜像') {agent nonesteps {container('nodejs') {withCredentials([usernamePassword(credentialsId : 'harbor-id' ,usernameVariable : 'DOCKER_USER_VAR' ,passwordVariable : 'DOCKER_PWD_VAR' ,)]) {sh 'echo "$DOCKER_PWD_VAR" | docker login $REGISTRY -u "$DOCKER_USER_VAR" --password-stdin'sh "docker tag $APP_NAME:latest $REGISTRY/$DOCKERHUB_NAMESPACE/$APP_NAME:$BRANCH_TAG_NAME-$BUILD_NUMBER"sh 'docker push $REGISTRY/$DOCKERHUB_NAMESPACE/$APP_NAME:$BRANCH_TAG_NAME-$BUILD_NUMBER'}}}}stage('部署') {agent nonesteps {kubernetesDeploy(configs: 'deploy.yml', enableConfigSubstitution: true, kubeconfigId: "$KUBECONFIG_CREDENTIAL_ID")}}}environment {DOCKER_CREDENTIAL_ID = 'dockerhub'KUBECONFIG_CREDENTIAL_ID = 'kubeconfig'REGISTRY = 'k8s-habor:30002'DOCKERHUB_NAMESPACE = 'afterloan'APP_NAME = 'afterloan-web'SONAR_CREDENTIAL_ID = 'sonar-token'K8S_NAMESPACE='afterloan-project'}}
FROM nginxCOPY ./dist /dataRUN rm /etc/nginx/conf.d/default.confADD student-eva.conf /etc/nginx/conf.d/default.confRUN rm /etc/nginx/nginx.confADD nginx.conf /etc/nginx/nginx.confRUN /bin/bash -c 'echo init ok'
user nginx;worker_processes 1;error_log /var/log/nginx/error.log warn;pid /var/run/nginx.pid;events {worker_connections 1024;}http {include /etc/nginx/mime.types;default_type application/octet-stream;client_max_body_size 200M;log_format main '$remote_addr - $remote_user [$time_local] "$request" ''$status $body_bytes_sent "$http_referer" ''"$http_user_agent" "$http_x_forwarded_for"';access_log /var/log/nginx/access.log main;add_header Cache-Control "no-cache";sendfile on;#tcp_nopush on;keepalive_timeout 65;#gzip on;include /etc/nginx/conf.d/*.conf;}
server {listen 80;server_name localhost;gzip on;gzip_static on; # 需要http_gzip_static_module 模块gzip_min_length 1k;gzip_comp_level 4;gzip_proxied any;gzip_types text/plain text/xml text/css;gzip_vary on;gzip_disable "MSIE [1-6]\.(?!.*SV1)";# 前端打包好的dist目录文件root /data/;# 若新增后端路由前缀注意在此处添加(|新增)location ~* ^/(code|auth|admin|course|arranging|dict|resource|exercise|study|tpi|activity|lesson|studentEva) {proxy_pass http://course-gateway:9999;proxy_connect_timeout 15s;proxy_send_timeout 15s;proxy_read_timeout 15s;proxy_set_header X-Real-IP $remote_addr;proxy_set_header X-Forwarded-For $proxy_add_x_forwarded_for;proxy_set_header X-Forwarded-Proto http;}}

若有收获,就点个赞吧
0 人点赞
