下载微软提供的demo
https://github.com/Microsoft/Reporting-Services/tree/master/CustomSecuritySample
如果上面链接打不开,点击下面链接下载
https://www.123pan.com/s/SSzA-pESdv

编译项目
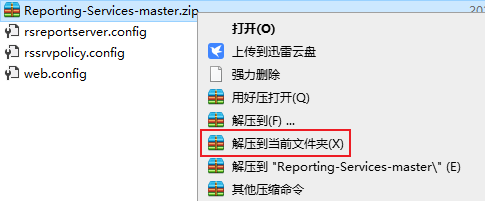
解压缩
打开项目
用Visual Studio打开CustomSecuritySample.sln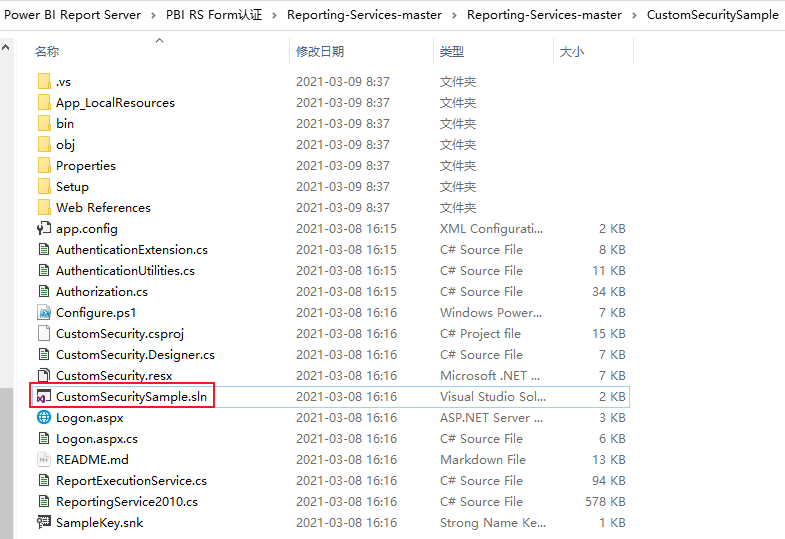
安装.NET Framework
如果提示“未安装项目的目标框架,则选择下载,并点击确定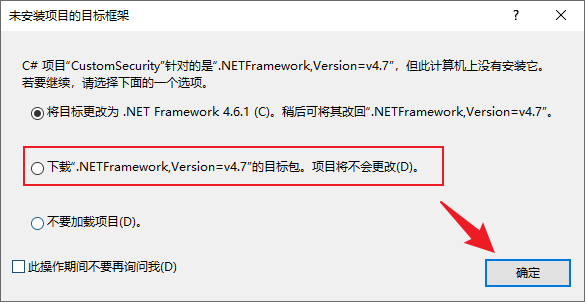
根据弹窗提示的.NETFramework版本号,下载对应的Developer Pack
注意:只能选择Developer Pack安装包,如果是在线安装包或脱机安装包,当所安装的版本低于当前系统所安装的.NETFramework最高版本时,将无法安装。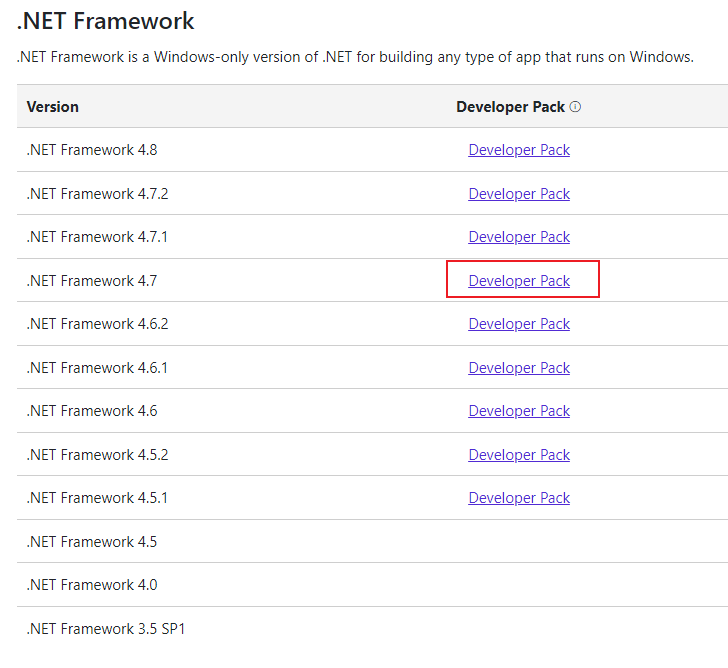
下载好安装包之后进行安装
回到Visual Studio,点击重试
页面中出现了刚才安装的.NET Framwork版本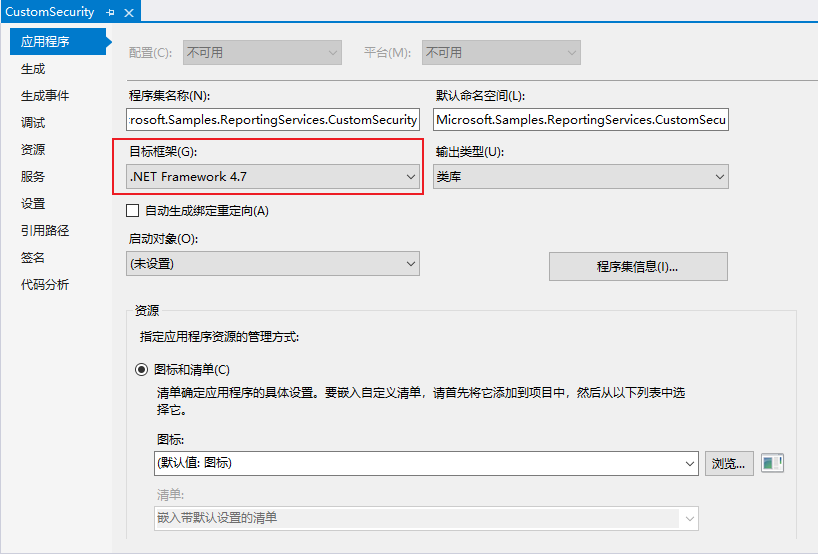
创建密钥
打开Visual Studio开发人员命令提示符
打开后,跳转到需要的目录,如cd c:\test,然后输入:sn -k SampleKey.snk
设置签名
生成的samplekey.snk需要和程序关联,点击应用程序的属性,选择签名,选择强签名密钥文件为刚生成的samplekey.snk
编译
右击解决方案,选择生成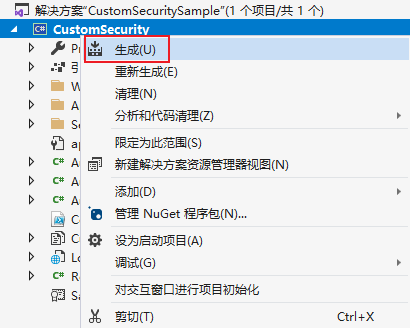
如果不能通过,可能需要添加 Microsoft.ReportingServices.Interfaces 这可以在 C:\Program Files\Microsoft Power BI Report Server\PBIRS\PowerBI 目录下找到 Microsoft.ReportingServices.Interfaces.DLL进行引用
[
](https://blog.csdn.net/capsicum29/article/details/83746921)
如果一切顺利将生成成功
部署项目

将Logon.aspx复制到下列目录:
C:\Program Files\Microsoft Power BI Report Server\PBIRS\ReportServer
将Microsoft.Samples.ReportingServices.CustomSecurity.dll和Microsoft.Samples.ReportingServices.CustomSecurity.pdb复制到下列目录:
C:\Program Files\Microsoft Power BI Report Server\PBIRS\ \ReportServer\bin
C:\Program Files\Microsoft Power BI Report Server\PBIRS\ \Portal
C:\Program Files\Microsoft Power BI Report Server\PBIRS\ \PowerBI
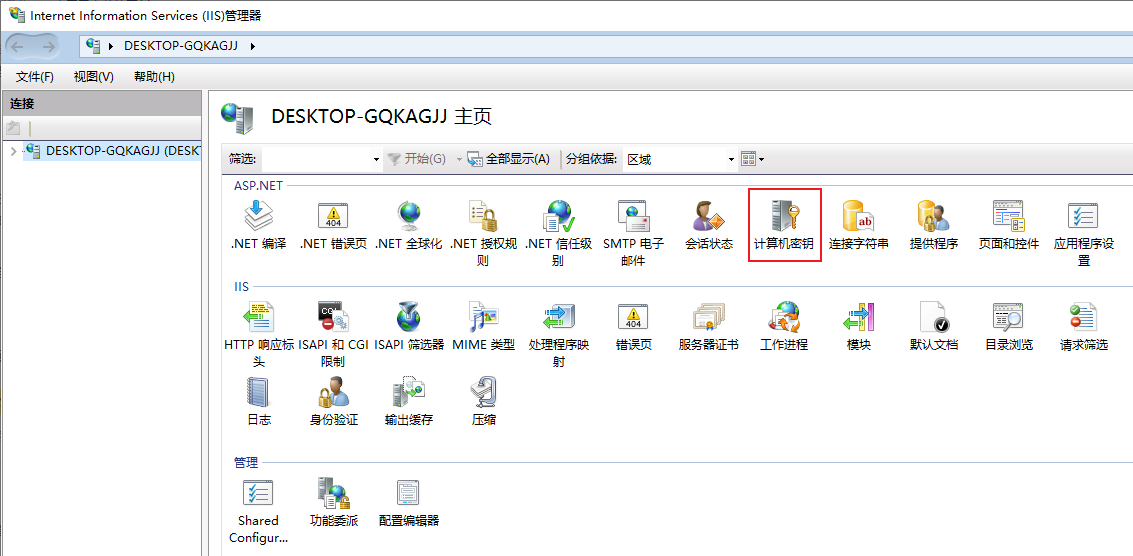
生成密钥
生成密钥理论有很多方法实现,我的这台服务器安装了IIS 我使用IIS进行生成密钥
打开IIS
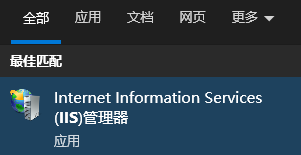
安装IIS
如果搜不到IIS,需要先安装
控制面板-程序和功能,点击“启动或关闭Windows功能”
勾选IIS,点确定
双击打开“计算机密钥”
安装“计算机密钥”
如果在IIS中没有“计算机密钥”,需要先安装
控制面板-程序和功能,点击“启动或关闭Windows功能”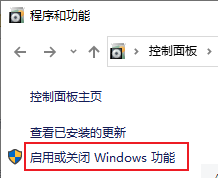
勾选HTTP激活,点确定
重新打开IIS,“计算机密钥”就有了。
生成密钥
验证方法选“AES”
加密方法选“AES”
点“生成密钥”
点“应用”
记录好验证密钥和解密密钥备用
修改配置文件
修改RSReportServer.config
C:\Program Files\Microsoft Power BI Report Server\PBIRS\ReportServer\RSReportServer.config
在
<Authentication><AuthenticationTypes><Custom/></AuthenticationTypes><RSWindowsExtendedProtectionLevel>Off</RSWindowsExtendedProtectionLevel><RSWindowsExtendedProtectionScenario>Proxy</RSWindowsExtendedProtectionScenario><EnableAuthPersistence>true</EnableAuthPersistence></Authentication>
在元素中找到
<Security><Extension Name="Forms" Type="Microsoft.Samples.ReportingServices.CustomSecurity.Authorization, Microsoft.Samples.ReportingServices.CustomSecurity" ><Configuration><AdminConfiguration><UserName>maxbiuser</UserName></AdminConfiguration></Configuration></Extension></Security>
<Authentication><Extension Name="Forms" Type="Microsoft.Samples.ReportingServices.CustomSecurity.AuthenticationExtension,Microsoft.Samples.ReportingServices.CustomSecurity" /></Authentication>
下面加入:
<MachineKey ValidationKey="[YOUR KEY]" DecryptionKey="[YOUR KEY]" Validation="AES" Decryption="AES" />
下加入,配置直通 cookie
<UI><CustomAuthenticationUI><PassThroughCookies><PassThroughCookie>sqlAuthCookie</PassThroughCookie></PassThroughCookies></CustomAuthenticationUI></UI>
修改rssrvpolicy. config
C:\Program Files\Microsoft Power BI Report Server\PBIRS\ReportServer\rssrvpolicy. config
需要为自定义安全扩展添加一个代码组, 该代码组将授予您的扩展的 fulltrust 权限。为此, 可以将代码组添加到 rssrvpoligy. config 文件中。
在安全策略文件中的现有代码组之后添加以下元素, 如下所示, 然后添加一个条目, 如下所示, 以 rssrvpolicy. config。请确保根据您的 reportserver 安装目录更改以下路径:
<CodeGroupclass="UnionCodeGroup"version="1"Name="SecurityExtensionCodeGroup"Description="Code group for the sample security extension"PermissionSetName="FullTrust">5<IMembershipConditionclass="UrlMembershipCondition"version="1"Url="C:\Program Files\Microsoft Power BI Report Server\PBIRS\ReportServer\bin\Microsoft.Samples.ReportingServices.CustomSecurity.dll"/></CodeGroup>
修改web.config
C:\Program Files\Microsoft Power BI Report Server\PBIRS\ReportServer\web.config
找到
<identity impersonate="false" />
找到<forms>
<authentication mode="Forms">
    <forms loginUrl="logon.aspx" name="sqlAuthCookie" timeout="60" path="/"></forms>
</authentication>
直接在元素之后添加以下元素。
<authorization>
<deny users="?" />
</authorization>
这将拒绝未经身份验证的用户访问报表服务器的权限。该元素以前建立的 loginurl 属性将未经身份验证的请求重定向到 logon.aspx 页。
创建用户表
使用CustomSecuritySample\Setup下面 CreateUserStore.sql 创建用户表

若有收获,就点个赞吧
0 人点赞
