学习目标:
- 掌握 Vue.js 基础语法
案例基本会涵盖到以下内容知识点:
- 数据绑定
- 计算属性 computed
- 侦听器 watch
- Class 与 Style 样式处理
- 条件渲染
- 列表渲染
- 事件处理
- 表单输入绑定
- 。。。
案例介绍
- TodoMVC 官网
- 对比在线完整版查看需求: http://todomvc.com/examples/vue/
准备
下载模板
# 使用 Git 把模板下载到本地$ git clone https://github.com/tastejs/todomvc-app-template.git# 切换到 todomvc-vue 目录中,安装依赖项cd 下载的项目中# 模板项目把样式等文件放到了第三方包里面了,所以我们要执行 npm install 安装它的那些依赖项才能正常的预览到这个项目页面npm install
安装完成,打开 index.html 预览模板。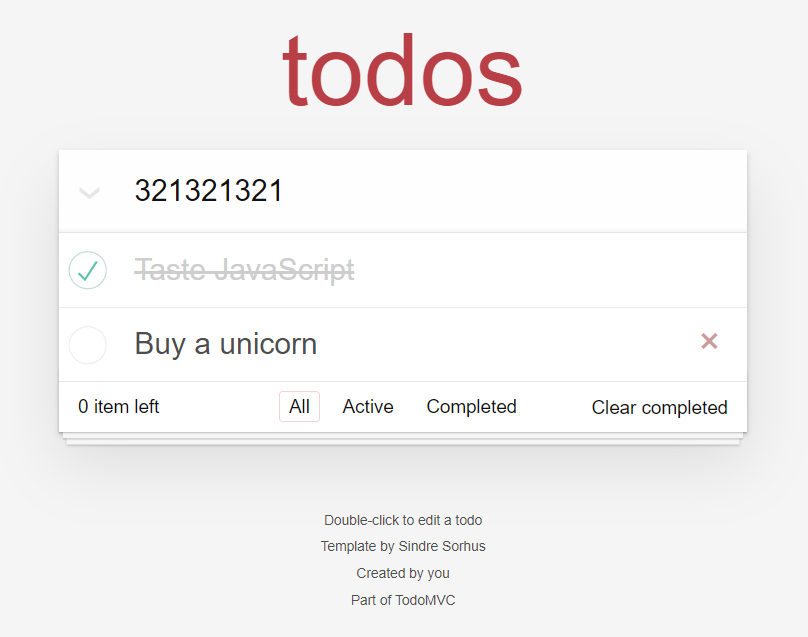
导入 Vue
1、安装 Vue 到项目中
$ npm i vue
2、在页面中引入 vue.js 脚本文件
3、在 js/app.js 中
new Vue({el: "#app",data: {foo: "bar"},methods: {}});
需求说明
- 任务列表
- 有数据的时候
- 没有数据的时候
- 添加任务
- 添加任务到列表中
- 清空文本框
- 删除单个任务项
- 切换单个任务的完成状态
- 删除所有已完成任务
- 处理它的显示状态
- 删除功能
- 切换所有任务的完成状态(全选功能)
- 切换
- 受子元素影响
- 显示所有未完成任务的数量
- 数据筛选
- 展示所有任务
- 展示已完成任务
- 展示未完成所有
- 刷新页面保持筛选状态
- 数据持久化
- 这里没有后端接口,我们可以使用本地存储简单处理一下
- 编辑任务
- 双击获取编辑状态
- 回车保存
- ESC 取消
任务列表
<li class="completed" v-for="item in todos">
  <div class="view">
    <input class="toggle" type="checkbox" checked />
    <label>{{ item.title }}</label>
    <button class="destroy"></button>
  </div>
  <input class="edit" value="Create a TodoMVC template" />
</li>
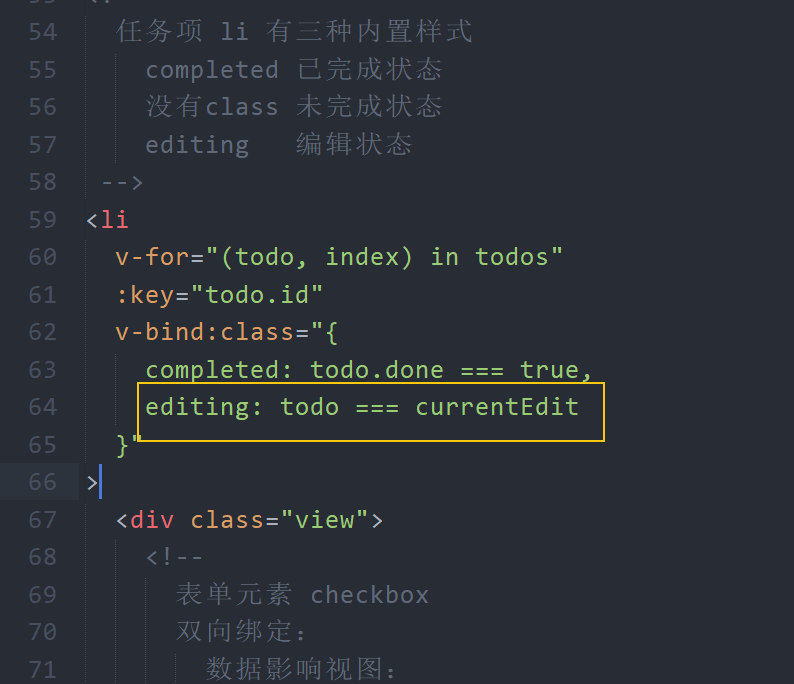
状态处理
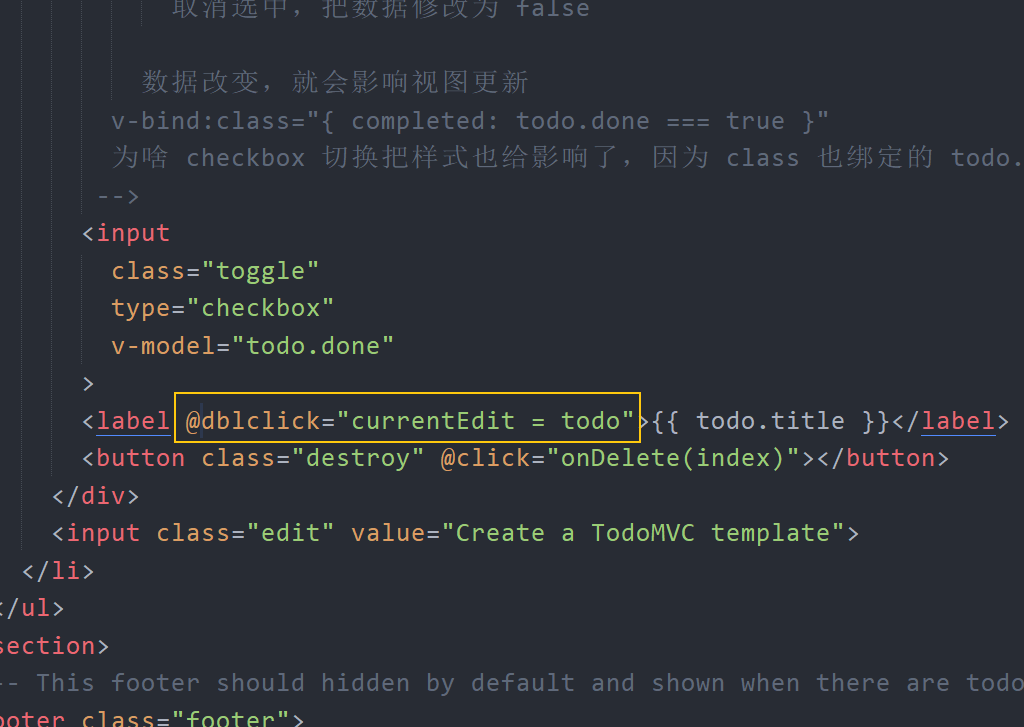
<li :class="{ completed: item.completed }" v-for="item in todos">
  <div class="view">
    <input class="toggle" type="checkbox" v-model="item.completed" />
    <label>{{ item.title }}</label>
    <button class="destroy"></button>
  </div>
  <input class="edit" value="Create a TodoMVC template" />
</li>
没有数据的时候隐藏内容区域
<template v-if="todos.length > 0">
<!-- This section should be hidden by default and shown when there are todos -->
<section class="main">
<input id="toggle-all" class="toggle-all" type="checkbox" />
<label for="toggle-all">Mark all as complete</label>
<ul class="todo-list">
<!-- These are here just to show the structure of the list items -->
<!-- List items should get the class `editing` when editing and `completed` when marked as completed -->
<!--
任务项
completed 已完成
editing 编辑中
空 未完成
-->
<li :class="{ completed: item.completed }" v-for="item in todos">
<div class="view">
<input class="toggle" type="checkbox" v-model="item.completed" />
<label>{{ item.title }}</label>
<button class="destroy"></button>
</div>
<input class="edit" value="Create a TodoMVC template" />
</li>
<!-- <li>
<div class="view">
<input class="toggle" type="checkbox">
<label>Buy a unicorn</label>
<button class="destroy"></button>
</div>
<input class="edit" value="Rule the web">
</li> -->
</ul>
</section>
<!-- This footer should hidden by default and shown when there are todos -->
<footer class="footer">
<!-- This should be `0 items left` by default -->
<span class="todo-count"><strong>0</strong> item left</span>
<!-- Remove this if you don't implement routing -->
<ul class="filters">
<li>
<a class="selected" href="#/">All</a>
</li>
<li>
<a href="#/active">Active</a>
</li>
<li>
<a href="#/completed">Completed</a>
</li>
</ul>
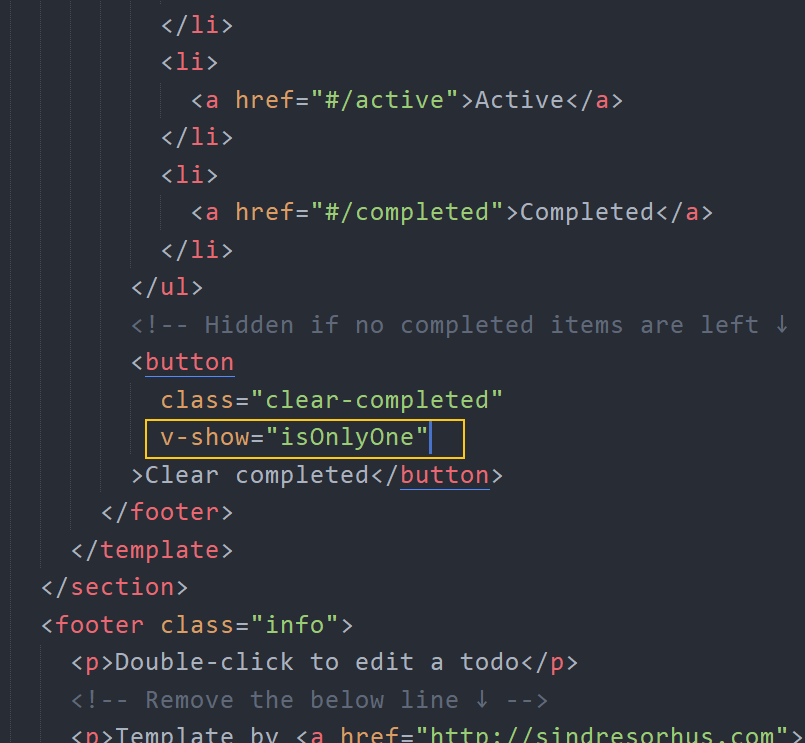
<!-- Hidden if no completed items are left ↓ -->
<button class="clear-completed">Clear completed</button>
</footer>
</template>
...
<template v-if="todos.length > 0">
  <section class="main">
    <input
      id="toggle-all"
      class="toggle-all"
      type="checkbox"
      v-bind:checked="getToggleAllStatus()"
      @change="handleToggleAll"
    />
    <label for="toggle-all">Mark all as complete</label>
    <ul class="todo-list">
      <!-- These are here just to show the structure of the list items -->
      <!-- List items should get the class `editing` when editing and `completed` when marked as completed -->
      <li v-for="(item, index) in todos" v-bind:class="{completed: item.done}">
        <div class="view">
          <input class="toggle" type="checkbox" v-model="item.done" />
          <label>{{ item.title }}</label>
          <button @click="handleRemoveTodo(index)" class="destroy"></button>
        </div>
        <input class="edit" value="Rule the web" />
      </li>
    </ul>
  </section>
  <!-- This footer should hidden by default and shown when there are todos -->
  <footer class="footer">
    <!-- This should be `0 items left` by default -->
    <span class="todo-count"><strong>0</strong> item left</span>
    <!-- Remove this if you don't implement routing -->
    <ul class="filters">
      <li>
        <a class="selected" href="#/">All</a>
      </li>
      <li>
        <a href="#/active">Active</a>
      </li>
      <li>
        <a href="#/completed">Completed</a>
      </li>
    </ul>
    <!-- Hidden if no completed items are left ↓ -->
    <button class="clear-completed">Clear completed</button>
  </footer>
</template>
...
添加任务
1、首先在模板中给输入框绑定按键回车事件
...
<input
  class="new-todo"
  placeholder="What needs to be done?"
  autofocus
  +
  v-model="inputTitle"
  +
  @keydown.enter="onAdd"
/>
...
2、然后在 JavaScript 中
new Vue({
el: '#app',
data: {
+ inputTitle: '', // 用户输入的任务名称
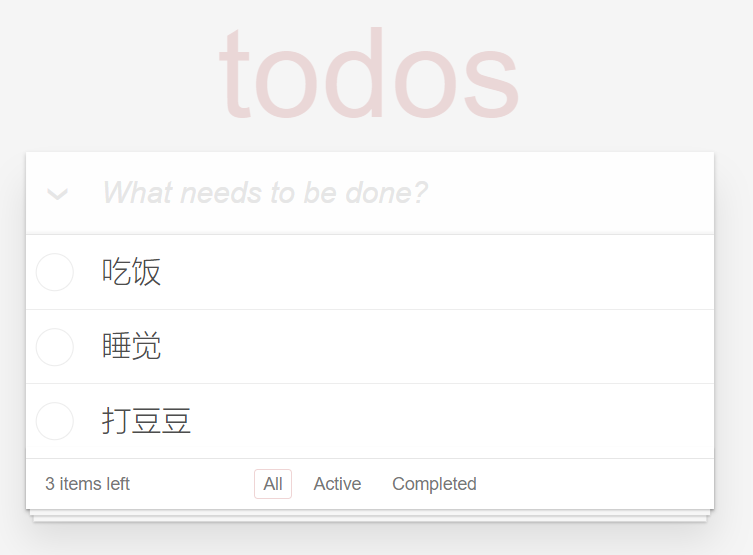
todos: [
{ id: 1, title: '吃饭', done: false },
{ id: 2, title: '睡觉', done: true },
// { id: 3, title: '打豆豆', done: false },
{ id: 4, title: '跑步', done: true }
]
},
methods: {
+++ onAdd () {
// 1. 得到文本框的数据
const inputTitle = this.inputTitle.trim()
// 2. 非空校验
// if (inputTitle.length === 0) {
if (!inputTitle.length) {
return
}
// 3. 如果没问题,把数据添加到任务列表中
this.todos.push({
id: Math.random(),
title: inputTitle,
done: false
})
// 4. 清空文本框
this.inputTitle = ''
}
}
})
删除单个任务
1、在视图模板中注册事件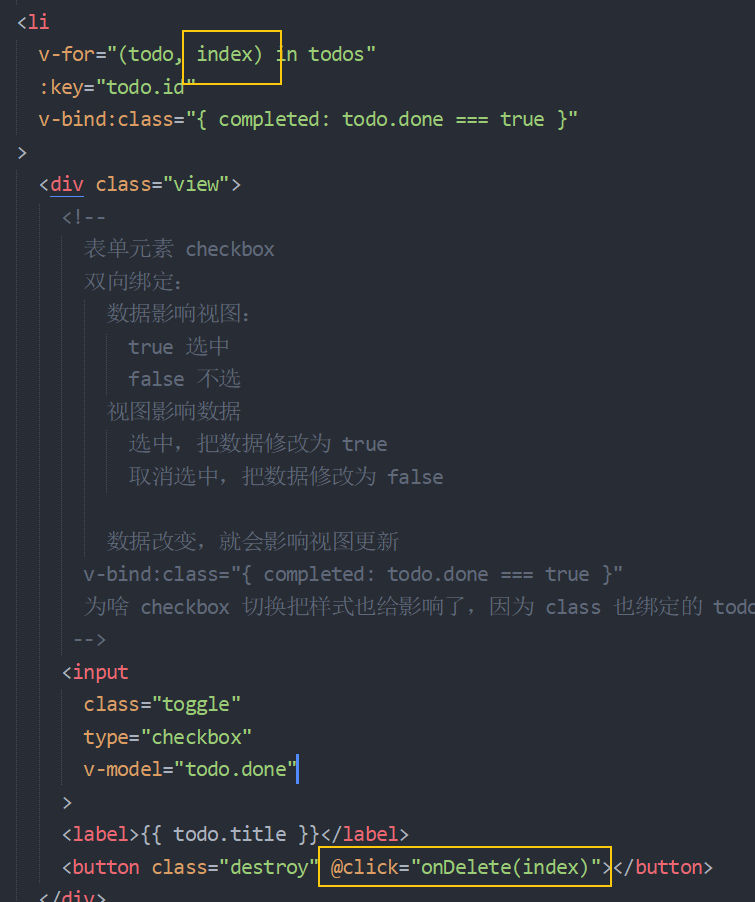
2、在 JavaScript 中添加一个 methods 成员
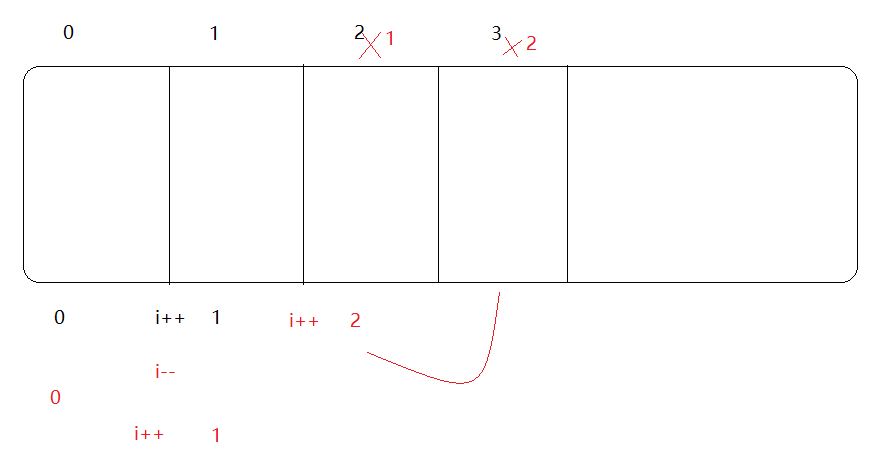
数组的 splice 方法
const arr = [1, 2, 3, 4, 5];

// arr.splice(1) // 从指定索引开始(包括索引本身)一直删到最后

// arr.splice(1, 2) // 从指定索引开始(包括索引本身),删除指定的个数

// arr.splice(1, 2, 3) // 从索引1开始,删除2个,替换为 3

// arr.splice(1, 2, 3, 4, 5, 6) // 从索引1开始,删除2个,替换为 3, 4, 5, 6

说白了从第3个参数开始都是要替换的参数;
删除所有已完成任务
处理显示状态
1、在模板中
2、添加一个计算属性
删除
1、在模板中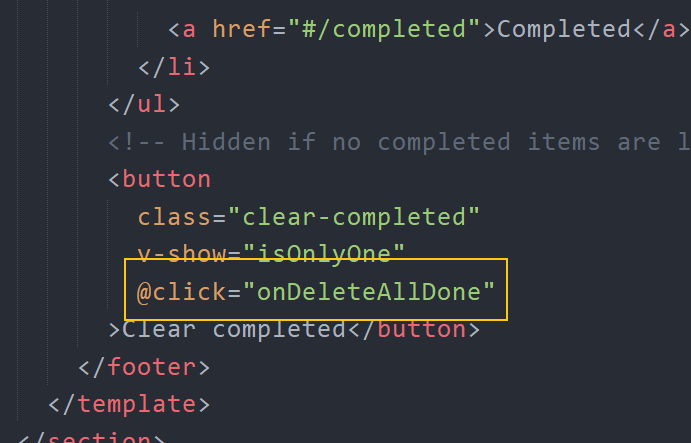
2、然后添加一个 methods 方法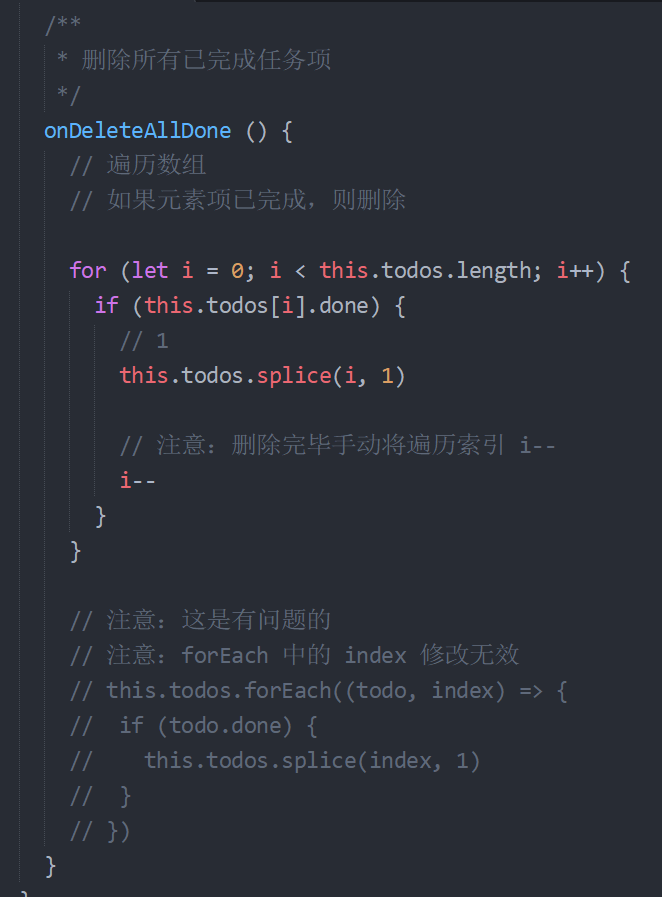
显示所有剩余未完成任务数
1、在模板中
2、然后添加一个 computed 计算属性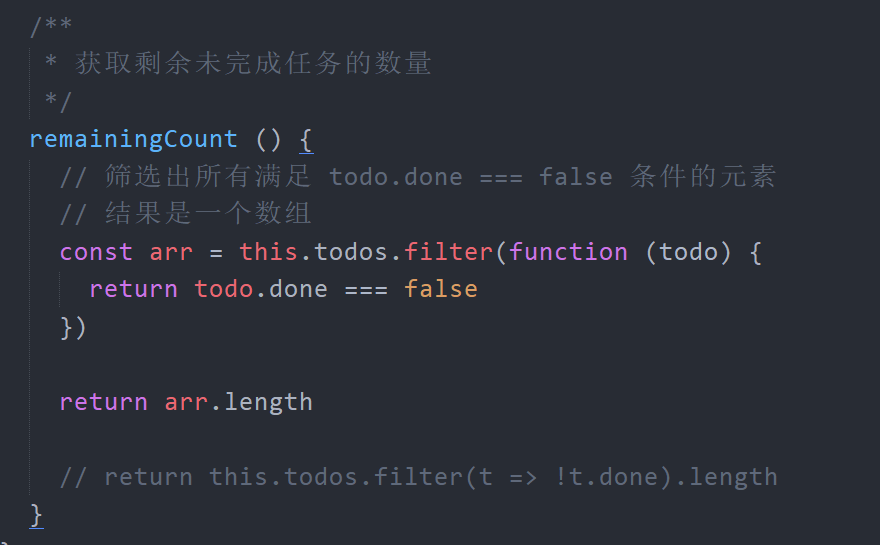
切换所有任务的完成状态(全选)
切换所有
1、在模板中
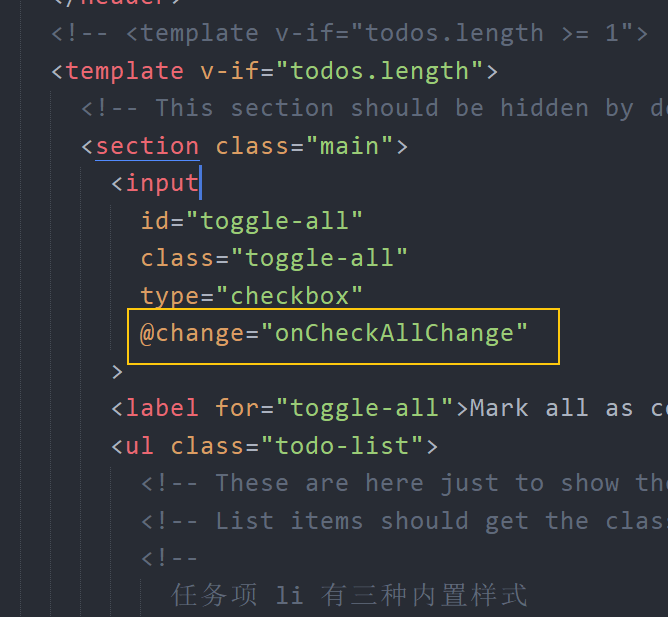
2、添加一个 methods 处理函数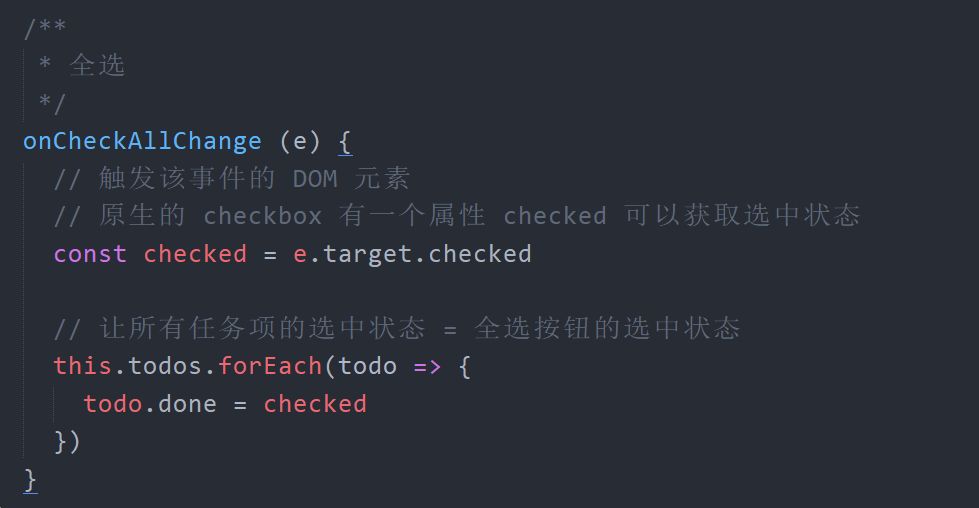
让其受子元素的完成状态影响
1、在模板中绑定一个计算属性
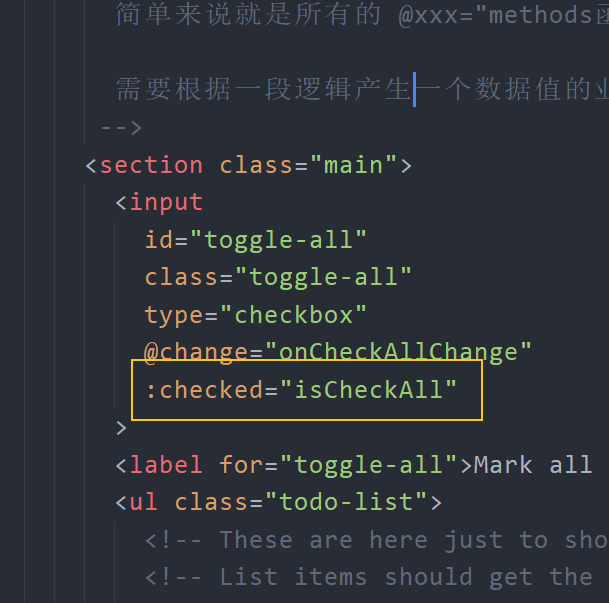
2、然后添加一个计算属性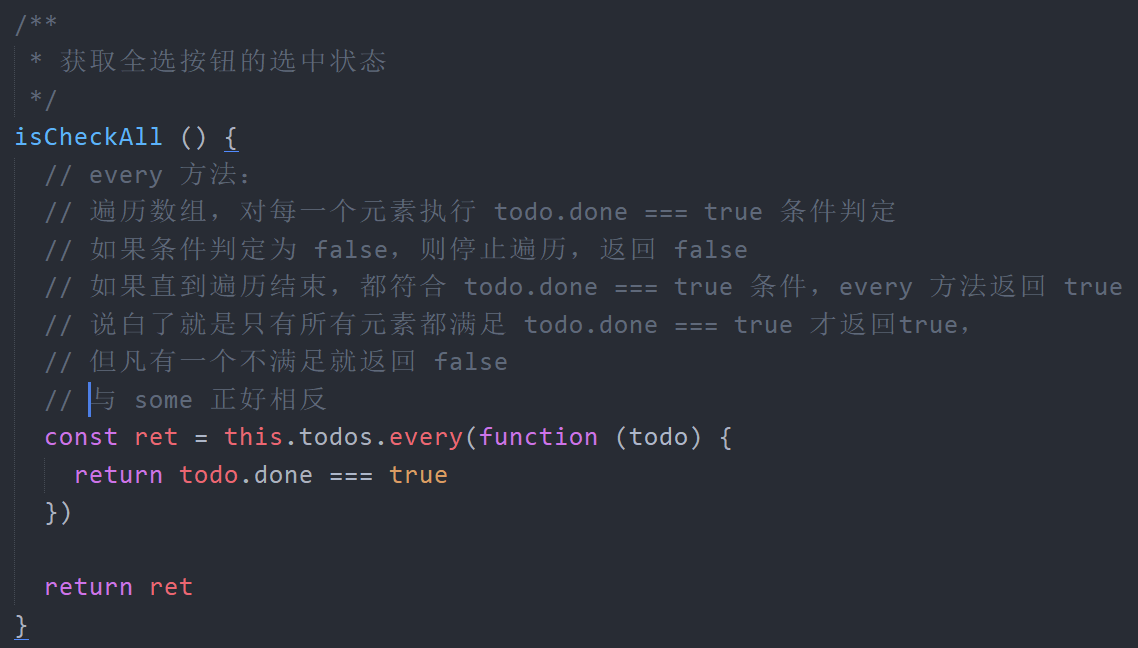
编辑任务
双击获得编辑状态
思路:
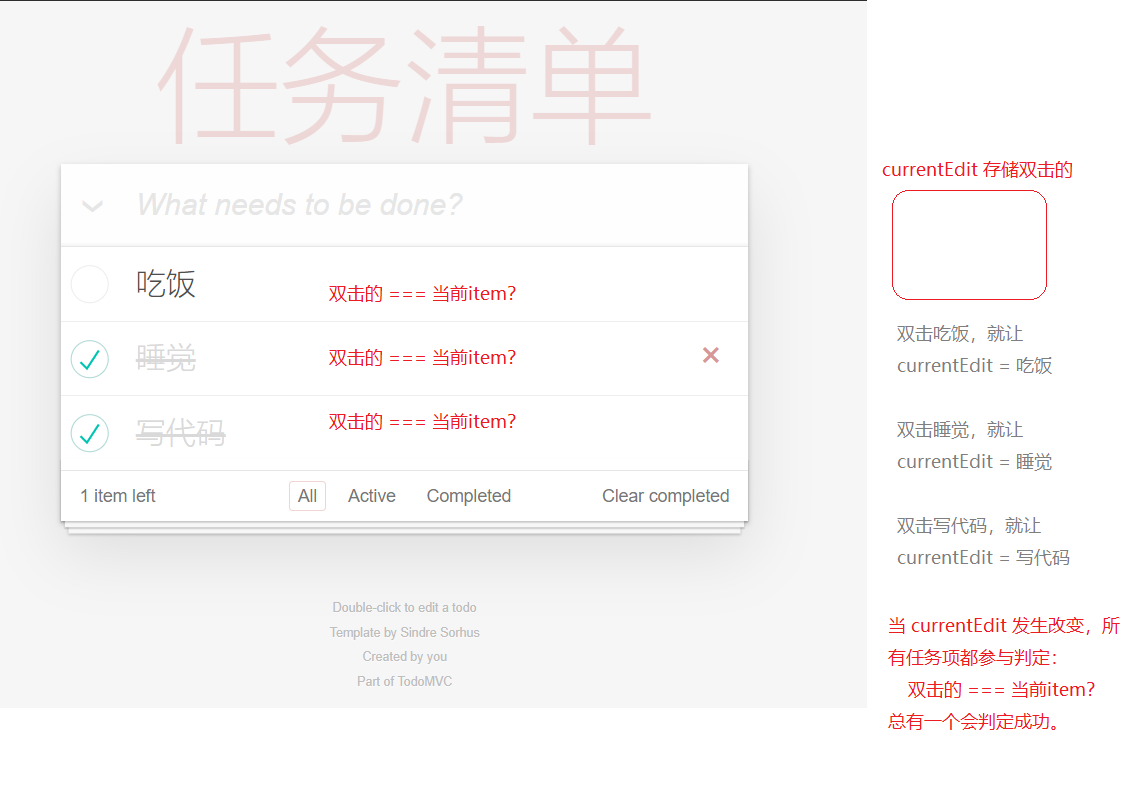
1、在模板中
2、添加一个 data 数据
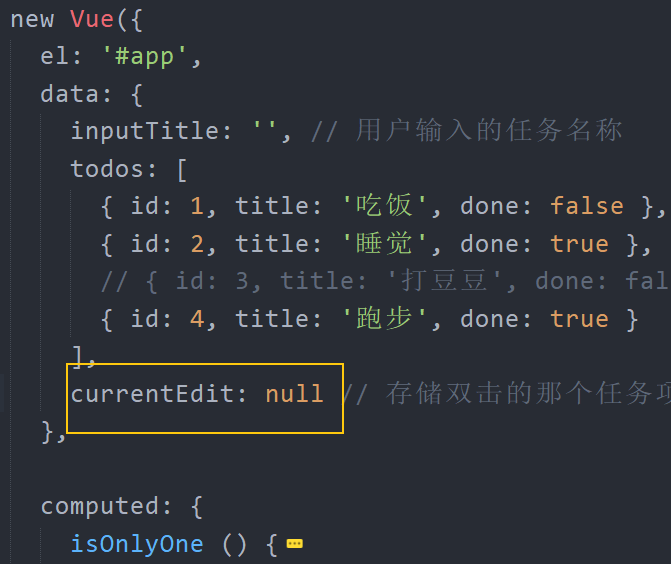
3、当双击任务项的时候,把双击的任务项存储给 currentEdit
回车保存
1、在模板中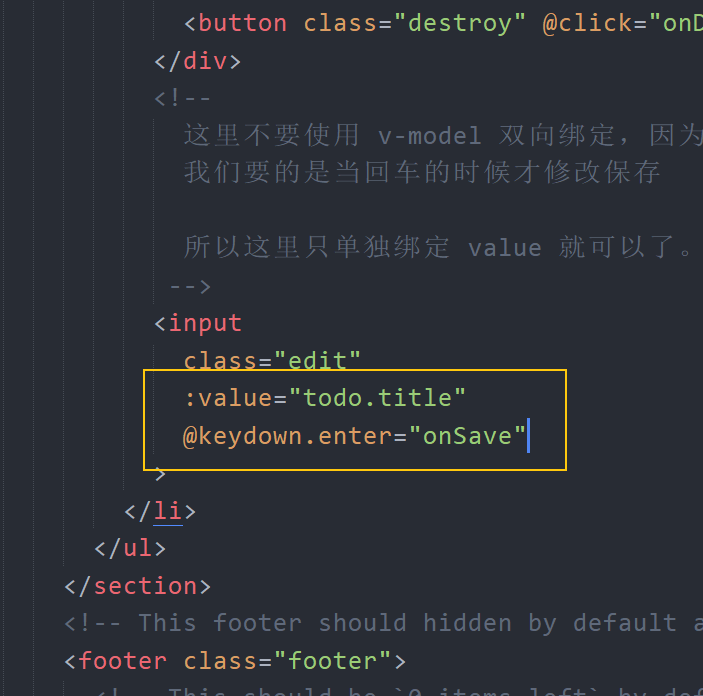
2、添加一个 methods 处理函数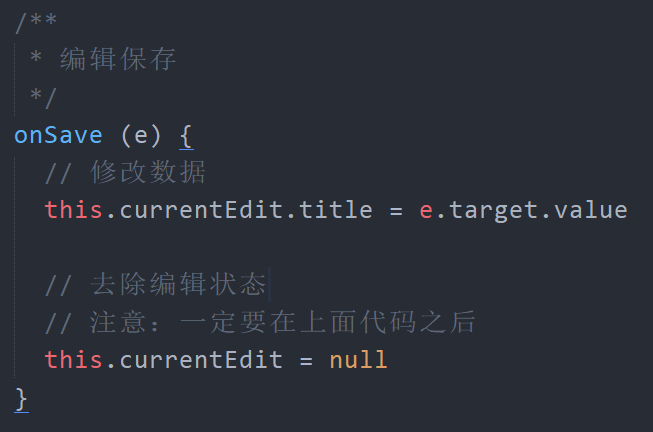
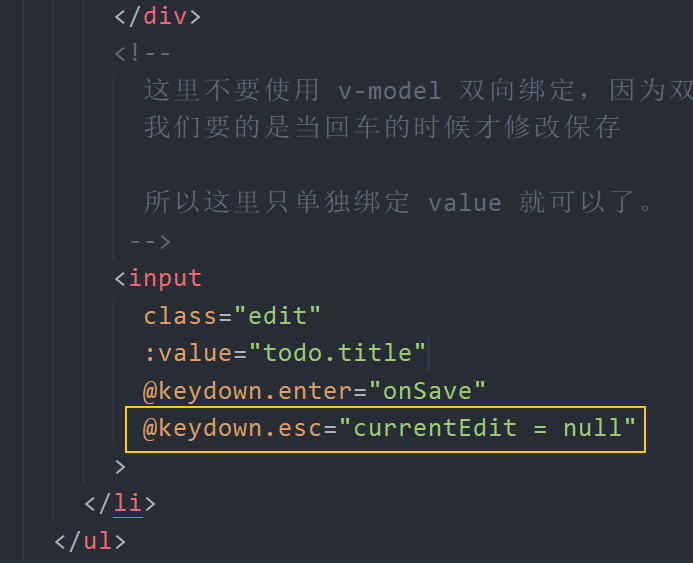
ESC 取消编辑
数据过滤(自行参考源码学习)
原版代码: https://github.com/tastejs/todomvc/tree/gh-pages/examples/vue
持久化存储
1、使用 watch 监视,当 todos 数据改变,将数据存储到本地存储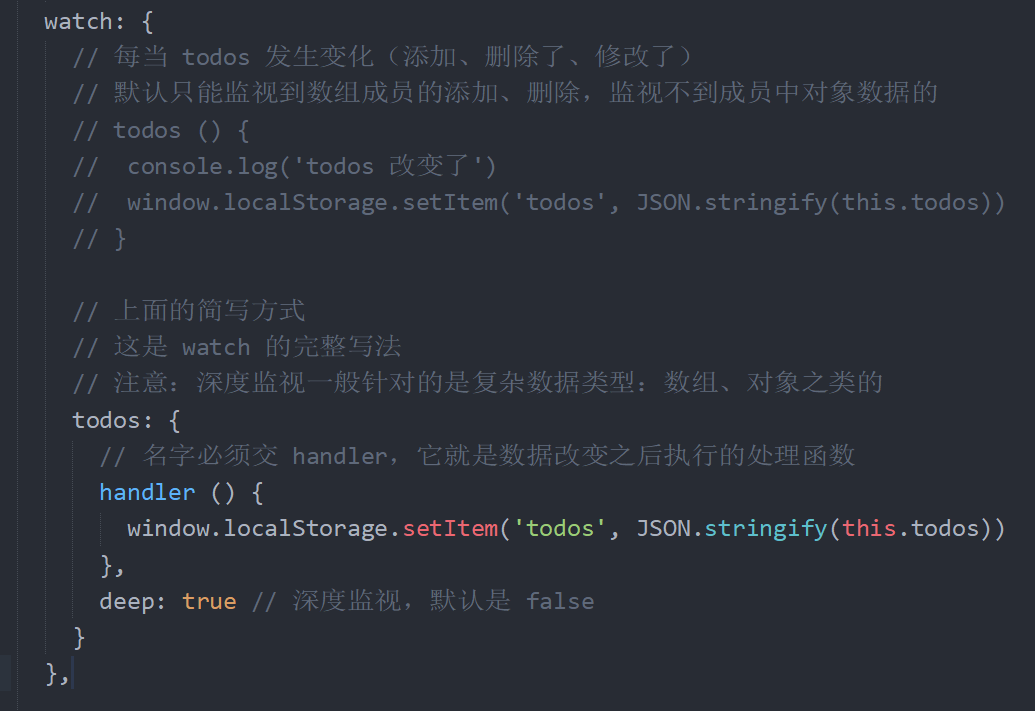
2、在 data 中获取使用本地存储中的数据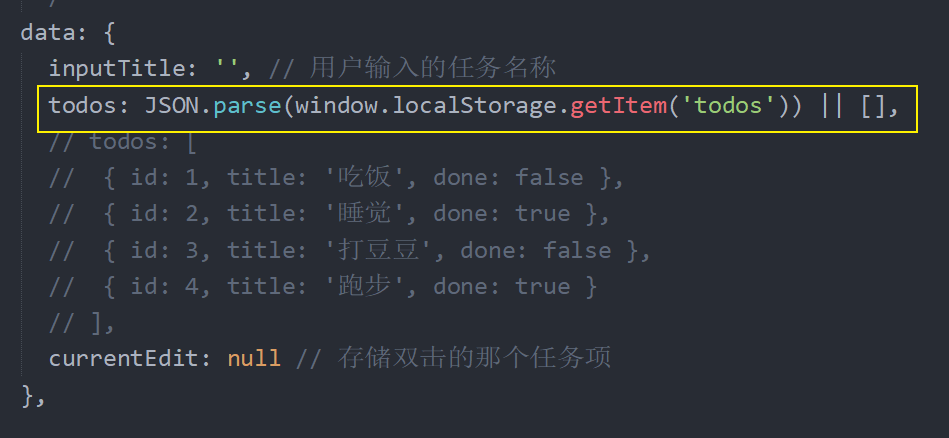
总结

若有收获,就点个赞吧
0 人点赞
