相关书籍推荐
读书的原则:不求甚解,观其大略
你如果进到庐山里头,二话不说,蹲下头来,弯下腰,就对着某棵树某棵小草猛研究而不是说先把庐山的整体脉络跟那研究清楚了,那么你的学习方法肯定效率巨低而且特别痛苦,最重要的还是慢慢地还打击你的积极性,说我的学习怎么那么不happy啊,怎么那么特没劲那,因为你的学习方法错了,大体读明白,先拿来用,用着用着,很多道理你就明白了
▪《编码:隐匿在计算机软硬件背后的语言》
▪《深入理解计算机系统》
▪语言:C JAVA K&R《C程序设计语言》《C Primer Plus》
▪ 数据结构与算法: — 毕生的学习 leetCode
–《Java数据结构与算法》《算法》
–《算法导论》《计算机程序设计艺术》//难
▪操作系统:Linux内核源码解析 Linux内核设计与实现 30天自制操作系统
▪网络:机工《TCP/IP详解》卷一 翻译一般
▪编译原理:机工 龙书 《编译原理》 《编程语言实现模式》马语
▪数据库:SQLite源码 Derby - JDK自带数据库
硬件基础知识
CPU的制作过程
Intel cpu的制作过程
https://haokan.baidu.com/v?vid=11928468945249380709&pd=bjh&fr=bjhauthor&type=video
CPU是如何制作的(文字描述)
https://www.sohu.com/a/255397866_468626
CPU的原理
计算机需要解决的最根本问题:如何代表数字
晶体管是如何工作的:
https://haokan.baidu.com/v?vid=16026741635006191272&pd=bjh&fr=bjhauthor&type=video
晶体管的工作原理:
https://www.bilibili.com/video/av47388949?p=2
汇编语言(机器语言)的执行过程
汇编语言的本质:机器语言的助记符 其实它就是机器语言
计算机通电 -> CPU读取内存中程序(电信号输入)
->时钟发生器不断震荡通断电 ->推动CPU内部一步一步执行
(执行多少步取决于指令需要的时钟周期)
->计算完成->写回(电信号)->写给显卡输出(sout,或者图形)
量子计算机
量子比特,同时表示1 0
CPU的基本组成
PC -> Program Counter 程序计数器 (记录当前指令地址)
Registers -> 暂时存储CPU计算需要用到的数据
ALU -> Arithmetic & Logic Unit 运算单元
CU -> Control Unit 控制单元
MMU -> Memory Management Unit 内存管理单元
cache
缓存
一致性协议:https://www.cnblogs.com/z00377750/p/9180644.html
缓存行:
缓存行越大,局部性空间效率越高,但读取时间慢
缓存行越小,局部性空间效率越低,但读取时间快
取一个折中值,目前多用:
64字节
package com.mashibing.juc.c_028_FalseSharing;public class T03_CacheLinePadding {public static volatile long[] arr = new long[2];public static void main(String[] args) throws Exception {Thread t1 = new Thread(()->{for (long i = 0; i < 10000_0000L; i++) {arr[0] = i;}});Thread t2 = new Thread(()->{for (long i = 0; i < 10000_0000L; i++) {arr[1] = i;}});final long start = System.nanoTime();t1.start();t2.start();t1.join();t2.join();System.out.println((System.nanoTime() - start)/100_0000);}}
package com.mashibing.juc.c_028_FalseSharing;public class T04_CacheLinePadding {public static volatile long[] arr = new long[16];public static void main(String[] args) throws Exception {Thread t1 = new Thread(()->{for (long i = 0; i < 10000_0000L; i++) {arr[0] = i;}});Thread t2 = new Thread(()->{for (long i = 0; i < 10000_0000L; i++) {arr[8] = i;}});final long start = System.nanoTime();t1.start();t2.start();t1.join();t2.join();System.out.println((System.nanoTime() - start)/100_0000);}}
缓存行对齐:对于有些特别敏感的数字,会存在线程高竞争的访问,为了保证不发生伪共享,可以使用缓存航对齐的编程方式
JDK7中,很多采用long padding提高效率
JDK8,加入了@Contended注解(实验)需要加上:JVM -XX:-RestrictContended
乱序执行
https://preshing.com/20120515/memory-reordering-caught-in-the-act/
jvm/jmm/Disorder.java
禁止乱序
CPU层面:Intel -> 原语(mfence lfence sfence) 或者锁总线
JVM层级:8个hanppens-before原则 4个内存屏障 (LL LS SL SS)
as-if-serial : 不管硬件什么顺序,单线程执行的结果不变,看上去像是serial
合并写(不重要)
Write Combining Buffer
一般是4个字节
由于ALU速度太快,所以在写入L1的同时,写入一个WC Buffer,满了之后,再直接更新到L2
NUMA
Non Uniform Memory Access
ZGC - NUMA aware
分配内存会优先分配该线程所在CPU的最近内存
启动过程(不重要)
通电 -> bios uefi 工作 -> 自检 -> 到硬盘固定位置加载bootloader -> 读取可配置信息 -> CMOS
OS
内核分类
微内核 - 弹性部署 5G IoT
宏内核 - PC phone
外核 - 科研 实验中 为应用定制操作系统 (多租户 request-based GC JVM)
用户态与内核态
cpu分不同的指令级别
linux内核跑在ring 0级, 用户程序跑在ring 3,对于系统的关键访问,需要经过kernel的同意,保证系统健壮性
内核执行的操作 - > 200多个系统调用 sendfile read write pthread fork
JVM -> 站在OS老大的角度,就是个普通程序
进程 线程 纤程 中断
面试高频:进程和线程有什么区别?
答案:进程就是一个程序运行起来的状态,线程是一个进程中的不同的执行路径。专业:进程是OS分配资源的基本单位,线程是执行调度的基本单位。分配资源最重要的是:独立的内存空间,线程调度执行(线程共享进程的内存空间,没有自己独立的内存空间)
纤程:用户态的线程,线程中的线程,切换和调度不需要经过OS
优势:1:占有资源很少 OS : 线程1M Fiber:4K 2:切换比较简单 3:启动很多个10W+
目前2020 3 22支持内置纤程的语言:Kotlin Scala Go Python(lib)… Java? (open jdk : loom)
Java中对于纤程的支持:没有内置,盼望内置
利用Quaser库(不成熟)
<?xml version="1.0" encoding="UTF-8"?><project xmlns="http://maven.apache.org/POM/4.0.0"xmlns:xsi="http://www.w3.org/2001/XMLSchema-instance"xsi:schemaLocation="http://maven.apache.org/POM/4.0.0 http://maven.apache.org/xsd/maven-4.0.0.xsd"><modelVersion>4.0.0</modelVersion><groupId>mashibing.com</groupId><artifactId>HelloFiber</artifactId><version>1.0-SNAPSHOT</version><dependencies><!-- https://mvnrepository.com/artifact/co.paralleluniverse/quasar-core --><dependency><groupId>co.paralleluniverse</groupId><artifactId>quasar-core</artifactId><version>0.8.0</version></dependency></dependencies></project>import co.paralleluniverse.fibers.Fiber;import co.paralleluniverse.fibers.SuspendExecution;import co.paralleluniverse.strands.SuspendableRunnable;public class HelloFiber {public static void main(String[] args) throws Exception {long start = System.currentTimeMillis();Runnable r = new Runnable() {@Overridepublic void run() {calc();}};int size = 10000;Thread[] threads = new Thread[size];for (int i = 0; i < threads.length; i++) {threads[i] = new Thread(r);}for (int i = 0; i < threads.length; i++) {threads[i].start();}for (int i = 0; i < threads.length; i++) {threads[i].join();}long end = System.currentTimeMillis();System.out.println(end - start);}static void calc() {int result = 0;for (int m = 0; m < 10000; m++) {for (int i = 0; i < 200; i++) result += i;}}}import co.paralleluniverse.fibers.Fiber;import co.paralleluniverse.fibers.SuspendExecution;import co.paralleluniverse.strands.SuspendableRunnable;public class HelloFiber2 {public static void main(String[] args) throws Exception {long start = System.currentTimeMillis();int size = 10000;Fiber<Void>[] fibers = new Fiber[size];for (int i = 0; i < fibers.length; i++) {fibers[i] = new Fiber<Void>(new SuspendableRunnable() {public void run() throws SuspendExecution, InterruptedException {calc();}});}for (int i = 0; i < fibers.length; i++) {fibers[i].start();}for (int i = 0; i < fibers.length; i++) {fibers[i].join();}long end = System.currentTimeMillis();System.out.println(end - start);}static void calc() {int result = 0;for (int m = 0; m < 10000; m++) {for (int i = 0; i < 200; i++) result += i;}}}
作业:目前是10000个Fiber -> 1个JVM线程,想办法提高效率,10000Fiber -> 10份 -> 10Threads
纤程的应用场景
纤程 vs 线程池:很短的计算任务,不需要和内核打交道,并发量高!
僵尸进程
#include <stdio.h>#include <stdlib.h>#include <unistd.h>#include <string.h>#include <assert.h>#include <sys/types.h>int main() {pid_t pid = fork();if (0 == pid) {printf("child id is %d\n", getpid());printf("parent id is %d\n", getppid());} else {while(1) {}}}
孤儿进程
#include <stdio.h>#include <stdlib.h>#include <unistd.h>#include <string.h>#include <assert.h>#include <sys/types.h>int main() {pid_t pid = fork();if (0 == pid) {printf("child ppid is %d\n", getppid());sleep(10);printf("parent ppid is %d\n", getppid());} else {printf("parent id is %d\n", getpid());sleep(5);exit(0);}}
进程调度
2.6采用CFS调度策略:Completely Fair Scheduler
按优先级分配时间片的比例,记录每个进程的执行时间,如果有一个进程执行时间不到他应该分配的比例,优先执行
默认调度策略:
实时 (急诊) 优先级分高低 - FIFO (First In First Out),优先级一样 - RR(Round Robin) 普通: CFS
中断
硬件跟操作系统内核打交道的一种机制
软中断(80中断) == 系统调用
系统调用:int 0x80 或者 sysenter原语
通过ax寄存器填入调用号
参数通过bx cx dx si di传入内核
返回值通过ax返回
java读网络 – jvm read() – c库read() - >
内核空间 -> system_call() (系统调用处理程序)
-> sys_read()
从汇编角度理解软中断
搭建汇编环境
yum install nasm
;hello.asm;write(int fd, const void *buffer, size_t nbytes);fd 文件描述符 file descriptor - linux下一切皆文件section datamsg db "Hello", 0xAlen equ $ - msgsection .textglobal _start_start:mov edx, lenmov ecx, msgmov ebx, 1 ;文件描述符1 std_outmov eax, 4 ;write函数系统调用号 4int 0x80mov ebx, 0mov eax, 1 ;exit函数系统调用号int 0x80
编译:nasm -f elf hello.asm -o hello.o
链接:ld -m elf_i386 -o hello hello.o
一个程序的执行过程,要么处于用户态,要么处于内核态
内存管理
内存管理的发展历程
DOS时代 - 同一时间只能有一个进程在运行(也有一些特殊算法可以支持多进程)
LRU是Least Recently Used的缩写,即最近最少使用,是一种常用的页面置换算法,选择最近最久未使用的页面予以淘汰。
windows9x - 多个进程装入内存 1:内存不够用 2:互相打扰
为了解决这两个问题,诞生了现在的内存管理系统:虚拟地址 分页装入 软硬件结合寻址
- 分页(内存不够用),内存中分成固定大小的页框(4K),把程序(硬盘上)分成4K大小的块,用到哪一块,加载那一块,加载的过程中,如果内存已经满了,会把最不常用的一块放到swap分区, 把最新的一块加载进来,这个就是著名的LRU算法
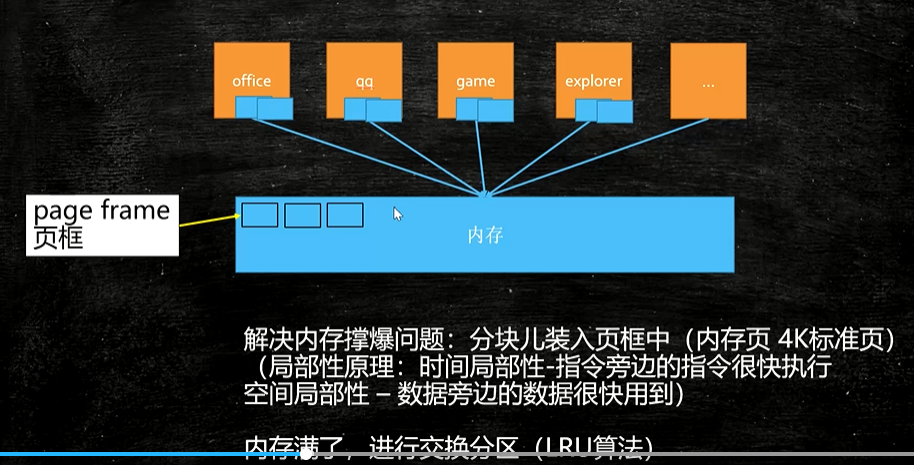
- LRU算法 LeetCode146题,头条要求手撕,阿里去年也要求手撕
- Least Recently Used 最不常用
- 哈希表(保证 查找操作O(1)) + 链表 (保证 排序操作和新增操作 O(1)))
- 双向链表 (保证 左边指针 指向右边块)
虚拟内存(解决相互打扰问题)
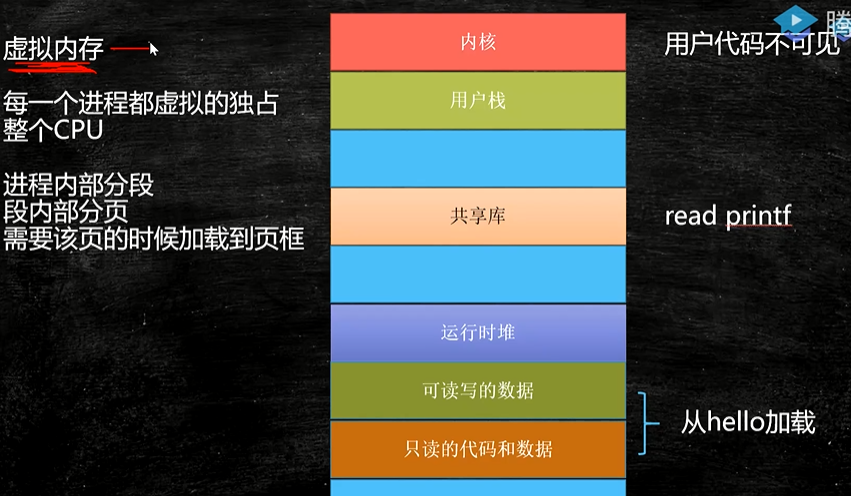
- DOS Win31 … 互相干掉
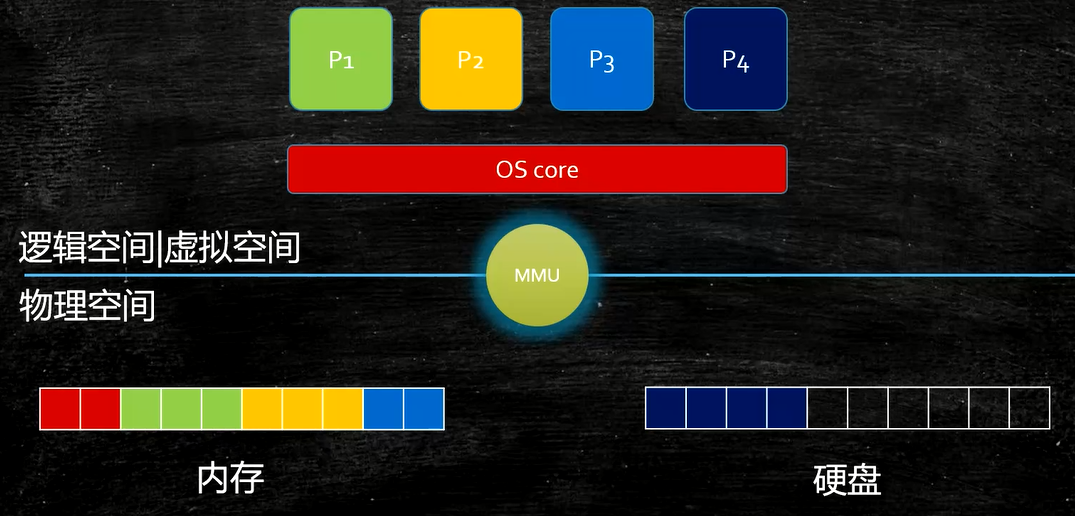
- 为了保证互不影响 - 让进程工作在虚拟空间,程序中用到的空间地址不再是直接的物理地址,而是虚拟的地址,这样,A进程永远不可能访问到B进程的空间
- 虚拟空间多大呢?寻址空间 - 64位系统 2 ^ 64,比物理空间大很多 ,单位是byte
- 站在虚拟的角度,进程是独享整个系统 + CPU
- 内存映射:偏移量 + 段的基地址 = 线性地址 (虚拟空间)
- 线性地址通过 OS + MMU(硬件 Memory Management Unit)
- 缺页中断(不是很重要):
- 需要用到页面内存中没有,产生缺页异常(中断),由内核处理并加载
ZGC
算法叫做:Colored Pointer
GC信息记录在指针上,不是记录在头部, immediate memory use
42位指针 寻址空间4T JDK13 -> 16T 目前为止最大16T 2^44
CPU如何区分一个立即数 和 一条指令
总线内部分为:数据总线 地址总线 控制总线
地址总线目前:48位
颜色指针本质上包含了地址映射的概念
内核同步机制
关于同步理论的一些基本概念
•临界区(critical area): 访问或操作共享数据的代码段 简单理解:synchronized大括号中部分(原子性)
•竞争条件(race conditions)两个线程同时拥有临界区的执行权
•数据不一致:data unconsistency 由竞争条件引起的数据破坏
•同步(synchronization)避免race conditions
•锁:完成同步的手段(门锁,门后是临界区,只允许一个线程存在) 上锁解锁必须具备原子性
•原子性(象原子一样不可分割的操作)
•有序性(禁止指令重排)
•可见性(一个线程内的修改,另一个线程可见)
互斥锁 排他锁 共享锁 分段锁
内核同步常用方法
1.原子操作 – 内核中类似于AtomicXXX,位于
2.自旋锁 – 内核中通过汇编支持的cas,位于
3.读-写自旋 – 类似于ReadWriteLock,可同时读,只能一个写 读的时候是共享锁,写的时候是排他锁
4.信号量 – 类似于Semaphore(PV操作 down up操作 占有和释放) 重量级锁,线程会进入wait,适合长时间持有的锁情况
5.读-写信号量 – downread upread downwrite upwrite (多个写,可以分段写,比较少用)(分段锁)
6.互斥体(mutex) – 特殊的信号量(二值信号量)
7.完成变量 – 特殊的信号量(A发出信号给B,B等待在完成变量上) vfork() 在子进程结束时通过完成变量叫醒父进程 类似于(Latch)
8.BKL:大内核锁(早期,现在已经不用)
9.顺序锁(2.6): – 线程可以挂起的读写自旋锁 序列计数器(从0开始,写时增加(+1),写完释放(+1),读前发现单数, 说明有写线程,等待,读前读后序列一样,说明没有写线程打断)
10.禁止抢占 – preempt_disable()
11.内存屏障 – 见volatile
汇编实现引导程序
编写汇编码
; 文件名 boot.asmorg 7c00h ; BIOS读入MBR后,从0x7c00h处开始执行; 下面部分和10h有关中断,10h中断用来显示字符mov ax, csmov es, axmov ax, msgmov bp, ax ; ES:BP表示显示字符串的地址mov cx, msgLen ; CX存字符长度mov ax, 1301h ; AH=13h表示向TTY显示字符,AL=01h表示显示方式(字符串是否包含显示属性,01h表示不包含)mov bx, 000fh ; BH=00h表示页号,BL=0fh表示颜色mov dl, 0 ; 列int 10hmsg: db "hello world, welcome to OS!"msgLen: equ $ - msg ; 字符串长度times 510 - ($ - $$) db 0 ; 填充剩余部分dw 0aa55h ; 魔数,必须有这两个字节BIOS才确认是MBR
编译
nasm boot.asm -o boot.bin
制作启动软盘
- dd if=/dev/zero of=floppy.img bs=1474560 count=1 生成空白软盘镜像
- dd if=boot.bin of=myos.img bs=512 count=1 制作包含主引导记录boot.bin的启动镜像文件
- dd if=floppy.img of=myos.img skip=1 seek=1 bs=512 count=2879 在 bin 生成的镜像文件后补上空白,成为合适大小的软盘镜像,一共2880个扇区,略过第一个
用软盘启动系统
- 将myos.img下载到windows
- VMWare创建空的虚拟机
- 文件 - 创建新的虚拟机 - 典型
- 稍后安装操作系统
- 其他
- 一路next 完成
- 虚拟机设置,去掉CD/DVD选项中“启动时连接”
- 网络,选择“仅主机模式”,勾选“启动时连接”(好像无所谓)
- 添加软盘驱动器 使用软盘映像 找到myos.img
- 启动虚拟机
为什么是0x7C00?


若有收获,就点个赞吧
0 人点赞
