使用yum安装Nginx
一、安装之前
Nginx 要gcc的编译环境,所以,在 Centos 中需要安装编译环境来使Nginx能够编译起来
1.安装gcc的编译环境yum -y install gcc gcc-c++#如果需要的话,安装这些依赖 - pcre来解析正则表达式,使用zlib对http包的内容进行gzip,openssl支持https(即在ssl协议上传输http),需要在linux安装openssl库yum install -y pcre pcre-devel zlib zlib-devel openssl openssl-devel#查询所有已经安装的软件包rpm -qa | grep nginx#如果有,使用以下命令进行强制卸载rpm -e --nodeps <nginx安装过的rpm>
二、安装
2.安装nginxsudo yum -y install nginx
三、启动
3.设置nginx启动与开机启动sudo systemctl start nginx && systemctl enable nginx#或 sudo service nginx start && chkconfig nginx on#启动sudo systemctl start nginx#或 service nginx start#重启sudo systemctl restart nginx#或 service nginx restart#开机启动sudo systemctl enable nginx#或 sudo service nginx star#关闭开机启动sudo systemctl disable nginx#或 sudo chkconfig nginx off#重载文件#sudo nginx -s reload#检查配置是否成功#nginx -t
四、设置调整防火墙
FirewallD是Centos 8上的默认防火墙解决方案 在安装过程中,Nginx使用预定义的规则创建防火墙服务文件,以允许访问HTTP(80)和 HTTPS(443) 端口
4.使用以下命令永久打开必要的端口#netstat -lnp|grep 6379 #执行开放端口号时候可以看看那些端口在运行#netstat -anp #哪些端口被打开#firewall-cmd --state #查看防火墙状态systemctl start firewalldsudo firewall-cmd --permanent --zone=public --add-service=httpsudo firewall-cmd --permanent --zone=public --add-service=httpsfirewall-cmd --zone=public --add-port=7001/tcp --permanentfirewall-cmd --zone=public --add-port=8080/tcp --permanentsudo firewall-cmd --reloadsystemctl restart firewalld
现在,您可以通过http://119.23.72.172/在Web浏览器中打开来测试Nginx的安装。您应该看到默认的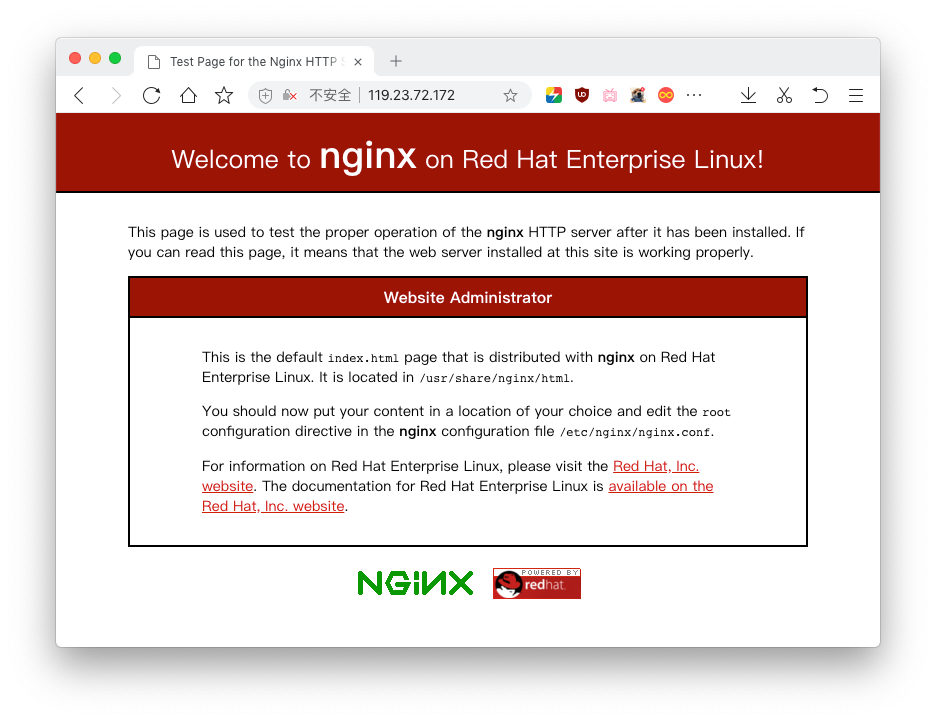
五、配置nginx.conf文件
Nginx配置文件的结构说明
- /etc/nginx/ Nginx所有配置文件目录
- /etc/nginx/nginx.conf Nginx的主要配置文件
- 为每个域创建一个单独的配置文件使服务器易于维护。
- Nginx服务器阻止文件必须以结尾.conf并存储在/etc/nginx/conf.d目录中。您可以根据需要拥有任意数量的服务器块。
- 遵循标准命名约定是一个好习惯。例如:如果域名是mydomain.com则配置文件应命名为mydomain.com.conf
- 如果在域服务器块中使用可重复的配置段,则最好将这些段重构为片段。
- Nginx日志文件(access.log和error.log)位于/var/log/nginx/目录中。建议有不同access和error日志文件每个服务器模块。
- 您可以将域文档的根目录设置为所需的任何位置。webroot的最常见位置包括:
- /home/
/ - /var/www/
- /var/www/html/
- /opt/
- /usr/share/nginx/html
- /usr/local/<站点名称>
- vim /etc/nginx/nginx.conf 编辑完成重载配置文件 sudo nginx -s reload && systemctl restart nginx
#* Official English Documentation: http://nginx.org/en/docs/#* Official Russian Documentation: http://nginx.org/ru/docs/#运行用户user root;#启动进程,通常设置成和cpu的数量相等或者2倍于cpu的个数(具体结合cpu和内存)。默认为autoworker_processes auto;#全局的错误日志和日志级别[ debug | info | notice | warn | error | crit ]error_log /var/log/nginx/error.log;#pid进程文件pid /run/nginx.pid;# Load dynamic modules. See /usr/share/doc/nginx/README.dynamic.include /usr/share/nginx/modules/*.conf;#工作模式以及连接数上限events {worker_connections 1024;}http {#设定日志格式log_format main '$remote_addr - $remote_user [$time_local] "$request" ''$status $body_bytes_sent "$http_referer" ''"$http_user_agent" "$http_x_forwarded_for"';#access日志文件的路径,采用上面定义的main 格式记录access_log /var/log/nginx/access.log main;#开启高效文件传输模式,sendfile指令指定nginx是否调用sendfile函数来输出文件,#对于普通应用设为 on,如果用来进行下载等应用磁盘IO重负载应用,可设置为off,#以平衡磁盘与网络I/O处理速度,降低系统的负载。注意:如果图片显示不正常把这个改成off。默认开启状态sendfile on;#防止网络阻塞tcp_nopush on;#tcp协议tcp_nodelay on;#长连接超时时间,单位是秒keepalive_timeout 65;#类型最大大小types_hash_max_size 2048;#设定mime类型,类型由mime.type文件定义。文件扩展名与文件类型映射表include /etc/nginx/mime.types;#默认文件类型default_type application/octet-stream;#开启gzip压缩输出#gzip on;include /etc/nginx/conf.d/*.conf;#虚拟主机的配置server {#监听窗口listen 80 default_server;listen [::]:80 default_server;#定义使用localhost,也可以自动定义域名访问#域名可以有多个用空格隔开server_name _;if ($host = 'gdpi.club'){return https://www.jianshu.com;}root /usr/share/nginx/html;# 加载默认服务器块的配置文件include /etc/nginx/default.d/*.conf;location / {#定义服务器的默认网站根目录位置root /home/admin/app/deep_foundation_front/dist;#定义首页索引文件的名称 定义多个用空格隔开index index.html index.htm;try_files $uri $uri/ /index.html;}# location ~ .*\.(gif|jpg|jpeg|png)$ {# expires 24h;# root /images/;#指定图片存放路径# access_log /home/nginx/logs/images.log;#图片 日志路径# proxy_store on;# proxy_store_access user:rw group:rw all:rw;# proxy_temp_path /home/images/;#代理临时路径# proxy_redirect off;# proxy_set_header Host 127.0.0.1;# proxy_set_header X-Real-IP $remote_addr;# proxy_set_header X-Forwarded-For $proxy_add_x_forwarded_for;# client_max_body_size 10m;# client_body_buffer_size 1280k;# proxy_connect_timeout 900;# proxy_send_timeout 900;# proxy_read_timeout 900;# proxy_buffer_size 40k;# proxy_buffers 40 320k;# proxy_busy_buffers_size 640k;# proxy_temp_file_write_size 640k;# if ( !-e $request_filename)# {# proxy_pass http://127.0.0.1:8088;#代理访问地址# }# }#location /new {# 此为新应用index,static目录,同时注意这里是alias,不是root,还有以及new的后面有/结尾# alias /usr/share/nginx/html/new/;# try_files $uri $uri/ /new/index.html;# index index.html index.htm;# }#location /api {# proxy_pass http://47.93.240.205:8800;# }# 将PHP脚本代理到在127.0.0.1:80上监听的Apache#location ~ \.php$ {# proxy_pass http://127.0.0.1;#}# 将PHP脚本传递给在127.0.0.1:9000上监听的FastCGI服务器#location ~ \.php$ {# root html;# fastcgi_pass 127.0.0.1:9000;# fastcgi_index index.php;# fastcgi_param SCRIPT_FILENAME /scripts$fastcgi_script_name;# include fastcgi_params;#}# 如果Apache的文档根与nginx的一致,禁止访问.htaccess文件#location ~ /\.ht {# deny all;#}#定义404错误提示页面error_page 404 /404.html;location = /40x.html {}# 定义 50x 错误提示页面error_page 500 502 503 504 /50x.html;location = /50x.html {}}# Settings for a TLS enabled server.# 另一个虚拟主机使用混合 ip name port 的配置# server {# listen 443 ssl http2 default_server;# listen [::]:443 ssl http2 default_server;# #定义使用localhost,也可以自动定义域名访问# server_name _;# root /usr/share/nginx/html;# #ssl证书的pem文件# ssl_certificate "/etc/pki/nginx/server.crt";# #ssl证书的key文件# ssl_certificate_key "/etc/pki/nginx/private/server.key";# #设置存储session参数的缓存的类型和大小# #off:严格禁止使用会话缓存:nginx明确告知客户端会话不可重用。# #none:会话缓存是不允许的:nginx告知客户端会话可以重用,但并没有在缓存中存储会话参数。# #builtin:在OpenSSL中构建缓存;只能被一个工作进程使用。缓存的大小在会话中指定,如果没有指定大小,默认20480个会话。使用内置缓存会导致内存碎片化。# #shared:缓存在所有工作进程之间共享。缓存大小按照字节为单位指定;1MB可以存储4000个会话。每块共享内存都应该起个名字。同一块缓存可以在多个虚拟服务中使用。# ssl_session_cache shared:SSL:1m;# #指定客户端可以重用会话参数的时间# ssl_session_timeout 10m;# #密码套件# ssl_ciphers PROFILE=SYSTEM;# #设置协商加密算法时,优先使用我们服务端的加密套件,而不是客户端浏览器的加密套件。# ssl_prefer_server_ciphers on;# # 加载默认服务器块的配置文件.# include /etc/nginx/default.d/*.conf;# location / {# root html;# index index.html index.htm;# }# error_page 404 /404.html;# location = /40x.html {# }# error_page 500 502 503 504 /50x.html;# location = /50x.html {# }# }}
六、git拉取项目部署服务
#初次部署拉取项目sudo mkdir -p /home/admin/app/ && chmod -R 777 /home/admin/app/cd /home/admin/app/git clone --depth=1 https://codeup.aliyun.com/5ed7d18fd1d1abe63b55e9f6/bi_meng/deep_foundation_front.gitcd ./deep_foundation_frontnpm run installnpm run buildsudo nginx -s reload && systemctl restart nginx@再次拉取项目cd /home/admin/app/deep_foundation_frontgit pull && npm install && npm run buildsudo nginx -s reload && systemctl restart nginx
快速部署nginx
#快速安装常用工具#curl --silent --location https://rpm.nodesource.com/setup_12.x | sudo bash -yum -y install gcc gcc-c++ nodejs git#---------------------sudo yum -y install nginxsudo systemctl start nginx && systemctl enable nginx#---------------------systemctl start firewalldsudo firewall-cmd --permanent --zone=public --add-service=httpsudo firewall-cmd --permanent --zone=public --add-service=httpsfirewall-cmd --zone=public --add-port=7001/tcp --permanentfirewall-cmd --zone=public --add-port=8080/tcp --permanentsudo firewall-cmd --reloadsystemctl restart firewalld#---------------------sudo mkdir -p /home/admin/app/ && chmod -R 777 /home/admin/app/cd /home/admin/app/#---------------------git clone --depth=1 https://codeup.aliyun.com/5ed7d18fd1d1abe63b55e9f6/bi_meng/deep_foundation_front.git#---------------------cd ./deep_foundation_frontnpm install --registry=https://registry.npm.taobao.orgnpm run build#最后需要编辑配置文件 vim /etc/nginx/nginx.conf#这里需要编辑配置文件,编辑完成后 sudo nginx -s reload && systemctl restart nginx
查看
#验证 nginx 服务是否正在运行方式1: ps aux | grep nginx方式2: systemctl status nginx 或 systemctl status nginx.service方式3: service nginx status#查看启动项的服务列表systemctl list-unit-files --type=service | grep enabled#验证是否安装成功curl http://localhost#查看进程可拥有的文件描述符的数量ulimit -n#查看nginx的版本nginx -V
关闭与卸载
第一步:查看 mysql 是否在运行,如果在运行则先关闭方式1: kill -9 <pid进程>方式2: sudo pkill nginx方式3: suto systemctl stop nginx方式4: service nginx stop第二步:移除redisyum -y remove nginx
正向代理代理客户端,反向代理代理服务器
VPN 全称Virtual Private Network,中文翻译为虚拟专用网络,通俗的讲就是中转服务
它被定义为通过一个公用网络(通常是因特网)建立一个临时的、安全的连接,是一条穿过混乱的公用网络的安全、稳定隧道。使用这条隧道可以对数据进行几倍加密达到安全使用互联网的目
- 正向代理
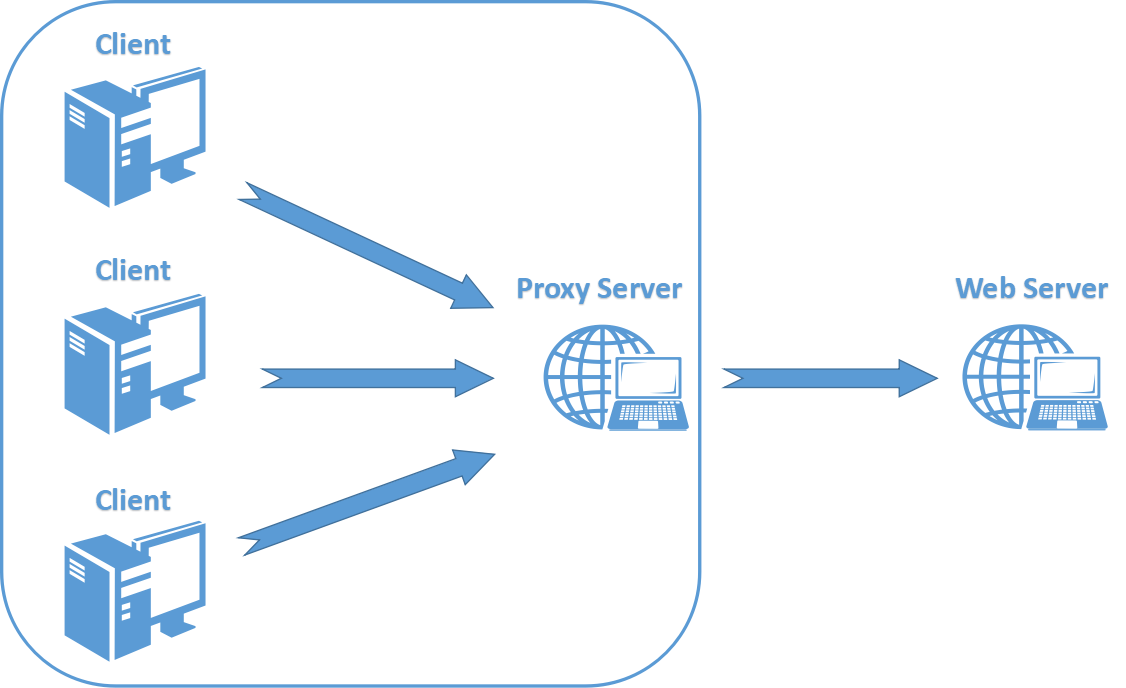
- 反向代理

安装包模式
一、安装之前
1.安装依赖 - pcre来解析正则表达式,使用zlib对http包的内容进行gzip,openssl支持https(即在ssl协议上传输http),需要在linux安装openssl库yum install -y gcc gcc-c++ pcre pcre-devel zlib zlib-devel openssl openssl-devel#查询所有已经安装的软件包rpm -qa | grep nginx#如果有,使用以下命令进行强制卸载rpm -e --nodeps <nginx安装过的rpm>
二、安装
#2.1.下载 nginx-1.9.9 安装包,在root目录下执行wget http://nginx.org/download/nginx-1.16.1.tar.gz#2.2.解压redis安装包并且进入redis目录tar -zxvf nginx-1.16.1.tar.gz && cd nginx-1.16.1#2.3.编码安装./configure --prefix=/usr/local/nginx && make install#make && make prefix=/usr/local/git install
三、启动
4.开启nginx进程/usr/local/nginx/sbin/nginx#重启nginx进程/usr/local/nginx/sbin/nginx -s reload
关闭和卸载
#从容停止服务,这种方法较stop相比就比较温和一些了,需要进程完成当前工作后再停止。/usr/local/nginx/sbin/nginx -s quit#立即停止服务,这种方法比较强硬,无论进程是否在工作,都直接停止进程。/usr/local/nginx/sbin/nginx -s stop第一步:查看 nginx 是否在运行,如果在运行则先关闭方式1: kill -9 <pid进程>方式2: sudo pkill nginx方式3: /usr/local/nginx/sbin/nginx -s stop第二步:nginxrm -rf /usr/local/nginx
防火墙
安装防火墙
yum -y install iptables-services
防火墙查看、启动、重载
#查看防火墙的状态方式1: firewall-cmd --state方式2: systemctl status firewalld方式3: service firewalld status#设置systemctl启动与开机启动sudo systemctl start firewalld && systemctl enable firewalld#或 sudo service firewalld start && chkconfig firewalld on#开启防火墙方式1: systemctl start firewalld方式2: service firewalld start#重启防火墙方式1: systemctl restart firewalld方式2: service firewalld restart#关闭开机启动sudo systemctl disable firewalld#或 sudo chkconfig firewalld off#重新载入配置firewall-cmd --reload
关闭防火墙
#关闭防火墙方式1: systemctl stop firewalld方式2: service firewalld stop
设置防火墙端口
systemctl start firewalldfirewall-cmd --zone=public --add-port=80/tcp --permanentfirewall-cmd --zone=public --add-port=8080/tcp --permanentfirewall-cmd --zone=public --add-port=8081/tcp --permanentsystemctl restart firewalld
- -zone 作用域
- –add-port=80/tcp 添加端口,格式为:端口/通讯协议
- –permanent 永久生效,没有此参数重启后失效
用iptables管理防火墙
安装iptables
yum -y install iptables
重启防火墙,这里有两种方式重启/关闭 防火墙
#启动防火墙方式1: service iptables start方式2: systemctl start iptables方式3: /etc/init.d/iptables start#重启防火墙方式1: service iptables restart方式2: systemctl restart iptables方式3: /etc/init.d/iptables restart#保存/etc/rc.d/init.d/iptables save#设置防火墙的开机自启方式1: chkconfig iptables on方式2: systemctl enable iptables#关闭防火墙的开机自启方式1: chkconfig iptables off方式2: systemctl disable iptables#关闭防火墙方式1: service iptables stop方式2: systemctl stop iptables
使用iptables管理端口
#1.查看防火墙设置有没有开启80端口方式1: iptables -L -n --line-number #可以显示规则和相对应的编号方式2: /sbin/iptables -L -n --line-number #可以显示规则和相对应的编号#2.让防火墙开放某个端口, vim /etc/sysconfig/iptables 修改文件,增加下面那一行-A RH-Firewall-1-INPUT -m state --state NEW -m tcp -p tcp --dport 8080 -j ACCEPT#开放一个范围的端口3000到5000#-A RH-Firewall-1-INPUT -m state --state NEW -m tcp -p tcp --dport 3000:5000 -j ACCEPT#iptables -A INPUT -p tcp --dport 22 -j ACCEPT#iptables -A OUTPUT -p tcp --sport 22 -j ACCEPT#重启防火墙sudo systemctl start iptables && systemctl enable iptables
-A:参数就看成是添加一条 INPUT 的规则
-p:指定是什么协议 我们常用的tcp 协议,当然也有udp,例如53端口的DNS
–dport:就是目标端口,当数据从外部进入服务器为目标端口
–sport:数据从服务器出去,则为数据源端口
-j:就是指定是 ACCEPT接收或者DROP不接收
解决错误问题
nginx: [error] open() “/usr/local/var/run/nginx.pid” failed (2: No such file or directory)
原因 没有nginx.pid 这个文件,每次当我们停止nginx时(nginx -s stop) ,nginx 会把 /usr/local/var/run/ 路径下名为nginx.pid 的文件删掉
可以直接启动nginx,重新生成nginx.pid就可以了
nginx
如果出现这个
nginx: [emerg] bind() to 0.0.0.0:7001 failed (98: Address already in use)nginx: [emerg] bind() to 0.0.0.0:7001 failed (98: Address already in use)
是因为端口被占用,杀一下端口就可以了
kill -9 $(lsof -i:7001 -t)
如果直接启动还是不可行,执行nginx -t查看nginx配置文件路径:
$ nginx -tnginx: the configuration file /usr/local/etc/nginx/nginx.conf syntax is oknginx: configuration file /usr/local/etc/nginx/nginx.conf test is successful
指定一下conf文件:
nginx -c /usr/local/etc/nginx/nginx.conf

若有收获,就点个赞吧
0 人点赞
