by wangpwm
背景信息
SkyWalking是一款针对分布式系统的国产APM(Application Performance Monitoring,应用性能监控)产品,主要针对微服务、Cloud Native和容器化(Docker、Kubernetes、Mesos)架构的应用。SkyWalking的核心是一个分布式追踪系统,目前已进入Apache 。
要通过SkyWalking将Java应用数据上报至链路追踪控制台,首先需要完成埋点工作。SkyWalking既支持自动探针(Dubbo、gRPC、JDBC、OkHttp、Spring、Tomcat、Struts、Jedis等),也支持手动埋点(OpenTracing)。本文介绍安装和自动动埋点方法。
安装 elasticsearch 7
下载
wget https://mirrors.tuna.tsinghua.edu.cn/elasticstack/7.x/yum/7.6.2/elasticsearch-7.6.2-x86_64.rpm
安装
yum install -y elasticsearch-7.6.2-x86_64.rpm
修改配置中目录的用户与用户组,不然无法启动
groupadd elasticsearchuseradd elasticsearch -g elasticsearch -p peter@2020chown -R elasticsearch:elasticsearch /var/lib/elasticsearchchown -R elasticsearch:elasticsearch /var/log/elasticsearch
chmod g+w /etc/elasticsearch
修改 elasticsearch 的配置
# ---------------------------------- Cluster -----------------------------------## Use a descriptive name for your cluster:#cluster.name: skywalking-application## ------------------------------------ Node ------------------------------------## Use a descriptive name for the node:#node.name: skywalking-node-1## Add custom attributes to the node:##node.attr.rack: r1## ----------------------------------- Paths ------------------------------------## Path to directory where to store the data (separate multiple locations by comma):#path.data: /var/lib/elasticsearch## Path to log files:#path.logs: /var/log/elasticsearch## ----------------------------------- Memory -----------------------------------## Lock the memory on startup:##bootstrap.memory_lock: true## Make sure that the heap size is set to about half the memory available# on the system and that the owner of the process is allowed to use this# limit.## Elasticsearch performs poorly when the system is swapping the memory.## ---------------------------------- Network -----------------------------------## Set the bind address to a specific IP (IPv4 or IPv6):#network.host: 0.0.0.0## Set a custom port for HTTP:#http.port: 9200## For more information, consult the network module documentation.## --------------------------------- Discovery ----------------------------------## Pass an initial list of hosts to perform discovery when this node is started:# The default list of hosts is ["127.0.0.1", "[::1]"]#discovery.seed_hosts: ["127.0.0.1"]## Bootstrap the cluster using an initial set of master-eligible nodes:#cluster.initial_master_nodes: ["skywalking-node-1"]## For more information, consult the discovery and cluster formation module documentation.## ---------------------------------- Gateway -----------------------------------## Block initial recovery after a full cluster restart until N nodes are started:##gateway.recover_after_nodes: 3## For more information, consult the gateway module documentation.## ---------------------------------- Various -----------------------------------## Require explicit names when deleting indices:##action.destructive_requires_name: true
启动 elasticsearch
sudo systemctl daemon-reloadsudo systemctl enable elasticsearch.servicesudo systemctl start elasticsearch.service
查看是否启动成功
- 验证是否启动成功
curl http://localhost:9200/
成功会看到如下信息
{"name" : "skywalking-node-1","cluster_name" : "skywalking-application","cluster_uuid" : "6TSWaZJ-SaKhpQbUh4TMQw","version" : {"number" : "7.0.0","build_flavor" : "default","build_type" : "rpm","build_hash" : "b7e28a7","build_date" : "2019-04-05T22:55:32.697037Z","build_snapshot" : false,"lucene_version" : "8.0.0","minimum_wire_compatibility_version" : "6.7.0","minimum_index_compatibility_version" : "6.0.0-beta1"},"tagline" : "You Know, for Search"}
- 查看 启动失败的信息
systemctl status elasticsearch.servicejournalctl -xe
- 安装失败后,可以用下面命令进行卸载
yum remove elasticsearch-7.6.2-x86_64.rpm
skyWalking
下载
wget https://mirrors.tuna.tsinghua.edu.cn/apache/skywalking/7.0.0/apache-skywalking-apm-es7-7.0.0.tar.gz
解压
mkdir -p /opt/apache/skywalkingmv apache-skywalking-apm-es7-7.0.0.tar.gz /opt/apache/skywalkingcd /opt/apache/skywalkingtar -zxvf apache-skywalking-apm-es7-7.0.0.tar.gz
修改配置文件
vim /opt/apache/skywalking/apache-skywalking-apm-bin-es7/config/application.yml
只需关注如下内容,原配置文件的其他内容无需更改
... ##storage:selector: elasticsearch7elasticsearch:nameSpace: ${SW_NAMESPACE:"skywalking-application"}clusterNodes: ${SW_STORAGE_ES_CLUSTER_NODES:127.0.0.1:9200}protocol: ${SW_STORAGE_ES_HTTP_PROTOCOL:"http"}trustStorePath: ${SW_SW_STORAGE_ES_SSL_JKS_PATH:"../es_keystore.jks"}trustStorePass: ${SW_SW_STORAGE_ES_SSL_JKS_PASS:""}user: ${SW_ES_USER:""}password: ${SW_ES_PASSWORD:""}secretsManagementFile: ${SW_ES_SECRETS_MANAGEMENT_FILE:""} # Secrets management file in the properties format includes the username, password, which are managed by 3rd party tool.enablePackedDownsampling: ${SW_STORAGE_ENABLE_PACKED_DOWNSAMPLING:true} # Hour and Day metrics will be merged into minute index.dayStep: ${SW_STORAGE_DAY_STEP:1} # Represent the number of days in the one minute/hour/day index.indexShardsNumber: ${SW_STORAGE_ES_INDEX_SHARDS_NUMBER:2}indexReplicasNumber: ${SW_STORAGE_ES_INDEX_REPLICAS_NUMBER:0}# Those data TTL settings will override the same settings in core module.recordDataTTL: ${SW_STORAGE_ES_RECORD_DATA_TTL:7} # Unit is dayotherMetricsDataTTL: ${SW_STORAGE_ES_OTHER_METRIC_DATA_TTL:45} # Unit is daymonthMetricsDataTTL: ${SW_STORAGE_ES_MONTH_METRIC_DATA_TTL:18} # Unit is month# Batch process setting, refer to https://www.elastic.co/guide/en/elasticsearch/client/java-api/5.5/java-docs-bulk-processor.htmlbulkActions: ${SW_STORAGE_ES_BULK_ACTIONS:1000} # Execute the bulk every 1000 requestsflushInterval: ${SW_STORAGE_ES_FLUSH_INTERVAL:10} # flush the bulk every 10 seconds whatever the number of requestsconcurrentRequests: ${SW_STORAGE_ES_CONCURRENT_REQUESTS:2} # the number of concurrent requestsresultWindowMaxSize: ${SW_STORAGE_ES_QUERY_MAX_WINDOW_SIZE:10000}metadataQueryMaxSize: ${SW_STORAGE_ES_QUERY_MAX_SIZE:5000}segmentQueryMaxSize: ${SW_STORAGE_ES_QUERY_SEGMENT_SIZE:200}profileTaskQueryMaxSize: ${SW_STORAGE_ES_QUERY_PROFILE_TASK_SIZE:200}advanced: ${SW_STORAGE_ES_ADVANCED:""}elasticsearch7:nameSpace: ${SW_NAMESPACE:"skywalking-application"}clusterNodes: ${SW_STORAGE_ES_CLUSTER_NODES:127.0.0.1:9200}protocol: ${SW_STORAGE_ES_HTTP_PROTOCOL:"http"}trustStorePath: ${SW_SW_STORAGE_ES_SSL_JKS_PATH:"../es_keystore.jks"}trustStorePass: ${SW_SW_STORAGE_ES_SSL_JKS_PASS:""}enablePackedDownsampling: ${SW_STORAGE_ENABLE_PACKED_DOWNSAMPLING:true} # Hour and Day metrics will be merged into minute index.dayStep: ${SW_STORAGE_DAY_STEP:1} # Represent the number of days in the one minute/hour/day index.user: ${SW_ES_USER:""}password: ${SW_ES_PASSWORD:""}secretsManagementFile: ${SW_ES_SECRETS_MANAGEMENT_FILE:""} # Secrets management file in the properties format includes the username, password, which are managed by 3rd party tool.indexShardsNumber: ${SW_STORAGE_ES_INDEX_SHARDS_NUMBER:2}indexReplicasNumber: ${SW_STORAGE_ES_INDEX_REPLICAS_NUMBER:0}# Those data TTL settings will override the same settings in core module.recordDataTTL: ${SW_STORAGE_ES_RECORD_DATA_TTL:7} # Unit is dayotherMetricsDataTTL: ${SW_STORAGE_ES_OTHER_METRIC_DATA_TTL:45} # Unit is daymonthMetricsDataTTL: ${SW_STORAGE_ES_MONTH_METRIC_DATA_TTL:18} # Unit is month# Batch process setting, refer to https://www.elastic.co/guide/en/elasticsearch/client/java-api/5.5/java-docs-bulk-processor.htmlbulkActions: ${SW_STORAGE_ES_BULK_ACTIONS:1000} # Execute the bulk every 1000 requestsflushInterval: ${SW_STORAGE_ES_FLUSH_INTERVAL:10} # flush the bulk every 10 seconds whatever the number of requestsconcurrentRequests: ${SW_STORAGE_ES_CONCURRENT_REQUESTS:2} # the number of concurrent requestsresultWindowMaxSize: ${SW_STORAGE_ES_QUERY_MAX_WINDOW_SIZE:10000}metadataQueryMaxSize: ${SW_STORAGE_ES_QUERY_MAX_SIZE:5000}segmentQueryMaxSize: ${SW_STORAGE_ES_QUERY_SEGMENT_SIZE:200}profileTaskQueryMaxSize: ${SW_STORAGE_ES_QUERY_PROFILE_TASK_SIZE:200}advanced: ${SW_STORAGE_ES_ADVANCED:""}mysql:properties:jdbcUrl: ${SW_JDBC_URL:"jdbc:mysql://localhost:3306/swtest"}dataSource.user: ${SW_DATA_SOURCE_USER:root}dataSource.password: ${SW_DATA_SOURCE_PASSWORD:root@1234}dataSource.cachePrepStmts: ${SW_DATA_SOURCE_CACHE_PREP_STMTS:true}dataSource.prepStmtCacheSize: ${SW_DATA_SOURCE_PREP_STMT_CACHE_SQL_SIZE:250}dataSource.prepStmtCacheSqlLimit: ${SW_DATA_SOURCE_PREP_STMT_CACHE_SQL_LIMIT:2048}dataSource.useServerPrepStmts: ${SW_DATA_SOURCE_USE_SERVER_PREP_STMTS:true}metadataQueryMaxSize: ${SW_STORAGE_MYSQL_QUERY_MAX_SIZE:5000}influxdb:# Metadata storage provider configurationmetabaseType: ${SW_STORAGE_METABASE_TYPE:H2} # There are 2 options as Metabase provider, H2 or MySQL.h2Props:dataSourceClassName: ${SW_STORAGE_METABASE_DRIVER:org.h2.jdbcx.JdbcDataSource}dataSource.url: ${SW_STORAGE_METABASE_URL:jdbc:h2:mem:skywalking-oap-db}dataSource.user: ${SW_STORAGE_METABASE_USER:sa}dataSource.password: ${SW_STORAGE_METABASE_PASSWORD:}mysqlProps:jdbcUrl: ${SW_STORAGE_METABASE_URL:"jdbc:mysql://localhost:3306/swtest"}dataSource.user: ${SW_STORAGE_METABASE_USER:root}dataSource.password: ${SW_STORAGE_METABASE_PASSWORD:root@1234}dataSource.cachePrepStmts: ${SW_STORAGE_METABASE_CACHE_PREP_STMTS:true}dataSource.prepStmtCacheSize: ${SW_STORAGE_METABASE_PREP_STMT_CACHE_SQL_SIZE:250}dataSource.prepStmtCacheSqlLimit: ${SW_STORAGE_METABASE_PREP_STMT_CACHE_SQL_LIMIT:2048}dataSource.useServerPrepStmts: ${SW_STORAGE_METABASE_USE_SERVER_PREP_STMTS:true}metadataQueryMaxSize: ${SW_STORAGE_METABASE_QUERY_MAX_SIZE:5000}# InfluxDB configurationurl: ${SW_STORAGE_INFLUXDB_URL:http://localhost:8086}user: ${SW_STORAGE_INFLUXDB_USER:root}password: ${SW_STORAGE_INFLUXDB_PASSWORD:}database: ${SW_STORAGE_INFLUXDB_DATABASE:skywalking}actions: ${SW_STORAGE_INFLUXDB_ACTIONS:1000} # the number of actions to collectduration: ${SW_STORAGE_INFLUXDB_DURATION:1000} # the time to wait at most (milliseconds)fetchTaskLogMaxSize: ${SW_STORAGE_INFLUXDB_FETCH_TASK_LOG_MAX_SIZE:5000} # the max number of fetch task log in a request...
修改的内容为
storage:selector: elasticsearch7elasticsearch7:nameSpace: ${SW_NAMESPACE:"skywalking-application"}clusterNodes: ${SW_STORAGE_ES_CLUSTER_NODES:127.0.0.1:9200}
启动 skywalking
- 启动 skywalking 后台服务
/opt/apache/skywalking/apache-skywalking-apm-bin-es7$ sh bin/oapService.sh
- 启动 UI
/opt/apache/skywalking/apache-skywalking-apm-bin-es7$ sh bin/webappService.sh
注意 虽然启动后,会返回SkyWalking OAP started successfully!但是并不表示真的启动成功了。 看到 SkyWalking Web Application started successfully! 也不表示正在的成功;
在日志中
/opt/apache/skywalking/apache-skywalking-apm-bin-es7$ tail -f logs/skywalking-oap-server.log
看到Started @66759ms表示启动成功
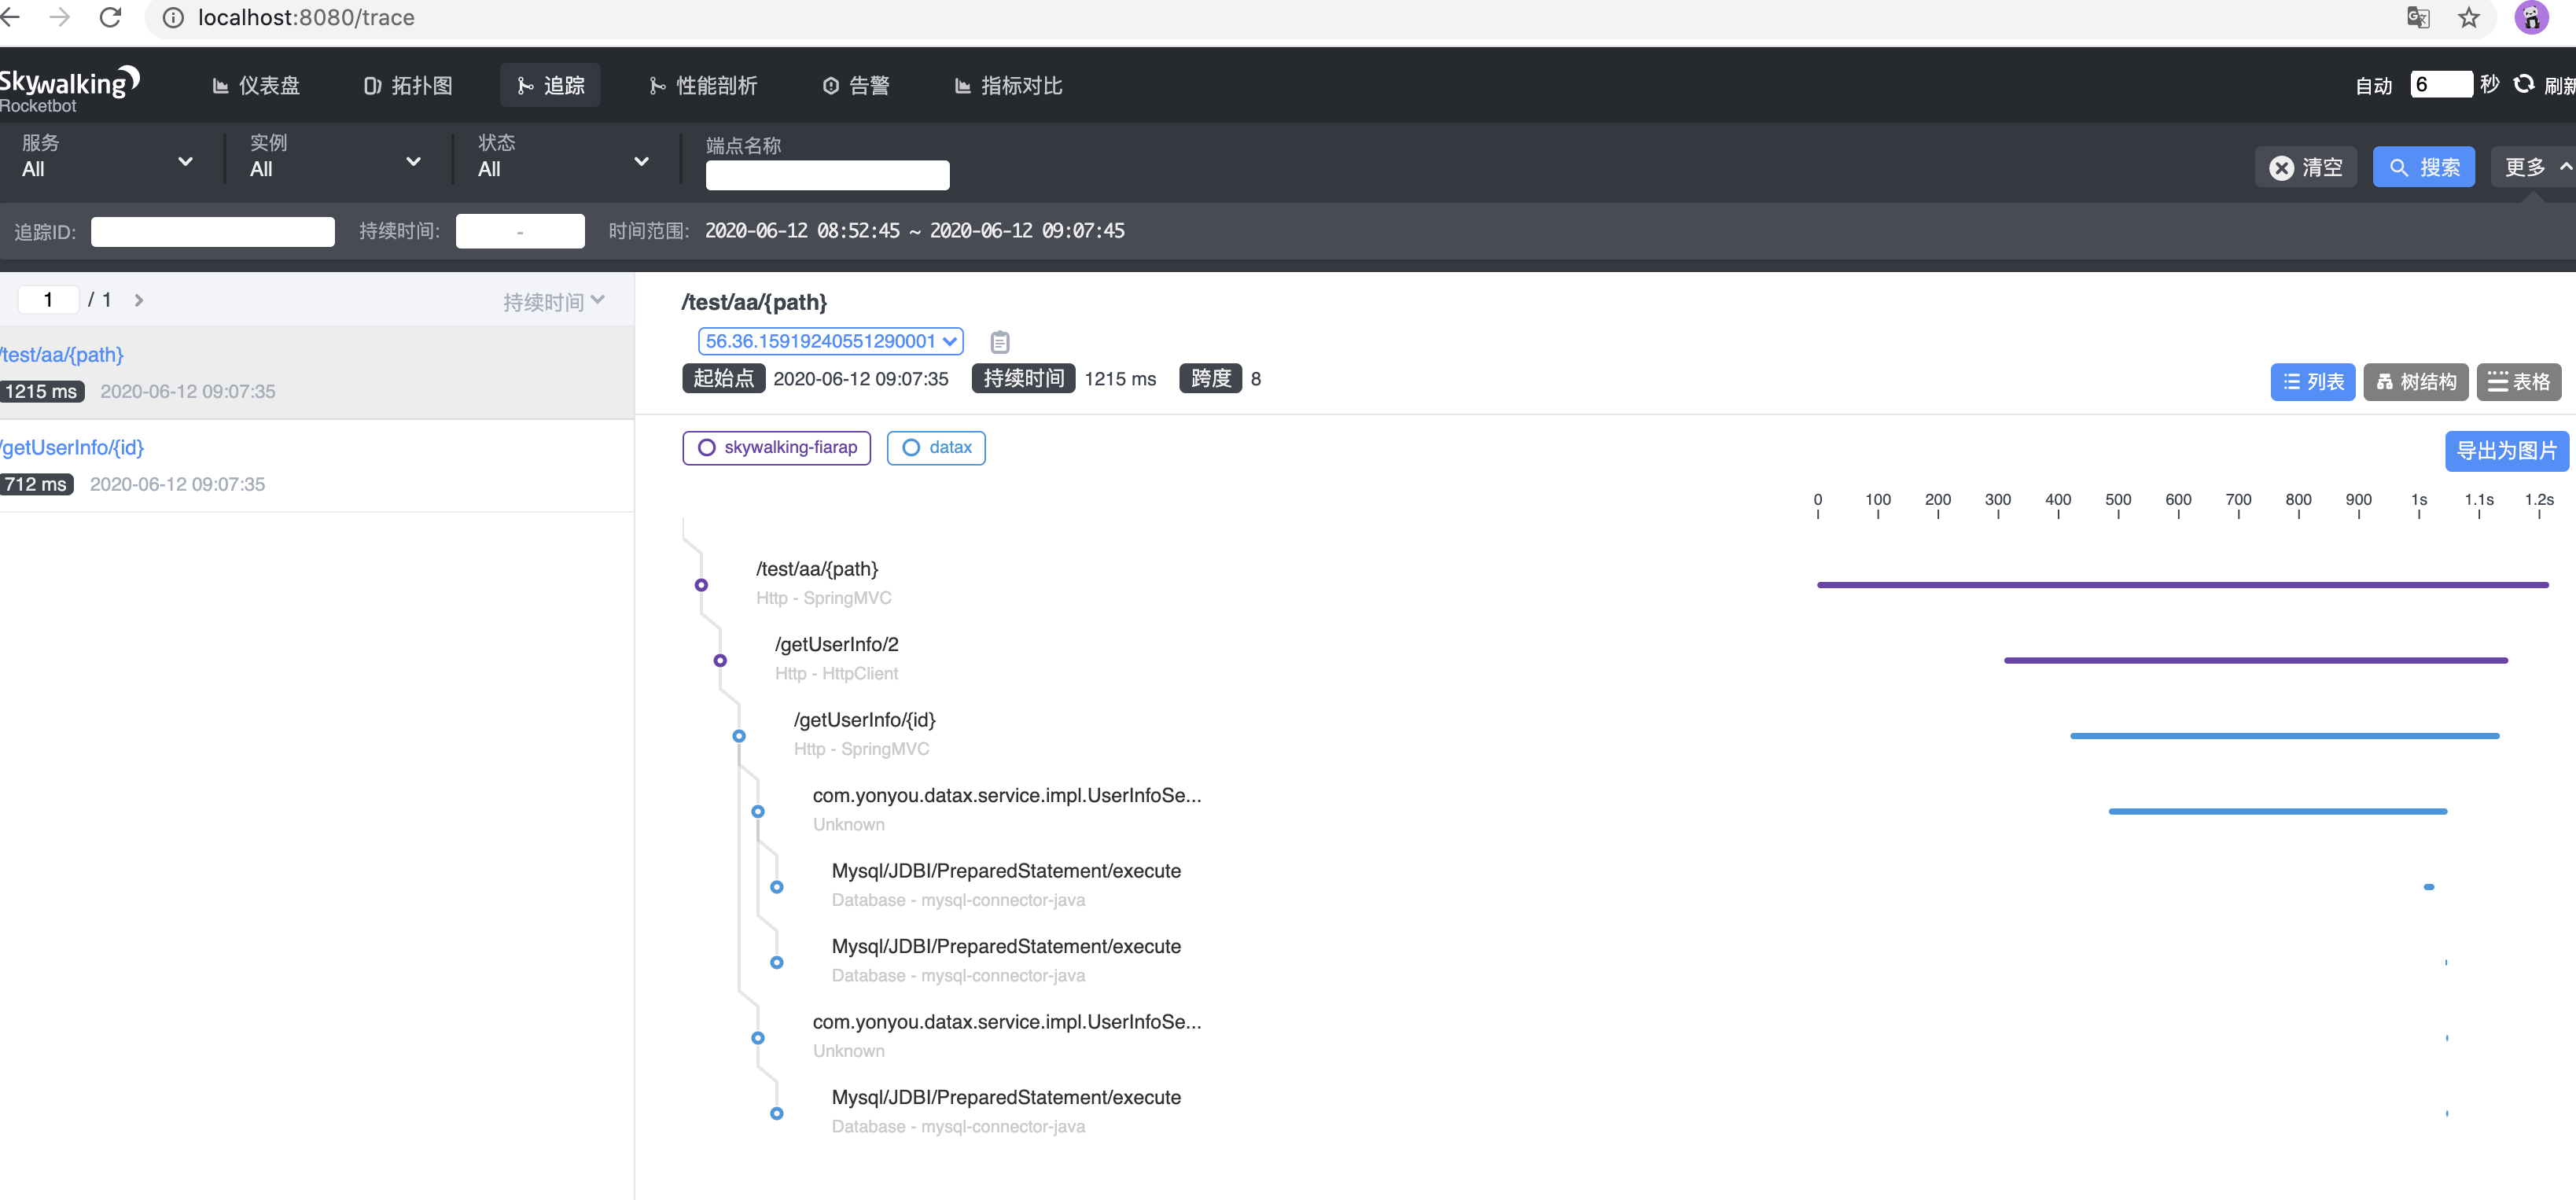
浏览器访问
http://127.0.0.1:8080/
SkyWalking上报Java应用数据
请将以下示例代码中的替换为Agent文件夹中的skywalking-agent.jar的绝对路径。
JAR File或Spring Boot
在应用程序的启动命令行中添加-Dskywalking.agent.service_name参数。
java -javaagent:<skywalking-agent-path> -Dskywalking.agent.service_name=<ServiceName> -Dskywalking.collector.backend_service=127.0.0.1:11800 -jar yourApp.jar
Jetty
在{JETTY_HOME}/start.ini配置文件中添加以下内容:
--exec # 去掉前面的井号取消注释。-javaagent:<skywalking-agent-path>
Tomcat
linux下 在 tomcat/bin/catalina.sh 第一行添加以下内容:
CATALINA_OPTS="$CATALINA_OPTS -javaagent:<skywalking-agent-path>"; export CATALINA_OPTS
Windows下在 tomcat/bin/catalina.bat 第一行添加以下内容:
set "CATALINA_OPTS=-javaagent:<skywalking-agent-path>"
idea 下
-Dskywalking.agent.service_name=skywalking-fiarap -Dskywalking.collector.backend_service=127.0.0.1:11800 -javaagent://opt/apache/skywalking/apache-skywalking-apm-bin-es7/agent/skywalking-agent.jar

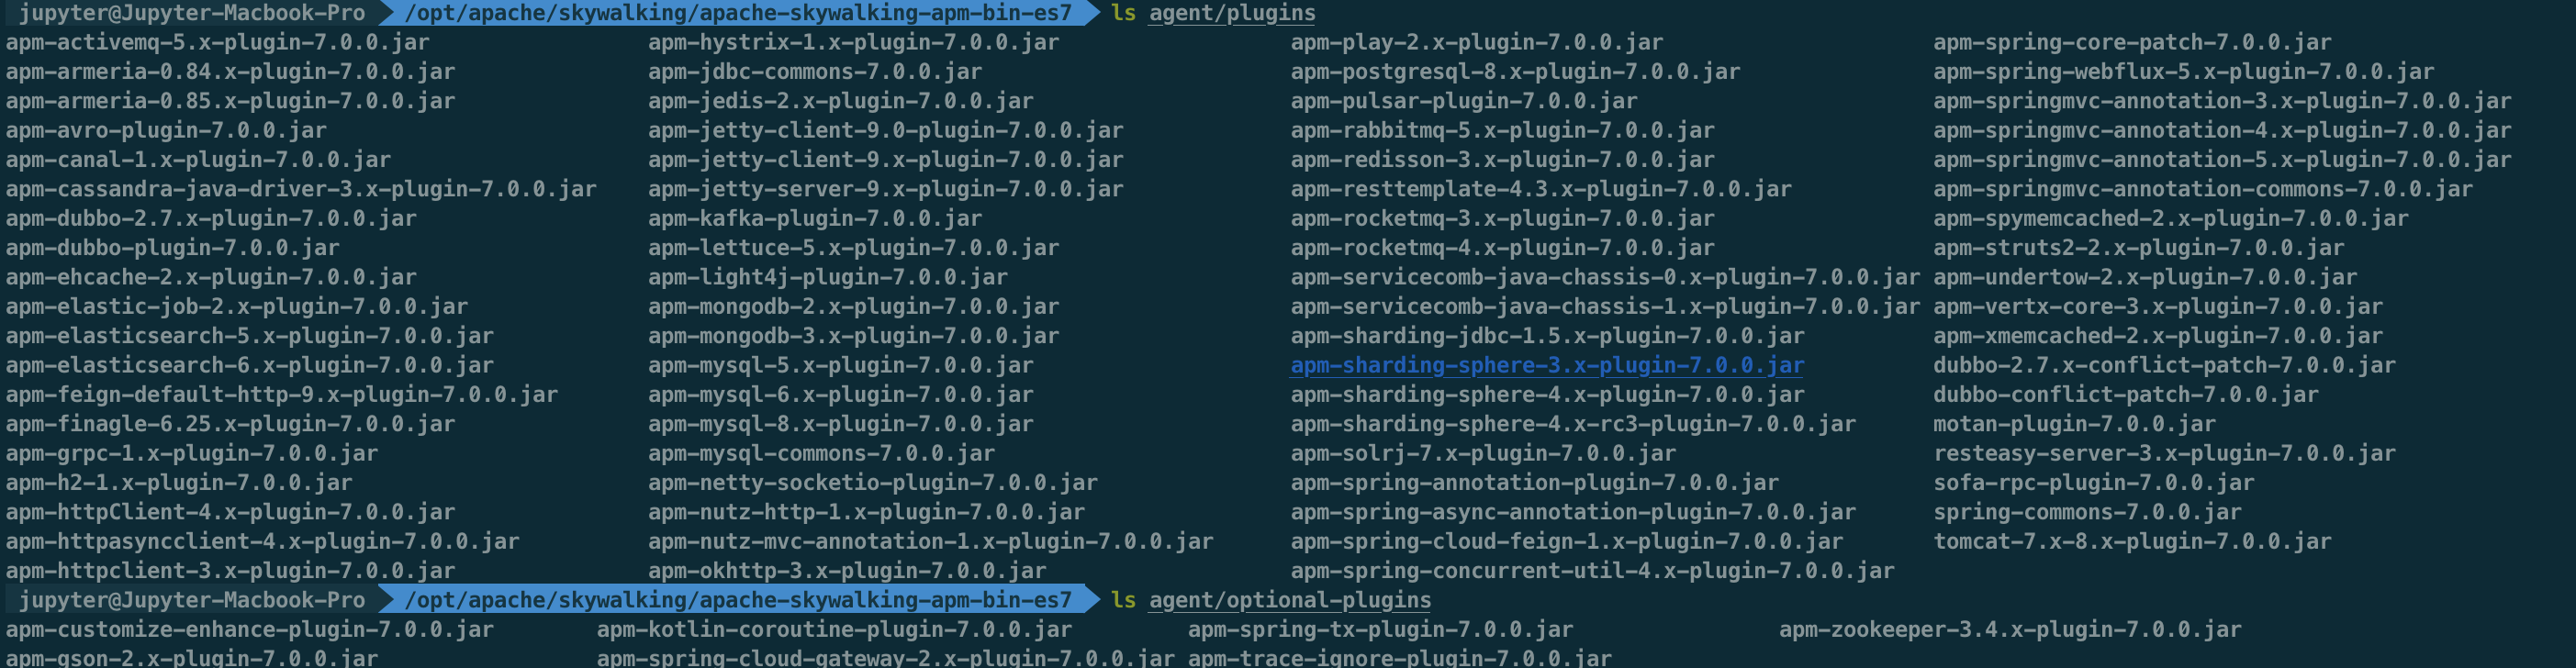
skywalking 支持的中间件

若有收获,就点个赞吧
0 人点赞
