组件可以在原生 HTML 元素中管理一小片区域的 HTML。从技术角度说,它就是一个带模板的指令。
属性型指令
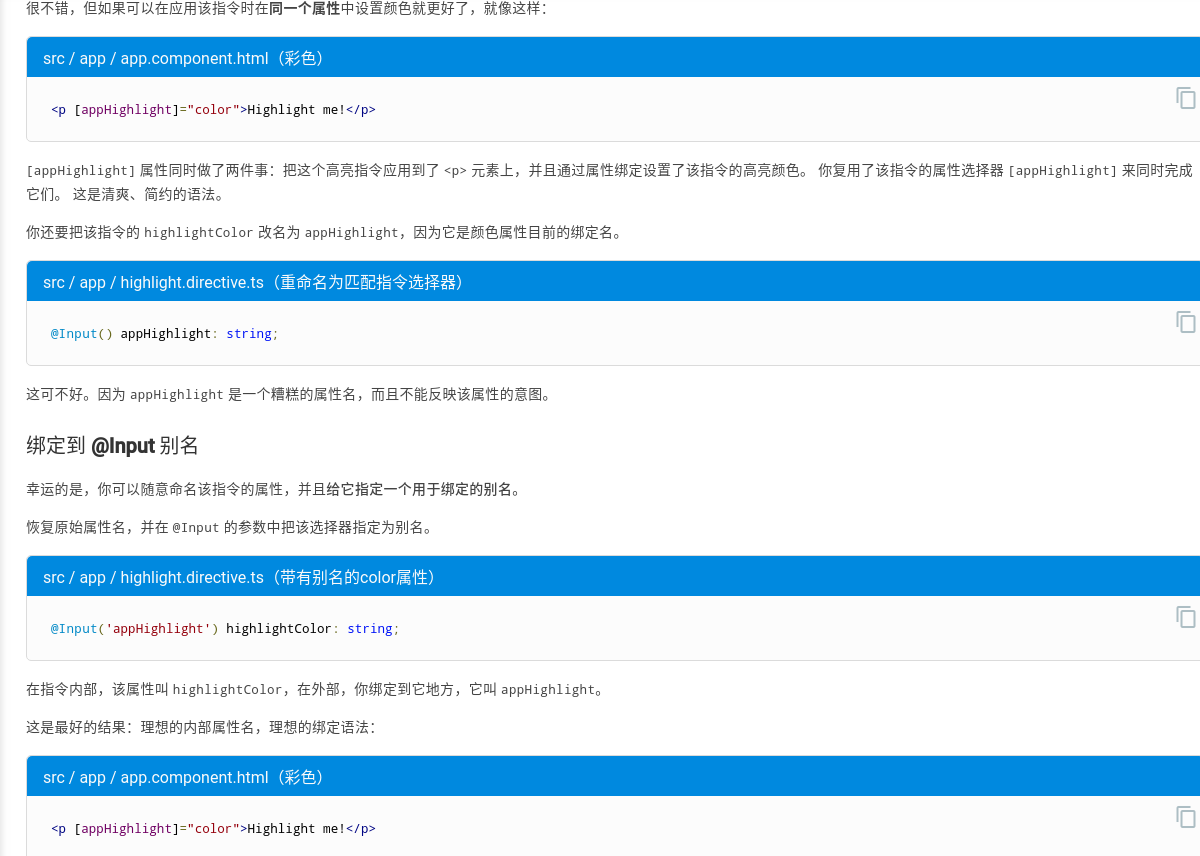
用@input输入属性(别名)绑定指令的属性
ElementRef、HostListeners
/* tslint:disable:member-ordering */import { Directive, ElementRef, HostListener, Input } from '@angular/core';@Directive({selector: '[appHighlight]'})export class HighlightDirective {constructor(private el: ElementRef) { }@Input() defaultColor: string;@Input('appHighlight') highlightColor: string;@HostListener('mouseenter') onMouseEnter() {this.highlight(this.highlightColor || this.defaultColor || 'red');}@HostListener('mouseleave') onMouseLeave() {this.highlight(null);}private highlight(color: string) {this.el.nativeElement.style.backgroundColor = color;}}
<h1>My First Attribute Directive</h1><h4>Pick a highlight color</h4><div><input type="radio" name="colors" (click)="color='lightgreen'">Green<input type="radio" name="colors" (click)="color='yellow'">Yellow<input type="radio" name="colors" (click)="color='cyan'">Cyan</div><p [appHighlight]="color">Highlight me!</p><p [appHighlight]="color" defaultColor="violet">Highlight me too!</p>
附录:为什么要加@Input?
<p [appHighlight]="color">Highlight me!</p>
color属性位于右侧的绑定表达式中,它属于模板所在的组件。 该模板和组件相互信任。因此color不需要@[Input](https://angular.cn/api/core/Input)装饰器。—— 组件的成员变量colorappHighlight属性位于左侧,它引用了HighlightDirective中一个带别名的属性,它不是模板所属组件的一部分,因此存在信任问题。 所以,该属性必须带@[Input](https://angular.cn/api/core/Input)装饰器。 —— 是指令类中的@Input变量。
结构性指令
带*前缀和微语法
NgFor指令在列表上循环,每个循环中都会设置和重置它自己的上下文对象上的属性。 这些属性包括但不限于index和odd以及一个特殊的属性名$implicit(隐式变量)。- 这里并没有指定
let-hero的上下文属性。它的来源是隐式的。
| 微语法 | 解语法糖后 |
|---|---|
*[ngFor](https://angular.cn/api/common/NgForOf)="let item of [1,2,3]" |
<ng-template [ngFor](https://angular.cn/api/common/NgForOf) let-item [[ngForOf](https://angular.cn/api/common/NgForOf)]="[1,2,3]"> |
*[ngFor](https://angular.cn/api/common/NgForOf)="let item of [1,2,3] as items; trackBy: myTrack; index as i" |
<ng-template [ngFor](https://angular.cn/api/common/NgForOf) let-item [[ngForOf](https://angular.cn/api/common/NgForOf)]="[1,2,3]" let-items="[ngForOf](https://angular.cn/api/common/NgForOf)" [ngForTrackBy]="myTrack" let-i="index"> |
*[ngIf](https://angular.cn/api/common/NgIf)="exp" |
<ng-template [[ngIf](https://angular.cn/api/common/NgIf)]="exp"> |
*[ngIf](https://angular.cn/api/common/NgIf)="exp as value" |
<ng-template [[ngIf](https://angular.cn/api/common/NgIf)]="exp" let-value="[ngIf](https://angular.cn/api/common/NgIf)"> |
模板输入变量
模板输入变量和引用变量具有各自独立的命名空间。let hero 中的 hero 和 #hero 中的 hero 并不是同一个变量
| 模板输入变量 | 模板引用变量 |
|---|---|
| 范围被限制在所重复模板的单一实例 | 引用变量引用的是它所附着到的元素、组件或指令。它可以在整个模板的任意位置访问 |
每个宿主元素上只能有一个结构型指令
写一个结构型指令
<p *appUnless="condition">Show this sentence unless the condition is true.</p>
TemplateRef 和 ViewContainerRef
像这个例子一样的简单结构型指令会从 Angular 生成的
(译注:注意不是子节点,而是兄弟节点)。
你可以使用TemplateRef取得
import { Directive, Input, TemplateRef, ViewContainerRef } from '@angular/core';/*** Add the template content to the DOM unless the condition is true.*/@Directive({ selector: '[appUnless]'})export class UnlessDirective {private hasView = false;constructor(private templateRef: TemplateRef<any>,private viewContainer: ViewContainerRef) { }@Input() set appUnless(condition: boolean) {if (!condition && !this.hasView) {this.viewContainer.createEmbeddedView(this.templateRef);this.hasView = true;} else if (condition && this.hasView) {this.viewContainer.clear();this.hasView = false;}}}
- 如果条件为假,并且以前尚未创建过该视图,就告诉视图容器(ViewContainer)根据模板创建一个内嵌视图。
- 如果条件为真,并且视图已经显示出来了,就会清除该容器,并销毁该视图
改进
用处应该不是很大,略。
NgTemplateOutlet
文档demo
- 不带上下文
- let取用默认值let-name,即Context.$implicit
let取用指定值let-person=”localSk”,即Context.localSk
@Component({selector: 'ng-template-outlet-example',template: `<ng-container *ngTemplateOutlet="greet"></ng-container><hr><ng-container *ngTemplateOutlet="eng; context: myContext"></ng-container><hr><ng-container *ngTemplateOutlet="svk; context: myContext"></ng-container><hr><ng-template #greet><span>Hello</span></ng-template><ng-template #eng let-name><span>Hello {{name}}!</span></ng-template><ng-template #svk let-person="localSk"><span>Ahoj {{person}}!</span></ng-template>`})export class NgTemplateOutletExample {myContext = {$implicit: 'World', localSk: 'Svet'};}
项目应用
```typescript
{{ color[line] }}
```typescript<td><ng-container *ngTemplateOutlet="editableCell; context: { color: color, line: 'code'}"></ng-container></td>

若有收获,就点个赞吧
0 人点赞
