多台设备并行运行monkey
比如有10 台设备,要在这10台设备上运行monkey 脚本们可以通过命令行的方式来进行。如果手动执行会比较麻烦;
运行单个手机 monkey
adb 命令
adb shell monkey 500
monkey :https://developer.android.google.cn/studio/test/monkey?hl=zh-cn
subprocss 子进程方式执行命令
python 脚本, 执行一台设备的脚本
import subprocessmonkey_cmd = "adb -s 127.0.0.1:62001 shell monkey -p org.cnodejs.android.md -v --throttle 500 500"with open('./monkey_run.log',mode='w',encoding='utf8') as file:subprocess.Popen(monkey_cmd,stdout=file)
命令解释
"adb -s 127.0.0.1:62001 shell monkey -p org.cnodejs.android.md -v --throttle 500 500"-s 127.0.0.1:62001 # 执行的手机设备串号-p org.cnodejs.android.md # 执行运行的app-v # 显示详细日志 日志级别分为三个基本 -vv 表示最详细的日志级别--throttle 500 # 每个事件之间的 间隔时间 为500 毫秒500 # 执行500个事件
如果现在是两台设备
C:\Users\zengy>adb devicesList of devices attached127.0.0.1:62001 deviceemulator-5554 device
写个for循环 启动子进程的方式运行多台设备
import subprocessdef run(device_id):monkey_cmd = f"adb -s {device_id} shell monkey -p org.cnodejs.android.md -v --throttle 500 500"with open('./monkey_run.log',mode='w',encoding='utf8') as file:subprocess.Popen(monkey_cmd,stdout=file,shell=True)if __name__ == '__main__':devices = ['127.0.0.1:62001',"emulator-5554"]for device in devices:run(device)
两台设备运行的时候都会把把日志写入到一个文件中。这样肯定是不行的
下面要求:
- 自动获取device的设备串号,比如设备连接 三台, 自动获取这三台手机的串号
- 自动执行monkey ,运行monkey的时候,每台设备产生的日志信息应该保存到对应的设备的日志中。日志文件名以设备串号命名。
使用代码的方式获取已经连接成功的设备
C:\Users\zengy>adb devicesList of devices attachedemulator-5554 deviceemulator-5556 unauthorized
获取所有连接的设备
import subprocess# 创建子进程devices = []proc = subprocess.Popen('adb devices',stdout=subprocess.PIPE,shell=True)for line in proc.stdout.readlines():# print(type(line),line)# 将字节类型转换为字符串linestr = line.decode(encoding='utf8')if '\tdevice' in linestr:# 字符串分割 提取 deviceid值device_id = linestr.strip().split('\tdevice')[0]devices.append(device_id)print(devices)
实现自动执行多台设备
import subprocessdef get_connect_devices():"""获取已经成功连接的设备:return: list"""devices = []proc = subprocess.Popen('adb devices', stdout=subprocess.PIPE,shell=True)for line in proc.stdout.readlines():# print(type(line),line)# 将字节类型转换为字符串linestr = line.decode(encoding='utf8')if '\tdevice' in linestr:# 字符串分割 提取 deviceid值device_id = linestr.strip().split('\tdevice')[0]devices.append(device_id)return devicesdef run(device_id:str):# 字符串名字去掉特殊字符devicename = device_id.replace(':','_')devicefile = devicename.replace('.',"_")monkey_cmd = f"adb -s {device_id} shell monkey -p org.cnodejs.android.md -vv --throttle 500 500"with open(f'./{devicefile}.log',mode='w',encoding='utf8') as file:subprocess.Popen(monkey_cmd,stdout=file,shell=True)if __name__ == '__main__':devices = get_connect_devices()for device in devices:run(device)
multiprocessing 并行运行
通过多进程的方式执行自动化脚本
https://docs.python.org/zh-cn/3/library/multiprocessing.html
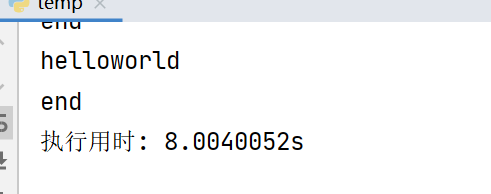
import timedef run():time.sleep(1)print('helloworld')time.sleep(1)print('end')if __name__ == '__main__':start= time.perf_counter()for i in range(4):run()end = time.perf_counter()print(f'执行用时: {end-start}s')
下面使用多进程的方式执行
import timeimport multiprocessingimport randomdef run(name):time.sleep(1)print(f'helloworld-{name}')time.sleep(1)print('end')if __name__ == '__main__':start= time.perf_counter()processes = []# 启动8个进程for i in range(8):p = multiprocessing.Process(target=run,args=(random.random(),)) # 注意参数processes.append(p)p.start() # 启动# 执行进程中的脚本for proce in processes:proce.join() # 加入队列end = time.perf_counter()print(f'执行用时: {end-start}s')
使用多进程的方式之后,代码执行需要2s
使用多进程的方式改进自动化monkey代码
import subprocessimport multiprocessingdef get_connect_devices():"""获取已经成功连接的设备:return: list"""devices = []proc = subprocess.Popen('adb devices', stdout=subprocess.PIPE,shell=True)for line in proc.stdout.readlines():# print(type(line),line)# 将字节类型转换为字符串linestr = line.decode(encoding='utf8')if '\tdevice' in linestr:# 字符串分割 提取 deviceid值device_id = linestr.strip().split('\tdevice')[0]devices.append(device_id)return devicesdef run(device_id:str):# 字符串名字去掉特殊字符devicename = device_id.replace(':','_')devicefile = devicename.replace('.',"_")monkey_cmd = f"adb -s {device_id} shell monkey -p org.cnodejs.android.md -s 1625569785406 -vv --throttle 500 500"with open(f'./{devicefile}.log',mode='w',encoding='utf8') as file:subprocess.Popen(monkey_cmd,stdout=file,shell=True)if __name__ == '__main__':devices = get_connect_devices()process = []for device_id in devices:p = multiprocessing.Process(target=run,args=(device_id,))process.append(p)p.start()for proc in process:proc.join()# for device in devices:# run(device)
appium 多台设备并行执行
现在有两台手机设备
C:\Users\zengy>adb devicesList of devices attached127.0.0.1:62001 device127.0.0.1:62025 device
分别启动两个appium 服务
appium -p 4723
appium -p 4725

同时使用appium 连接两台设备
def start_driver(device_id, port):desired_caps = {'platformName': 'Android', # 测试Android系统'udid': device_id, # adb devices 命令查看 设置为自己的设备'automationName': 'UiAutomator2', # 自动化引擎'noReset': False, # 不要重置app的状态'fullReset': False, # 不要清理app的缓存数据# 'chromedriverExecutable': chromedriver, # chromedriver 对应的绝对路径'appPackage': "org.cnodejs.android.md", # 应用的包名'appActivity': ".ui.activity.LaunchActivity" # 应用的活动页名称}driver = webdriver.Remote(f'http://127.0.0.1:{port}/wd/hub', desired_capabilities=desired_caps)driver.implicitly_wait(5) # 全局的隐式等待时间if __name__ == '__main__':deivces = [('127.0.0.1:62001', 4723),('127.0.0.1:62025',4725)]processes = []for device in deivces:p= multiprocessing.Process(target=start_driver,args=(device[0],device[1],))p.start()processes.append(p)for proc in processes:proc.join()
自动获取连接的设备,并自动启动appium
# 并行 运行两台设备from appium import webdriverimport subprocess,os,sysimport multiprocessingdef get_connect_devices():"""获取已经成功连接的设备:return: list"""devices = []port = 4723proc = subprocess.Popen('adb devices', stdout=subprocess.PIPE,shell=True)for line in proc.stdout.readlines():# print(type(line),line)# 将字节类型转换为字符串linestr = line.decode(encoding='utf8')if '\tdevice' in linestr:# 字符串分割 提取 deviceid值device_id = linestr.strip().split('\tdevice')[0]devices.append((device_id,port))port += 2 # 端口递增2return devicesdef start_appium(port):"""使用命令行的方式启动appium:return:"""start_cmd=f'appium -p {port}'with open(f'./{port}.log',mode='w',encoding='utf8') as file:subprocess.Popen(start_cmd,shell=True,stdout=file)def kill_appium(port):"""通过端口号结束appium 进程Windows 执行命令 netstat -anp | finstr port通过 taskkill -f -pid pid 结束进程Mac 系统 执行名 lsof -p port执行 kill -9 pid 结束进程:param port::return:"""# 执行根据端口号 查找进程# windows 系统:# print(sys.platform)if sys.platform == 'win32':find_pid = f'netstat -ano | findstr {port}'proc = subprocess.Popen(find_pid,shell=True,stdout=subprocess.PIPE)for line in proc.stdout.readlines():print("line",line)if line:strline= line.decode(encoding='utf8')if "LISTENING" in strline:print('strline',strline)pid = strline.strip().split('LISTENING')[-1].strip()# 有了pid 之后 再执行 taskkill -f -pid pidos.system(f'taskkill -f -pid {pid}')# mac 系统else:mac_cmd = f"lsof -i tcp:{port}"p = subprocess.Popen(mac_cmd, shell=True, stdout=subprocess.PIPE, stderr=subprocess.PIPE)for line in p.stdout.readlines():line = line.decode('utf8')# print("line",line)if "node" in line:stdoutline = line.split(" ")print(stdoutline)pid = stdoutline[4]os.system(f"kill {pid}")def start_driver(device_id, port):# 先开启appium 再连接, 启动之前 先结束之前启动的apppiumkill_appium(port)start_appium(port)desired_caps = {'platformName': 'Android', # 测试Android系统'udid': device_id, # adb devices 命令查看 设置为自己的设备'automationName': 'UiAutomator2', # 自动化引擎'noReset': False, # 不要重置app的状态'fullReset': False, # 不要清理app的缓存数据# 'chromedriverExecutable': chromedriver, # chromedriver 对应的绝对路径'appPackage': "org.cnodejs.android.md", # 应用的包名'appActivity': ".ui.activity.LaunchActivity" # 应用的活动页名称}driver = webdriver.Remote(f'http://127.0.0.1:{port}/wd/hub', desired_capabilities=desired_caps)driver.implicitly_wait(5) # 全局的隐式等待时间if __name__ == '__main__':devices = get_connect_devices()# print(devices)# deivces = [('127.0.0.1:62001', 4723),('127.0.0.1:62025',4725)]processes = []for device in devices:p= multiprocessing.Process(target=start_driver,args=(device[0],device[1],))p.start()processes.append(p)for proc in processes:proc.join()

若有收获,就点个赞吧
0 人点赞
