shell1. Docker镜像
Docker 容器的运行是基于宿主机的内核,通过linux的namespaces来实现隔离,相对于虚拟机而言降低了硬件资源的性能损耗,且具备一定程度上的应用隔离效果。
另外,通过最小化的镜像方式运行docker 容器,相对于虚拟机而言大幅度降低非生产力进程的资源消耗。
最后使用打包好的镜像,统一了应用程序的运行环境,降低了开发和测试人员的负担,但是增加了运维工作的复杂度。
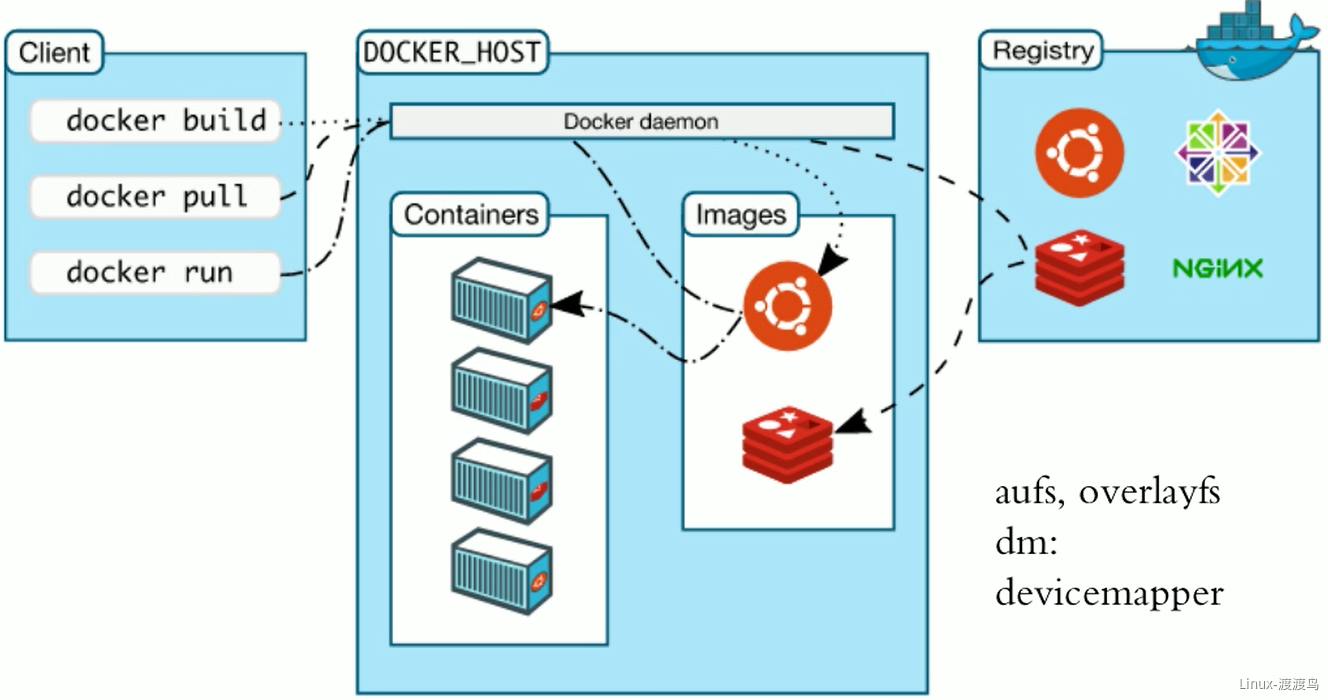
Docker 客户端启动一个容器时,通过TCP或者unix socket连接docker daemon。如果需要启动的容器镜像本地不存在,则从registry来拉取到本地,然后根据传递的CMD或者默认的CMD来启动容器。
Docker 镜像的命名方式: ${registry_name}/${repository_name}/${image_name}:${tag_name}。其中默认的registry_name为docker.io,repository_name默认值为library,默认tag_name为lastest。lastest为一个指针,可以指向任意一个版本,一般都是指向最新的版本。非官方镜像必须要带上${repository_name},非docker-hub镜像必须带上 ${registry_name}/${repository_name}。
2. Docker 镜像相关操作

- 基于运行中的容器,手动制作镜像
- 将运行中的容器暂停(docker commit 默认暂停容器),然后将当前的状态制作成镜像,注意需要指定repository,可以只要-a添加作者信息,-c修改其它字段信息,常修改CMD信息。
- 导出(export)当前容器的文件系统信息,导出后的格式为.tar,.tar文件是一个中间状态的文件,需要使用import导入并且设置CMD等相关信息才是一个完整的镜像。
- 自动化制作镜像 Dockerfile
Dockerfile 能解决两个问题:
- 制作过程自动化:原理也是先运行容器,然后再基于运行的容器制作镜像,但是将制作过程使用dockerfile预先指定好
- 可以引入变量:在制作镜像时手动传参,根据传递的参数制作不同的镜像;在创建容器时手动传参,根据传递的参数修改进程的配置
- 镜像导出和导入
这并不是制作镜像,而是共享或传输镜像到其它服务器的一种方式,如果局域网中存在registory,这种方式意义不大。
如果局域网中没有registory,通过公网下载镜像会变得非常慢,因此将需要的镜像在一台机器上打包好,分发到各台服务器上会更加节约时间。
3. docker commit
3.1. 指令
docker commit [OPTIONS] CONTAINER [REPOSITORY[:TAG]]docker container commit [OPTIONS] CONTAINER [REPOSITORY[:TAG]]-----a,--author string Author (e.g., "John Hannibal Smith <hannibal@a-team.com>")-c,change list Apply Dockerfile instruction to the created image-m,--message string Commit message-p,--pause Pause container during commit (default true)
3.2. 案例
3.2.1. 针对运行中的容器创建镜像
[root@centos-82 ~]# docker run —name img01 -it quay.io/quay/busybox
/ # echo 'busybox' > /tmp/a.txt
[root@centos-82 ~]# docker container commit -a “Heyingsheng 29492492@qq.com“ img01 ## 未指定仓库和标签的镜像
[root@centos-82 ~]# docker image ls
REPOSITORY TAG IMAGE ID CREATED SIZE<none> <none> 2fcb2d26d167 7 seconds ago 2.49MBnginx latest f09fe80eb0e7 3 weeks ago 109MBquay.io/quay/busybox latest c8cb1f026eeb 5 years ago 2.49MB
[root@centos-82 ~]# docker container commit -a “Heyingsheng 29492492@qq.com“ img01 devops/busybox:1.0.1 ## 指定仓库和标签
REPOSITORY TAG IMAGE ID CREATED SIZEdevops/busybox 1.0.1 a29845416384 3 seconds ago 2.49MB<none> <none> 2fcb2d26d167 44 seconds ago 2.49MBnginx latest f09fe80eb0e7 3 weeks ago 109MBquay.io/quay/busybox latest c8cb1f026eeb 5 years ago 2.49MB
[root@centos-82 ~]# docker run —name busybox01 -it devops/busybox:1.0.1 ## 运行并查看
/ # cat /tmp/a.txtbusybox
3.2.2. 创建镜像并修改CMD参数
[root@centos-82 ~]# docker image inspect busybox:latest | grep -n CMD
31: "CMD [\"sh\"]"
[root@centos-82 ~]# docker container run —name busybox02 -it busybox
/ # mkdir -p /opt/webiste/ # echo "<h1>Hello World</h1>" > /opt/webiste/index.html/ # exit
[root@centos-82 ~]# docker container commit -a “Heyingsheng 33202492034@qq.com“ -c ‘CMD [“/bin/httpd”,”-f”,”-h”,”/opt/website”]’ busybox_01 devops/apache:1.0.1 ## Every element in list must delemeted by “,”.
[root[@centos-82 ](/centos-82 ) ~]# docker container run --name web_1.0.1 -d devops/apache:1.0.1
[root@centos-82 ~]# docker container inspect web_1.0.1 | grep IPAddress
"SecondaryIPAddresses": null,"IPAddress": "172.17.0.2","IPAddress": "172.17.0.2",
[root@centos-82 ~]# curl 172.17.0.2
<p>Hello World</p>
4. image save & load
4.1. 指令
docker [image] save [OPTIONS] IMAGE [IMAGE...]Options:-o, --output string Write to a file, instead of STDOUT# ---docker [image] load [OPTIONS]Options:-i, --input string Read from tar archive file, instead of STDIN-q, --quiet Suppress the load output
4.2. 案例
4.2.1 image save
[root@centos-82 ~]# docker image ls
REPOSITORY TAG IMAGE ID CREATED SIZEdevops/apache 1.0.1 d5fd027d1066 30 minutes ago 1.2MBbusybox latest d8233ab899d4 2 weeks ago 1.2MBnginx latest f09fe80eb0e7 3 weeks ago 109MB
[root@centos-82 ~]# docker image save d5fd027d1066 d8233ab899d4 f09fe80eb0e7 -o deveops.tar.gz ## doesn’t gzip
[root@centos-82 ~]# docker save d5fd027d1066 d8233ab899d4 f09fe80eb0e7 -o deveops2.tar ## no tag and repository
[root@centos-82 ~]# ls -lh
-rw------- 1 root root 110M Mar 3 11:04 deveops2.tar-rw------- 1 root root 110M Mar 3 11:04 deveops.tar.gz
[root@centos-82 ~]# file deveops2.tar deveops.tar.gz
deveops2.tar: POSIX tar archivedeveops.tar.gz: POSIX tar archive
[root@centos-82 ~]# gunzip deveops.tar.gz
gzip: deveops.tar.gz: not in gzip format ## image save doesn't gzip images.
[root@centos-82 ~]# tar tf deveops2.tar
0d59d15c626f2cb0a2d5cdfa08bc3e255e7d151819fde4b1981c7e5ded237a77/0d59d15c626f2cb0a2d5cdfa08bc3e255e7d151819fde4b1981c7e5ded237a77/VERSION0d59d15c626f2cb0a2d5cdfa08bc3e255e7d151819fde4b1981c7e5ded237a77/json0d59d15c626f2cb0a2d5cdfa08bc3e255e7d151819fde4b1981c7e5ded237a77/layer.tar......manifest.json
[root@centos-82 ~]# docker image save nginx:latest busybox:latest devops/apache:1.0.1 -o output.tar
4.2.2 image load 案例
[root@centos-81 ~]# docker image load -i /tmp/deveops2.tar
adab5d09ba79: Loading layer [==================================================>] 1.416 MB/1.416 MB1b5d74440182: Loading layer [==================================================>] 5.12 kB/5.12 kB0a07e81f5da3: Loading layer [==================================================>] 58.47 MB/58.47 MB92c15149e23b: Loading layer [==================================================>] 54.44 MB/54.44 MB6b5e2ed60418: Loading layer [==================================================>] 3.584 kB/3.584 kBLoaded image ID: sha256:d5fd027d10667a28b75c3bbe10171eae51411a775849bab396fea45354327690Loaded image ID: sha256:d8233ab899d419c58cf3634c0df54ff5d8acc28f8173f09c21df4a07229e1205Loaded image ID: sha256:f09fe80eb0e75e97b04b9dfb065ac3fda37a8fac0161f42fca1e6fe4d0977c80
[root@centos-81 ~]# docker image ls -a ## 使用 image save 导出时需要加 repostory和tag
REPOSITORY TAG IMAGE ID CREATED SIZE<none> <none> d5fd027d1066 41 minutes ago 1.2 MB<none> <none> d8233ab899d4 2 weeks ago 1.2 MB<none> <none> f09fe80eb0e7 3 weeks ago 109 MB
[root@centos-81 ~]# docker image rm d8233ab899d4 f09fe80eb0e7 d5fd027d1066
[root@centos-81 ~]# docker image load -i /tmp/output.tar
adab5d09ba79: Loading layer [==================================================>] 1.416 MB/1.416 MBLoaded image: busybox:latest1b5d74440182: Loading layer [==================================================>] 5.12 kB/5.12 kBLoaded image: devops/apache:1.0.10a07e81f5da3: Loading layer [==================================================>] 58.47 MB/58.47 MB92c15149e23b: Loading layer [==================================================>] 54.44 MB/54.44 MB6b5e2ed60418: Loading layer [==================================================>] 3.584 kB/3.584 kBLoaded image: nginx:latest
[root@centos-81 ~]# docker image ls -a # good images
REPOSITORY TAG IMAGE ID CREATED SIZEdevops/apache 1.0.1 d5fd027d1066 46 minutes ago 1.2 MBbusybox latest d8233ab899d4 2 weeks ago 1.2 MBnginx latest f09fe80eb0e7 3 weeks ago 109 MB
5. container export & import
5.1. 指令
docker [container] export [OPTIONS] CONTAINEROptions:-o, --output string Write to a file, instead of STDOUT#---docker [image] import [OPTIONS] file|URL|- [REPOSITORY[:TAG]]Options:-c, --change list Apply Dockerfile instruction to the created image (default [])-m, --message string Set commit message for imported image
5.2. 案例
5.2.1. export
docker container run --name web01 -it busybox # Run a container and httpd service# mkdir -p /opt/website# echo "<p>Container export</p>" > /opt/website/index.html# httpd -f -h /opt/website/docker container export -o web.tar web01 # Export container to an image.docker container export -o web.tar web01 # Export container to an image.
5.2.2. import
[root@centos-81 ~]# docker image import /tmp/web.tar ## No reporsitory and tags,bad image[root@centos-81 ~]# docker image import /tmp/web.tar httpd:v0.1 ## Specify reporsitory and tag.Not running httpd when start container.[root@centos-81 ~]# docker image import -c 'CMD ["/bin/httpd","-f","-h","/opt/website"]' /tmp/web.tar httpd:v0.2 ## Specify reporsitory,tag and CMD.[root@centos-81 ~]# docker image ls
REPOSITORY TAG IMAGE ID CREATED SIZEhttpd v0.2 3f22152f75b7 9 seconds ago 1.2 MBhttpd v0.1 562ec613ec3a About an hour ago 1.2 MB<none> <none> 5010a1bb08b7 About an hour ago 1.2 MBdevops/apache 1.0.1 d5fd027d1066 2 hours ago 1.2 MBbusybox latest d8233ab899d4 2 weeks ago 1.2 MBnginx latest f09fe80eb0e7 3 weeks ago 109 MB
5.3. export & import VS save & load
5.3.1. image save VS container export
- Command docker save is copy old_image to file.tar.It keep old image_name,image_tag and keep all the layers
- Command docker export is copy container to file.tar.It keep state of container and combine(合并) multiple(众多) layers into one layer
5.3.2. image load VS image import
- Command docker load is using for improt file.tar which is export by docker save
- Command docker import is using for import file.tar which is export by docker export

若有收获,就点个赞吧
0 人点赞
