1. 虚拟化和容器技术
- 虚拟化技术
Type1: 不安装宿主机操作系统,而直接在硬件基础上安装虚拟化管理软件
Type2: 安装宿主机操作系统,在宿主机操作系统之上安装虚拟化管理软件
- 容器技术
Container 是在宿主机操作系统上使用Cgroups,Namespaceses技术创建出来具有边界的特殊进程。
- 区别
虚拟化技术会虚拟出多个内核,每个虚拟机拥有一个自己的内核,彼此之间隔离性非常好。并且在创建虚拟机之初就定义好了虚拟机的资源限制,如CPU核心数,内存大小,磁盘大小等。
容器技术是直接运行在宿主机之上的,多个容器共用一个内核,因此隔离效果比较差,但是性能更好。

2. 容器化的基础
2.1. Chroot
如果需要在一个宿主机上运行多个容器,且容器之间相互个离,那么第一个就需要系统库文件的依赖,对于一个容器而言,需要将其需要的系统文件单独复制出来一份,放到指定目录,并且需要让进程认为这就是根目录,而不是去调用宿主机系统上的库文件。Chroot就是一个切换根目录的方式。
2.2. NameSpaces
为了让多个容器以沙盒的方式在宿主机上运行,就需要提前定义好各个容器能看到的边界。由于各个容器都是直接运行在宿主机系统上,因此需要内核对各个容器的上下文进行修改,让他们看上去是一个独立的操作系统。比如,指定PID为1的进程,指定网卡设备,指定文件系统挂载,指定用户等等。
Linux操作系统内核从底层实现了为各个进程创建独立用户空间的功能,不同用户空间似于一个个独立的虚拟机系统,用户空间内部进程不能感知到其它用户空间中的进程状态。内核提供了六种Namespaces:
| UTS | hostname and domainname | 主机名和域名隔离 | 内核版本:2.6.19 |
|---|---|---|---|
| User | 用户隔离。运行进程的用户和组 | 内核版本:3.8.x | |
| Mount | 挂载点隔离。即挂载点隔离,主要指根目录 | 内核版本:2.4.19 | |
| IPC | Inter-process-connection | 进程间通信隔离。消息队列、共享内容、信号量 | 内核版本:2.6.19 |
| Pid | Process ID | PID隔离 | 内核版本:2.6.24 |
| Net | Network | 网络隔离。网络设备、协议栈、端口 | 内核版本:2.6.29 |
2.3. Cgroups
Namespaceses通过障眼法实现了用户空间的隔离,但是没办法对硬件资源进行限制,当一个容器进行CPU密集型操作时,会消耗掉整个宿主机的CPU资源,进而影响了其它容器的正常运行。
因此在Namespaceses之上,还需要对各个容器实现硬件资源限制,比如CPU,Memory,diskio等等。
Cgroups技术针对进程而言的,在centos7系统上,可以通过以下方式来实现对进程的资源限制:
[root@centos-82 ~]# while :;do :;done &[1] 2136[root@centos-82 ~]# pidstat -u -p 2136 2 ## 未加cgroups限制下,跑满单个CPU核心11:09:54 AM UID PID %usr %system %guest %CPU CPU Command11:09:56 AM 0 2136 99.50 0.00 0.00 99.50 4 bash11:09:58 AM 0 2136 100.00 0.00 0.00 100.00 4 bash11:10:00 AM 0 2136 100.00 0.00 0.00 100.00 4 bash[root@centos-82 ~]# mount -t cgroup ## 查看当前cgroups路径cgroup on /sys/fs/cgroup/systemd type cgroup (rw,nosuid,nodev,noexec,relatime,xattr,release_agent=/usr/lib/systemd/systemd-cgroups-agent,name=systemd)cgroup on /sys/fs/cgroup/hugetlb type cgroup (rw,nosuid,nodev,noexec,relatime,hugetlb)cgroup on /sys/fs/cgroup/cpuset type cgroup (rw,nosuid,nodev,noexec,relatime,cpuset)cgroup on /sys/fs/cgroup/cpu,cpuacct type cgroup (rw,nosuid,nodev,noexec,relatime,cpuacct,cpu)cgroup on /sys/fs/cgroup/net_cls,net_prio type cgroup (rw,nosuid,nodev,noexec,relatime,net_prio,net_cls)cgroup on /sys/fs/cgroup/devices type cgroup (rw,nosuid,nodev,noexec,relatime,devices)cgroup on /sys/fs/cgroup/blkio type cgroup (rw,nosuid,nodev,noexec,relatime,blkio)cgroup on /sys/fs/cgroup/pids type cgroup (rw,nosuid,nodev,noexec,relatime,pids)cgroup on /sys/fs/cgroup/freezer type cgroup (rw,nosuid,nodev,noexec,relatime,freezer)cgroup on /sys/fs/cgroup/perf_event type cgroup (rw,nosuid,nodev,noexec,relatime,perf_event)cgroup on /sys/fs/cgroup/memory type cgroup (rw,nosuid,nodev,noexec,relatime,memory)[root@centos-82 ~]# mkdir /sys/fs/cgroup/cpu/loop[root@centos-82 ~]# cat /sys/fs/cgroup/cpu/loop/cpu.cfs_quota_us-1[root@centos-82 ~]# cat /sys/fs/cgroup/cpu/loop/cpu.cfs_period_us100000[root@centos-82 ~]# echo 10000 >/sys/fs/cgroup/cpu/loop/cpu.cfs_quota_us ## CPU时间片限制在20%[root@centos-82 ~]# echo 2136 > /sys/fs/cgroup/cpu/loop/tasks ## 指定限制的进程PID[root@centos-82 ~]# pidstat -u -p 2136 2Linux 3.10.0-862.el7.x86_64 (centos-82) 03/02/2019 _x86_64_ (8 CPU)11:16:37 AM UID PID %usr %system %guest %CPU CPU Command11:16:39 AM 0 2136 10.50 0.00 0.00 10.50 4 bash11:16:41 AM 0 2136 10.00 0.00 0.00 10.00 4 bash11:16:43 AM 0 2136 9.50 0.00 0.00 9.50 4 bash11:16:45 AM 0 2136 9.95 0.00 0.00 9.95 4 bash
3. Docker架构
3.1. Docker组件
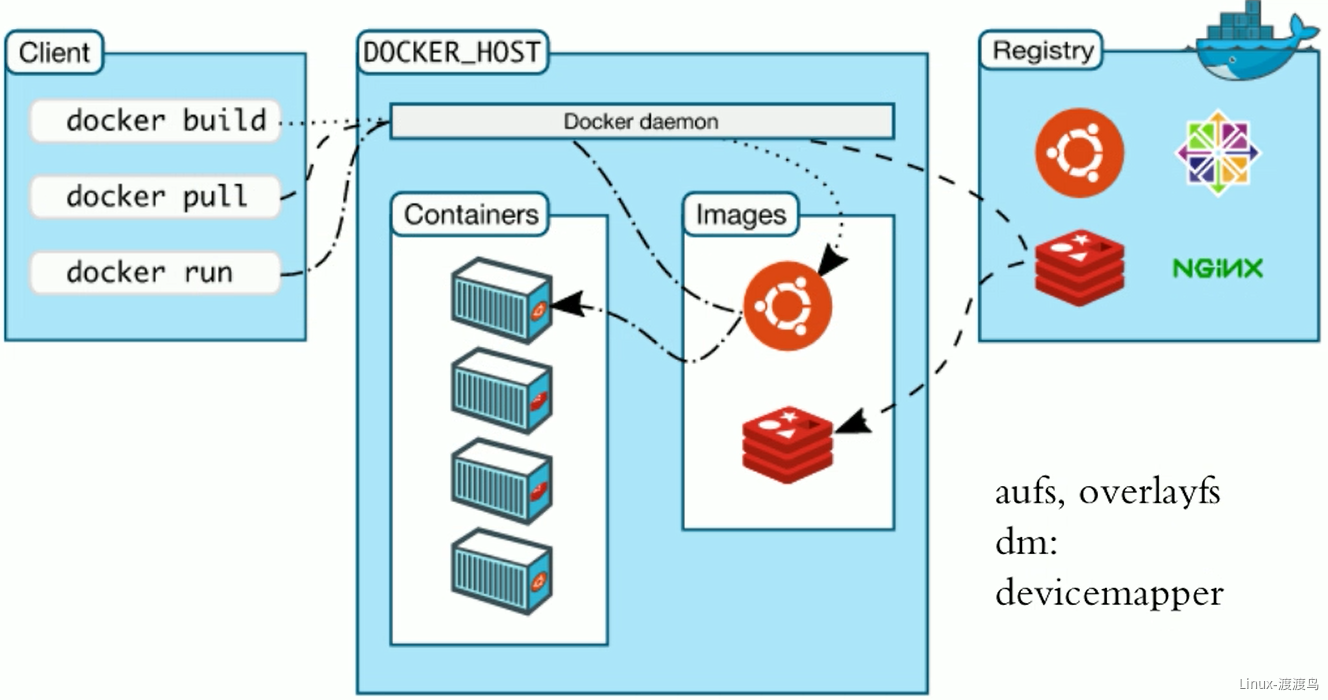
Docker服务有三个部分组成,分别是Client,Docker Host,Registry。当创建新的容器时,会向Docker Daemon发送指令,Docker Daemon通过本地镜像文件创建容器,当本地不存在镜像时,将从Registry下载镜像。
Registry由两个部分组成:
- Repostitory
- 由特定的docker镜像的所有迭代版本组成一个镜像仓库
- 一个Registry可以包括多个Repostitory
- Repostitory包含顶层仓库和用户仓库
- 顶层仓库: 仓库名:标签, nginx:latest
- 用户仓库: 用户名/仓库名:标签, heyang/nginx:1.4.2
- 一个镜像可以有多个标签,如最新版的nginx,可以是nginx:latest,nginx:1.4.2
- Index
- 提供用户认证、镜像检索功能
3.2. Docker镜像和容器
3.2.1. Docker镜像
镜像(Image)是一堆只读层(read-only layer)的统一视角。如下图所示:
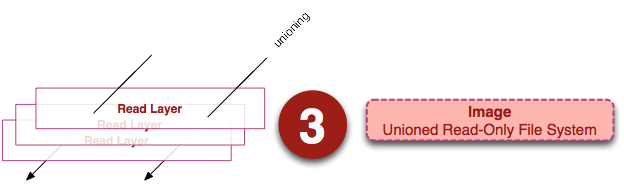

左边的是多个只读层,他们相互堆叠在一起。除了最下层之外,其它每一层都会有一个指针指向下一层。这些层是Docker内部的实现细节,并且能够在宿主机的文件系统上访问到。
统一文件系统(union file system,aufs)技术(新版用overlay2)能够将不同的层整合成一个文件系统,为这些层提供了一个统一的视角,这样就隐藏了多层的存在,在用户的角度看来,只存在一个文件系统。我们可以在图片的右边看到这个视角的形式。
每一层都包含了当前层的ID,Metadata,Pointer(指向上一层)三层,最底层不包含Pointer。
3.2.2. Docker容器
Docker容器包含静止状态和运行状态两种,这两种状态下的层级不一样。
静态状态的容器仅仅是在镜像状态下增加一个可读写的层级,运行状态中的容器包含了进程和对应的进程空间:


4. Docker安装
4.1. Docker安装配置
Docker在2017年以前时使用大版本号+小版本号来名,在2017年之后,采用YY.MM.N-xx格式,如 19.03.1-ce表示2019年3月份的第2个ce版本。以CentOS 7安装docker-ce版本为例
[root@docker-24-20 ~]# uname -r # 确认内核版本,要求大于3.83.10.0-862.el7.x86_64[root@docker-24-20 ~]# wget -O /etc/yum.repos.d/docker-ce.repo https://mirrors.aliyun.com/docker-ce/linux/centos/docker-ce.repo[root@docker-24-20 ~]# yum install -y docker-ce # 安装docker-ce[root@docker-24-20 ~]# vim /etc/docker/daemon.json # 初始化配置{"graph": "/data/docker","storage-driver": "overlay2","insecure-registries": ["registry.access.redhat.com","quay.io"],"registry-mirrors": ["https://q2gr04ke.mirror.aliyuncs.com"],"bip": "172.24.20.1/24","exec-opts": ["native.cgroupdriver=systemd"],"log-opts": {"max-size":"256M", "max-file":"2"},"live-restore": true}[root@docker-24-20 ~]# mkdir -p /data/docker[root@docker-24-20 ~]# systemctl start docker && systemctl enable docker[root@docker-24-20 ~]# ip addr show dev docker0 # 确认IP地址3: docker0: <NO-CARRIER,BROADCAST,MULTICAST,UP> mtu 1500 qdisc noqueue state DOWN group defaultlink/ether 02:42:e7:6b:2d:f6 brd ff:ff:ff:ff:ff:ffinet 172.24.20.1/24 brd 172.24.20.255 scope global docker0valid_lft forever preferred_lft forever[root@docker-24-20 ~]# docker container run --rm hello-world # 测试docker是否运行正常Unable to find image 'hello-world:latest' locallylatest: Pulling from library/hello-world1b930d010525: Pull completeDigest: sha256:4fe721ccc2e8dc7362278a29dc660d833570ec2682f4e4194f4ee23e415e1064Status: Downloaded newer image for hello-world:latestHello from Docker!This message shows that your installation appears to be working correctly.To generate this message, Docker took the following steps:1. The Docker client contacted the Docker daemon.2. The Docker daemon pulled the "hello-world" image from the Docker Hub.(amd64)3. The Docker daemon created a new container from that image which runs theexecutable that produces the output you are currently reading.4. The Docker daemon streamed that output to the Docker client, which sent itto your terminal.To try something more ambitious, you can run an Ubuntu container with:$ docker run -it ubuntu bashShare images, automate workflows, and more with a free Docker ID:https://hub.docker.com/For more examples and ideas, visit:https://docs.docker.com/get-started/
# daemon.json 配置介绍{"graph": "/data/docker","storage-driver": "overlay2","insecure-registries": ["registry.access.redhat.com","quay.io"],"registry-mirrors": ["https://q2gr04ke.mirror.aliyuncs.com"],"bip": "172.24.20.1/24","exec-opts": ["native.cgroupdriver=systemd"],"live-restore": true}# 配置项注意点:# graph: 该关键字未来将被弃用,可以采用 "data-root" 替代# storage-driver: 存储驱动,即分层文件系统# insecure-registries: 不安全的docker registries,即使用http协议推拉镜象# registry-mirrors: 加速站点,一般可以使用阿里、网易云、docker中国(https://registry.docker-cn.com)的地址# bip: 指定docker bridge地址(不能以.0结尾),生产中建议采用 172.xx.yy.1/24,其中xx.yy为宿主机ip后四位,方便定位问题# 若启动失败,查看 /var/log/message 日志排错
[root@docker-24-20 ~]# docker info # Docker 信息查看Client:Debug Mode: falseServer:Containers: 0 # 容器数量Running: 0Paused: 0Stopped: 0Images: 1 # 镜像数量Server Version: 19.03.5 # server 版本Storage Driver: overlay2Backing Filesystem: xfs # 宿主机上的底层文件系统Supports d_type: trueNative Overlay Diff: trueLogging Driver: json-fileCgroup Driver: systemd # Cgroups 驱动Plugins:Volume: localNetwork: bridge host ipvlan macvlan null overlayLog: awslogs fluentd gcplogs gelf journald json-file local logentries splunk syslogSwarm: inactiveRuntimes: runcDefault Runtime: runcInit Binary: docker-initcontainerd version: b34a5c8af56e510852c35414db4c1f4fa6172339runc version: 3e425f80a8c931f88e6d94a8c831b9d5aa481657init version: fec3683Security Options:seccompProfile: defaultKernel Version: 3.10.0-862.el7.x86_64 # 宿主机的相关信息Operating System: CentOS Linux 7 (Core)OSType: linuxArchitecture: x86_64CPUs: 2Total Memory: 3.685GiBName: docker-24-20ID: ASZO:NO2O:EJ2W:WGN5:MWAL:MBMP:TURI:WKNC:YUPS:E4E2:MATG:MXV3Docker Root Dir: /data/docker # docker 数据存储目录Debug Mode: falseRegistry: https://index.docker.io/v1/ # registry 地址Labels:Experimental: falseInsecure Registries:quay.ioregistry.access.redhat.com127.0.0.0/8Registry Mirrors: # 加速站点https://q2gr04ke.mirror.aliyuncs.com/Live Restore Enabled: trueWARNING: bridge-nf-call-iptables is disabled # 当前两个warn需要设置内核模块WARNING: bridge-nf-call-ip6tables is disabled
4.2. Docker pull配置代理
部分场景中,下载国外镜像非常慢,因此可以配置相关代理进行加速,方法如下:
4.2.1. 配置宿主机代理
1. 找到 Lantern 的代理服务器的http(s)监听地址,以当前宿主机 127.0.0.1:9768 为例2. 配置windows端口的转发,将所有10.4.7.1的10080端口转发至 127.0.0.1:9768netsh interface portproxy add v4tov4 listenaddress=10.4.7.1 listenport=10080 connectaddress=127.0.0.1 connectport=97683. 配置windows防火墙策略,允许 10.4.7.0/24 网段访问 10.4.7.1:100804. 配置Linux机器的http和https代理[root@centos-7-50 ~]# export http_proxy="10.4.7.1:10080"[root@centos-7-50 ~]# export https_proxy="10.4.7.1:10080"5. 测试[root@centos-7-50 ~]# curl -I https://www.google.comHTTP/1.1 200 OKDate: Friday, 20-Mar-20 09:55:18 CSTKeep-Alive: timeout=58Content-Length: 0# 实验环境的虚拟机使用的是 10.4.7.0/24 的NAT网络,宿主机地址为 10.4.7.1
4.2.2. 配置docker代理
root@ubuntu-7-61:~# mkdir /etc/systemd/system/docker.service.droot@ubuntu-7-61:~# vim /etc/systemd/system/docker.service.d/http-proxy.conf[Service]Environment="HTTP_PROXY=http://10.4.7.1:10080"root@ubuntu-7-61:~# systemctl daemon-reloadroot@ubuntu-7-61:~# systemctl restart dockerroot@ubuntu-7-61:~# docker info 2>&1 | grep -i proxyHTTP Proxy: http://10.4.7.1:10080

若有收获,就点个赞吧
0 人点赞
