- uni-app 护眼背景色
- uni-app 执行流程
- uni 统计入门教程
- hbuilder 快捷键
- hbuilder 保存即编译
- 发布
- 应用生命周期
- 页面生命周期
- 路由
- 钉钉专属tabbar
- 修改后台服务地址
- 取 URL 上的参数
- 轮播图集成
- 分类导航
- 小程序图片高度适应
- 富文本显示
- 成功跳转
- 加下拉刷新
- data 默认值的定义
- 分页处理
- 切换导航,数据记得清空
- uniapp 弹框出提醒消息
- 弹出成功后调用js方法
- 动态设置当前页面的标题
- 钉钉页面导航标题一直不变
- 跳转页面会出现 undefined
- 小程序编译后,直接进入某个页面
- 钉钉支付宝支付
- 钉钉弹框提醒
- 页面单独显示一张图片
- App.vue
- 内网穿透报错
- 集成钉钉h5微应用
- 自定义导航栏使用注意
- uniapp 存储本地数据缓存
- uniapp 跳转其他页面
- 页面通讯
- 画页面的时候 加一个边框
- 增加下拉刷新事件
- 自定义 uni-app 弹框样式
- PopUp 弹出层
- uni-app页面滑到一定距离固定某个元素在顶部,如导航栏
- 日期选择器
- tabbar 在 h5 端高度问题
- input @confirm事件
- 隐藏键盘框、隐藏软键盘
- PC适配
- 换行
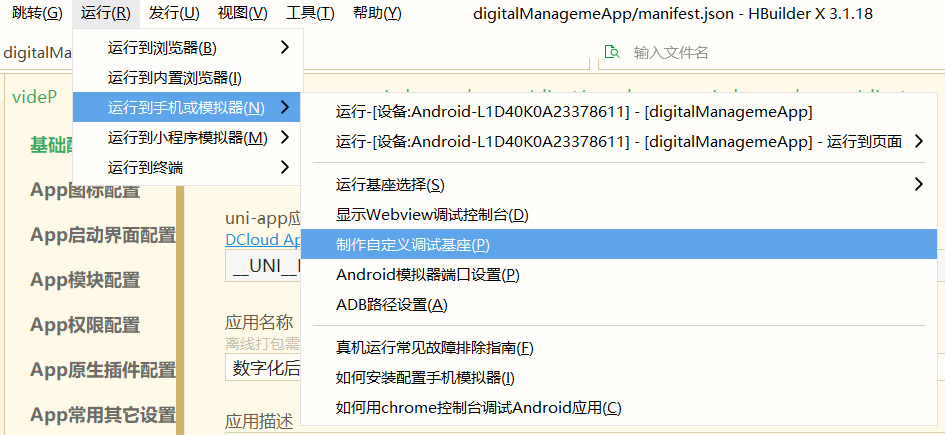
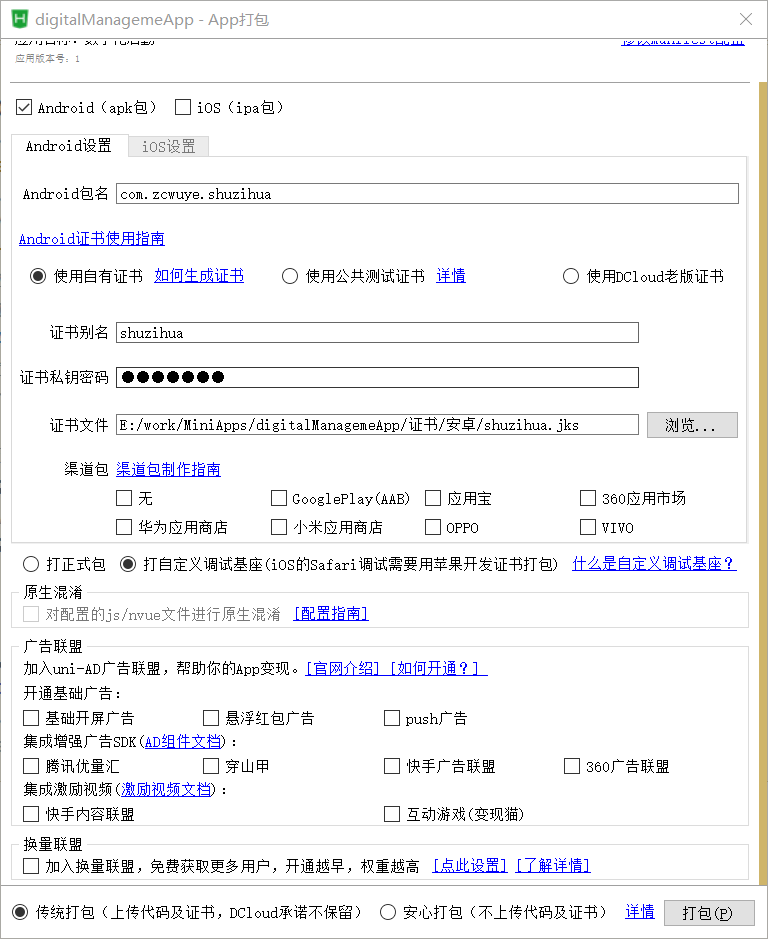
- 运行app
- 在uni回调里面不能用this
- http://xxxx/#/preview-image">uni.previewImage 在h5下页面标题变为http://xxxx/#/preview-image
uni-app 护眼背景色
https://ask.dcloud.net.cn/docs/#//ask.dcloud.net.cn/article/35112
绿柔环保主题
idea 配置护眼色
uni-app 执行流程
1、下载hbuilderx:https://download.dcloud.net.cn/HBuilderX.2.6.11.20200409.full.zip2、导入代码:本地目录或者git3、安装项目npm依赖: 代码包位置,按shift键右键选择powershell 执行 npm i4、安装环境依赖包:工具》安装插件》选择编译时提示的需要安装的包5、开发测试环境:选项编译 dev【运行》运行到微信模拟器】6、发布版本:选择编译 build;【发行》小程序-微信】7、配置微信开发者工具端口号:打开微信开发者工具》安全设置》开启》使用默认555208、开发与发布:开发包仅开发调试用,需要编译开发后热刷新的;编译包是发布包,可以直接提交代码审核
uni 统计入门教程
hbuilder 快捷键
https://ask.dcloud.net.cn/docs/#//ask.dcloud.net.cn/article/35357
- Alt+Shift+o 折叠、展开
- Alt+w 左边大纲
- Ctrl+q 关闭其他标签
hbuilder 保存即编译


项目目录地址:{projectHome}/unpackage/dist/dev


注意:发布的时候,不要上传dev代码,之前上传错了,贼慢。
运行模式(dev)下不压缩代码且含有sourcemap,体积较大;若要正式发布,请点击发行菜单进行发布
npm run dev:%PLATFORM%# PLATFORM# mp-alipay = 支付宝# mp-weixin = 微信小程序
发布
命令行操作
npm run build:%PLATFORM%# PLATFORM# mp-alipay = 支付宝# mp-weixin = 微信小程序
在HBuilderX中顶部菜单依次点击 “发行” => “小程序-支付宝”,即可在 /unpackage/dist/build/mp-alipay 生成支付宝小程序项目代码。

在支付宝小程序开发者工具中,导入生成的支付宝小程序项目,测试项目代码运行正常后,点击“上传”按钮上传代码,在 支付宝小程序后台,选择刚提交的版本点击提交审核,详见:支付宝小程序文档。
应用生命周期
uni-app 支持如下应用生命周期函数:
| 函数名 | 说明 |
|---|---|
| onLaunch | 当uni-app初始化完成时触发(全局只触发一次) |
| onShow | 当 uni-app启动,或从后台进入前台显示 |
| onHide | 当 uni-app从前台进入后台 |
| onError | 当 uni-app报错时触发 |
| onUniNViewMessage | 对 nvue页面发送的数据进行监听,可参考 nvue 向 vue 通讯 |
| onUnhandledRejection | 对未处理的 Promise 拒绝事件监听函数(2.8.1+) |
| onPageNotFound | 页面不存在监听函数 |
| onThemeChange | 监听系统主题变化 |
注意
- 应用生命周期仅可在
App.vue中监听,在其它页面监听无效。 - onlaunch里进行页面跳转,如遇白屏报错,请参考https://ask.dcloud.net.cn/article/35942
页面生命周期
https://uniapp.dcloud.io/collocation/frame/lifecycle?id=页面生命周期
| 函数名 | 说明 | 平台差异说明 | 最低版本 |
|---|---|---|---|
| onLoad | 监听页面加载,其参数为上个页面传递的数据,参数类型为Object(用于页面传参),参考示例 | ||
| onShow | 监听页面显示。页面每次出现在屏幕上都触发,包括从下级页面点返回露出当前页面(当切换其他应用程序的时候,返回回来,也会show一次) | ||
| onReady | 监听页面初次渲染完成。注意如果渲染速度快,会在页面进入动画完成前触发 | ||
| onHide | 监听页面隐藏 | ||
| onUnload | 监听页面卸载 | ||
| onResize | 监听窗口尺寸变化 | App、微信小程序 | |
| onPullDownRefresh | 监听用户下拉动作,一般用于下拉刷新,参考示例 | ||
| onReachBottom | 页面滚动到底部的事件(不是scroll-view滚到底),常用于下拉下一页数据。具体见下方注意事项 | ||
| onTabItemTap | 点击 tab 时触发,参数为Object,具体见下方注意事项 | 微信小程序、支付宝小程序、百度小程序、H5、App(自定义组件模式) | |
| onShareAppMessage | 用户点击右上角分享 | 微信小程序、百度小程序、字节跳动小程序、支付宝小程序 | |
| onPageScroll | 监听页面滚动,参数为Object | nvue暂不支持 | |
| onNavigationBarButtonTap | 监听原生标题栏按钮点击事件,参数为Object | App、H5 | |
| onBackPress | 监听页面返回,返回 event = {from:backbutton、 navigateBack} ,backbutton 表示来源是左上角返回按钮或 android 返回键;navigateBack表示来源是 uni.navigateBack ;详细说明及使用:onBackPress 详解 。支付宝小程序只有真机能触发,只能监听非navigateBack引起的返回,不可阻止默认行为。 |
app、H5、支付宝小程序 | |
| onNavigationBarSearchInputChanged | 监听原生标题栏搜索输入框输入内容变化事件 | App、H5 | 1.6.0 |
| onNavigationBarSearchInputConfirmed | 监听原生标题栏搜索输入框搜索事件,用户点击软键盘上的“搜索”按钮时触发。 | App、H5 | 1.6.0 |
| onNavigationBarSearchInputClicked | 监听原生标题栏搜索输入框点击事件 | App、H5 | 1.6.0 |
| onShareTimeline | 监听用户点击右上角转发到朋友圈 | 微信小程序 | 2.8.1+ |
| onAddToFavorites | 监听用户点击右上角收藏 | 微信小程序 | 2.8.1+ |
路由
/pages.json
{"pages": [{"path": "pages/home/home", // 页面路径"style": {"navigationBarTitleText": "首页", //设置页面标题文字"enablePullDownRefresh":true //开启下拉刷新}},],"globalStyle":{ // 全局外观配置"navigationBarTextStyle": "black", // 导航栏标题颜色"navigationBarTitleText": "钉家医", // 导航栏标题文字内容"navigationBarBackgroundColor": "#FFF", // 导航栏背景颜色"backgroundColor": "#F8F8F8" // 窗口的背景色 微信小程序},"tabBar": {"color": "#5D5C5C", // tab 上的文字默认颜色"selectedColor": "#1A8BFB", // tab 上的文字选中时的颜色"borderStyle": "black", // tabbar 上边框的颜色,仅支持 black/white"backgroundColor": "#ffffff", // tab 的背景色"list": [{"pagePath": "pages/home/home", // 页面路径,必须在 pages 中先定义"iconPath": "static/shouye22x.png", // 图片路径,icon 大小限制为40kb,建议尺寸为 81px * 81px,当 postion 为 top 时,此参数无效,不支持网络图片"selectedIconPath": "static/shouye2.png", // 选中时的图片路径,icon 大小限制为40kb,建议尺寸为 81px * 81px ,当 postion 为 top 时,此参数无效"text": "首页" // tab 上按钮文字},]}}
- tabBar 底部导航,如下图所示

钉钉专属tabbar
调用dd.setTabBarBadge为 tabBar 某一项的右上角添加文本。
dd.setTabBarBadge({index: 0,text: '新'})

修改后台服务地址
util/api.js
// const host = 'http://192.168.1.245/api' //测试const host = 'http://118.190.27.104:8291/api/' //正式
取 URL 上的参数
shop.vue 页面跳转代码如下
//服务详情navto_fwdetail(id){uni.navigateTo({url:'fwDetails?id='+id})},
fwDetails.vue 页面取值代码如下
onLoad(e) {this.id = e.id;},
轮播图集成
<view class="swiper"><swiper :indicator-dots="true" :autoplay="true" :interval="3000" :duration="1000" indicator-active-color="#fff"circular="true"><swiper-item v-for="(item,i) in banner" :key="i" ><view class="swiper-item" @click="toskip(item)"><image :src="$http.host()+item.imgUrl" mode="widthFix"></image></view></swiper-item></swiper></view>
- interval 自动切换时间间隔,单位毫秒
- duration 轮播图切换速度 ,单位毫秒
//轮播图getswiper() {this.$http.get('/banner/list', {userType: this.userType}).then(res => {console.log(res, '轮播图')this.banner = res})},
分类导航

<view class="shop_fwGoods_Nav"><scroll-view scroll-x><view class="fwGoods_Nav_part" :class="{ active: navI == index }" v-for="(item, index) in navList" @click="selectNav(item.id)">{{ item.name }}</view></scroll-view></view>
export default {data() {return {// 服务分类navList:[],navI: 0 //当前导航的下标};},}
小程序图片高度适应
widthFix
<image :src="$http.host()+item.imgUrl" mode="widthFix"></image>
富文本显示

<rich-text :nodes="contentNodes" class="richtext"></rich-text>
// 导入转换的包import parse from 'mini-html-parser2';data(){return{contentNodes:{},}},methods:{getServeProduct(){var id = this.id;this.$http.get('/shopServe/getServeProduct',{id:id}).then(res => {this.serveProduct = reslet string = res.content.replace(/\<img/gi, '<img style="max-width:100%;height:auto" ')parse(string, (err, htmlNodes) => {if (!err) {this.contentNodes = htmlNodes}})})},}
成功跳转
this.$http.post('/shopTask/submit').then(res => {console.log(res, '答题测试问题提交')if(res=='成功'){uni.navigateTo({url:'answerOver'})}})
util/api.js 封装http请求
// const host = 'http://dingjiayi.vaiwan.com/api' //本地const host = 'http://dingjiayi.cn1.utools.club/api' //测试// const host = 'http://118.190.27.104:8291/api/' //正式let Promises = PromisePromises.prototype.finally = function(callback) {let P = this.constructorreturn this.then(value => P.resolve(callback()).then(() => value),reason => P.resolve(callback()).then(() => {throw reason}))}class Https {host() {return host}request(url, method, data, type) {// console.log(data)const token = uni.getStorageSync('token')// console.log(token)uni.showLoading({title: '加载中'});return new Promises((resolve, reject) => {uni.request({// dd.httpRequest({url: host + url, // 接口地址method: method, // 接口类型data: {...data},header: {'token': token,'content-type': 'application/json' //'application/x-www-form-urlencoded'// 默认值},success: function(res) {uni.hideLoading() // 关闭加载中// console.log(res)if (res.data.code == 200) {resolve(res.data.data)} else {resolve(res.data.data)uni.showToast({title: res.data.message,icon: 'none',duration: 2000})}},fail: function(error) {uni.hideLoading() // 关闭加载中uni.showModal({title:'提示',content:error.errMsg,})reject(error)}})})uni.hideLoading() // 关闭加载中}get(url, data) {return this.request(url, 'GET', data, 0)}post(url, data) {return this.request(url, 'POST', data, 0)}postNoFormat(url, data) {return this.request(url, 'POST', data, 1)}// 上传图片upImg(tempFilePaths, count, length) {let timestamp = Date.parse(new Date()) // 获取时间戳return new Promises((resolve, reject) => {wx.showLoading({title: '正在上传第' + (Number(count) + 1) + '张'})wx.uploadFile({url: qiniuHost,filePath: tempFilePaths[count],name: 'file',formData: {token: uni.getStorageSync('qiniuToken'),key: timestamp + Math.floor(Math.random() * 10000) + '.png'},success(res) {let imgKey = JSON.parse(res.data).keyif (Number(count) + 1 === length) { // 上传完毕wx.showToast({title: '上传成功',icon: 'success',duration: 2000})}resolve(imgKey)},fail: function(error) {reject(error)}})})}// uniApiuniApi(params, data) {return new Promises((resolve, reject) => {params.events({...data,success(res) {resolve(res)},fail(err) {reject(err)}})})}}const https = new Https()export default https
加下拉刷新

onReachBottom() {if(this.jtlist.length < this.total) {this.pageNum++this.getlecturelist()}},
data 默认值的定义
- 根据后台后台数据是否显示,默认值给null
- 如果不是,默认值给0
代码如下
<view v-if="taskQuesStatus==0" class="submit_answer"><view class="submit_btn" @click="navto_over">提交</view></view><script>export default{data(){return{// 答题状态taskQuesStatus:null,}},onShow() {this.getTaskQuesStatus()},methods:{// 获取答题状态getTaskQuesStatus(){this.$http.get('/shopTask/getTaskQuesStatus').then(res => {console.log(res, '获取答题状态')this.taskQuesStatus = resthis.listTaskQues()})},}</script>
默认值给 0 的情况下

默认值给 null 的情况下

分页处理
<script>export default {data() {return {shopAddressList: [],pageNum:1,//分页isfenye:false,//判断是否有数据可以分页如果是false 则可以分页 true则不能分页}},// 页面滚动到底部的事件(不是scroll-view滚到底),常用于下拉下一页数据onReachBottom() {if(!this.isfenye){this.pageNum++this.listShopAddress()}},methods: {listShopAddress() {if(this.pageNum == 1){this.shopAddressList = []}this.$http.get('/shopAddress/listShopAddress',{pageNum:this.pageNum,pageSize:10}).then(res=>{console.log(res, '收货地址列表')// 根据后台框架返回的分页数据去改if(res.list.length<10){this.isfenye = true}// concat 是用于下拉刷新,每次加载的数据都得拼接上原数据this.shopAddressList = this.serveProductList.concat(res.list)})}}</script>
切换导航,数据记得清空

<template><view class="orderList_modular_Nav"><view class="orderList_modular_Nav_part" :class="{active:Navi==-1}" @click="nav(-1)">全部</view><view class="orderList_modular_Nav_part" :class="{active:Navi==1}" @click="nav(1)">待使用</view></view></template><script>export default {data() {return {Navi: 1,orderList: []}},methods: {nav(i) {this.Navi = ithis.orderList = []this.listOrder(i)},listOrder(i){}}</script>
uniapp 弹框出提醒消息
参考:https://uniapp.dcloud.io/api/ui/prompt?id=showtoast
uni.showToast({title: res.data.message,icon: 'none',duration: 2000,succcess:function(){// 注意:需要配置一个定时器,1.5秒后执行其他操作setTimeout(() => {_this.refresh();}, 1500);}})
| 参数 | 类型 | 必填 | 说明 | 平台差异说明 |
|---|---|---|---|---|
| title | String | 是 | 提示的内容,长度与 icon 取值有关。 | |
| icon | String | 否 | 图标,有效值详见下方说明。 | |
| image | String | 否 | 自定义图标的本地路径 | App、H5、微信小程序、百度小程序 |
| mask | Boolean | 否 | 是否显示透明蒙层,防止触摸穿透,默认:false | App、微信小程序 |
| duration | Number | 否 | 提示的延迟时间,单位毫秒,默认:1500 | |
| position | String | 否 | 纯文本轻提示显示位置,填写有效值后只有 title属性生效, 有效值详见下方说明。 |
App |
| success | Function | 否 | 接口调用成功的回调函数 | |
| fail | Function | 否 | 接口调用失败的回调函数 | |
| complete | Function | 否 | 接口调用结束的回调函数(调用成功、失败都会执行) |
icon 值说明
| 值 | 说明 | 平台差异说明 |
|---|---|---|
| success | 显示成功图标,此时 title 文本最多显示 7 个汉字长度。默认值 | |
| loading | 显示加载图标,此时 title 文本最多显示 7 个汉字长度。 | 支付宝小程序不支持 |
| none | 不显示图标,此时 title 文本在小程序最多可显示两行, App仅支持单行显示。 |
弹出成功后调用js方法
用 let _this = this ,调用方法的时候用 _this
sure(id) {// 确认核销订单this.$http.get('/shopServe/updateOrderStatus', {orderId: id}).then(res => {console.log(res, '确认核销订单')let _this=thisif (res == 'ok') {uni.showToast({title: '核销成功',icon: 'none',duration: 2000,success: function() {// 注意:需要配置一个定时器,1.5秒后执行其他操作setTimeout(() => {_this.listOrder()}, 1500);}}})}})},
动态设置当前页面的标题

https://uniapp.dcloud.io/api/ui/navigationbar
// editAddress.vueonLoad(e) {var title = "添加收货地址"if(e.id){title = "编辑收货地址"}// 钉钉微应用(h5)不支持 钉钉微应用(h5)参考uni.setNavigationBarTitle({title: title});},
因为在onLoad内执行需要延迟一小段时间,在 pages.json 配置路由不要命名
{"path": "pages/shop/editAddress","style": {// 无名氏"navigationBarTitleText": ""}},
钉钉页面导航标题一直不变
兼容性问题
https://ding-doc.dingtalk.com/document/app/set-the-navigation-bar-title
dd.js
setTitle(title){dd.biz.navigation.setTitle({title : title,//控制标题文本,空字符串表示显示默认文本onSuccess : function(result) {/*结构{}*/},onFail : function(err) {}});}
页面引用 onReady
onReady(){this.$dd.setTitle("首页")},
跳转页面会出现 undefined
在最上层 view 加上 v-if = 'xxx!=null'
小程序编译后,直接进入某个页面


钉钉支付宝支付
| 返回码 | 含义 |
|---|---|
| 9000 | 订单支付成功 |
| 8000 | 正在处理中,支付结果未知(有可能已经支付成功),请通过 alipay.trade.query 接口查询订单支付状态 |
| 4000 | 订单支付失败 |
| 6001 | 用户中途取消 |
| 6002 | 网络连接出错 |
| 6004 | 支付结果未知(有可能已经支付成功),请通过 alipay.trade.query 接口查询订单支付状态 |
| 其他 | 其他支付错误 |
dd.biz.alipay.pay({info: 'xxxx', // 订单信息,onSuccess: function (result) {{memo: 'xxxx', // 保留参数,一般无内容result: 'xxxx', // 本次操作返回的结果数据resultStatus: '' // 本次操作的状态返回值,标识本次调用的结果}},onFail: function (err) {}});
钉钉弹框提醒
dd.alert({content:JSON.stringify(res)})
页面单独显示一张图片

<template><view class="box"><image class="img" src="https://i.loli.net/2021/01/30/b2J5d9ePGNatzWY.png" mode="widthFix" ></image></view></template><style lang="scss" scoped>.box {padding: 0;position: relative;}.box .img {width: 100%;height: 100%;}</style>
注意: widthFix 和 aspectFill 的区别
- widthFix 宽度不变,高度自动变化,保持原图宽高比不变
- aspectFill 保持纵横比缩放图片,只保证图片的短边能完全显示出来。也就是说,图片通常只在水平或垂直方向是完整的,另一个方向将会发生截取。
App.vue
通用css 都可以放在这,其他页面都可以引用
内网穿透报错
Invalid Host header
manifest.json 添加一下代码:
"h5" : {"uniStatistics" : {"enable" : false},"devServer": {//解决127.0.0.1指向其他域名时出现"Invalid Host header"问题"disableHostCheck": true}},
集成钉钉h5微应用
- 如果报下面的错误,项目需要初始化

npm init# 一直回车即可
- 安装
dingtalk-jsapi
npm install dingtalk-jsapi --save
util目录创建一个dd.js
import * as dd from 'dingtalk-jsapi'export default{getCode(callback) {let corpId = 'ding81c870a3d9410366a1320dcb25e91351'// alert(dd.env.platform)if (dd.env.platform !== 'notInDingTalk') {dd.runtime.permission.requestAuthCode({corpId: corpId,onSuccess: function(result) {/*{code: 'hYLK98jkf0m' //string authCode}*/alert(result.code);callback(result.code)},onFail : function(err) {alert('err'+err);}});}}}
main.js引入dd.js
import dd from './util/dd.js' //引入dingtalk.jsVue.prototype.$dd = dd // dingtalk.js
home.vue使用
this.$dd.getCode(code=>{console.log(code)})
自定义导航栏使用注意

pages.json 在 globalStyle 添加以下代码
"globalStyle": {# custom即取消默认的原生导航栏"navigationStyle":"custom"}

uniapp 存储本地数据缓存
- 存 setStorageSync
uni.setStorageSync('token',token)
- 取 getStorageSync
uni.getStorageSync('token')
uniapp 跳转其他页面
- 配置路由
pages.json
{"path": "pages/home/report","style": {"navigationBarTitleText": "报表"}}
- 跳转页面
uni.navigateTo({url: 'report'})
页面通讯
先定义,再回传,比如选择申请人,弹出一个申请人列表,然后把勾选的申请人ids回传回来。
// 我的页面onLoad(){// 监听事件uni.$on('login',(usnerinfo)=>{this.usnerinfo = usnerinfo;})},onUnload() {// 移除监听事件uni.$off('login');},
进入登陆页面,触发事件
// 登陆页面uni.$emit('login', {avatarUrl: 'https://img-cdn-qiniu.dcloud.net.cn/uploads/nav_menu/10.jpg',token: 'user123456',userName: 'unier',login: true});
画页面的时候 加一个边框
border: 1px red solid;
增加下拉刷新事件
vue 页面
onPullDownRefresh(){this.listChangeWorkRecord();},
pages.json
{"path": "pages/home/home","style": {"navigationBarTitleText": "首页",// 在 style 选项中开启 enablePullDownRefresh"enablePullDownRefresh":true}},
自定义 uni-app 弹框样式

H5 弹窗解决思路,全局修改 uni.showModal 弹窗样式
App.vue 添加以下代码
<style>/*每个页面公共css */.uni-modal .uni-modal__bd{// CSS3 内容对齐开始边界text-align: start;}</style>
PopUp 弹出层

代码如下:
<view class="report_bottom"><view @click="$refs.popu.open()"><text>值班注意事项</text></view></view><uni-popup ref="popu"><view class="popu-box" ><scroll-view scroll-y="true" class="popu-content"><view v-html="content"></view></scroll-view><view class="model-close" @click="$refs.popu.close()" ><image src="/static/img/cha@2x.png"></image></view></view></uni-popup>
data() {return {content:"",};}
uni-app页面滑到一定距离固定某个元素在顶部,如导航栏
效果如图所示

代码如下
<view class="report_table" :style="isTop == 1 ? 'position:fixed;background:#FFFFFF;z-index:9;top:0' :''"><view class="head head1">值班日期</view><view class="head head2">带班领导</view><view class="head head3">值班人员</view><view class="head head4">值班车辆</view></view>
data() {return {isTop: 0,};},mounted() {console.log('mounted 组件挂载完毕状态===============》');const query = uni.createSelectorQuery().in(this);query.select('.report_table').boundingClientRect(data => {// console.log("得到布局位置信息" + JSON.stringify(data));// console.log("节点离页面顶部的距离为" + data.top);this.myScroll = data.top - 3}).exec();},// 监听页面滚动onPageScroll: function(e) {if (e.scrollTop >= this.myScroll) {this.isTop = 1} else {this.isTop = 0}},
日期选择器


代码如下:
<!-- fields=year 显示年 --><picker @change="changeDate" mode="date" fields="year">{{dateStr}}</picker><!-- fields=month 显示月份 --><picker @change="changeDate" mode="date" fields="month">{{dateStr}}</picker><!-- 默认显示天 --><picker @change="changeDate" mode="date" >{{dateStr}}</picker>
data(){return {dateStr:'2021-02-01',};},methods:{changeDate(event){this.dateStr = event.detail.value;},}
tabbar 在 h5 端高度问题
.box{min-height: calc(100vh - 100rpx);}
tabbar常见问题 https://uniapp.dcloud.io/collocation/pages?id=tips-tabbar
input @confirm事件
代码如下:
<input class="txt" v-model="userName" @confirm="getReport()" placeholder="搜索"></input>
隐藏键盘框、隐藏软键盘
uni.hideKeyboard();
PC适配
宽屏适配指南
在根目录新增 postcss.config.js 文件
// postcss.config.jsconst path = require('path')module.exports = {parser: 'postcss-comment',plugins: {'postcss-import': {resolve(id, basedir, importOptions) {if (id.startsWith('~@/')) {return path.resolve(process.env.UNI_INPUT_DIR, id.substr(3))} else if (id.startsWith('@/')) {return path.resolve(process.env.UNI_INPUT_DIR, id.substr(2))} else if (id.startsWith('/') && !id.startsWith('//')) {return path.resolve(process.env.UNI_INPUT_DIR, id.substr(1))}return id}},'autoprefixer': {overrideBrowserslist: ["Android >= 4", "ios >= 8"],remove: process.env.UNI_PLATFORM !== 'h5'},// 借助postcss-px-to-viewport插件,实现rpx转px,文档:https://github.com/evrone/postcss-px-to-viewport/blob/master/README_CN.md// 以下配置,可以将rpx转换为1/2的px,如20rpx=10px,如果要调整比例,可以调整 viewportWidth 来实现'postcss-px-to-viewport': {unitToConvert: 'rpx',viewportWidth: 200,unitPrecision: 5,propList: ['*'],viewportUnit: 'px',fontViewportUnit: 'px',selectorBlackList: [],minPixelValue: 1,mediaQuery: false,replace: true,exclude: undefined,include: undefined,landscape: false},'@dcloudio/vue-cli-plugin-uni/packages/postcss': {}}}
pages.json 添加以下内容
"globalStyle": {// rpx 计算所支持的最大设备宽度,单位 px,默认值为 960"rpxCalcMaxDeviceWidth": 960,// rpx 计算使用的基准设备宽度,设备实际宽度超出 rpx 计算所支持的最大设备宽度时将按基准宽度计算,单位 px,默认值为 375"rpxCalcBaseDeviceWidth": 375,// rpx 计算特殊处理的值,始终按实际的设备宽度计算,单位 rpx,默认值为 750"rpxCalcIncludeWidth": 750},
换行
// 在长单词或 URL 地址内部进行换行word-wrap:break-word
运行app


在uni回调里面不能用this
需要在外面单独定义一个 let _this = this , 然后用 _this
let _this = this;uni.login({onlyAuthorize:true,provider: 'weixin',success: function (loginRes) {var code = loginRes.code;login_pwd({username: code,loginType: 3,loginSource: 3}).then(res => {console.log('登录成功',res);_this.toast('登录成功');// 将token保存到vuex中_this.saveToken(res.data.access_token);});});},fail: function (err) {console.log(err,'loginByWx fail');}});},
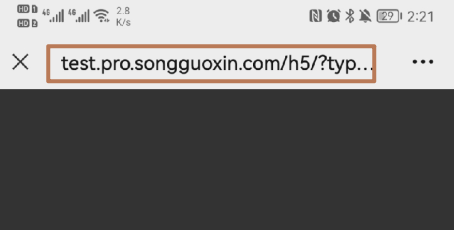
uni.previewImage 在h5下页面标题变为http://xxxx/#/preview-image
点击图片预览
预期结果:
预览图片页面的页面标题使用全局配置的标题
实际结果:
显示的是http://xxxx/#/preview-image
bug描述:
在浏览器环境下使用 uni.previewImage 预览图片页面标题变为http://xxxx/#/preview-image。
解决方案:
是由于 Vue2 实现 previewImage 是路由跳转,title会跟着改变。你可以自己处理一下 document.title
uni.previewImage({current: e,urls: this.imglist,success(){setTimeout(()=>{document.title = '图片预览'}, 0)}})

