疑问
我们知道,本质上,React Router 就是在url变化的时候,通过我们配置的路由path去匹配,然后渲染对应的组件
那么从这句话中,我们可以知道,Router要做以下几件事情:
- 如何监听url变化?
- 如何做到局部更新?
- 如何匹配path,按照什么规则?
- 渲染对应的匹配组件
那么我就围绕这几个问题一起看看源码吧
思考:如何自己实现?
在看源码之前,我想自己来实现下,第一步解决局部刷新,局部刷新有两种方案:一种是hash,一种是H5的API history。二者的主要差别在于对 URL 监听部分的不同,hash 模式监听 URL 的 hash 部分,也就是 # 号后面部分的变化。
hash模式
对于 hash 的监听,浏览器提供了 onHashChange 事件帮助我们直接监听 hash 的变化,话不多少,上代码
<body><a href="#/home">Home</a><a href="#/user">User</a><a href="#/about">About</a><div id="view"></div></body><script>// onHashChange事件回调, 匹配路由的改变并渲染对应内容function onHashChange() {const view = document.getElementById('view')switch (location.hash) {case '#/home':view.innerHTML = 'Home';break;case '#/user':view.innerHTML = 'User';break;case '#/about':view.innerHTML = 'About';break;}}// 绑定hash变化事件,监听路由变化window.addEventListener('hashchange', onHashChange);</script>
hash 模式的实现比较简单,我们通过 hashChange 事件就能直接监听到路由 hash 的变化,并根据匹配到的 hash 的不同来渲染不同的内容。
history模式
先了解一下 H5 的几个 history API 的基本用法。其实 window.history 这个全局对象在 HTML4 的时代就已经存在,只不过那时我们只能调用 back()、go()等几个方法来操作浏览器的前进后退等基础行为,而 H5 新引入的 pushState()和 replaceState()及 popstate事件 ,能够让我们在不刷新页面的前提下,修改 URL,并监听到 URL 的变化,为history 路由的实现提供了基础能力
// 几个 H5 history API 的用法History.pushState(state, title [, url])// 往历史堆栈的顶部添加一个状态,方法接收三个参数:一个状态对象, 一个标题, 和一个(可选的)URL// 简单来说,pushState能更新当前 url,并且不引起页面刷新History.replaceState(stateObj, title[, url]);// 修改当前历史记录实体,方法入参同上// 用法和 pushState类似,区别在于 pushState 是往页面栈顶新增一个记录,而 replaceState 则是修改当前记录window.onpopstate// 当活动历史记录条目更改时,将触发popstate事件// 需要注意的是,pushState 和 replaceState 对 url 的修改都不会触发onpopstate// 它只会在浏览器某些行为下触发, 比如点击后退、前进按钮、a标签点击等
控制台开始时 url是history结尾 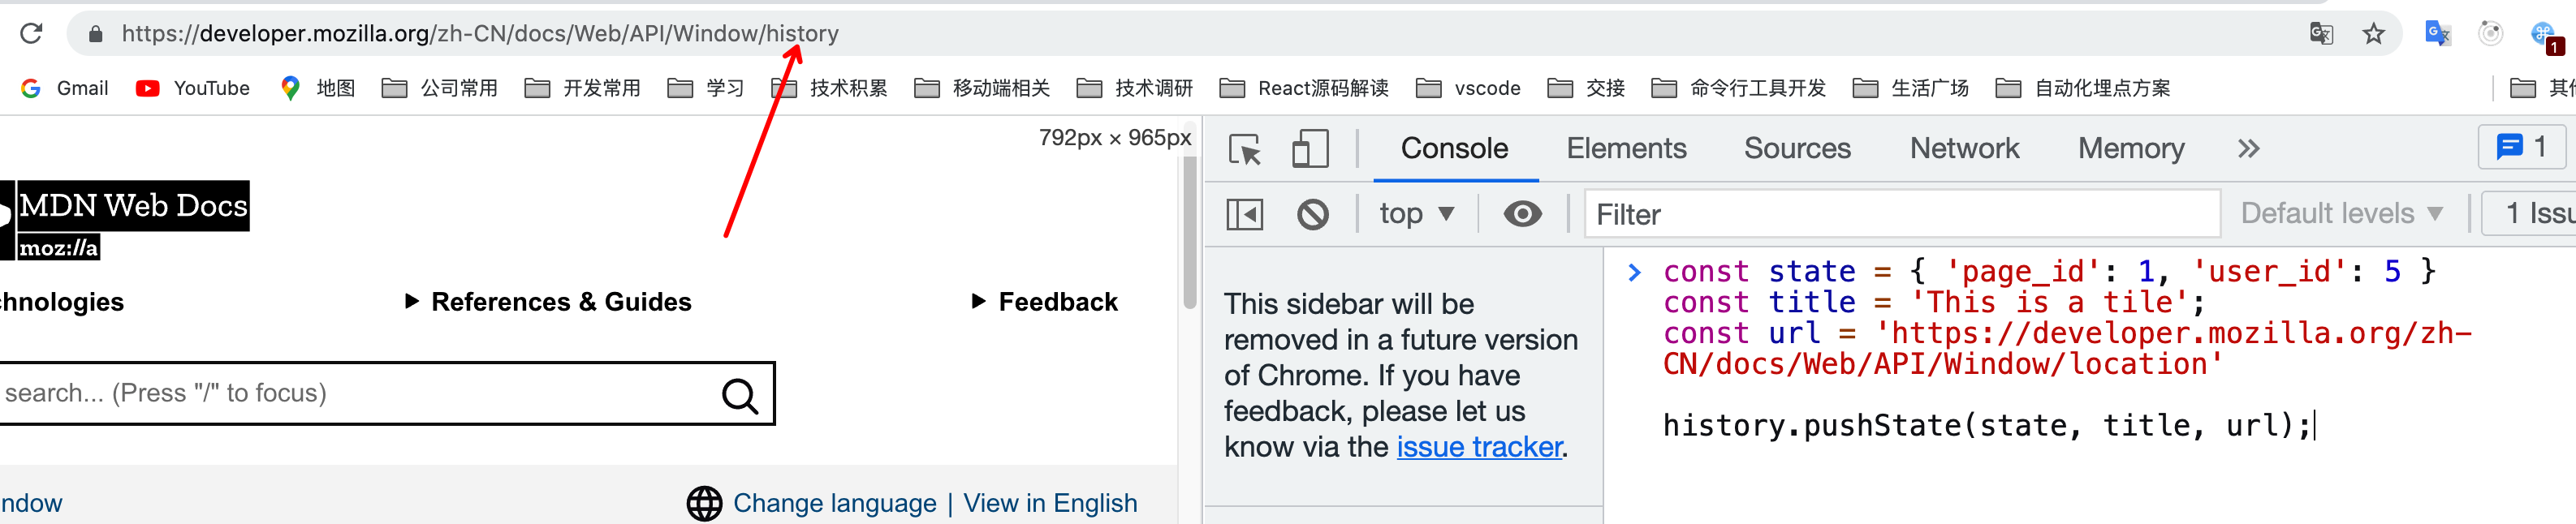
执行面板中的代码后,url变成location,且history中length会+1,state对象被存贮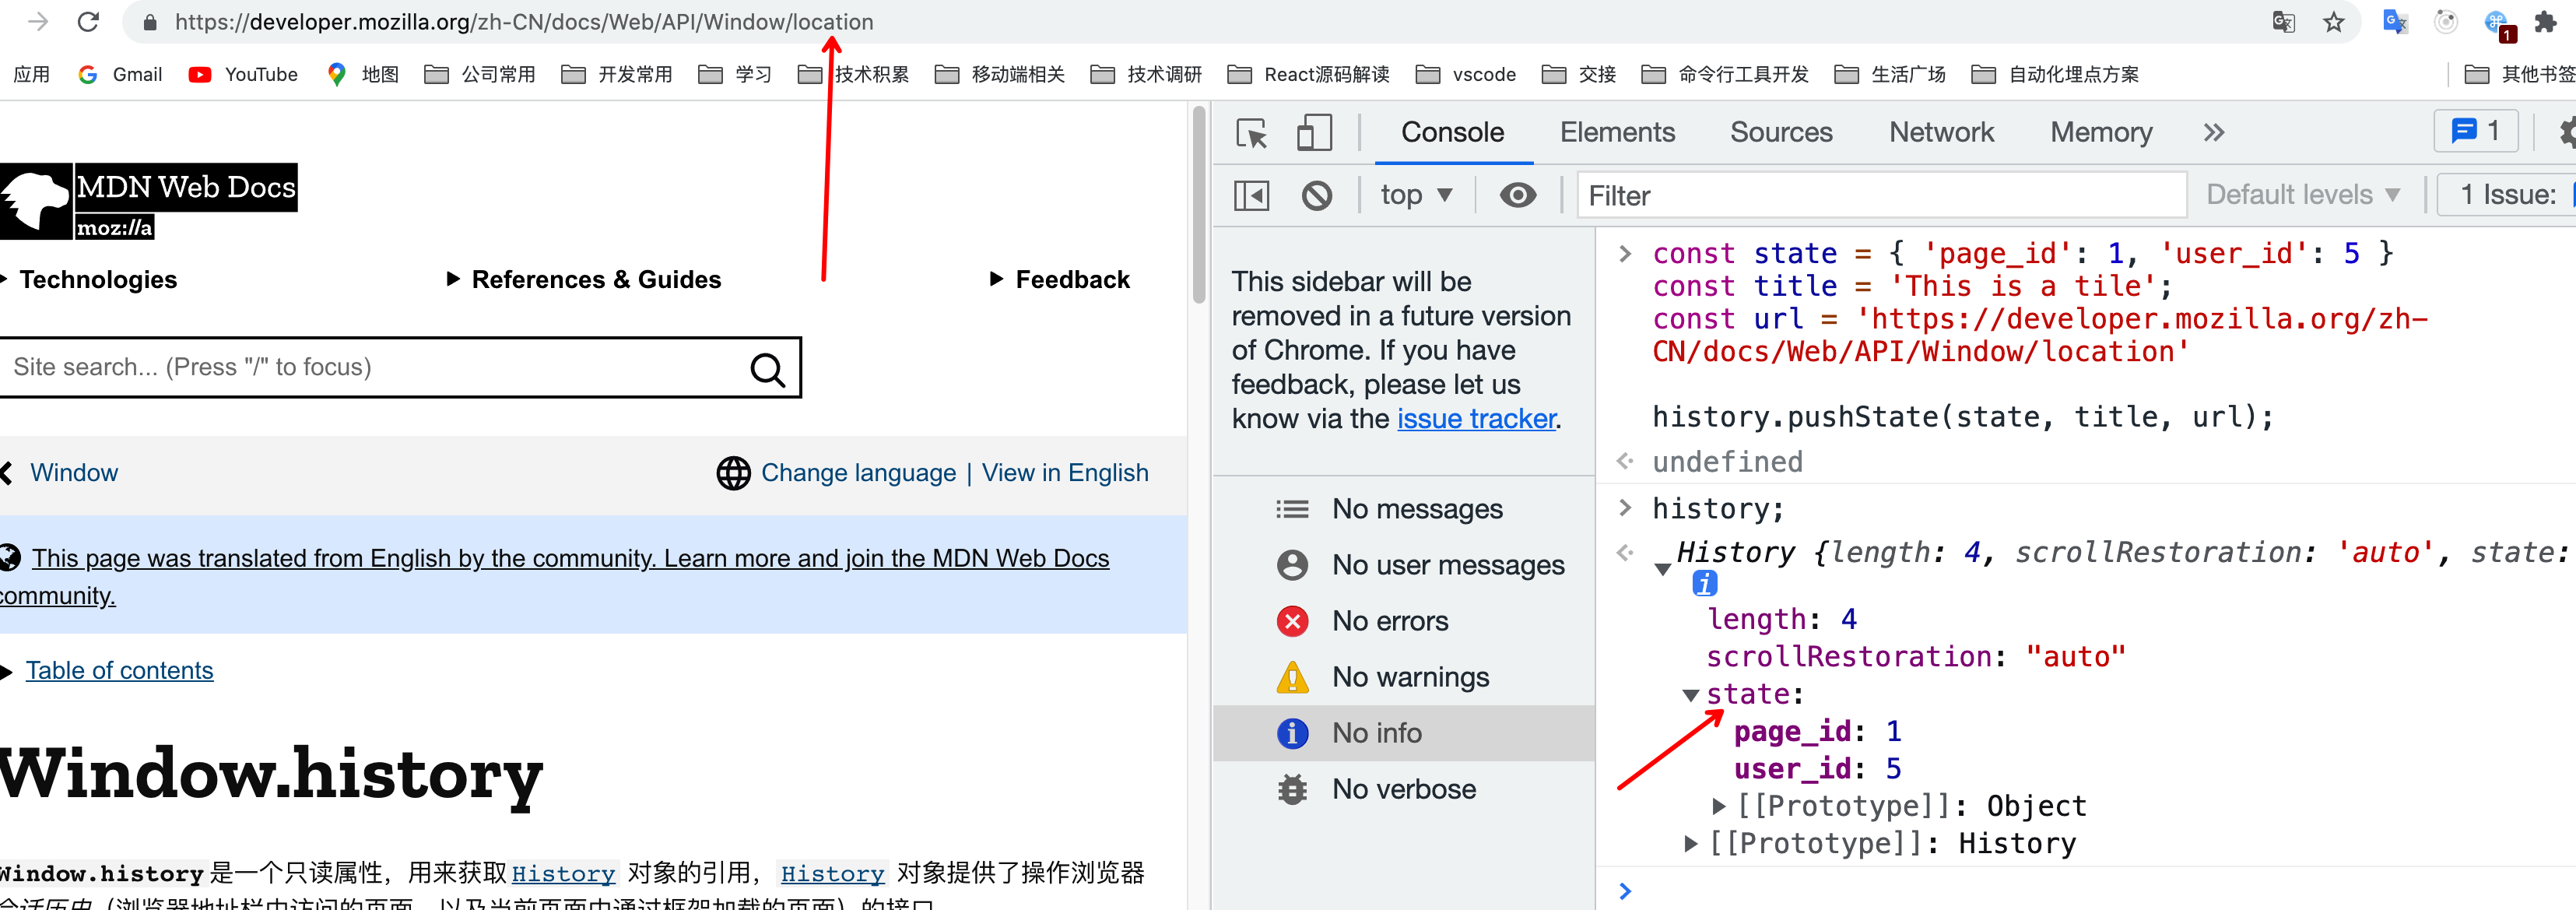
对于history是有会话栈这个概念的
下图中,我有执行了pushState,发现history的长度+1,state是最新的会话状态
当我执行back操作时,相当于是后退,也就是向前一个会话移动
执行forward的时候,相当于前进,也就是向后一个会话移动

为了方便理解,画了个图: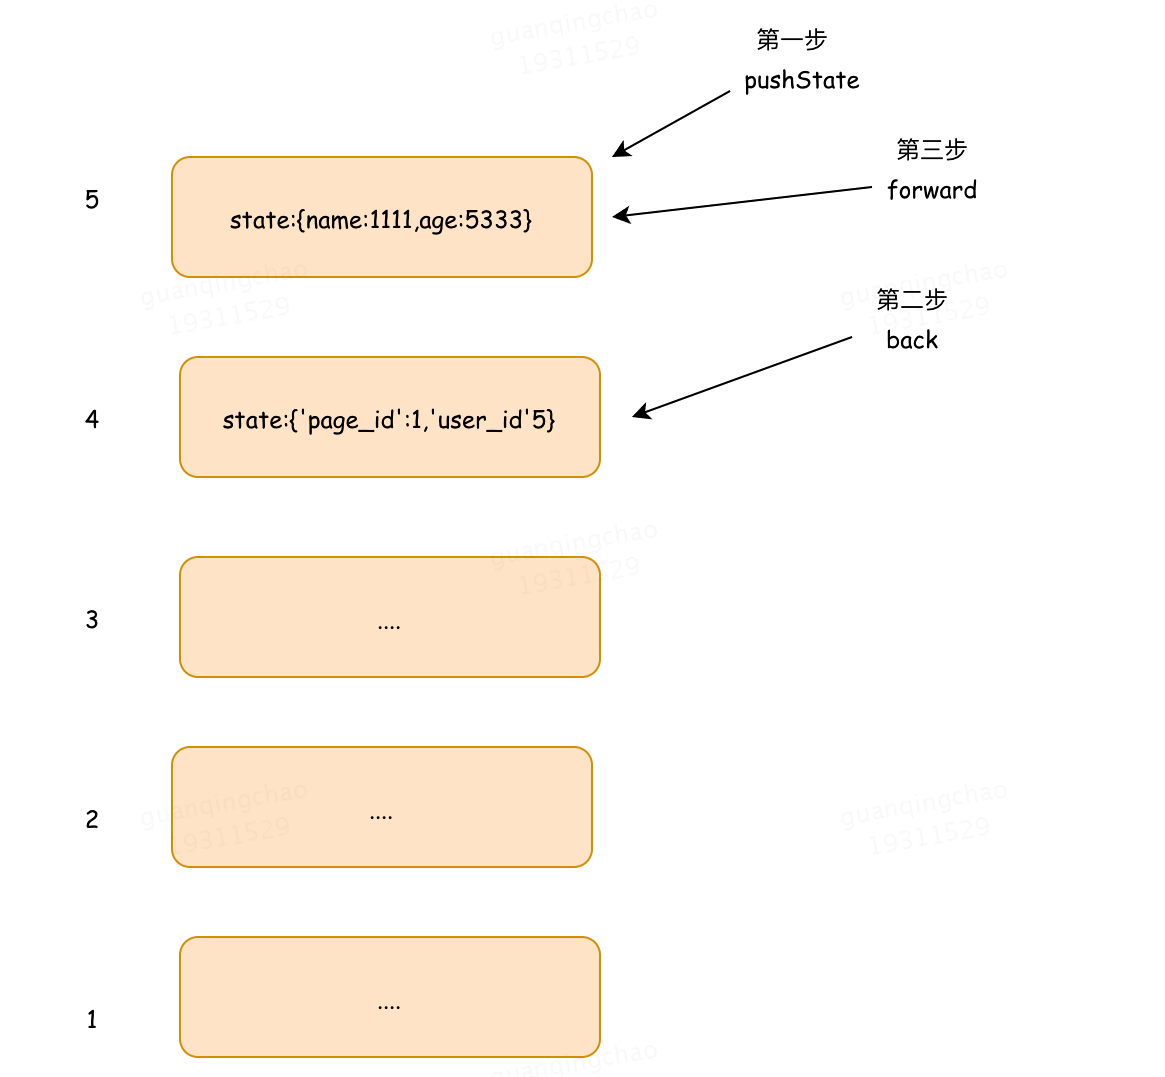
关于history的api不再展开,下面来看下如何 利用history来实现路由。
history模式的url不带#
<body><a href="/home">Home</a><a href="/user">User</a><a href="/about">About</a><div id="view"></div></body>
我们知道a标签会默认跳转到href,如果要实现路由匹配,那么需要处理:
1.拦截 a 标签 的点击事件,阻止它的默认跳转行为
2.使用 H5 的 history API 更新 URL
3.监听和匹配路由改变以更新页面
<body>
    <a href="/home">Home</a>
    <a href="/user">User</a>
    <a href="/about">About</a>
    <div id="view"></div>
</body>

<script>
    // 1. 第一步 重写所有 a 标签事件
    const elements = document.querySelectorAll('a[href]')
    elements.forEach(el => el.addEventListener('click', (e) => {
      e.preventDefault()    // 阻止默认点击事件
      const test = el.getAttribute('href')
      history.pushState(null, null, el.getAttribute('href'))
      // 由于pushState不会触发onpopstate事件, 所以我们需要手动触发事件
      onPopState()
    }))

    // 2. 第二步 处理规则匹配和渲染
    function onPopState() {
        const view = document.querySelector('#view')
        switch (location.pathname) {
          case '/home':
              view.innerHTML = 'Home';
              break;
          case '/user':
              view.innerHTML = 'User';
              break;
          case '/about':
              view.innerHTML = 'About';
              break;
        }
    }
    // 3. 第三步 绑定onpopstate事件, 当页面路由发生更改时(如前进后退),将触发popstate事件
    window.addEventListener('popstate', onPopState);
</script>
我们自己实现了一个简易的demo,整体的思路是正确的。
那么我们就开始看看源码吧!
源码解读
基于v6.0.2版本
├── packages
    ├── react-router    // 核心、公用代码
    ├── react-router-dom   // 浏览器环境路由
    └── react-router-native   // React Native 路由
可以看到,有3个包。
react-router-dom 461行代码,在react-router的核心基础上,添加了用于跳转的Link组件,和histoy模式下的BrowserRouter和hash模式下的HashRouter组件等。所谓BrowserRouter和HashRouter,也只不过用了history库中createBrowserHistory和createHashHistory方法
react-router 1334行代码 可以理解为是react-router-dom的核心,里面封装了Router,Routes,Route,Outlet,useXXX等核心组件,实现了从路由的改变到组件的更新的核心功能,在我们的项目中只要一次性引入react-router-dom就可以了。
react-router-native React native路由,不是我们探讨的重点
history 额外重点提一下这个库,可以理解为react-router的核心,也是整个路由原理的核心,里面集成了popState,history.pushState等底层路由实现的原理方法。 history
BrowserRouter HashRouter都是history中生成的,我们先看下history这个库吧。
History
源码仓库: https://github.com/remix-run/history
先来看 history 库,这里的 history 并非 H5 的 history 对象,而是一个有着 7k+ star 的会话历史管理库,是 React Router 的核心依赖。本小节我们来看 history 库的用法,以及了解为什么 React Router 要选择 history 来管理会话历史。
在看具体用法之前,我们先思考一下我们的”会话历史管理”的需求。所谓会话历史管理,我们很容易想到维护一个页面访问历史栈,跳转页面的时候 push 一个历史,后退 pop 一个历史即可。不过我们通过第一节对 hash 和 history 路由的原生实现就能明白,不同路由模式之间,操作会话历史的 API 不同、监听会话历史的方式也不同,而且前端路由并不只有这两种模式,React Router 还提供了 memory 模式 static 模式,分别用于 RN 开发和 SSR。
所以我们希望在中间加一层抽象,来屏蔽几种模式之间操作会话历史的差别,而不是将这些差别和判断带进 React Router 的代码中。
- A “browser history” is for use in modern web browsers that support the HTML5 history API (see cross-browser compatibility)
- A “hash history” is for use in web browsers where you want to store the location in the hash portion of the current URL to avoid sending it to the server when the page reloads
- A “memory history” is used as a reference implementation that may be used in non-browser environments, like React Native or tests
history有3种,browser history基于HTML5 history API,hash history 基于hash,memory history
打印history,可以看到有action、back、push、replace、forward、go等方法
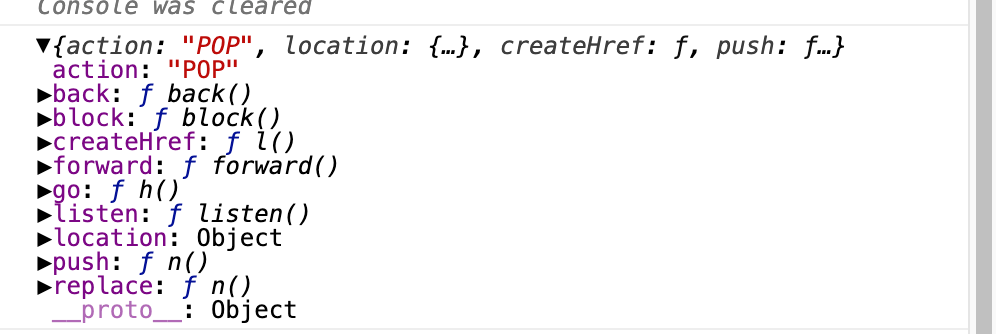
属性
action: PUSH POP REPLACE
location: 是window.location的子集 包含 location.pathname/search/hash/state/key
方法
[history.push(to: To, state?: State)](https://github.com/ReactTraining/history/blob/master/docs/api-reference.md#history.push)- Pushes a new location onto the history stack[history.replace(to: To, state?: State)](https://github.com/ReactTraining/history/blob/master/docs/api-reference.md#history.replace)- Replaces the current location with another[history.go(delta: number)](https://github.com/ReactTraining/history/blob/master/docs/api-reference.md#history.go)- Changes the current index in the history stack by a given delta[history.back()](https://github.com/ReactTraining/history/blob/master/docs/api-reference.md#history.back)- Navigates one entry back in the history stack[history.forward()](https://github.com/ReactTraining/history/blob/master/docs/api-reference.md#history.forward)- Navigates one entry forward in the history stack
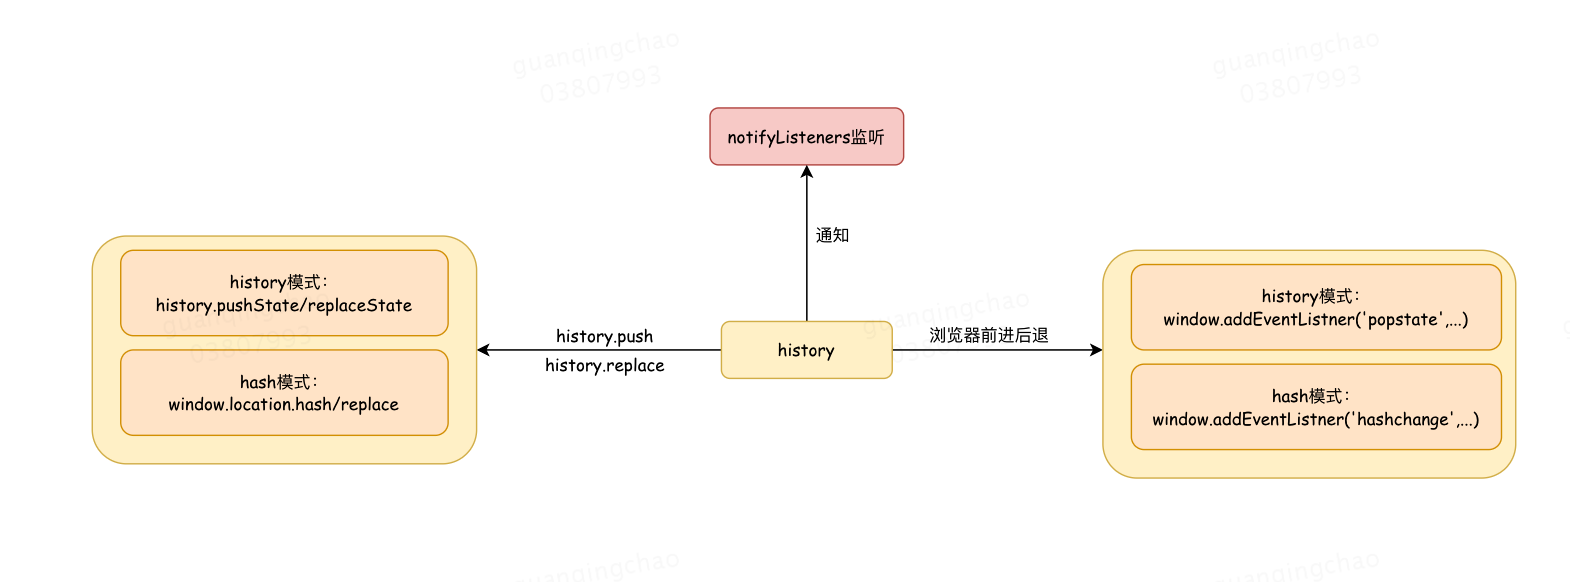
history模式
改变路由:history.pushState(state,title,path) || history.replaceState(state,title,path)
监听路由: window.addEventListener(‘popstate‘,function(e){ / 监听改变 /})
注意⚠️的是:用 history.pushState() 或者 history.replaceState() 不会触发 popstate 事件。 popstate 事件只会在浏览器某些行为下触发, 比如点击后退、前进按钮或者调用 history.back()、history.forward()、history.go()方法。
hash模式
改变路由: window.location.href | window.location.replace来改变路由
监听路由:window.addEventListener(‘hashchange’,function(e){ / 监听改变 /}
React Router源码
下面我进入正题,看下Router源码吧!Router中对外暴露的API都是从react-router-dom中的导出的。
import {
  MemoryRouter,
  Navigate,
  Outlet,
  Route,
  Router,
  Routes,
  createRoutesFromChildren,
  generatePath,
  matchRoutes,
  matchPath,
  resolvePath,
  renderMatches,
  useHref,
  useInRouterContext,
  useLocation,
  useMatch,
  useNavigate,
  useNavigationType,
  useOutlet,
  useParams,
  useResolvedPath,
  useRoutes
} from "react-router";

export {
  MemoryRouter,
  Navigate,
  Outlet,
  Route,
  Router,
  Routes,
  createRoutesFromChildren,
  generatePath,
  matchRoutes,
  matchPath,
  renderMatches,
  resolvePath,
  useHref,
  useInRouterContext,
  useLocation,
  useMatch,
  useNavigate,
  useNavigationType,
  useOutlet,
  useParams,
  useResolvedPath,
  useRoutes
};

HashRoute
BrowserRoute
Link
NavLink
useSearchParam
可以看到,大多数都是从react-router的包中导入的,在基础上实现了Link、NavLink、HashRoute、BrowserRoute等
BrowserRouter/HashRouter
很简单,实例化history,BrowserRouter将history和children等传给Router
export function BrowserRouter({
  basename,
  children,
  window
}: BrowserRouterProps) {

  let historyRef = React.useRef<BrowserHistory>();
  if (historyRef.current == null) {
    historyRef.current = createBrowserHistory({ window });
  }
  //创建history
  let history = historyRef.current;

  //从history中获取action和location
  let [state, setState] = React.useState({
    action: history.action,
    location: history.location
  });
  //在每次浏览器渲染之前监听
  React.useLayoutEffect(() => history.listen(setState), [history]);

  // 将props中的basename、children以及location、action等信息传递给Router
  return (
    <Router
      basename={basename}
      children={children}
      location={state.location}
      navigationType={state.action}
      navigator={history}
    />
  );
}
HashRouter做的事情基本差不多,只不过创建的时候调用的是不同的API createHashHistory
export function HashRouter({ basename, children, window }: HashRouterProps) {
  let historyRef = React.useRef<HashHistory>();
  if (historyRef.current == null) {
    historyRef.current = createHashHistory({ window });
  }

  let history = historyRef.current;
  let [state, setState] = React.useState({
    action: history.action,
    location: history.location
  });

  React.useLayoutEffect(() => history.listen(setState), [history]);

  return (
    <Router
      basename={basename}
      children={children}
      location={state.location}
      navigationType={state.action}
      navigator={history}
    />
  );
}
Router
沿着Router继续往下看
export function Router({
  basename: basenameProp = "/",
  children = null,
  location: locationProp,
  navigationType = NavigationType.Pop,
  navigator,
  static: staticProp = false
}: RouterProps): React.ReactElement | null {

  // 对传入的basename进行规范 例如'v2'=> '/v2' 或者 '/v2/'=>'/v2'
  let basename = normalizePathname(basenameProp);

  let navigationContext = React.useMemo(
    () => ({ basename, navigator, static: staticProp }),
    [basename, navigator, staticProp]
  );
  //parsePath是history中的方法,将url转成对象  一个包含了 pathname,search,hash 的对象
  if (typeof locationProp === "string") {
    locationProp = parsePath(locationProp);
  }

  let {
    pathname = "/",
    search = "",
    hash = "",
    state = null,
    key = "default"
  } = locationProp;

  let location = React.useMemo(() => {
    //保证pathname中包含basename 且最后从pathname中切除basename
    let trailingPathname = stripBasename(pathname, basename);

    if (trailingPathname == null) {
      return null;
    }

    return {
      pathname: trailingPathname,
      search,
      hash,
      state,
      key
    };
  }, [basename, pathname, search, hash, state, key]);


  if (location == null) {
    return null;
  }

  return (
    <NavigationContext.Provider value={navigationContext}>
      <LocationContext.Provider
        children={children}
        value={{ location, navigationType }}
      />
    </NavigationContext.Provider>
  );
}
Router主要做了:
- 监听路由变化,通知改变location,改变组件。
- 将children(这里指Router中子组件,包含Routes、Route、Oulet等等)包裹在 navigation和location的context中
Routes
我们知道Routes替代了Switch,Switch会找到第一个匹配的path进行渲染,Routes
第一语义上更加友好,第二Routes实现了全新的路由查找算法。
由于V5中的路由算法是渲染第一个命中的路由组件,开发者在使用时需要进行手动排序来展示组件优先级。V6中的路由匹配算法更加智能、强大,会通过计算比较返回优先级高的路由组件
来看看Routes做了啥?
export function Routes({
  children,
  location
}: RoutesProps): React.ReactElement | null {
  return useRoutes(createRoutesFromChildren(children), location);
}
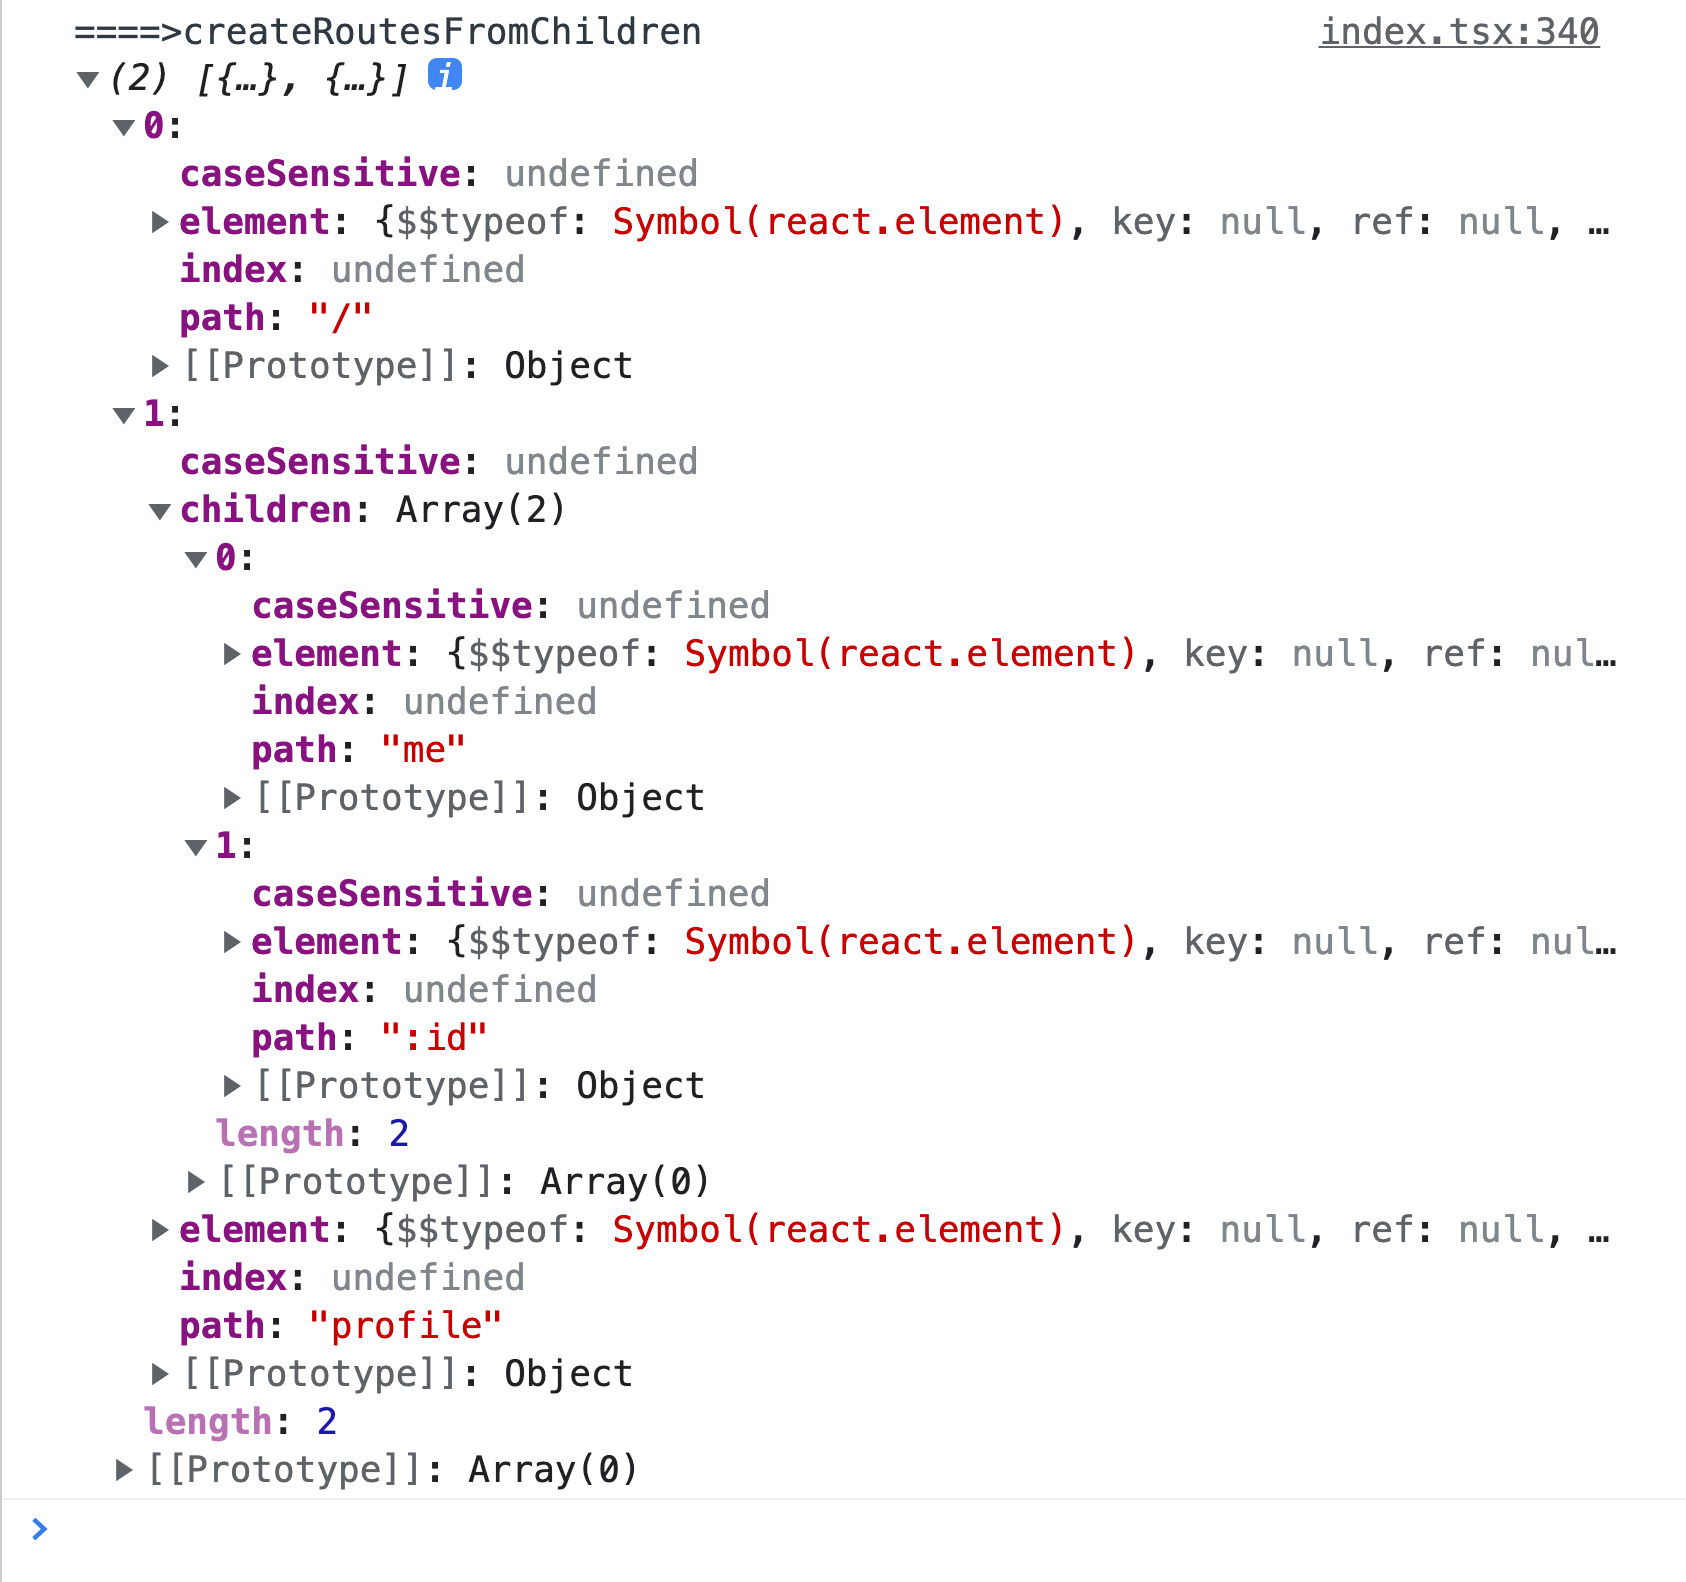
这里的useRoutes很眼熟,还记得 V6新玩法中useRoutes代替react-router-config,用于将router config转成JSX的Route。这里我可以猜测到,这里的useRoutes应该是做同样的事情,那么可想而知,createRoutesFromChildren应该是将child转成 router config的对象。
没错,createRoutesFromChildren主要做的事情就是根据
export function createRoutesFromChildren(
  children: React.ReactNode
): RouteObject[] {
  let routes: RouteObject[] = [];

  React.Children.forEach(children, element => {
    if (!React.isValidElement(element)) {
      return;
    }

    if (element.type === React.Fragment) {
      // Transparently support React.Fragment and its children.
      routes.push.apply(
        routes,
        createRoutesFromChildren(element.props.children)
      );
      return;
    }

    let route: RouteObject = {
      caseSensitive: element.props.caseSensitive,
      element: element.props.element,
      index: element.props.index,
      path: element.props.path
    };

    if (element.props.children) {
      route.children = createRoutesFromChildren(element.props.children);
    }

    routes.push(route);
  });

  return routes;
}
    <Routes>
        <Route exact path="/" element={<Home />} />
        {/**这里路径 可以是profile 也可以是profile/*  */}
        <Route path="profile" element={<Profile />}>
          <Route path={`me`} element={<Profile1 />} />
          <Route path={`:id`} element={<Profile2 />} />
        </Route>
      </Routes>
useRoutes
export function useRoutes(
  routes: RouteObject[],
  // Routes没传入locationArg,这个我们忽略掉
  locationArg?: Partial<Location> | string
): React.ReactElement | null {

  //1. 获取parentMatches最后一项routeMatch
  const { matches: parentMatches } = React.useContext(RouteContext);

  const routeMatch = parentMatches[parentMatches.length - 1];
  const parentParams = routeMatch ? routeMatch.params : {};
  const parentPathnameBase = routeMatch ? routeMatch.pathnameBase : "/";


  //2. LocationContext 获取location
  const locationFromContext = useLocation();

  let location;
  if (locationArg) {
    const parsedLocationArg =
      typeof locationArg === "string" ? parsePath(locationArg) : locationArg;

    location = parsedLocationArg;
  } else {
    location = locationFromContext;
  }
  const pathname = location.pathname || "/";

  // eg: pathname = `${parentPathnameBase}xxx`,remainingPathname = 'xxx'
  // eg: pathname = `/about/child`,parentPathnameBase = '/about', remainingPathname = '/child'
  const remainingPathname =
    parentPathnameBase === "/"
      ? pathname
      : pathname.slice(parentPathnameBase.length) || "/";

  //3. 根据当前 location 对应的 routes 获取相应的 matches:RouteMatch<string>[]
  const matches = matchRoutes(routes, { pathname: remainingPathname });

  //4. 通过`_renderMatches`渲染上面得到的matches
  return _renderMatches(
    matches &&
      matches.map(match =>
        Object.assign({}, match, {
          params: Object.assign({}, parentParams, match.params),
          pathname: joinPaths([parentPathnameBase, match.pathname]),
          pathnameBase: joinPaths([parentPathnameBase, match.pathnameBase])
        })
      ),
    parentMatches
  );
}
export function matchRoutes(
  routes: RouteObject[],
  locationArg: Partial<Location> | string,
  basename = "/"
): RouteMatch[] | null {
  let location =
    typeof locationArg === "string" ? parsePath(locationArg) : locationArg;

  let pathname = stripBasename(location.pathname || "/", basename);

  if (pathname == null) {
    return null;
  }
  // 将嵌套路由进行扁平处理 同时会带有score评分和routerMata
  // 在 flatten 的过程中会收集每个 route 的 props 作为 routeMeta
  let branches = flattenRoutes(routes);

  //根据 score 或 childIndex 排序每个 branch
  //如果 score 相等才去比较 routesMeta 的每个 childIndex
  rankRouteBranches(branches);

  let matches = null;
  // 通过每个 branch 的 routesMeta 来看看是否能匹配到相应的 pathname
  // 只要有一个不匹配,就返回 null而
  // routesMeta 最后一项是该 route 自己的路由信息,前面项都是 parentMetas
  // 所以只有从头到尾都匹配到,才表示匹配到完整的路由信息
  for (let i = 0; matches == null && i < branches.length; ++i) {
    matches = matchRouteBranch(branches[i], routes, pathname);
  }

  return matches;
}
优先级排名
    <Route path="/profile/:id" component={Profile1} />
    <Route path="/profile/me" component={Profile2} />
我们定义了两个路由,实际上访问大多数/profile路径没有很大的歧义,但当页面访问/profile/me时,此时同时命中了这两个路由,那么最终会渲染哪个组件? 在v5中,最终渲染是先定义的路由组件(Profile1),即先定义,先渲染(符合之前说的v5路由算法返回第一个匹配的组件),所以开发者需要手动对路由进行排序控制组件渲染的优先级。
但这并不符合我们的页面渲染预期。
V6会对每个路径进行分割,对路径中的各个部分累计打分排名,分数越高,则优先渲染
// 匹配路由动态部分, 如/:id
const paramRe = /^:\w+$/;
// 动态路由部分分值
const dynamicSegmentValue = 3;
// index子路由分值
const indexRouteValue = 2;
// 空路由部分分值
const emptySegmentValue = 1;
// 静态路由部分分值
const staticSegmentValue = 10;
// 当路径中存在*时分值
const splatPenalty = -2;
const isSplat = (s: string) => s === "*";

function computeScore(path: string, index: boolean | undefined): number {
  // 分割路径成数组
  let segments = path.split("/");
  let initialScore = segments.length;
  if (segments.some(isSplat)) {
    initialScore += splatPenalty;
  }

 if (index) {
   initialScore += indexRouteValue;
 }

 return segments
   .filter(s => !isSplat(s))
   .reduce(
     (score, segment) =>
       score +
       (paramRe.test(segment)
         ? dynamicSegmentValue
         : segment === ""
         ? emptySegmentValue
         : staticSegmentValue),
     initialScore
   );
}
可以看出越是动态的路由它的分数往往越低
静态路由部分分值(staticSegmentValue: 10) > 动态路由部分分值(dynamicSegmentValue: 3) >路径 *通配 splatPenalty:-2
回到上面的例子,在访问/profile/me路径时,V6会计算/profile/:id和/profile/me路由分数,由于/profile/me是静态路由分数会高于/profile/:id,因此v6中会渲染NewUser组件。
完美,很符合预期!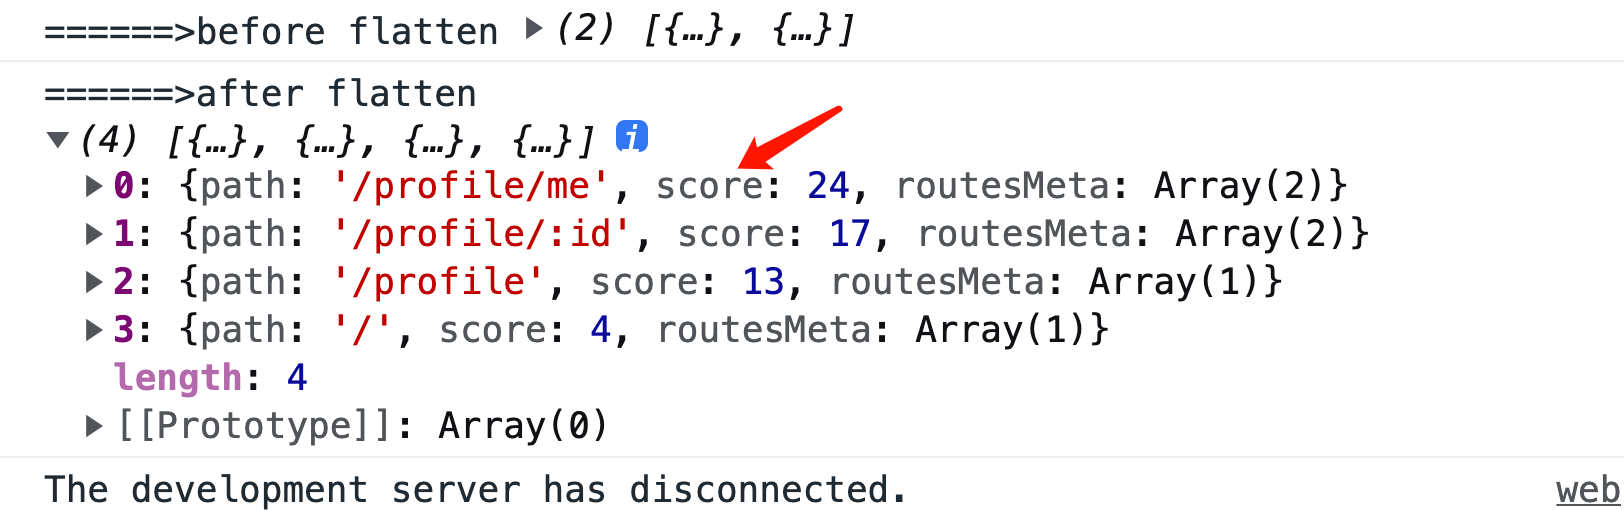
匹配
matchPath是router暴露的API,主要作用是 根据pathname和pattern来匹配返回match的信息
/**
 * @description 对pathname执行对应的正则匹配,看是否能返回match的信息
 */
export function matchPath<ParamKey extends string = string>(
  pattern: PathPattern | string,
  pathname: string
): PathMatch<ParamKey> | null {
  if (typeof pattern === "string") {
    pattern = { path: pattern, caseSensitive: false, end: true };
  }
  // 根据pattern.path生成正则以及获取path中的动态参数
  // compilePath下面有讲,看到这里可先看下面再回来
  const [matcher, paramNames] = compilePath(
    pattern.path,
    pattern.caseSensitive,
    pattern.end
  );
  // pattern.path生成正则是否match传入的pathname
  const match = pathname.match(matcher);
  if (!match) return null;

  const matchedPathname = match[0];
  // eg: 'about/'.replace(/(.)\/+$/, "$1") => 'about' // 即(.),$1表示第一个匹配到的小括号中的值;
  // eg: 'about/*'.replace(/(.)\/+$/, "$1") => 'about/*'; // 不匹配,返回原字符串
  let pathnameBase = matchedPathname.replace(/(.)\/+$/, "$1");
  // eg: pattern = {path: 'about/*', caseSensitive: false, end: true}, pathname = '/about/child';
  //     matcher = /^\/about(?:\/(.+)|\/*)$/i, paramNames = ['*'];
  //     match = ['/about/child', 'child', index: 0, input: '/about/child', groups: undefined]
  // 那么 matchedPathname = '/about/child', captureGroups = ['child'], params = { '*': 'child' }, pathnamebase = '/about'
  // 从第二项就是()中匹配的,所以叫slice从1开始
  const captureGroups = match.slice(1);
  const params: Params = paramNames.reduce<Mutable<Params>>(
    (memo, paramName, index) => {
      // We need to compute the pathnameBase here using the raw splat value
      // instead of using params["*"] later because it will be decoded then
      if (paramName === "*") {
        const splatValue = captureGroups[index] || "";
        // eg:
        // pattern.path = 'about/*', matchedPathname = '/about/child', captureGroups =['child']
        // matchedPathname.slice(0, matchedPathname.length - splatValue.length) => '/basic/'
        // '/about/'.replace(/(.)\/+$/, "$1") = '/about'
        // 即pathnameBase = '/about'
        pathnameBase = matchedPathname
          .slice(0, matchedPathname.length - splatValue.length)
          .replace(/(.)\/+$/, "$1");
      }

      memo[paramName] = safelyDecodeURIComponent(
        captureGroups[index] || "",
        paramName
      );
      return memo;
    },
    {}
  );

  return {
    params,
    pathname: matchedPathname,
    pathnameBase,
    pattern
  };
}
compilePath 的作用是根据路由路径path 和匹配参数options等参数拼出正则regexp,和路径参数keys 是路径参数
/**
 * @description: 根据path生成正则以及获取path中的动态参数
 * @param {string} path path不能是:xxx*,如果尾部是*,那么需要以"/*"结尾,正常的"/", "/auth"没问题
 * @param {boolean} caseSensitive 默认false,根据path生成的正则是否忽略大小写
 * @param {boolean} end 默认true,是否到了最后一个routesMeta
 * @return {[RegExp, string[]]} 正则以及获取path中的动态参数
 *
 * @example
 *
 * compilePath('/') => matcher = /^\/\/*$/i
 * compilePath('/', true, false) => matcher = /^\/(?:\b|$)/i
 * compilePath('/about') => matcher = /^\/about\/*$/i
 * compilePath('/about/child', true) => matcher = /^\/about\/child\/*$/
 * compilePath('about/*', true) => matcher = /^\/about(?:\/(.+)|\/*)$/
 */
function compilePath(
  path: string,
  caseSensitive = false,
  end = true
): [RegExp, string[]] {
  warning(
    path === "*" || !path.endsWith("*") || path.endsWith("/*"),
    `Route path "${path}" will be treated as if it were ` +
      `"${path.replace(/\*$/, "/*")}" because the \`*\` character must ` +
      `always follow a \`/\` in the pattern. To get rid of this warning, ` +
      `please change the route path to "${path.replace(/\*$/, "/*")}".`
  );
  // 动态参数名数组
  // eg: '/auth/:id/www/:name/ee' => paramNames = ['id', 'name']
  const paramNames: string[] = [];
  let regexpSource =
    "^" +
    path
      .replace(/\/*\*?$/, "") // 去掉尾部的'/'、'//' ..., 或'/*'、'//*', '///*' ..., '*'
      .replace(/^\/*/, "/") //  开头没'/'那么加上;开头有多个'/',那么保留一个;eg: (//about | about) => /about
      .replace(/[\\.*+^$?{}|()[\]]/g, "\\$&") // 对\.*+^$?{}或()[]都给加上\,eg: `()[]` => '\(\)\[\]';`.*+^$?{}` => '\.\*\+\^\$\?\{\}'
      .replace(/:(\w+)/g, (_: string, paramName: string) => {  // \w ===  [A-Za-z0-9_], /:(\w+)/g表示处理动态参数
        paramNames.push(paramName);
        /** [^\\/]+ 表示不能是出现/
         * @example
         * '/auth/:id/www/:name/ee' => '/auth/([^\/]+)/www/([^\/]+)/ee'
         * const reg = new RegExp('/auth/([^\/]+)/www/([^\/]+)/ee', 'i')
         * reg.test('/auth/33/www/a1_A/ee') // params = ['33', 'a1_A'], true
         * reg.test('/auth/33/www/a1_A//ee')) // params = ['33', 'a1_A/'], false
         */
        return "([^\\/]+)";
      });

  if (path.endsWith("*")) {
    // 如果path以"*"结尾,那么paramNames也push
    paramNames.push("*");
    regexpSource +=
      // 如果path等于*或/*, 那么regexpSource最终为regexpSource = '^/(.*)$',(.*)$ 表示match剩下的
      path === "*" || path === "/*"
        ? "(.*)$" // Already matched the initial /, just match the rest
        /**
         * (?:x),匹配 'x' 但是不记住匹配项。这种括号叫作非捕获括号,使得你能够定义与正则表达式运算符一起使用的子表达式。
         * @example
         * eg1:
         * /(?:foo){1,2}/。如果表达式是 /foo{1,2}/,{1,2} 将只应用于 'foo' 的最后一个字符 'o'。
         * 如果使用非捕获括号,则 {1,2} 会应用于整个 'foo' 单词
         *
         * eg2: 对比下两种exec的结果
         * const reg = new RegExp('w(?:\\d+)e')
         * reg.exec('w12345e')
         * ['w12345e', index: 0, input: 'w12345e', groups: undefined] // 不记住匹配项
         *
         * 而
         * const reg = new RegExp('w(\\d+)e')
         * reg.exec('w12345e')
         * ['w12345e', '12345', index: 0, input: 'w12345e', groups: undefined] // 记住匹配项
         *
         * 本处eg:
         * path = 'xxx/*'
         * const reg = new RegExp("xxx(?:\\/(.+)|\\/*)$", 'i')
         * 下面的abc是(.+)中的
         * reg.exec('xxx/abc') // ['xxx/abc', 'abc', index: 0, input: 'xxx/abc', groups: undefined]
         * 下面两处满足 `|` 后面的\\/*: '/' 出现出现零次或者多次
         * reg.exec('xxx') //  ['xxx', undefined, index: 0, input: 'xxx', groups: undefined]
         * reg.exec('xxx/') //  ['xxx/', undefined, index: 0, input: 'xxx/', groups: undefined]
         * 当>= 2个'/',就又变成满足\\/(.+)了,所以个人感觉这里的\\/*是不是应该改为\\/{0,1} ????
         * reg.exec('xxx//') //  ['xxx//','/', index: 0, input: 'xxx//', groups: undefined]
         */
        : "(?:\\/(.+)|\\/*)$"; // Don't include the / in params["*"]
  } else {
    // path不以"*"结尾
    regexpSource += end
      ? "\\/*$" // When matching to the end, ignore trailing slashes 如果是end的话,忽略斜杠"/"
      : // Otherwise, at least match a word boundary. This restricts parent
        // routes to matching only their own words and nothing more, e.g. parent
        // route "/home" should not match "/home2".
        /**
         * 否则,至少匹配到一个单词边界,这限制了parent routes只能匹配自己的单词。比如/home不允许匹配为/home2。
         *
         * \b: 匹配这样的位置:它的前一个字符和后一个字符不全是(一个是,一个不是或不存在) \w (\w ===  [A-Za-z0-9_])
         * 通俗的理解,\b 就是“隐式位置”
         * "It"中 'I' 和 't' 就是显示位置,中间是“隐式位置”。 更多可见:https://www.cnblogs.com/litmmp/p/4925374.html
         * 使用"moon"举例:
         * /\bm/匹配“moon”中的‘m’;
         * /oo\b/并不匹配"moon"中的'oo',因为'oo'被一个“字”字符'n'紧跟着
         * /oon\b/匹配"moon"中的'oon',因为'oon'是这个字符串的结束部分。这样他没有被一个“字”字符紧跟着
         *
         * 本例:
         * compilePath('/', true, false) => matcher = /^\/(?:\b|$)/i
         * '/auth'.match(/^\/(?:\b|$)/i) // ['/', index: 0, input: '/auth', groups: undefined]
         * 'auth'.match(/^\/(?:\b|$)/i) // null
         * reg.exec('/xxx2') or reg.exec('/xxxx') // null
         *  */
        "(?:\\b|$)";
  }

  const matcher = new RegExp(regexpSource, caseSensitive ? undefined : "i");

  return [matcher, paramNames];
}
渲染
/** 根据matches渲染出嵌套的 `<RouteContext.Provider></RouteContext.Provider>`*/
function _renderMatches(
  matches: RouteMatch[] | null,
  parentMatches: RouteMatch[] = []
): React.ReactElement | null {
  if (matches == null) return null;
  return matches.reduceRight((outlet, match, index) => {
    // 如果match.route.element为空,那么<Outlet />实际上就是该RouteContext的outlet,就是下面value的outlet
    return (
      <RouteContext.Provider
        children={match.route.element || <Outlet />}
        value={{
          outlet,
          matches: parentMatches.concat(matches.slice(0, index + 1))
        }}
      />
    );
  }, null as React.ReactElement | null);
}
生成类似的结构
return (
  <RouteContext.Provider
    value={{
      matches: parentMatches.concat(matches.slice(0, 1)),
      outlet: (
      <RouteContext.Provider
        value={{
          matches: parentMatches.concat(matches.slice(0, 2)),
          outlet: null // 第一次outlet为null,
        }}
      >
        {<Layout2 /> || <Outlet />}
      </RouteContext.Provider>
    ),
    }}
  >
    {<Layout1 /> || <Outlet />}
  </RouteContext.Provider>
)
总结
Route
V5的Route可以接收component作为渲染组件,看起来很简单,但我们无法给该组件传递自定义属性,因此我们可以使用render来弥补component的缺陷,除此之外v5版本还提供children属性,当children是一个函数时,接收路由匹配的上下文数据,实际上功能和render相同。
v6版本将Route的三个属性统一规范成element。
// v6
function App() {
   return (
     <BrowserRouter>
       <Routes>
          <Route path="/user" element={
            <main style={{ padding: "1rem" }}>
              <p>There's nothing here!</p>
            </main>
            } />
          <Route path="/user/1" element={<User animate={true} />} />
       </Routes>
     </BrowserRouter>
   )
}

// 结合v6提供的hooks,可以获取路由相关数据
function User({ animate }) {
  let params = useParams();
  let location = useLocation();
}
通过上面对Routes的分析可以知道,Rout只是提供 props 供createRoutesFromChildren使用罢了。这也给我们提供了一种全新的思路,打破了以往的认知
export function Route(
  _props: PathRouteProps | LayoutRouteProps | IndexRouteProps
): React.ReactElement | null {
  invariant(
    false,
    `A <Route> is only ever to be used as the child of <Routes> element, ` +
      `never rendered directly. Please wrap your <Route> in a <Routes>.`
  );
}
Outlet
v6带来了Outlet组件,用于渲染当前路由下的子路由组件,先回顾用法 V6新玩儿法尝鲜:
// v6
function App() {
  return (
    <BrowserRouter>
      <Routes>
        <Route path="/" element={<Home />} />
        <Route path="users" element={<Users />}>
          <Route path="me" element={<OwnUserProfile />} />
          <Route path=":id" element={<UserProfile />} />
        </Route>
      </Routes>
    </BrowserRouter>
  );
}

function Users() {
  return (
    <div>
      <nav>
        <Link to="me">My Profile</Link>
      </nav>
      // 当访问/users/me 或者 /users/id时,子路由会被渲染
      <Outlet />
    </div>
  );
}
通过Outlet可以将所有的路由(嵌套的子路由)配置合并在一起,可进行路由的统一管理,增加了代码可维护性。
/**
 * Renders the child route's element, if there is one.
 *
 * @see https://reactrouter.com/docs/en/v6/api#outlet
 */
export function Outlet(_props: OutletProps): React.ReactElement | null {
  return useOutlet();
}
export function useOutlet(): React.ReactElement | null {
  return React.useContext(RouteContext).outlet;
}
Link
export const Link = React.forwardRef<HTMLAnchorElement, LinkProps>(
  function LinkWithRef(
    { onClick, replace = false, state, target, to, ...rest },
    ref
  ) {
    const href = useHref(to);
    const internalOnClick = useLinkClickHandler(to, { replace, state, target });
    function handleClick(
      event: React.MouseEvent<HTMLAnchorElement, MouseEvent>
    ) {
      // 如果有传onClick,那么调用该onClick
      if (onClick) onClick(event);
      // 否则如果事件的默认行为没有被阻止的话,那么调用internalOnClick,
      // 因为internalOnClick里面会调用event.preventDefault(),使event.defaultPrevented = true
      if (!event.defaultPrevented) {
        internalOnClick(event);
      }
    }

    return (
      // eslint-disable-next-line jsx-a11y/anchor-has-content
      <a
        {...rest}
        href={href}
        onClick={handleClick}
        ref={ref}
        target={target}
      />
    );
  }
);
实质上只是包装了,对 onClick 事件做了处理,如果自定义了 onClick,那么用该 onClick,否则会用内部的函数internalOnClick
export function useLinkClickHandler<
  E extends Element = HTMLAnchorElement,
  S extends State = State
>(
  to: To,
  {
    target,
    replace: replaceProp,
    state
  }: {
    target?: React.HTMLAttributeAnchorTarget;
    replace?: boolean;
    state?: S;
  } = {}
): (event: React.MouseEvent<E, MouseEvent>) => void {
  const navigate = useNavigate();
  const location = useLocation();
  const path = useResolvedPath(to);

  return React.useCallback(
    (event: React.MouseEvent<E, MouseEvent>) => {
      if (
        event.button === 0 && //  忽略除了左键外的所有内容
        (!target || target === "_self") &&  // 让浏览器处理"target=_blank"等
        !isModifiedEvent(event) // 忽略meta、alt、ctrl、shift等修饰符
      ) {
        // 阻止默认事件
        event.preventDefault();
        // 如果有传replace为true或当前location和传入path的`pathname + search + hash`相等,那么replace为true,
        // 即URL没有改变的话,<a>会使用replace而不是push
        // 比如当前路径为/basic, 点后点击<Link to='.'>,那上面的useResolvedPath(to)的path还是为{pathname: '/basic', search: '', hash: ''}
        // 那么这里的replace就满足createPath(location) === createPath(path),即为true了,那就是replace,如果不是跳本路由,那么就为false,那就是push
        const replace =
          !!replaceProp || createPath(location) === createPath(path);
        navigate(to, { replace, state });
      }
    },
    [location, navigate, path, replaceProp, state, target, to]
  );
}
重要-Link路径处理
V6新玩法中的路径匹配,我们知道相对路径的Link 和Route v5嵌套路由里需要拼接绝对路径来渲染组件的子路由,忽略尾部的/,相当于cd操作,那么这个逻辑在是哪里处理的呢?答案:
export function useHref(to: To): string {

  let { basename, navigator } = React.useContext(NavigationContext);
  let { hash, pathname, search } = useResolvedPath(to);

  let joinedPathname = pathname;
  if (basename !== "/") {
    let toPathname = getToPathname(to);
    let endsWithSlash = toPathname != null && toPathname.endsWith("/");
    joinedPathname =
      pathname === "/"
        ? basename + (endsWithSlash ? "/" : "")
        : joinPaths([basename, pathname]);
  }

  return navigator.createHref({ pathname: joinedPathname, search, hash });
}
总结
- 总体来说 V6版本的router,用Hooks重写了一遍,整体的代码体积减少到8kb,很精简。
- 整体的路由流程和V5的思路还是一样的
- 匹配路由的时候,会根据优先级排名来进行匹配
References
https://github.com/remix-run/react-router/tree/v6.0.2
https://reactrouter.com/docs/en/v6/getting-started/overview
https://reactrouter.com/web/api/Route/render-func
https://github.com/ReactTraining/react-router
https://github.com/ReactTraining/history
https://juejin.cn/post/6886290490640039943#heading-24
https://v5.reactrouter.com/web/api/history
V6源码
history源码解析
V5源码

若有收获,就点个赞吧
0 人点赞
