如👇图,实现一个滚动内容区域,右侧字母滚动索引定位;选择和拖动字母索引,对应内容滚动到视窗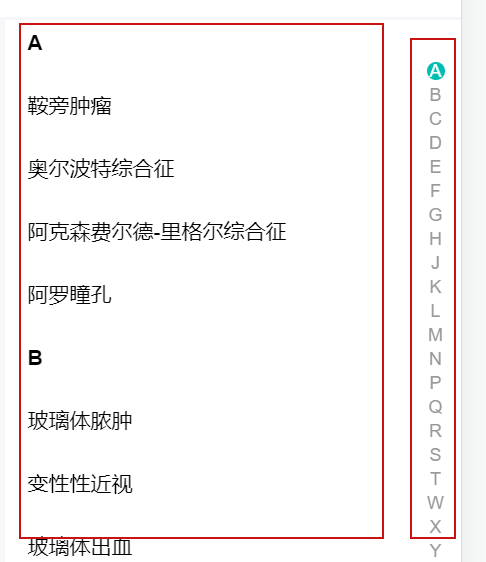
环境准备:
- 安装better-scroll npm包
安装 mouseWheel 扩展 BetterScroll 鼠标滚轮的能力,开启鼠标滚动(移动端非必须)
npm install @better-scroll/core @better-scroll/mouse-wheel --save
实现步骤:
数据结构
内容区和索引按下图数据结构处理
export default {data() {return {entityList: [{key: 'A',list: ['氨基酸代谢病', '广泛性发育障碍']},{key: 'B',list: ['巴特综合征', '包涵体性结膜炎', '膀胱外翻', '鼻腔结外型NK/T细胞淋巴瘤']},{key: 'C',list: ['C5功能不全综合征', '肠道蛔虫症', '喘息样支气管炎']},{key: 'D',list: ['低氯性氮质血症综合征', '石棉状糠疹', 'Dravet综合征']}]};}};
基本HTML
<!-- 内容区域 --><!-- 最外层父容器wrapper,固定高度并且overflow:hidden--><div class="h-534px flex-1 wrapper overflow-hidden" ref="wrapper"><!-- content 注意滚动区域一定是父容器的第一个子元素,当高度超出父容器即可滚动 --><ul class="content"><!-- v-for 循环出列表 --><liv-for="(item, index) in entityList":key="index"class="flex flex-col"ref="listGroup"><divclass="h-42px leading-42px text-sm font-bold pl-15px w-244px">{{ item.key }}</div><div class="flex flex-col"><spanclass="h-42px leading-42px text-sm pl-15px g-clamp1 w-244px"v-for="(it, i) in item.list":key="i">{{ it }}</span></div></li></ul></div><!-- 索引 --><ul class="entityList w-15px bg-white"><!-- v-for 循环出索引 --><liv-for="(item, index) in entityList":key="index":data-index="index"class="w-3 text-4 h-3 mb-1 leading-3 text-center text-gray6">{{ item.key }}</li></ul>
使用better-scroll实现内容区列表的滚动
<script>//import 引入BScrollimport BScroll from '@better-scroll/core';import MouseWheel from '@better-scroll/mouse-wheel';BScroll.use(MouseWheel);export default {mounted() {//dom渲染完毕,初始化better-scrollthis.$nextTick(() => {this.initBanner();});},methods: {initBanner() {if (this.scroll && this.scroll.destroy){this.scroll.refresh();//当 DOM 结构发生变化的时候需重新计算 BetterScrollthis.scroll.destroy();//销毁 BetterScroll,解绑事件}this.scroll = new BScroll('.wrapper', {scrollY: true,//纵向滚动click: true,mouseWheel: true,disableMouse: false, //启用鼠标拖动disableTouch: false, //启用手指触摸probeType: 3 //设置为3,BetterScroll实时派发 scroll 事件});}}};</script>
💥注意:这里我们在mounted时期,在this.$nextTick 的回调函数中初始化 better-scroll 。这时wrapper 的 DOM 已经渲染了,我们可以正确计算它以及它内层 content 的高度,以确保滚动正常。
给索引添加点击事件和移动事件实现跳转
<ul class="entityList w-15px bg-white"><liv-for="(item, index) in entityList":key="index":data-index="index"class="w-3 text-4 h-3 mb-1 leading-3 text-center text-gray6"@touchstart="onShortcutStart" //点击事件@touchmove.stop.prevent="onShortcutMove" //移动事件>{{ item.key }}</li></ul>
created() {// 添加一个 touch 用于记录移动的属性this.touch = {};this.$nextTick(() => {this.initBanner();});},methods: {onShortcutStart(e) {// 获取到绑定的 indexlet index = e.target.getAttribute('data-index');// 使用 better-scroll 的 scrollToElement 方法实现跳转this.scroll.scrollToElement(this.$refs.listGroup[index]);// 记录一下点击时候的 Y坐标 和 indexlet firstTouch = e.touches[0].pageY;this.touch.y1 = firstTouch;this.touch.anchorIndex = index;},onShortcutMove(e) {// 再记录一下移动时候的 Y坐标,然后计算出移动了几个索引let touchMove = e.touches[0].pageY;this.touch.y2 = touchMove;// 这里的 16.7 是索引元素的高度let delta = Math.floor((this.touch.y2 - this.touch.y1) / 18);// 计算最后的位置let index = this.touch.anchorIndex * 1 + delta;//注意,这里要有边界判断,不然会报错if (index >= 0 && index <= this.entityList.length - 2) {this.scroll.scrollToElement(this.$refs.listGroup[index]);}}}
给索引添加高亮
在data中定义currentIndex用于索引高亮的判断,并在html中绑定class
data() {return {currentIndex: 0,entityList: [{key: 'A',list: ['氨基酸代谢病', '广泛性发育障碍']}]}}
<ul class="entityList w-15px bg-white"><liv-for="(item, index) in entityList":key="index":data-index="index"class="w-3 text-4 h-3 mb-1 leading-3 text-center text-gray6"@touchstart="onShortcutStart"@touchmove.stop.prevent="onShortcutMove":class="{ current: currentIndex === index }">{{ item.key }}</li></ul>
接下来求currentIndex:
先通过better-scroll 的on(type, fn, context)方法,监听当前实例上的scroll,得到内容区y轴的偏移量
initBanner() {if (this.scroll && this.scroll.destroy) {this.scroll.refresh();this.scroll.destroy();}this.scroll = new BScroll('.wrapper', {scrollY: true,click: true,mouseWheel: true,disableMouse: false, //启用鼠标拖动disableTouch: false, //启用手指触摸probeType: 3});// 监听Y轴偏移的值this.scroll.on('scroll', pos => {this.scrollY = pos.y;});},
data中初始化 listHeight ,添加calculateHeight() 方法计算内容区高度
data() {return {listHeight: [],currentIndex: 0,entityList: [{key: 'A',list: ['氨基酸代谢病', '广泛性发育障碍']}]}}
//计算内容区高度_calculateHeight() {this.listHeight = [];const list = this.$refs.listGroup;let height = 0;this.listHeight.push(height);for (let i = 0; i < list.length; i++) {let item = list[i];//累加之前的高度height += item.clientHeight;this.listHeight.push(height);}}
data中初始化scrollY为-1,在 watch 中监听 scrollY
data() {return {scrollY: -1currentIndex: 0,listHeight: [],entityList: [{key: 'A',list: ['氨基酸代谢病', '广泛性发育障碍']}]}}
watch: {scrollY(newVal) {// 向下滑动的时候 newVal 是一个负数,所以当 newVal > 0 时,currentIndex 直接为 0if (newVal > 0) {this.currentIndex = 0;return;}// 计算内容区高度判断 对应索引currentIndex 的值for (let i = 0; i < this.listHeight.length - 1; i++) {let height1 = this.listHeight[i];let height2 = this.listHeight[i + 1];if (-newVal >= height1 && -newVal < height2) {this.currentIndex = i;return;}}// 当超 -newVal > 最后一个高度的时候// 因为 this.listHeight 有头尾,所以需要 - 2this.currentIndex = this.listHeight.length - 2;}}
全部代码
<template><div><!-- 内容区域 --><div class="h-534px flex-1 wrapper overflow-hidden" ref="listview"><ul class="content"><liv-for="(item, index) in entityList":key="index"class="flex flex-col"ref="listGroup"><div class="h-42px leading-42px text-sm font-bold pl-15px w-244px">{{ item.key }}</div><div class="flex flex-col"><Linkclass="h-42px leading-42px text-sm pl-15px g-clamp1 w-244px"v-for="(it, i) in item.list":key="i":to="{name: 'Yidian',query: {title: it}}">{{ it }}</Link></div></li></ul></div><!-- 索引 --><ul class="entityList w-15px bg-white"><liv-for="(item, index) in entityList":key="index":data-index="index"class="w-3 text-4 h-3 mb-1 leading-3 text-center text-gray6"@touchstart="onShortcutStart"@touchmove.stop.prevent="onShortcutMove":class="{ current: currentIndex === index }">{{ item.key }}</li></ul></div></template><script>import BScroll from '@better-scroll/core';import MouseWheel from '@better-scroll/mouse-wheel';BScroll.use(MouseWheel);export default {data() {return {currentIndex: 0,listHeight: [],entityList: [{key: 'A',list: ['氨基酸代谢病', '广泛性发育障碍']},{key: 'B',list: ['巴特综合征', '包涵体性结膜炎', '膀胱外翻', '鼻腔结外型NK/T细胞淋巴瘤']},{key: 'C',list: ['C5功能不全综合征', '肠道蛔虫症', '喘息样支气管炎']},{key: 'D',list: ['低氯性氮质血症综合征', '石棉状糠疹', 'Dravet综合征']},{key: 'E',list: ['耳聋', '儿童癫痫', '儿童头痛', '儿童急性中耳炎']},{key: 'F',list: ['腹肌缺如综合征','肥大性神经病',]}],scrollY: -1};},mounted() {this.touch = {};this.$nextTick(() => {this.initBanner();});},methods: {//初始化scrollinitBanner() {if (this.scroll && this.scroll.destroy) {this.scroll.refresh();this.scroll.destroy();}this.scroll = new BScroll('.wrapper', {scrollY: true,click: true,mouseWheel: true,disableMouse: false, //启用鼠标拖动disableTouch: false, //启用手指触摸probeType: 3});this._calculateHeight();this.scroll.on('scroll', pos => {this.scrollY = pos.y;});},onShortcutStart(e) {// 获取到绑定的 indexlet index = e.target.getAttribute('data-index');// 使用 better-scroll 的 scrollToElement 方法实现跳转this.scroll.scrollToElement(this.$refs.listGroup[index]);// 记录一下点击时候的 Y坐标 和 indexlet firstTouch = e.touches[0].pageY;this.touch.y1 = firstTouch;this.touch.anchorIndex = index;},onShortcutMove(e) {// 再记录一下移动时候的 Y坐标,然后计算出移动了几个索引let touchMove = e.touches[0].pageY;this.touch.y2 = touchMove;// 这里的 16.7 是索引元素的高度let delta = Math.floor((this.touch.y2 - this.touch.y1) / 12);// 计算最后的位置let index = this.touch.anchorIndex * 1 + delta;if (index >= 0 && index <= this.entityList.length - 2) {this.scroll.scrollToElement(this.$refs.listGroup[index]);}},//计算索引内容高度_calculateHeight() {this.listHeight = [];const list = this.$refs.listGroup;let height = 0;this.listHeight.push(height);for (let i = 0; i < list.length; i++) {let item = list[i];height += item.clientHeight;this.listHeight.push(height);}}},watch: {scrollY(newVal) {// 向下滑动的时候 newVal 是一个负数,所以当 newVal > 0 时,currentIndex 直接为 0if (newVal > 0) {this.currentIndex = 0;return;}// 计算 currentIndex 的值for (let i = 0; i < this.listHeight.length - 1; i++) {let height1 = this.listHeight[i];let height2 = this.listHeight[i + 1];if (-newVal >= height1 && -newVal < height2) {this.currentIndex = i;return;}}// 当超 -newVal > 最后一个高度的时候// 因为 this.listHeight 有头尾,所以需要 - 2this.currentIndex = this.listHeight.length - 2;}}};</script><style scoped lang="postcss">.tabActive {@apply font-bold;}.tabActive::after {content: '';display: block;width: 18px;height: 3px;background: #00c2b0;border-radius: 2px;position: absolute;bottom: 0;}.sortActive {color: #00c2b0;}.select-left {@apply w-110px;}.select-left-item {@apply pl-15px h-42px text-sm;}.entityList {position: fixed;right: 8px;top: 156px;}.current {border-radius: 50%;background: #00beb0;color: #fff;}.typeAct {@apply bg-white text-primary;}</style>
总结
- 参考了很多网上的资料,相对于原生实现,better-scroll带来了更大的便利,但是同时也需要我们对better-scroll有一定的了解。
参考文献

若有收获,就点个赞吧
0 人点赞
