Netty是一个异步的、基于事件驱动的网络应用程序,用于快速开发高性能、高可靠性的网络IO程序。Netty主要针对在TCP协议下,面向Clients端的高并发应用,或者Peer-to-Peer场景下的大量数据持续传输的应用。Netty本质是一个NIO框架,适用于服务器通讯相关的多种应用场景。
- BIO适用于连接数目比较小且固定的架构,它对于服务器资源的要求较高
- NIO适用于连接数目较多且连接比较短的架构,编程复杂
- AIO适用于连接数目多且连接比较长的架构,编程复杂
BIO的线程池改进案例
**
public class BIOServer {public static void main(String[] args) throws IOException {//1、创建一个线程池//2、如果有客户端连接,就创建一个线程,与之通讯(单独写一个方法)ExecutorService executorService = Executors.newCachedThreadPool();//创建ServerSocketServerSocket serverSocket = new ServerSocket(6666);System.out.println("服务器启动了");while (true) {System.out.println("线程信息:id= "+ Thread.currentThread().getId() + "; 线程名字:" + Thread.currentThread().getName());//监听,等待客户端连接System.out.println("等待连接");final Socket socket = serverSocket.accept();System.out.println("连接到一个客户端");//创建一个线程,与之通讯executorService.execute(() -> {//重写Runnable方法,与客户端进行通讯handler(socket);});}}//编写一个Handler方法,和客户端通讯public static void handler(Socket socket) {try {System.out.println("线程信息:id= "+ Thread.currentThread().getId() + "; 线程名字:" + Thread.currentThread().getName());byte[] bytes = new byte[1024];//通过socket获取输入流InputStream inputStream = socket.getInputStream();//循环的读取客户端发送的数据while (true){System.out.println("线程信息:id= "+ Thread.currentThread().getId() + "; 线程名字:" + Thread.currentThread().getName());System.out.println("read....");int read = inputStream.read(bytes);if (read != -1){System.out.println(new String(bytes, 0, read));//输出客户端发送的数据} else {break;}}} catch (IOException e) {e.printStackTrace();} finally {System.out.println("关闭和client的连接");try {socket.close();} catch (IOException e) {e.printStackTrace();}}}}
使用Java NIO实现简单的客户端和服务器通信:
@Testpublic void Server() throws IOException {//创建ServerSocketChannel -> ServerSocketServerSocketChannel serverSocketChannel = ServerSocketChannel.open();//得到一个Selector对象Selector selector = Selector.open();//绑定一个端口6666serverSocketChannel.socket().bind(new InetSocketAddress(6666));//设置非阻塞serverSocketChannel.configureBlocking(false);//把 serverSocketChannel 注册到 selector ,关心事件为:OP_ACCEPT,有新的客户端连接SelectionKey register = serverSocketChannel.register(selector, SelectionKey.OP_ACCEPT);System.out.println();//循环等待客户端连接while (true) {//等待1秒,如果没有事件发生,就返回if (selector.select(1000) == 0) {System.out.println("服务器等待了1秒,无连接");continue;}//如果返回的 > 0,表示已经获取到关注的事件// 就获取到相关的 selectionKey 集合,反向获取通道Set<SelectionKey> selectionKeys = selector.selectedKeys();//遍历 Set<SelectionKey>,使用迭代器遍历Iterator<SelectionKey> keyIterator = selectionKeys.iterator();while (keyIterator.hasNext()) {//获取到SelectionKeySelectionKey key = keyIterator.next();//根据 key 对应的通道发生的事件,做相应的处理if (key.isAcceptable()) {//如果是 OP_ACCEPT,有新的客户端连接//该客户端生成一个 SocketChannelSocketChannel socketChannel = serverSocketChannel.accept();System.out.println("客户端连接成功,生成了一个SocketChannel:" + socketChannel.hashCode());//将SocketChannel设置为非阻塞socketChannel.configureBlocking(false);//将socketChannel注册到selector,关注事件为 OP_READ,同时给SocketChannel关联一个BuffersocketChannel.register(selector, SelectionKey.OP_READ, ByteBuffer.allocate(1024));}if (key.isReadable()) {//通过key,反向获取到对应的ChannelSocketChannel channel = (SocketChannel) key.channel();//获取到该channel关联的BufferByteBuffer buffer = (ByteBuffer) key.attachment();channel.read(buffer);System.out.println("from 客户端:" + new String(buffer.array()));}//手动从集合中移除当前的 selectionKey,防止重复操作keyIterator.remove();}}}@Testpublic void Client() throws IOException {//得到一个网络通道SocketChannel socketChannel = SocketChannel.open();//设置非阻塞socketChannel.configureBlocking(false);//提供服务器端的IP和端口InetSocketAddress socketAddress = new InetSocketAddress("127.0.0.1", 6666);//连接服务器if (!socketChannel.connect(socketAddress)){ //如果不成功while (!socketChannel.finishConnect()){System.out.println("因为连接需要时间,客户端不会阻塞,可以做其他工作。。。");}}//如果连接成功,就发送数据String str = "hello, 尚硅谷";ByteBuffer byteBuffer = ByteBuffer.wrap(str.getBytes());//发送数据,实际上就是将buffer数据写入到channelsocketChannel.write(byteBuffer);System.in.read();}
原生NIO存在的问题:
- 类库和API繁杂,使用麻烦
- 必须熟悉多线程和网络编程
- 开发难度高
- 存在BUG:例如Epoll Bug,它会导致Selector空轮询,最终导致CPU100%被占用
Netty的优点:
- 适用于各种传输类型的统一 API 阻塞和非阻塞 Socket;基于灵活且可扩展的事件模型,可以清晰地分离关注点;高度可定制的线程模型 - 单线程,一个或多个线程池
- 完整的 SSL/TLS 和 StartTLS 支持
- 高性能、吞吐量更高:延迟更低;减少资源消耗;最小化不必要的内存复制
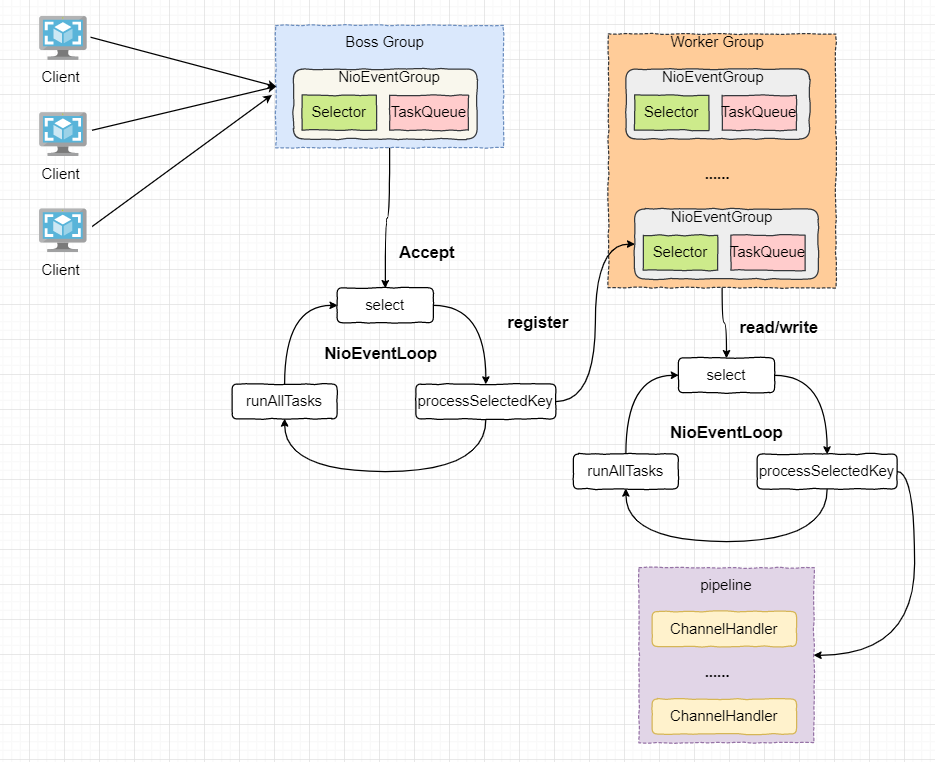
Netty主要是由基于主从的Reactor多线程模型进行了改进,其中主从Reactor都由一个变成了多个。Netty模型示意图如下所示:
如上所示,Netty抽象出两组线程池:
- BossGroup:负责接收客户端的连接
- WorkerGroup:负责读写请求
它们都是NioEventGroup类型,分别维护者多个BioEventLoop线程。初始化这两个Group线程组时,默认会在每个Group中生成 CPU个数2倍的NioEventLoop线程。当客户端请求到来时,Group默认会按照连接请求的顺序分别将这些连接分给各个NioEventLoop处理,通过Group还负责管理NioEventLoop的生命周期。
NioEventLoop表示一个不断循环执行处理任务的线程,它维护了一个线程和任务队列。每个NioEventLoop都包含一个Selector,用于监听绑定在上面的Channel对应的Socket请求。没增加一个Socket连接,NioEventLoopGroup就将这个请求一次分发给它下面的NioEventLoop处理。
每个NioEventLoop循环执行分为如下的三步:
- 轮询accept事件
- 处理accept事件,与Client建立连接,创建NioSocketChannel,并将其注册到Worker Group的某个NioEventLoopGroup的Selector上
- 处理任务队列的任务,即runAllTasks
对于Worker Group中的每个NioEventLoop来说,它执行的步骤如下所示:
- 轮询read、write事件
- 在对应的NioSocketChannel中处理事件
- 处理任务队列中的任务,即runAllTasks
每个 Worker Group中的NioEventLoop处理业务时,会使用pipeline(管道),pipeline中维护了一个ChannelHandlerContext链表,而ChannelHandlerContext则保存了Channel相关的所有上下文信息,同时关联一个ChannelHandler对象。如图所示,Channel和pipeline一一对应,ChannelHandler和ChannelHandlerContext一一对应。
ChannelHandler是一个接口,负责处理或拦截IO操作,并将其转发到Pipeline中的下一个Handler中进行处理。
I/O Requestvia Channel orChannelHandlerContext|+---------------------------------------------------+---------------+| ChannelPipeline | || \|/ || +---------------------+ +-----------+----------+ || | Inbound Handler N | | Outbound Handler 1 | || +----------+----------+ +-----------+----------+ || /|\ | || | \|/ || +----------+----------+ +-----------+----------+ || | Inbound Handler N-1 | | Outbound Handler 2 | || +----------+----------+ +-----------+----------+ || /|\ . || . . || ChannelHandlerContext.fireIN_EVT() ChannelHandlerContext.OUT_EVT()|| [ method call] [method call] || . . || . \|/ || +----------+----------+ +-----------+----------+ || | Inbound Handler 2 | | Outbound Handler M-1 | || +----------+----------+ +-----------+----------+ || /|\ | || | \|/ || +----------+----------+ +-----------+----------+ || | Inbound Handler 1 | | Outbound Handler M | || +----------+----------+ +-----------+----------+ || /|\ | |+---------------+-----------------------------------+---------------+| \|/+---------------+-----------------------------------+---------------+| | | || [ Socket.read() ] [ Socket.write() ] || || Netty Internal I/O Threads (Transport Implementation) |+-------------------------------------------------------------------+
下面使用Netty来实现一个简单的服务器和客户端,其中服务器的实现如下:
public class NettyServer {public static void main(String[] args) throws InterruptedException {//创建BossGroup 和 WorkerGroupEventLoopGroup bossGroup = new NioEventLoopGroup();EventLoopGroup worderGroup = new NioEventLoopGroup();try {//创建服务器端的启动对象,配置参数ServerBootstrap bootstrap = new ServerBootstrap();//使用链式编程来进行设置,配置bootstrap.group(bossGroup, worderGroup) //设置两个线程组.channel(NioServerSocketChannel.class) //使用 NioServerSocketChannel 作为服务器的通道实现.option(ChannelOption.SO_BACKLOG, 128) //设置线程队列得到连接个数.childOption(ChannelOption.SO_KEEPALIVE, true) //设置保持活动连接状态.childHandler(new ChannelInitializer<SocketChannel>() { //为accept channel的pipeline预添加的handler//给 pipeline 添加处理器,每当有连接accept时,就会运行到此处。@Overrideprotected void initChannel(SocketChannel socketChannel) throws Exception {socketChannel.pipeline().addLast(new NettyServerHandler());}}); //给我们的 workerGroup 的 EventLoop 对应的管道设置处理器System.out.println("........服务器 is ready...");//绑定一个端口并且同步,生成了一个ChannelFuture 对象//启动服务器(并绑定端口)ChannelFuture future = bootstrap.bind(6668).sync();//对关闭通道进行监听future.channel().closeFuture().sync();} finally {bossGroup.shutdownGracefully();worderGroup.shutdownGracefully();}}}
服务器Handler的实现如下:
public class NettyServerHandler extends ChannelInboundHandlerAdapter {/***读取客户端发送过来的消息* @param ctx 上下文对象,含有 管道pipeline,通道channel,地址* @param msg 就是客户端发送的数据,默认Object* @throws Exception*/@Overridepublic void channelRead(ChannelHandlerContext ctx, Object msg) throws Exception {System.out.println("服务器读取线程:" + Thread.currentThread().getName());System.out.println("server ctx = " + ctx);//看看Channel和Pipeline的关系Channel channel = ctx.channel();ChannelPipeline pipeline = ctx.pipeline(); //本质是个双向链表,出栈入栈//将msg转成一个ByteBuf,比NIO的ByteBuffer性能更高ByteBuf buf = (ByteBuf)msg;System.out.println("客户端发送的消息是:" + buf.toString(CharsetUtil.UTF_8));System.out.println("客户端地址:" + ctx.channel().remoteAddress());}//数据读取完毕@Overridepublic void channelReadComplete(ChannelHandlerContext ctx) throws Exception {//它是 write + flush,将数据写入到缓存buffer,并将buffer中的数据flush进通道//一般讲,我们对这个发送的数据进行编码ctx.writeAndFlush(Unpooled.copiedBuffer("hello, 客户端~", CharsetUtil.UTF_8));}//处理异常,一般是关闭通道@Overridepublic void exceptionCaught(ChannelHandlerContext ctx, Throwable cause) throws Exception {ctx.close();}}
客户端的实现如下:
public class NettyClient {public static void main(String[] args) throws InterruptedException {//客户端需要一个事件循环组EventLoopGroup group = new NioEventLoopGroup();try {//创建客户端启动对象//注意:客户端使用的不是 ServerBootStrap 而是 BootstrapBootstrap bootstrap = new Bootstrap();//设置相关参数bootstrap.group(group) //设置线程组.channel(NioSocketChannel.class) //设置客户端通道的实现类(使用反射).handler(new ChannelInitializer<SocketChannel>() {@Overrideprotected void initChannel(SocketChannel socketChannel) throws Exception {socketChannel.pipeline().addLast(new NettyClientHandler()); //加入自己的处理器}});System.out.println("客户端 OK...");//启动客户端去连接服务器端//关于 channelFuture 涉及到 netty 的异步模型ChannelFuture channelFuture = bootstrap.connect("127.0.0.1", 6668).sync();//给关闭通道进行监听channelFuture.channel().closeFuture().sync();} finally {group.shutdownGracefully();}}}
客户端的Handler实现如下:
public class NettyClientHandler extends ChannelInboundHandlerAdapter {/*** 当通道就绪就会触发* @param ctx* @throws Exception*/@Overridepublic void channelActive(ChannelHandlerContext ctx) throws Exception {System.out.println("client: " + ctx);ctx.writeAndFlush(Unpooled.copiedBuffer("hello, server", CharsetUtil.UTF_8));}/*** 当通道有读取事件时,会触发* @param ctx* @param msg* @throws Exception*/@Overridepublic void channelRead(ChannelHandlerContext ctx, Object msg) throws Exception {ByteBuf buf = (ByteBuf)msg;System.out.println("服务器回复的消息:" + buf.toString(CharsetUtil.UTF_8));System.out.println("服务器的地址:" + ctx.channel().remoteAddress());}@Overridepublic void exceptionCaught(ChannelHandlerContext ctx, Throwable cause) throws Exception {cause.printStackTrace();ctx.close();}}
任务队列
**
任务队列由NioEventLoop维护并不断执行。当我们就收到请求之后,在当前channel对应的pipeline中的各个Handler里面进行业务处理和请求过滤。当某些业务需要耗费大量时间的时候,我们可以将任务提交到由NioEventLoop维护的taskQueue或scheduleTaskQueue中,让当前的NioEventLoop线程在空闲时间去执行这些任务。
提交任务有3种方式:
用户自定义的普通任务:该方式会将任务提交到taskQueue队列中。提交到该队列中的任务会按照提交顺序依次执行
channelHandlerContext.channel().eventLoop().execute(new Runnable(){@Overridepublic void run() {//...}});
用于自定义的定时任务:该方式会将任务提交到scheduleTaskQueue定时任务队列中。该队列是底层是优先队列PriorityQueue实现的,固该队列中的任务会按照时间的先后顺序定时执行
channelHandlerContext.channel().eventLoop().schedule(new Runnable() {@Overridepublic void run() {}}, 60, TimeUnit.SECONDS);
为其他EventLoop线程对应的Channel添加任务:可以在ChannelInitializer中,将刚创建的各个Channel以及对应的标识加入到统一的集合中去,然后可以根据标识获取Channel以及其对应的NioEventLoop,然后就课程调用execute()或者schedule()方法

