1. 配置发布后的实时推送设计
配置中心最重要的一个特性就是实时推送,正因为有这个特性,我们才可以依赖配置中心做很多事情。如图 1 所示。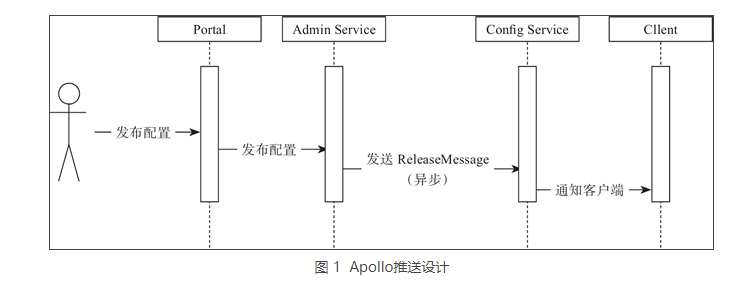
图 1 简要描述了配置发布的大致过程。
- 用户在 Portal 中进行配置的编辑和发布。
- Portal 会调用 Admin Service 提供的接口进行发布操作。
- Admin Service 收到请求后,发送 ReleaseMessage 给各个 Config Service,通知 Config Service 配置发生变化。
Config Service 收到 ReleaseMessage 后,通知对应的客户端,基于 Http 长连接实现。
2. 发送 ReleaseMessage 的实现方式
ReleaseMessage 消息是通过 Mysql 实现了一个简单的消息队列。之所以没有采用消息中间件,是为了让 Apollo 在部署的时候尽量简单,尽可能减少外部依赖,如图 2 所示。
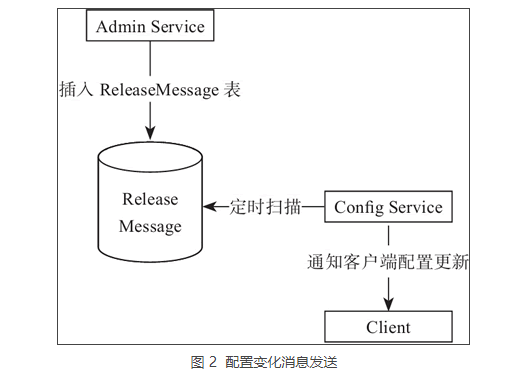
图 2 简要描述了发送 ReleaseMessage 的大致过程:Admin Service 在配置发布后会往 ReleaseMessage 表插入一条消息记录。
- Config Service 会启动一个线程定时扫描 ReleaseMessage 表,来查看是否有新的消息记录。
- Config Service 发现有新的消息记录,就会通知到所有的消息监听器。
-
3. Config Service 通知客户端的实现方式
通知采用基于 Http 长连接实现,主要分为下面几个步骤:
客户端会发起一个 Http 请求到 Config Service 的 notifications/v2 接口。
- notifications/v2 接口通过 Spring DeferredResult 把请求挂起,不会立即返回。
- 如果在 60s 内没有该客户端关心的配置发布,那么会返回 Http 状态码 304 给客户端。
- 如果发现配置有修改,则会调用 DeferredResult 的 setResult 方法,传入有配置变化的 namespace 信息,同时该请求会立即返回。
- 客户端从返回的结果中获取到配置变化的 namespace 后,会立即请求 Config Service 获取该 namespace 的最新配置。
4. 源码解析实时推送设计
Apollo 推送涉及的代码比较多,本教程就不做详细分析了,笔者把推送这里的代码稍微简化了下,给大家进行讲解,这样理解起来会更容易。
当然,这些代码比较简单,很多细节就不做考虑了,只是为了能够让大家明白 Apollo 推送的核心原理。
发送 ReleaseMessage 的逻辑我们就写一个简单的接口,用队列存储,测试的时候就调用这个接口模拟配置有更新,发送 ReleaseMessage 消息。具体代码如下所示。
@RestControllerpublic class NotificationControllerV2 implements ReleaseMessageListener {// 模拟配置更新, 向其中插入数据表示有更新public static Queue<String> queue = new LinkedBlockingDeque<>();@GetMapping("/addMsg")public String addMsg() {queue.add("xxx");return "success";}}
消息发送之后,根据前面讲过的 Config Service 会启动一个线程定时扫描 ReleaseMessage 表,查看是否有新的消息记录,然后取通知客户端,在这里我们也会启动一个线程去扫描,具体代码如下所示。
@Componentpublic class ReleaseMessageScanner implements InitializingBean {@Autowiredprivate NotificationControllerV2 configController;@Overridepublic void afterPropertiesSet() throws Exception {// 定时任务从数据库扫描有没有新的配置发布new Thread(() -> {for (;;) {String result = NotificationControllerV2.queue.poll();if (result != null) {ReleaseMessage message = new ReleaseMessage();message.setMessage(result);configController.handleMessage(message);}}}).start();;}}
循环读取 NotificationControllerV2 中的队列,如果有消息的话就构造一个 Release-Message 的对象,然后调用 NotificationControllerV2 中的 handleMessage() 方法进行消息的处理。
ReleaseMessage 就一个字段,模拟消息内容,具体代码如下所示。
public class ReleaseMessage {private String message;public void setMessage(String message) {this.message = message;}public String getMessage() {return message;}}
接下来,我们来看 handleMessage 做了哪些工作。
NotificationControllerV2 实现了 ReleaseMessageListener 接口,ReleaseMessageListener 中定义了 handleMessage() 方法,具体代码如下所示。
public interface ReleaseMessageListener {void handleMessage(ReleaseMessage message);}
handleMessage 就是当配置发生变化的时候,发送通知的消息监听器。消息监听器在得到配置发布的信息后,会通知对应的客户端,具体代码如下所示。
@RestControllerpublic class NotificationControllerV2 implements ReleaseMessageListener {private final Multimap<String, DeferredResultWrapper> deferredResults = Multimaps.synchronizedSetMultimap(HashMultimap.create());@Overridepublic void handleMessage(ReleaseMessage message) {System.err.println("handleMessage:" + message);List<DeferredResultWrapper> results = Lists.newArrayList(deferredResults.get("xxxx"));for (DeferredResultWrapper deferredResultWrapper : results) {List<ApolloConfigNotification> list = new ArrayList<>();list.add(new ApolloConfigNotification("application", 1));deferredResultWrapper.setResult(list);}}}
Apollo 的实时推送是基于 Spring DeferredResult 实现的,在 handleMessage() 方法中可以看到是通过 deferredResults 获取 DeferredResult,deferredResults 就是第一行的 Multimap,Key 其实就是消息内容,Value 就是 DeferredResult 的业务包装类 DeferredResultWrapper,我们来看下 DeferredResultWrapper 的代码,代码如下所示。
public class DeferredResultWrapper {private static final long TIMEOUT = 60 * 1000;// 60 secondsprivate static final ResponseEntity<List<ApolloConfigNotification>> NOT_MODIFIED_RESPONSE_LIST = new ResponseEntity<>(HttpStatus.NOT_MODIFIED);private DeferredResult<ResponseEntity<List<ApolloConfigNotification>>> result;public DeferredResultWrapper() {result = new DeferredResult<>(TIMEOUT, NOT_MODIFIED_RESPONSE_LIST);}public void onTimeout(Runnable timeoutCallback) {result.onTimeout(timeoutCallback);}public void onCompletion(Runnable completionCallback) {result.onCompletion(completionCallback);}public void setResult(ApolloConfigNotification notification) {setResult(Lists.newArrayList(notification));}public void setResult(List<ApolloConfigNotification> notifications) {result.setResult(new ResponseEntity<>(notifications, HttpStatus.OK));}public DeferredResult<ResponseEntity<List<ApolloConfigNotification>>> getResult() {return result;}}
通过 setResult() 方法设置返回结果给客户端,以上就是当配置发生变化,然后通过消息监听器通知客户端的原理,那么客户端是在什么时候接入的呢?具体代码如下。
@RestControllerpublic class NotificationControllerV2 implements ReleaseMessageListener {// 模拟配置更新, 向其中插入数据表示有更新public static Queue<String> queue = new LinkedBlockingDeque<>();private final Multimap<String, DeferredResultWrapper> deferredResults = Multimaps.synchronizedSetMultimap(HashMultimap.create());@GetMapping("/getConfig")public DeferredResult<ResponseEntity<List<ApolloConfigNotification>>> getConfig() {DeferredResultWrapper deferredResultWrapper = new DeferredResultWrapper();List<ApolloConfigNotification> newNotifications = getApolloConfigNotifications();if (!CollectionUtils.isEmpty(newNotifications)) {deferredResultWrapper.setResult(newNotifications);} else {deferredResultWrapper.onTimeout(() -> {System.err.println("onTimeout");});deferredResultWrapper.onCompletion(() -> {System.err.println("onCompletion");});deferredResults.put("xxxx", deferredResultWrapper);}return deferredResultWrapper.getResult();}private List<ApolloConfigNotification> getApolloConfigNotifications() {List<ApolloConfigNotification> list = new ArrayList<>();String result = queue.poll();if (result != null) {list.add(new ApolloConfigNotification("application", 1));}return list;}}
NotificationControllerV2 中提供了一个 /getConfig 的接口,客户端在启动的时候会调用这个接口,这个时候会执行 getApolloConfigNotifications() 方法去获取有没有配置的变更信息,如果有的话证明配置修改过,直接就通过 deferredResultWrapper.setResult(newNotifications) 返回结果给客户端,客户端收到结果后重新拉取配置的信息覆盖本地的配置。
如果 getApolloConfigNotifications() 方法没有返回配置修改的信息,则证明配置没有发生修改,那就将 DeferredResultWrapper 对象添加到 deferredResults 中,等待后续配置发生变化时消息监听器进行通知。
同时这个请求就会挂起,不会立即返回,挂起是通过 DeferredResultWrapper 中的下面这部分代码实现的,具体代码如下所示。
private static final long TIMEOUT = 60 * 1000; // 60 secondsprivate static final ResponseEntity<List<ApolloConfigNotification>> NOT_MODIFIED_RESPONSE_LIST = new ResponseEntity<>(HttpStatus.NOT_MODIFIED);private DeferredResult<ResponseEntity<List<ApolloConfigNotification>>> result;public DeferredResultWrapper() {result = new DeferredResult<>(TIMEOUT, NOT_MODIFIED_RESPONSE_LIST);}
在创建 DeferredResult 对象的时候指定了超时的时间和超时后返回的响应码,如果 60s 内没有消息监听器进行通知,那么这个请求就会超时,超时后客户端收到的响应码就是 304。
整个 Config Service 的流程就走完了,接下来我们来看一下客户端是怎么实现的,我们简单地写一个测试类模拟客户端注册,具体代码如下所示。
public class ClientTest {public static void main(String[] args) {reg();}private static void reg() {System.err.println("注册");String result = request("http://localhost:8081/getConfig");if (result != null) {// 配置有更新, 重新拉取配置// ......}// 重新注册reg();}private static String request(String url) {HttpURLConnection connection = null;BufferedReader reader = null;try {URL getUrl = new URL(url);connection = (HttpURLConnection) getUrl.openConnection();connection.setReadTimeout(90000);connection.setConnectTimeout(3000);connection.setRequestMethod("GET");connection.setRequestProperty("Accept-Charset", "utf-8");connection.setRequestProperty("Content-Type", "application/json");connection.setRequestProperty("Charset", "UTF-8");System.out.println(connection.getResponseCode());if (200 == connection.getResponseCode()) {reader = new BufferedReader(new InputStreamReader(connection.getInputStream(), "UTF-8"));StringBuilder result = new StringBuilder();String line = null;while ((line = reader.readLine()) != null) {result.append(line);}System.out.println("结果 " + result);return result.toString();}} catch (IOException e) {e.printStackTrace();} finally {if (connection != null) {connection.disconnect();}}return null;}}
首先启动 /getConfig 接口所在的服务,然后启动客户端,然后客户端就会发起注册请求,如果有修改直接获取到结果,则进行配置的更新操作。如果无修改,请求会挂起,这里客户端设置的读取超时时间是 90s,大于服务端的 60s 超时时间。
每次收到结果后,无论是有修改还是无修改,都必须重新进行注册,通过这样的方式就可以达到配置实时推送的效果。
我们可以调用之前写的 /addMsg 接口来模拟配置发生变化,调用之后客户端就能马上得到返回结果。

若有收获,就点个赞吧
0 人点赞
