1. 概要
在章节 04-4-日志收集 中以较为简单的方式介绍了下 ELK 如何在 k8s 中采集日志的,并且使用了 kafka 中间件。然而,在实际的生产环境中,该方案存在很多的问题。比如采集到的接口日志(ingress-controller、业务容器)无法对其中的字段进行解析,甚至仔细查看会发现时间戳都是错误的,即kibana的中时间戳和日志message中时间戳不一样。另外ES是单点,没有配置过期的日志删除、没有索引的生命周期管理、没有SSL加密、没有用户名和密码验证等等。
因此04-4-日志收集 文章中的日志采集更重要的熟悉k8s下如何采集日志,详细配置并不适合在在生产环境使用。本篇文章将较为详细的讲解下,如何在生产环境部署ELK,读者可以根据本篇文章内容优化 04-4-日志收集 方案。
2. VM环境下ELK部署
为了让 ELK 能在高可用环境下顺利跑通,本实验在多台虚拟机上进行,该章节仅介绍部署过程。采集系统日志(message),nginx日志(access.log, error.log)。
当前部署方式涉及到的证书部分和官方的文档有一定出入,建议读者学习完ELK后,参考官方文档再部署一份。原理熟悉后,部署并不难。
本实验中的部署方案针对小规模的 ELK 集群,存在的性能瓶颈:1. es集群没有区分角色,数量不足,或成为最大瓶颈。2. filebeat直接对接 logstash,在日志数量很大的情况,会丢失数据。
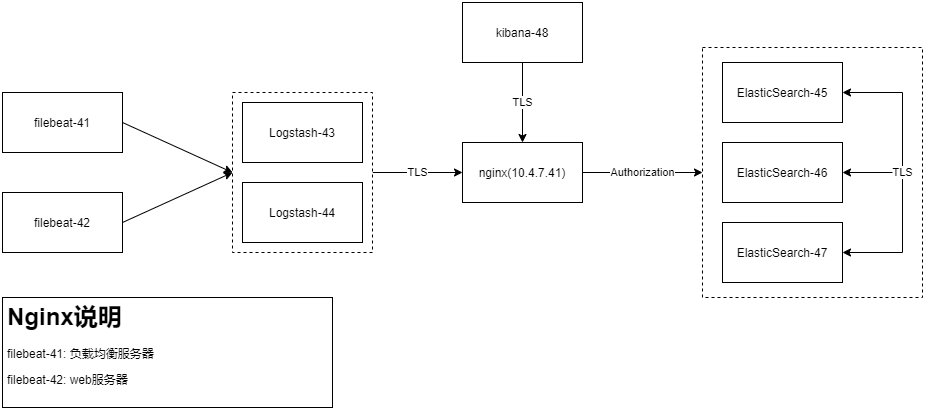
2.1. 架构图
| 主机名 | IP | OS | 配置 | 服务 |
|---|---|---|---|---|
| filebeat-41 | 10.4.7.41 | CentOS 7.5 | 1C 2G | filebeat, nginx |
| filebeat-42 | 10.4.7.42 | CentOS 7.5 | 1C 2G | filebeat, nginx |
| logstash-43 | 10.4.7.43 | CentOS 7.5 | 2C 4G | logstash |
| logstash-44 | 10.4.7.44 | CentOS 7.5 | 2C 4G | logstash |
| elasticsearch-45 | 10.4.7.45 | CentOS 7.5 | 2C 4G | elastchsearch |
| elasticsearch-46 | 10.4.7.46 | CentOS 7.5 | 2C 4G | elastchsearch |
| elasticsearch-47 | 10.4.7.47 | CentOS 7.5 | 2C 4G | elastchsearch |
| kibana-48 | 10.4.7.48 | CentOS 7.5 | 2C 4G | kibana |
2.2. 部署nginx
本次实验环境中有两个nginx,filebeat-41中nginx作为负载均衡服务器,filebeat-42中作为 web 服务器。均采用源码编译安装。nginx安装和平滑升级可参考以下文章!
01-Nginx的安装与启动
2.2.1. 部署LB
[root@filebeat-41 ~]# yum install -y gcc gcc-c++ pcre pcre-devel zlib zlib-devel openssl openssl-devel[root@filebeat-41 ~]# useradd -u 8080 -M -s /sbin/nologin nginx[root@filebeat-41 ~]# cd /opt/src/ ; wget -e "http_proxy=http://10.4.7.1:10080" -e "https_proxy=http://10.4.7.1:10080" https://nginx.org/download/nginx-1.14.2.tar.gz[root@filebeat-41 src]# tar -xf nginx-1.14.2.tar.gz[root@filebeat-41 nginx-1.14.2]# ./configure --prefix=/opt/release/nginx-1.14.2 --user=nginx --group=nginx --with-http_ssl_module && make && make install[root@filebeat-41 nginx-1.14.2]# ln -s /opt/release/nginx-1.14.2 /opt/apps/nginx
[root@filebeat-41 ~]# vim /opt/apps/nginx/conf/nginx.conf
worker_processes  1;
events {
    worker_connections  1024;
}
pid /opt/logs/nginx/nginx.pid;
http {
    include       mime.types;
    default_type  application/octet-stream;
    error_log /opt/logs/nginx/error.log error ;
    log_format access '$time_local|$http_x_real_ip|$remote_addr|$http_x_forwarded_for|$upstream_addr|'
                      '$request_method|$server_protocol|$host|$request_uri|$http_referer|$http_user_agent|'
                      '$proxy_host|$status' ;
    access_log  /opt/logs/nginx/access.log  access ;

    sendfile        on;
    keepalive_timeout  65;
    include     conf.d/*.conf;
}
[root@filebeat-41 ~]# vim /usr/lib/systemd/system/nginx.service
[Unit]
Description=nginx server
After=network-online.target remote-fs.target nss-lookup.target
Wants=network-online.target

[Service]
Type=forking
PIDFile=/opt/logs/nginx/nginx.pid
ExecStartPre=/opt/apps/nginx/sbin/nginx -t -c /opt/apps/nginx/conf/nginx.conf
ExecStart=/opt/apps/nginx/sbin/nginx -c /opt/apps/nginx/conf/nginx.conf
ExecReload=/bin/kill -s HUP $MAINPID
ExecStop=/bin/kill -s TERM $MAINPID

[Install]
WantedBy=multi-user.target
虚拟主机采用HTTPS方式访问,需要生成证书,放到后面步骤再操作。
2.2.2. 部署web服务器
[root@filebeat-42 ~]# yum install -y gcc gcc-c++ pcre pcre-devel zlib zlib-devel openssl openssl-devel
[root@filebeat-42 ~]# useradd -u 8080 -M -s /sbin/nologin nginx
[root@filebeat-42 ~]# cd /opt/src/ ; wget -e "http_proxy=http://10.4.7.1:10080" -e "https_proxy=http://10.4.7.1:10080" https://nginx.org/download/nginx-1.14.2.tar.gz
[root@filebeat-42 src]# tar -xf nginx-1.14.2.tar.gz && cd nginx-1.14.2
[root@filebeat-42 nginx-1.14.2]# ./configure --prefix=/opt/release/nginx-1.14.2 --user=nginx --group=nginx --with-http_ssl_module && make && make install
[root@filebeat-42 nginx-1.14.2]# ln -s /opt/release/nginx-1.14.2 /opt/apps/nginx
[root@filebeat-42 ~]# vim /opt/apps/nginx/conf/nginx.conf
worker_processes  1;
events {
    worker_connections  1024;
}


http {
    include       mime.types;
    default_type  application/octet-stream;
    error_log /opt/logs/nginx/error.log error ;
    log_format access '$time_local|$http_x_real_ip|$remote_addr|$http_x_forwarded_for|$upstream_addr|'
                      '$request_method|$server_protocol|$host|$request_uri|$http_referer|$http_user_agent|'
                      '$proxy_host|$status' ;
    access_log  /opt/logs/nginx/access.log  access ;

    sendfile        on;
    keepalive_timeout  65;
    include     conf.d/*.conf;
}
[root@filebeat-42 ~]# vim /opt/apps/nginx/conf/conf.d/web.conf
server {
    listen       80;
    server_name  localhost;
    location / {
        root   /data/web/;
        index  index.html index.htm;
    }
    location ~ /test {
        proxy_pass http://zrzy.jiangsu.gov.cn ;
    }
    location ~ /gtzx {
        root   /data/web/;
    }
    location ~ /gt[a-z]+ {
        proxy_pass http://zrzy.jiangsu.gov.cn ;
    }
    error_page   500 502 503 504  /50x.html;
    error_page   404 /404.html;
    location = /50x.html {
        return 500 "server error";
    }
    location = /404.html {
        return 404 "not found";
    }
}
[root@filebeat-42 ~]# mkdir -p /opt/logs/nginx
[root@filebeat-42 ~]# tar -xf web.tar.gz -C /data/
[root@filebeat-42 ~]# /opt/apps/nginx/sbin/nginx -t
nginx: the configuration file /opt/release/nginx-1.14.2/conf/nginx.conf syntax is ok
nginx: configuration file /opt/release/nginx-1.14.2/conf/nginx.conf test is successful
[root@filebeat-42 ~]# /opt/apps/nginx/sbin/nginx
网页的HTLM代码包:web.tar.gz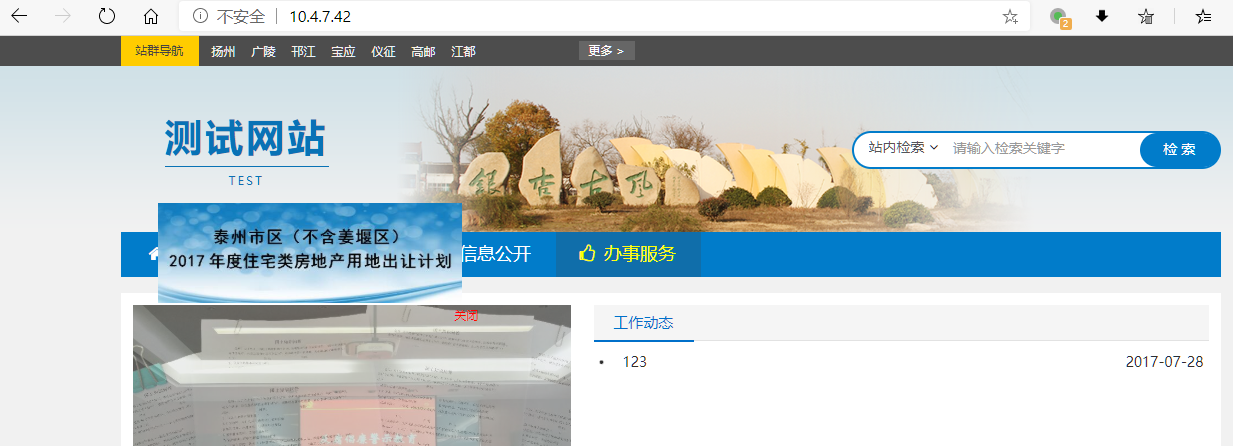
2.3. 部署es集群
2.3.1. es软件安装
- java 环境说明:
在 elasticsearch下载页,如果选择不带jdk的版本,则需要手动安装jdk,不同版本对jdk要求不同,可选择安装openjdk,本次是专用机器,没有其它需要jdk的应用,因此,直接下载带 jdk 版本的二进制包。
- 三个节点下载并安装 elasticsearch ``` [root@elasticsearch-46 ~]# cd /opt/src/ [root@elasticsearch-46 src]# wget -e “https_proxy=http://10.4.7.1:10080“ https://artifacts.elastic.co/downloads/elasticsearch/elasticsearch-7.9.2-linux-x86_64.tar.gz
[root@elasticsearch-46 src]# tar -xf elasticsearch-7.9.2-linux-x86_64.tar.gz -C /opt/release/ [root@elasticsearch-46 src]# ln -s /opt/release/elasticsearch-7.9.2 /opt/apps/elasticsearch [root@elasticsearch-46 src]# mkdir /data/elasticsearch/ /opt/logs/elasticsearch -p [root@elasticsearch-46 src]# groupadd -g 9200 es;useradd -g 9200 -u 9200 -M -s /sbin/nologin es [root@elasticsearch-46 src]# chown -R es.es /opt/release/elasticsearch-7.9.2 [root@elasticsearch-46 src]# chown -R es.es /opt/logs/elasticsearch /data/elasticsearch
[root@elasticsearch-46 src]# vim /usr/lib/systemd/system/elasticsearch.service [Unit] Description=Elasticsearch Documentation=https://www.elastic.co After=network.target
[Service] User=es Group=es LimitNOFILE=65535 LimitNPROC=4096 LimitAS=infinity LimitFSIZE=infinity TimeoutStopSec=0 KillMode=control-group Restart=on-failure RestartSec=60 ExecStart=/opt/apps/elasticsearch/bin/elasticsearch StandardOutput=null StandardError=null
[Install] WantedBy=multi-user.target [root@elasticsearch-46 src]# systemctl daemon-reload
<a name="01f5813e"></a>
#### 2.3.2. 制作SSL证书
该证书用于集群节点之间认证的,避免随意加入新的 es 节点。一般教程都是使用 es 自带的命令行工具来生成,其实只需要搞懂证书的原理,就可以用openssl来生成。证书原理参考以下博客。需要注意的是,es不支持多域名证书!<br />[06-1-密码学基础](https://www.yuque.com/duduniao/nginx/smgh7e?view=doc_embed)
[root@devops-7-3 ~]# mkdir -p ssl/elk [root@devops-7-3 ~]# cd ssl/elk [root@devops-7-3 elk]# openssl genrsa -out ca-key.pem 2048 [root@devops-7-3 elk]# openssl req -new -out ca-req.csr -key ca-key.pem [root@devops-7-3 elk]# openssl x509 -req -in ca-req.csr -out ca-cert.pem -signkey ca-key.pem -days 3650
```
# 图省事可以仅仅生成一个空域名证书, 有CA证书就可以随意签署N多个es的证书
[root@devops-7-3 elk]# openssl genrsa -out es.key 2048
[root@devops-7-3 elk]# openssl req -new -out es-req.csr -key es.key
[root@devops-7-3 elk]# openssl x509 -req -in es-req.csr -out es.pem -signkey es.key -CA ca-cert.pem -CAkey ca-key.pem -CAcreateserial -days 3650
[root@devops-7-3 elk]# ll | grep -E "key|pem"
-rw-r--r-- 1 root root 1103 2020-10-04 20:49:27 ca-cert.pem
-rw-r--r-- 1 root root 1679 2020-10-04 20:48:56 ca-key.pem
-rw-r--r-- 1 root root 1679 2020-10-04 21:01:31 es.key
-rw-r--r-- 1 root root 1249 2020-10-04 21:03:02 es.pem
[root@devops-7-3 elk]# tar -zcf es-cert.tar ca-cert.pem es.key es.pem
[root@elasticsearch-46 ~]# mkdir /opt/apps/elasticsearch/config/certs
[root@elasticsearch-46 ~]# cd /opt/apps/elasticsearch/config/certs
[root@elasticsearch-46 certs]# scp 10.4.7.3:/root/ssl/elk/es-cert.tar /opt/apps/elasticsearch/config/certs/
[root@elasticsearch-46 certs]# tar -xf es-cert.tar
[root@elasticsearch-46 certs]# rm -f es-cert.tar
[root@elasticsearch-46 certs]# ll
total 12
-rw-r--r-- 1 root root 1103 Oct  4 20:49 ca-cert.pem
-rw-r--r-- 1 root root 1679 Oct  4 21:01 es.key
-rw-r--r-- 1 root root 1249 Oct  4 21:03 es.pem
[root@elasticsearch-46 certs]# chown -R es.es * ; chmod 400 es.key # 应该在生成key时使用 umask 命令更合适
2.3.3. 简单配置 elasticsearch
[root@elasticsearch-46 certs]# vim /opt/apps/elasticsearch/config/elasticsearch.yml
cluster.name: elasticsearch-log-cluster
node.name: node-2 # 不同节点需要修改
path.data: /data/elasticsearch/data
path.logs: /opt/logs/elasticsearch
network.host: 10.4.7.46 # 不同节点需要修改,生产中如果有DNS服务器,推荐使用域名,制作证书也用得上
http.port: 9200
# https://www.elastic.co/guide/en/elasticsearch/reference/current/modules-discovery-settings.html
discovery.seed_hosts: ["10.4.7.45","10.4.7.46","10.4.7.47"] # 静态指定具备master资格的节点地址
cluster.initial_master_nodes: ["node-1", "node-2", "node-3"] # 初次形成集群时,显示指定具备master节点资格的列表

# 开启用户认证,仅对节点加入集群做验证
xpack.security.enabled: true
xpack.security.transport.ssl.enabled: true
xpack.security.transport.ssl.verification_mode: certificate
xpack.security.transport.ssl.key: config/certs/es.key
xpack.security.transport.ssl.certificate: config/certs/es.pem
xpack.security.transport.ssl.certificate_authorities: config/certs/ca-cert.pem
[root@elasticsearch-46 certs]# vim /opt/apps/elasticsearch/config/jvm.options
# 官方建议为物理内存的一半
-Xms2g
-Xmx2g
# specify an alternative path for JVM fatal error logs
-XX:ErrorFile=/opt/logs/elasticsearch/hs_err_pid%p.log

# JDK 9+ GC logging
9-:-Xlog:gc*,gc+age=trace,safepoint:file=/opt/logs/elasticsearch/gc.log:utctime,pid,tags:filecount=32,filesize=64m
- 系统参数调整
https://www.elastic.co/guide/en/elasticsearch/reference/7.4/setting-system-settings.html
/etc/security/limits.conf 中调整对 systemctl 方式启动的进程无效,因此此处不做配置,采用非 systemctl 启动的需要参考官方文档配置。本实验仅对 系统参数做简单调整: vm.max_map_count = 262144
- 启动es集群
按照上述配置部署 es 集群后,使用systemctl 启动 es 服务
[root@elasticsearch-46 ~]# systemctl start elasticsearch.service
[root@elasticsearch-46 ~]# systemctl enable elasticsearch.service
2.3.4. 初始化密码
[root@elasticsearch-46 certs]# cd /opt/apps/elasticsearch/
[root@elasticsearch-46 elasticsearch]# bin/elasticsearch-setup-passwords auto
Initiating the setup of passwords for reserved users elastic,apm_system,kibana,kibana_system,logstash_system,beats_system,remote_monitoring_user.
The passwords will be randomly generated and printed to the console.
Please confirm that you would like to continue [y/N]y


Changed password for user apm_system
PASSWORD apm_system = D0Zdw1yM6gY4zJycobIL

Changed password for user kibana_system
PASSWORD kibana_system = dDZ1hI15OEPI9QrR03PC

Changed password for user kibana
PASSWORD kibana = dDZ1hI15OEPI9QrR03PC

Changed password for user logstash_system
PASSWORD logstash_system = pBqAOkpeQrryTcDzrGQs

Changed password for user beats_system
PASSWORD beats_system = A85BPzYIBflCuwWf3kzq

Changed password for user remote_monitoring_user
PASSWORD remote_monitoring_user = QQnaCTlVoYq1VYj7b7QF

Changed password for user elastic
PASSWORD elastic = npAThrZ5k7ZJN8zOEQ8F
查看集群状态
[root@elasticsearch-47 ~]# curl -u elastic:npAThrZ5k7ZJN8zOEQ8F 10.4.7.47:9200/_cluster/health?pretty
{
"cluster_name" : "elasticsearch-log-cluster",
"status" : "green",
"timed_out" : false,
"number_of_nodes" : 3,
"number_of_data_nodes" : 3,
"active_primary_shards" : 1,
"active_shards" : 2,
"relocating_shards" : 0,
"initializing_shards" : 0,
"unassigned_shards" : 0,
"delayed_unassigned_shards" : 0,
"number_of_pending_tasks" : 0,
"number_of_in_flight_fetch" : 0,
"task_max_waiting_in_queue_millis" : 0,
"active_shards_percent_as_number" : 100.0
}
2.3.5. 配置es的HTTP LB
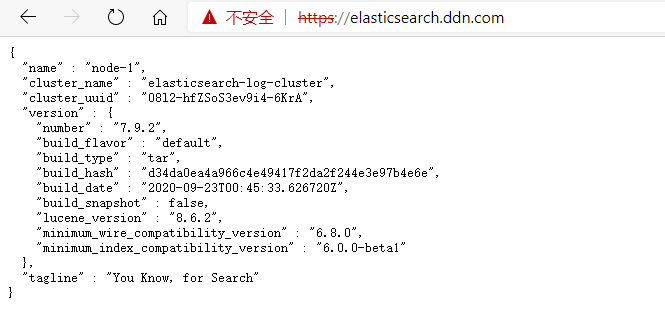
生成es 的域名证书
需要注意的是,logstash需要连接该域名,而 elk 组件不支持解析多域名证书,因此需要单独为 elasticsearch.ddn.com 签发证书。
[root@devops-7-3 elk]# openssl genrsa -out elasticsearch-ddn.key 2048
[root@devops-7-3 elk]# openssl req -new -out elasticsearch-ddn-req.csr -key elasticsearch-ddn.key
[root@devops-7-3 elk]# openssl x509 -req -in elasticsearch-ddn-req.csr -out elasticsearch-ddn.pem -signkey elasticsearch-ddn.key -CA ca-cert.pem -CAkey ca-key.pem -CAcreateserial -days 3650
Signature ok
subject=/C=CN/ST=JS/L=NJ/O=Default Company Ltd/CN=elasticsearch.ddn.com
Getting Private key
Getting CA Private Key
[root@devops-7-3 elk]# chmod 400 elasticsearch-ddn*
[root@devops-7-3 elk]# scp elasticsearch-ddn* 10.4.7.41:/opt/apps/nginx/conf/ssl_key/
配置es的LB ``` [root@filebeat-41 ~]# cat /opt/apps/nginx/conf/conf.d/elasticsearch.conf server { listen 443 ssl; server_name elasticsearch.ddn.com; keepalive_timeout 100s ; ## 增加长连接的时间 keepalive_requests 200 ;
ssl_certificate ssl_key/elasticsearch-ddn.pem ; ssl_certificate_key ssl_key/elasticsearch-ddn.key ; ssl_ciphers HIGH:!aNULL:!MD5 ; ssl_session_cache shared:SSL:30m ; ## 设置SSL session缓存 ssl_session_timeout 10m ; location / {
proxy_pass http://elasticsearch;} }
upstream elasticsearch { server 10.4.7.45:9200; server 10.4.7.46:9200; server 10.4.7.47:9200; }
<a name="GVoG5"></a>
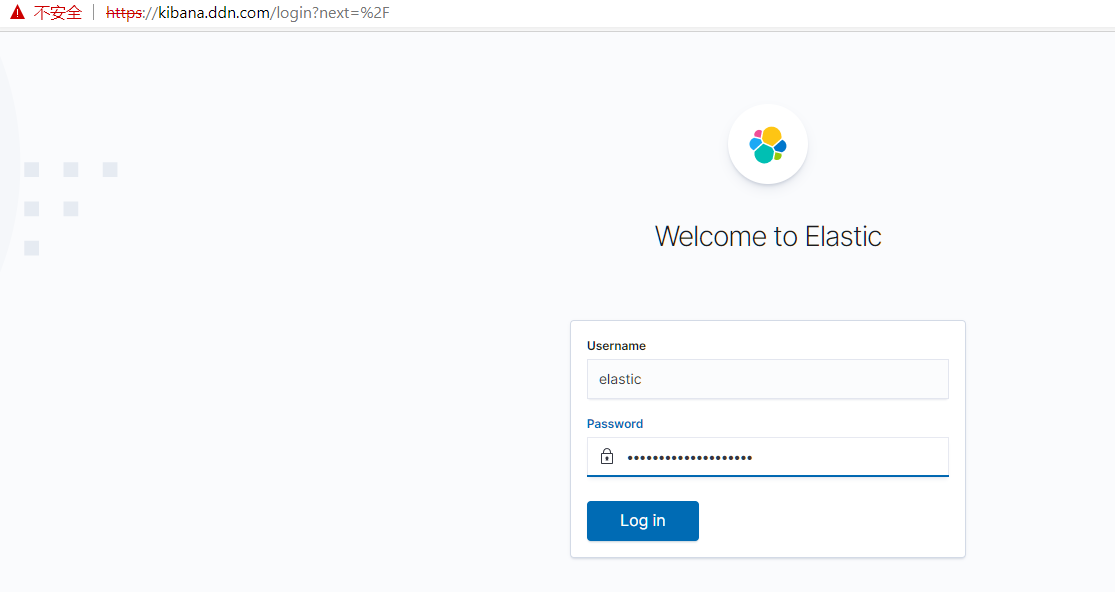
### 2.4. 部署kibana
<a name="UZ9JM"></a>
#### 2.4.1. 安装kibana
需要注意的时,此项目中,kibana直接连接ES的LB,因此在走 https 协议情况,es 的域名证书不能是多域名证书。
[root@kibana-48 ~]# cd /opt/src/ [root@kibana-48 src]# wget -e “https_proxy=http://10.4.7.1:10080“ https://artifacts.elastic.co/downloads/kibana/kibana-7.9.2-linux-x86_64.tar.gz [root@kibana-48 src]# tar -xf kibana-7.9.2-linux-x86_64.tar.gz -C /opt/release/ [root@kibana-48 src]# ln -s /opt/release/kibana-7.9.2-linux-x86_64 /opt/apps/kibana [root@devops-7-3 elk]# scp ca-cert.pem 10.4.7.48:/opt/apps/kibana/config/certs/ca-cert.pem
```
[root@kibana-48 ~]# vim /opt/apps/kibana/config/kibana.yml
server.port: 5601
server.host: "0.0.0.0"
elasticsearch.hosts: ["https://elasticsearch.ddn.com:443"]
elasticsearch.ssl.certificateAuthorities: ["/opt/apps/kibana/config/certs/ca-cert.pem"]
elasticsearch.username: "kibana_system"
elasticsearch.password: "dDZ1hI15OEPI9QrR03PC"
[root@kibana-48 src]# vim /usr/lib/systemd/system/kibana.service
[Unit]
Description=kibana service
After=network.target

[Service]
User=nobody
Group=nobody
KillMode=control-group
Restart=on-failure
RestartSec=60
ExecStart=/opt/apps/kibana/bin/kibana -q

[Install]
WantedBy=multi-user.target
[root@kibana-48 src]# systemctl daemon-reload
[root@kibana-48 src]# systemctl start kibana.service ; systemctl enable kibana.service
需要注意:在启动 Kibana 的时候日志会有一些报错(warning和error),在 /var/log/message 中可以查看,读者可以自行解决(解决报错时,建议直接命令行执行 /opt/apps/kibana/bin/kibana --allow-root ),即使不处理,也能使用 kibana 的基本功能,常用操作不受影响。
2.4.4. 配置kibana的代理
[root@devops-7-3 elk]# openssl genrsa -out kibana-ddn.key 2048
[root@devops-7-3 elk]# openssl req -new -out kibana-ddn-req.csr -key kibana-ddn.key
[root@devops-7-3 elk]# openssl x509 -req -in kibana-ddn-req.csr -out kibana-ddn.pem -signkey kibana-ddn.key -CA ca-cert.pem -CAkey ca-key.pem -CAcreateserial -days 3650
Signature ok
subject=/C=CN/ST=JS/L=NJ/O=Default Company Ltd/CN=kibana.ddn.com
Getting Private key
Getting CA Private Key
[root@devops-7-3 elk]# chmod 400 kibana-ddn*
[root@devops-7-3 elk]# ll kibana-ddn*
-r-------- 1 root root 1675 2020-10-11 21:54:18 kibana-ddn.key
-r-------- 1 root root 1139 2020-10-11 21:55:36 kibana-ddn.pem
-r-------- 1 root root  993 2020-10-11 21:55:06 kibana-ddn-req.csr
[root@devops-7-3 elk]# scp kibana-ddn* 10.4.7.41:/opt/apps/nginx/conf/ssl_key/
[root@filebeat-41 ~]# cat /opt/apps/nginx/conf/conf.d/kibanna.conf
server {
    listen 443 ssl;
    server_name kibana.ddn.com;
    keepalive_timeout 100s ;    ## 增加长连接的时间
    keepalive_requests 200 ;

    ssl_certificate ssl_key/kibana-ddn.pem ;
    ssl_certificate_key ssl_key/kibana-ddn.key ;
    ssl_ciphers HIGH:!aNULL:!MD5 ;
    ssl_session_cache shared:SSL:30m ;  ## 设置SSL session缓存
    ssl_session_timeout 10m ;
    location / {
        proxy_pass http://10.4.7.48:5601;
    }
}
2.4.3. 配置logstash用户
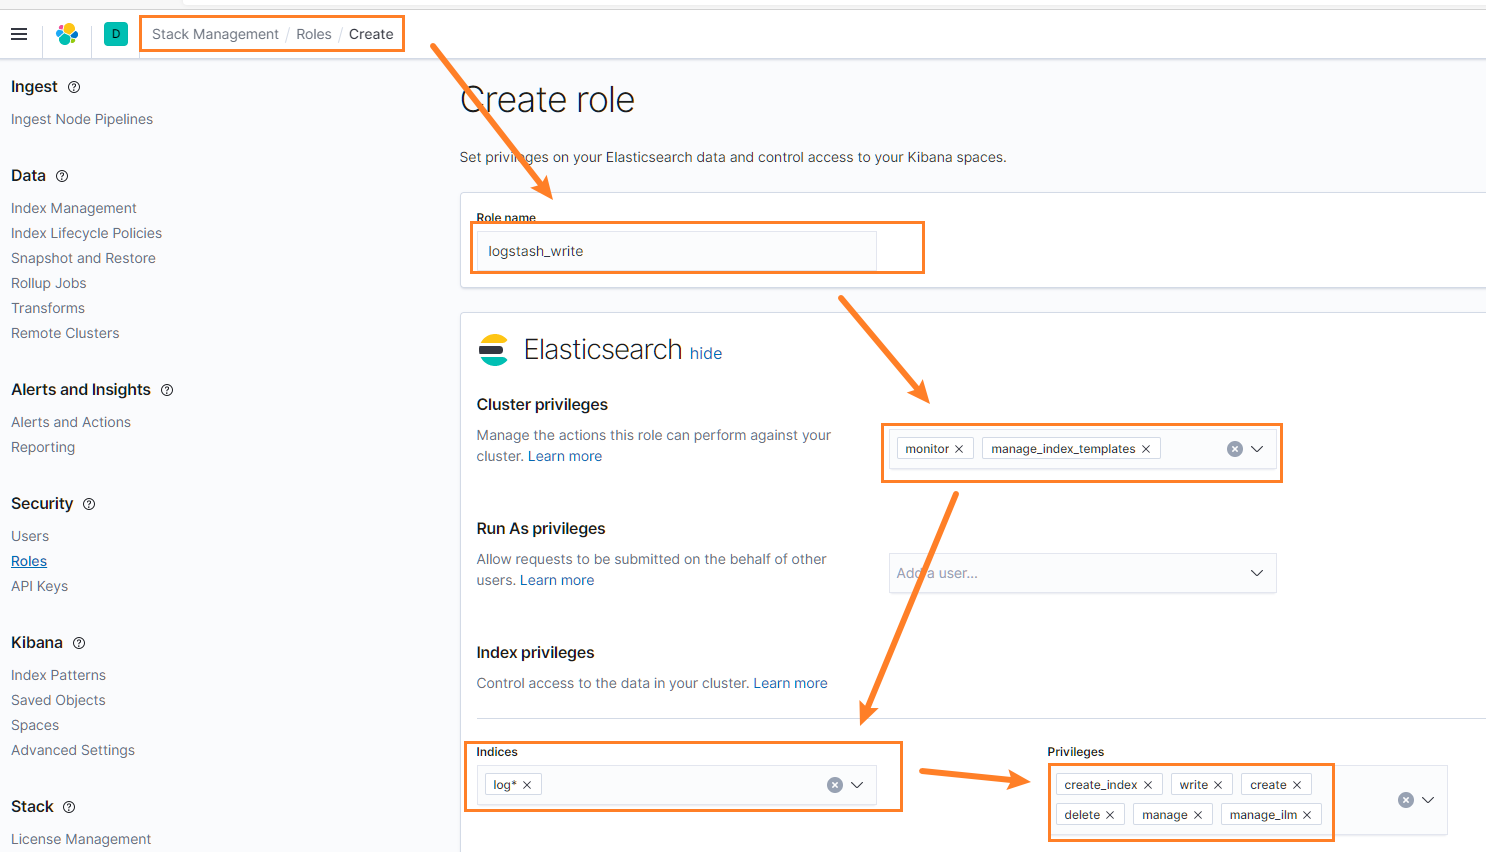
如果使用 Elasticsearch API 创建,参考以下方式:
POST /_security/role/logstash_write_role
{
    "cluster": [
      "monitor",
      "manage_index_templates"
    ],
    "indices": [
      {
        "names": [
          "logstash*"
        ],
        "privileges": [
          "write",
          "create_index"
        ],
        "field_security": {
          "grant": [
            "*"
          ]
        }
      }
    ],
    "run_as": [],
    "metadata": {},
    "transient_metadata": {
      "enabled": true
    }
}
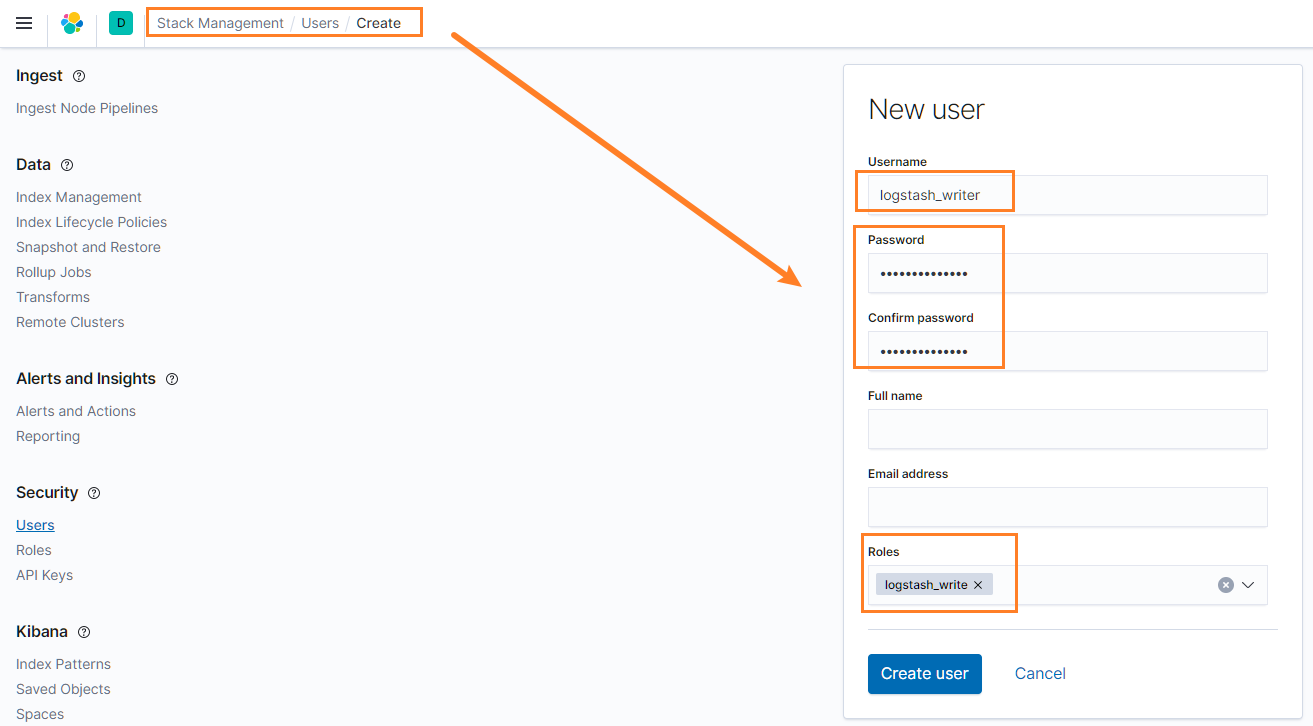
POST /_security/user/logstash_writer
{
  "username": "logstash_writer",
  "roles": [
    "logstash_write_role"
  ],
  "full_name": null,
  "email": null,
  "password": "<logstash_system_password>",
  "enabled": true
}
2.5. 部署logstash
2.5.1. 安装logstash
安装jdk,jdk11或者以上版本,logstash没有自带jdk
[root@logstash-43 ~]# cd /opt/src
[root@logstash-43 src]# wget -e "https_proxy=http://10.4.7.1:10080" https://download.java.net/openjdk/jdk11/ri/openjdk-11+28_linux-x64_bin.tar.gz
[root@logstash-43 src]# tar -xf openjdk-11+28_linux-x64_bin.tar.gz -C /opt/release/
[root@logstash-43 src]# ln -s /opt/release/jdk-11 /opt/apps/jdk
[root@logstash-43 src]# ll /opt/apps/jdk
lrwxrwxrwx 1 root root 19 Oct 11 20:48 /opt/apps/jdk -> /opt/release/jdk-11
[root@logstash-43 src]# vim /etc/profile.d/java.sh
#!/bin/bash
export JAVA_HOME='/opt/apps/jdk'
export PATH=$PATH:$JAVA_HOME/bin
[root@logstash-43 src]# source /etc/profile.d/java.sh
[root@logstash-43 src]# java -version
openjdk version "11" 2018-09-25
OpenJDK Runtime Environment 18.9 (build 11+28)
OpenJDK 64-Bit Server VM 18.9 (build 11+28, mixed mode
安装logstash
[root@logstash-43 ~]# cd /opt/src
[root@logstash-43 src]# wget -e "https_proxy=http://10.4.7.1:10080" https://artifacts.elastic.co/downloads/logstash/logstash-7.9.2.tar.gz
[root@logstash-43 src]# tar -xf logstash-7.9.2.tar.gz -C /opt/release/
[root@logstash-43 src]# ln -s /opt/release/logstash-7.9.2 /opt/apps/logstash
[root@logstash-43 src]# ll /opt/apps/logstash
lrwxrwxrwx 1 root root 27 Oct 11 20:31 /opt/apps/logstash -> /opt/release/logstash-7.9.2
``` [root@logstash-43 ~]# mkdir -p /opt/logs/logstash /data/logstash [root@logstash-43 ~]# chown -R nobody.nobody /opt/release/logstash-7.9.2 /opt/logs/logstash /data/logstash [root@logstash-43 ~]# vim /usr/lib/systemd/system/logstash.service [Unit] Description=logstash service After=network.target
[Service] User=nobody Group=nobody KillMode=control-group Restart=on-failure RestartSec=60 Environment=”JAVA_HOME=/opt/apps/jdk” Environment=”PATH=/usr/local/sbin:/usr/local/bin:/usr/sbin:/usr/bin:$JAVA_HOME/bin” ExecStart=/opt/apps/logstash/bin/logstash -f /opt/apps/logstash/config/pipeline-from-filebeat.conf
[Install] WantedBy=multi-user.target [root@logstash-43 ~]# systemctl daemon-reload
<a name="vmFCi"></a>
#### 2.5.2. 配置logstash
此部分不展开讲配置项的含义,相关配置字段在 ELK 组件介绍中查找,推荐查阅官网。<br />logstash 连接 es 时不支持多域名证书,会报错: `Duplicate extensions not allowed`
[root@logstash-43 src]# vim /opt/apps/logstash/config/logstash.yml node.name: logstash-node1 path: data: /data/logstash/data # /data/数据存放位置 logs: /opt/logs/logstash
log.level: warn
config: reload: automatic: true # 自动加载配置文件 interval: 10s # 扫描配置的间隔
持久化队列
queue: type: persisted # 持久化队列,在没有外部队列情况下,避免logstash故障导致数据丢失 max_bytes: 4096mb # 持久化队列的大小,超过将不再接受input。大队列性能差
Pipeline
pipeline: workers: 2 # 如果当前机器不承担其它业务,可以不设置。默认与CPU核心相同 ordered: false # 设置pipeline事件是否排序,不排序可以提升性能
```
[root@logstash-43 ~]# cat /opt/apps/logstash/config/pipeline-from-filebeat.conf
input {
    beats {
        port => "5044"
    }
}

filter {
    # access.log
    if [log_type] == "nginx_access" {
        dissect {
            mapping => {
                "message" => "%{time}|%{http_x_real_ip}|%{remote_addr}|%{http_x_forwarded_for}|%{upstream_addr}|%{request_method}|%{server_protocol}|%{server_name}|%{request_uri}|%{http_referer}|%{http_user_agent}|%{proxy_host}|%{status}"
            }
        }
        date {
            match => ["time","dd/MMM/yyyy:HH:mm:ss Z"]
            target => "@timestamp"
        }
        mutate {
            add_field => { "[@metadata][target_index]" => "log-nginx-access-%{+YYYY.MM}" }
        }
    } else if [log_type] == "nginx_error" {
        grok {
            match => [
                "message", "(?<time>\d{4}/\d{2}/\d{2}\s{1,}\d{2}:\d{2}:\d{2})\s{1,}\[%{DATA:err_severity}\]\s{1,}(%{NUMBER:pid:int}#%{NUMBER}:\s{1,}\*%{NUMBER}|\*%{NUMBER}) %{DATA:err_message}(?:,\s{1,}client:\s{1,}(?<client_ip>%{IP}|%{HOSTNAME}))(?:,\s{1,}server:\s{1,}%{IPORHOST:server})(?:, request: %{QS:request})?(?:, host: %{QS:server_name})?(?:, referrer: \"%{URI:referrer})?",
                "message", "(?<time>\d{4}/\d{2}/\d{2}\s{1,}\d{2}:\d{2}:\d{2})\s{1,}\[%{DATA:err_severity}\]\s{1,}%{GREEDYDATA:err_message}"
            ]
        }
        date {
            match => ["time","yyyy/MM/dd HH:mm:ss"]
            target => "@timestamp"
        }
        mutate {
            add_field => { "[@metadata][target_index]" => "log-nginx-error-%{+YYYY.MM}" }
        }
    } else if [log_type] == "syslog" {
        grok {
            match => { "message" => "(?<time>\w+\s{1,}\d+\s{1,}\d+:\d+:\d+)\s{1,}(?<process>[^:]+):\s{1,}(?<sys_message>.+)" }
        }
        date {
            match => ["time", "MMM d HH:mm:ss"]
            target => "@timestamp"
        }
        mutate {
            add_field => { "[@metadata][target_index]" => "log-syslog-%{+YYYY.MM}" }
        }
    } else {
        mutate {
            add_field => { "[@metadata][target_index]" => "log-others-%{+YYYY.MM}" }
        }
    }

    mutate {
        copy => {"[host][hostname]" => "hostname" }
        copy => {"[@metadata][ip_address]" => "ip" }
        remove_field => ["host","ecs","time","tags"]
    }
}

output {
    elasticsearch {
        hosts => ["https://elasticsearch.ddn.com:443"]
        index => "%{[@metadata][target_index]}"
        cacert => "/opt/apps/logstash/config/certs/ca.pem"
        user => "logstash_writer"
        password => "Logstash123456"
    }
}
[root@logstash-43 ~]# systemctl start logstash.service
[root@logstash-43 ~]# systemctl enable logstash.service
2.6. 部署filebeat
2.6.1. 部署filebeat
[root@filebeat-42 ~]# cd /opt/src/
[root@filebeat-42 src]# wget -e "https_proxy=http://10.4.7.1:10080" https://artifacts.elastic.co/downloads/beats/filebeat/filebeat-7.9.2-linux-x86_64.tar.gz
[root@filebeat-42 src]# tar -xf filebeat-7.9.2-linux-x86_64.tar.gz -C /opt/release/
[root@filebeat-42 src]# ln -s /opt/release/filebeat-7.9.2-linux-x86_64 /opt/apps/filebeat
[root@filebeat-42 ~]# vim /usr/lib/systemd/system/filebeat.servicee
[Unit]
Description=filebeat service
After=network.target

[Service]
User=root
Group=root
KillMode=control-group
Restart=on-failure
RestartSec=60
ExecStart=/opt/apps/filebeat/filebeat -c /opt/apps/filebeat/filebeat.yml

[Install]
WantedBy=multi-user.target
[root@filebeat-42 ~]# systemctl daemon-reload
2.6.2. 配置filebeat
[root@filebeat-42 ~]# vim /opt/apps/filebeat/filebeat.yml
# filebeat common config
path:
  home: /opt/apps/filebeat
  logs: /opt/logs/filebeat
  config: /opt/apps/filebeat
logging:
  level: info
  to_files: true
  files:
    path: /opt/logs/filebeat
    name: filebeat.log
    keepfiles: 3
    permissons: 0644
    rotateonstartup: false    # 禁止每次重启切割
    rotateeverybytes: 5252880 # 默认10m切割一次,单位 Byte

# loading external config
filebeat.config.inputs:
  enabled: true
  path: ${path.config}/inputs.d/*.yml
  reload.enabled: true  # 自动加载

# ---------------------------- Elasticsearch Output ----------------------------
# output.elasticsearch:
#   hosts: ["10.4.7.45:9200"] # es 地址列表
#   protocol: http            # 协议,支持http和https
#   indices:                  # 不同的日志打入不同的索引,方便筛选.未匹配的,打入 filebet-* 索引
#     - index: "nginx-info-%{+yyyy-MM-dd}"
#       when.regexp:
#         log.file.path: "/opt/logs/nginx/access.log"
#     - index: "nginx-error-%{+yyyy-MM-dd}"
#       when.regexp:
#         log.file.path: "/opt/logs/nginx/error.log"
#     - index: "system-message-%{+yyyy-MM-dd}"
#       when.regexp:
#         log.file.path: "/var/log/messages"
# ================================= Logstash  =================================
output.logstash:
  hosts: ["10.4.7.43:5044", "10.4.7.44:5044"]
  loadbalance: true # 负载均衡方式将日志轮流打入多个logstash
# ================================= Processors =================================
processors:
  - add_host_metadata:
      when.not.contains.tags: forwarded
  - add_cloud_metadata: ~
  - add_docker_metadata: ~
  - add_kubernetes_metadata: ~
[root@filebeat-42 ~]# vim /opt/apps/filebeat/inputs.d/nginx.yml
- type: log
  paths: ['/opt/logs/nginx/access.log*']
  ignore_older: 72h
  fields:
    log_type: nginx_access
  fields_under_root: true

- type: log
  paths: ['/opt/logs/nginx/error.log*']
  ignore_older: 72h
  fields:
    log_type: nginx_error
  fields_under_root: true  # 使得log_type称为一级字段
[root@filebeat-42 ~]# vim /opt/apps/filebeat/inputs.d/system.yml # 一般不采集系统日志,此处仅作为演示
- type: log
  paths: ['/var/log/messages']
  exclude_lines:
    - "Started Session"
    - "Starting Session"
  ignore_older: 72h
  fields:
    log_type: syslog
  fields_under_root: true
[root@filebeat-42 ~]# systemctl start filebeat.service
[root@filebeat-42 ~]# systemctl enable filebeat.service
2.7. 测试集群
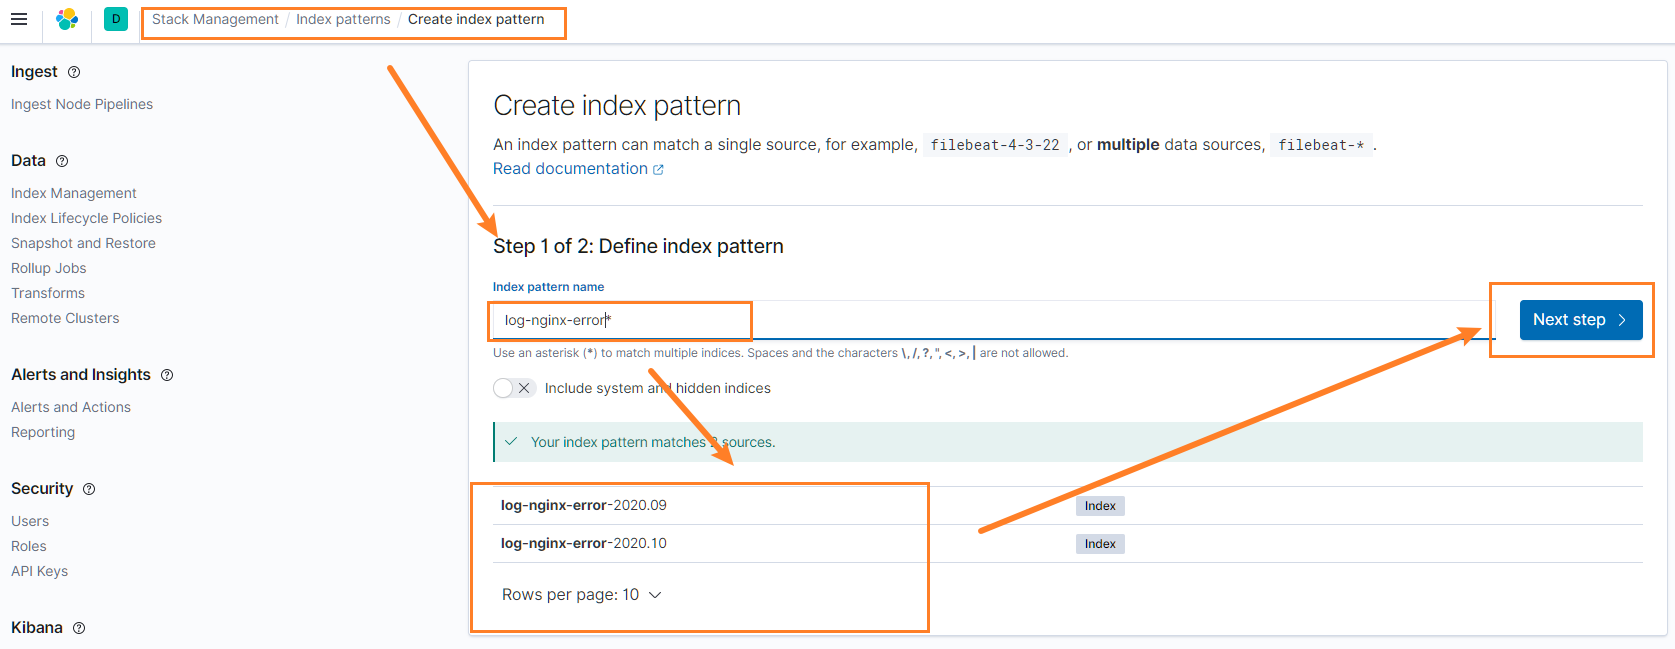
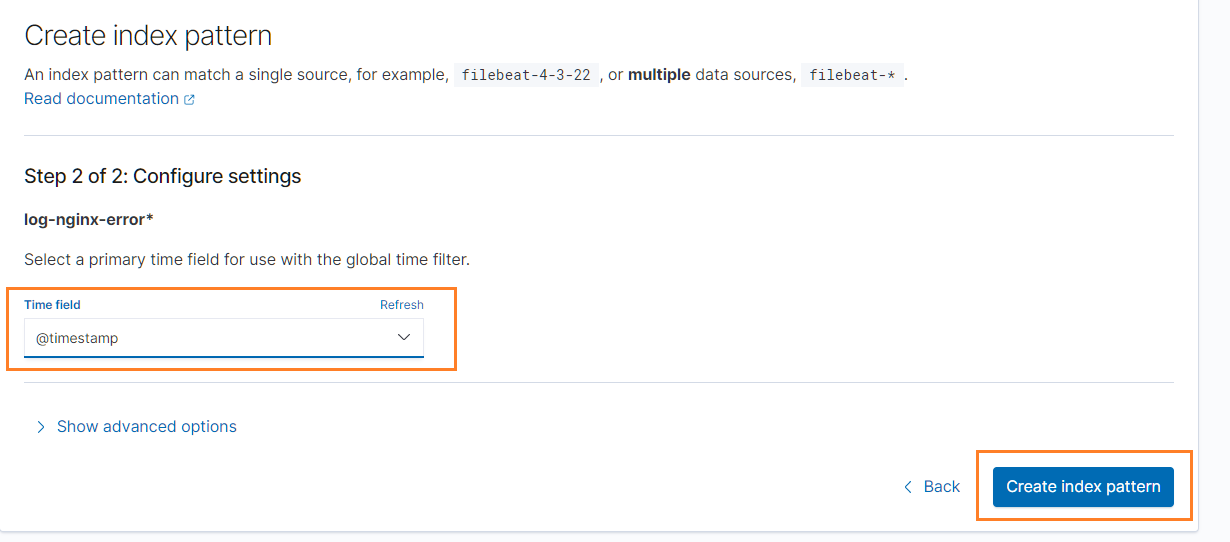
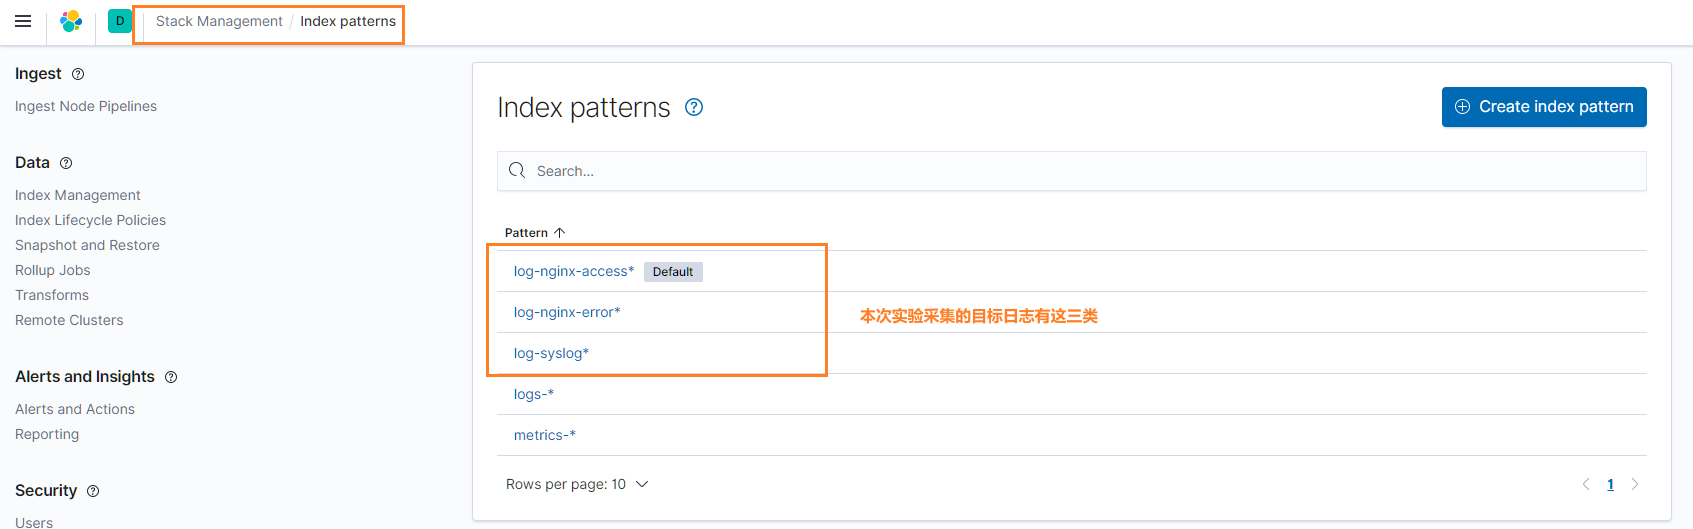
2.7.1. 配置kibana索引信息
添加索引前,推荐先产生一些日志信息,如访问 本次实验部署的 web 服务器。否则可能缺少数据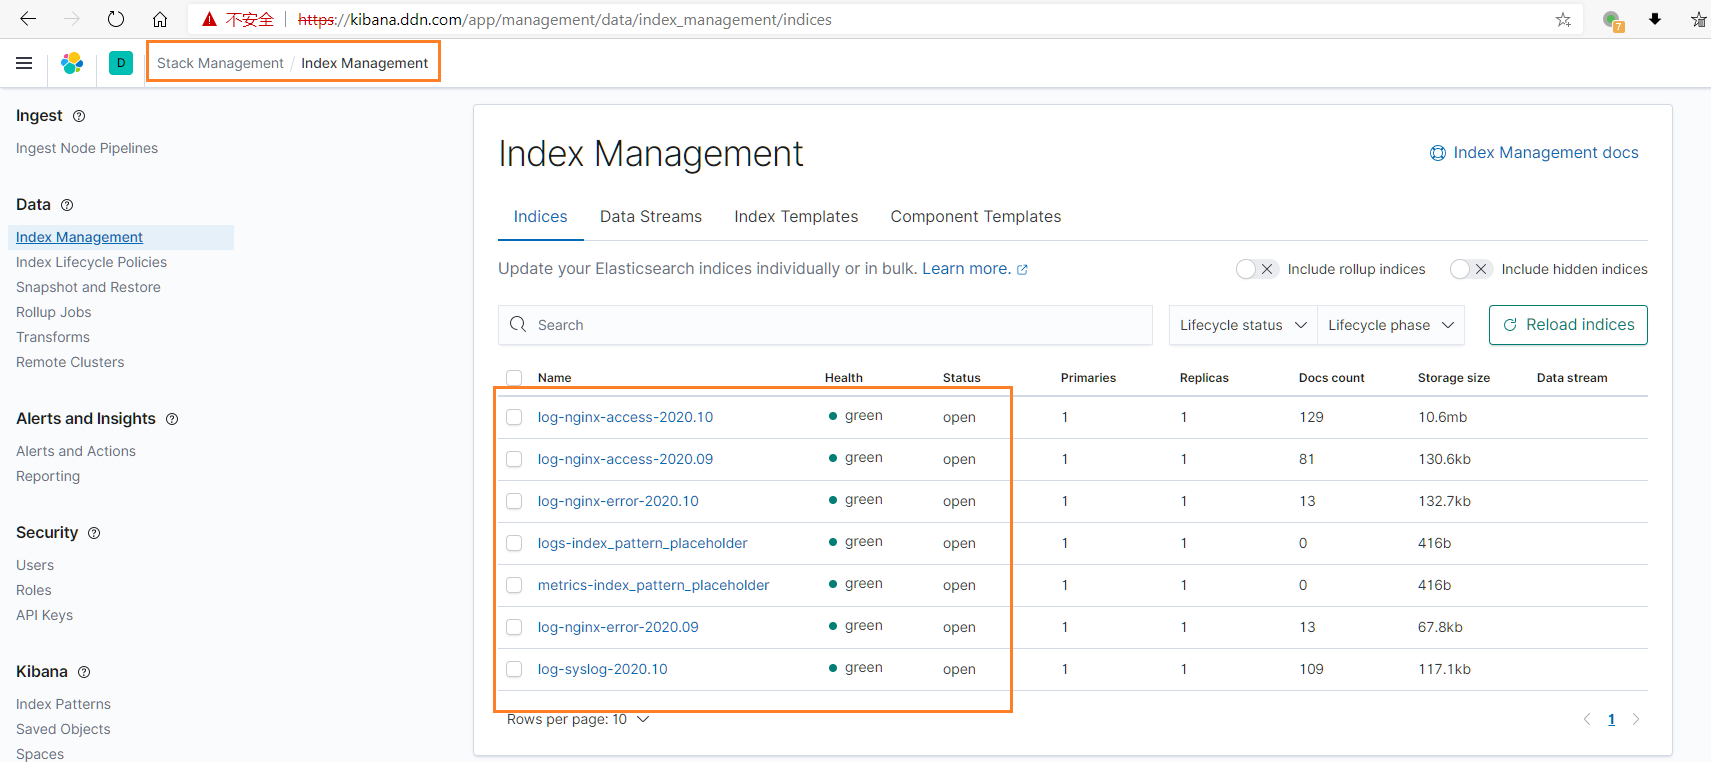
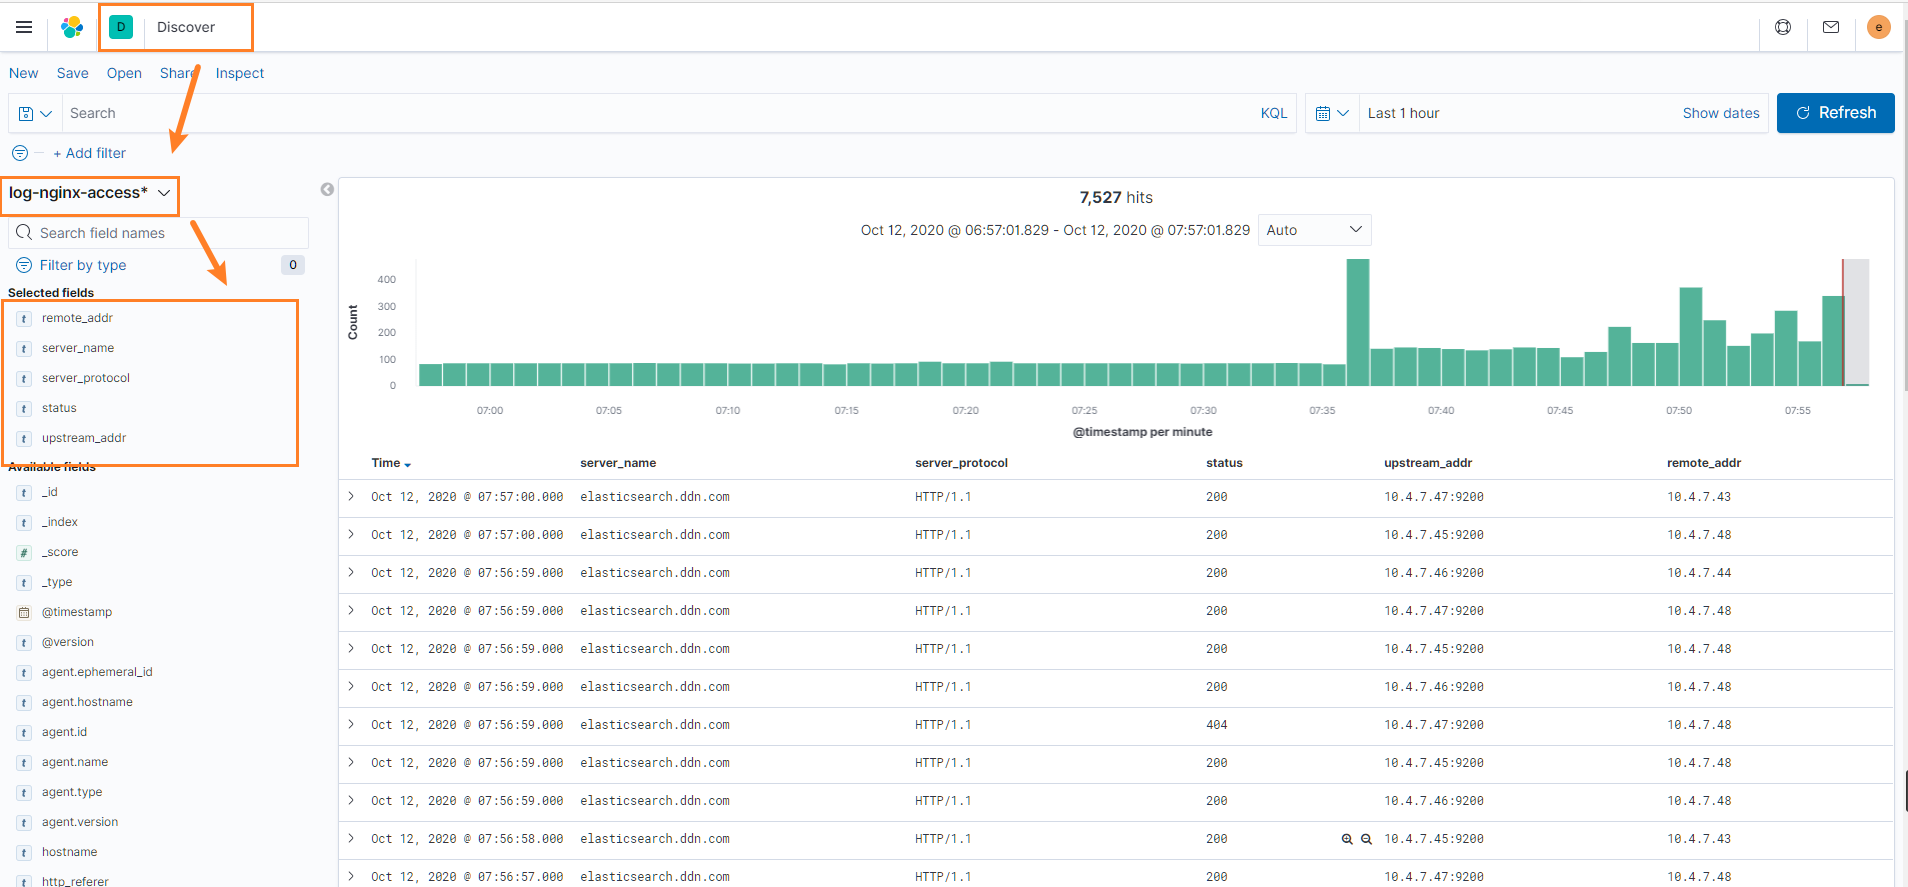
2.7.2. 查看日志


若有收获,就点个赞吧
0 人点赞
