LSP(Language Server Protocol) 语言服务协议,该协议定义了在编辑器或IDE与语言服务器之间使用的协议,该语言服务器提供了例如自动补全,转到定义,查找所有引用等的功能;语言服务器索引格式的目标是支持在开发工具中进行丰富的代码导航或者一个无需本地源码副本的WebUI。
LSP 无关编辑器并且提供了良好的抽象,一份 LSP 可以同时运用于多个编辑器,所以现在的主流编辑器都已经支持了 LSP,同样的主流的语言也都用了自己的 LSP. 对于语言和编辑器来说都大大降低了成本。

TypeScript 语言服务插件 (“plugins”) 是TypeScript 将自己 LSP 中的能力暴露出来可以让我们更改某些行为,或者组合这些能力提供新的编辑体验。TypeScript 语言服务插件 (“plugins”) 仅用于更改编辑体验。核心 TypeScript 语言保持不变。插件不能添加新的语言特性,例如新语法或不同的类型检查行为,并且在正常的命令行类型检查或发出期间不会加载插件(因此不会被 tsc 加载)。
相反,插件用于增强编辑体验。 插件可能会做的一些事情的例子:
- 提供更好的提示信息
- 过滤完成列表已删除某些 API
- 重定向“转到定义”以转到某些标识符的不同位置
- 为自定义模板语言启用字符串文字中的新错误或完成
基本原理
LanguageService 定义了一个 proxy,你可以修改 LanguageService 中的某些行为然后返回自己处理后结果。
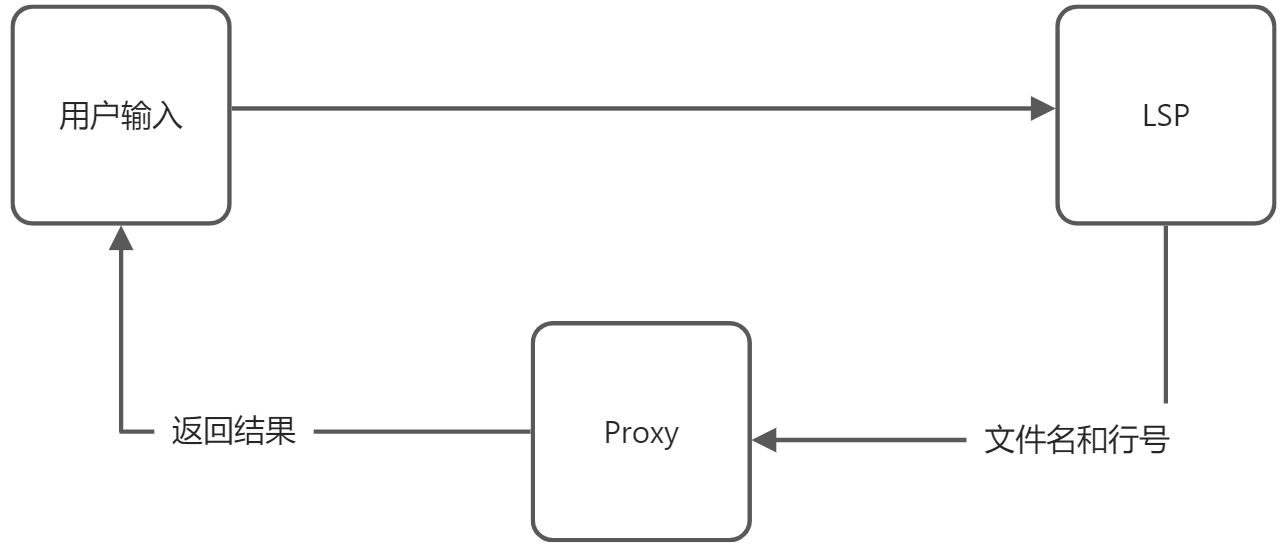
看起来很像一个网路请求但是因为在本地服务器,速度是超级快的。这里有个简单的日志,给了我们一个一些源信息,我们去做一些处理,然后返回约定好的数据结构。
Info 194 [11:28:55.221] request:{"seq": 28,"type": "request","command": "encodedSemanticClassifications-full","arguments": {"file": "c:/demo/testrush/test/src/pages/docs.tsx","start": 0,"length": 154,"format": "2020"}}Perf 195 [11:28:55.222] 28::encodedSemanticClassifications-full: elapsed time (in milliseconds) 0.1779Info 196 [11:28:55.222] response:{"seq":0,"type":"response","command":"encodedSemanticClassifications-full","request_seq":28,"success":true,"body":{"spans":[],"endOfLineState":0}}Info 197 [11:28:55.222] event:{"seq":0,"type":"event","event":"syntaxDiag","body":{"file":"c:/demo/testrush/test/src/pages/docs.tsx","diagnostics":[]}}Info 198 [11:28:55.348] [umi-typescript-plugin] diagnostic: []
这里有支持的 proxy 列表。
只是部分,其实有非常多。

这里我们用 getCompletionsAtPosition,getQuickInfoAtPosition,getDefinitionAndBoundSpan 来分别作为例子。
getQuickInfoAtPosition 自定义提示信息
TypeScript LSP plugin 可以用 getQuickInfoAtPosition 将提示信息进行自定义。
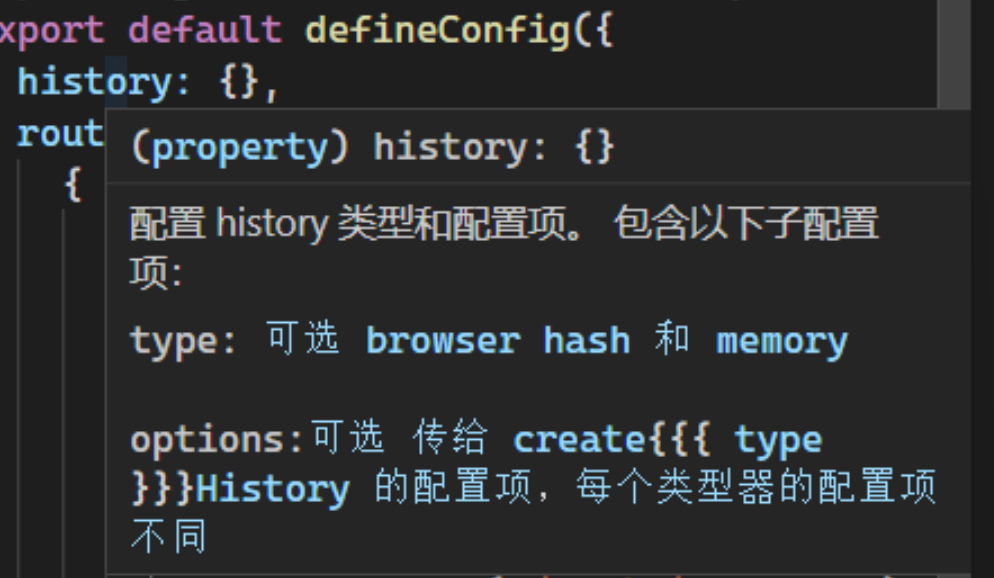
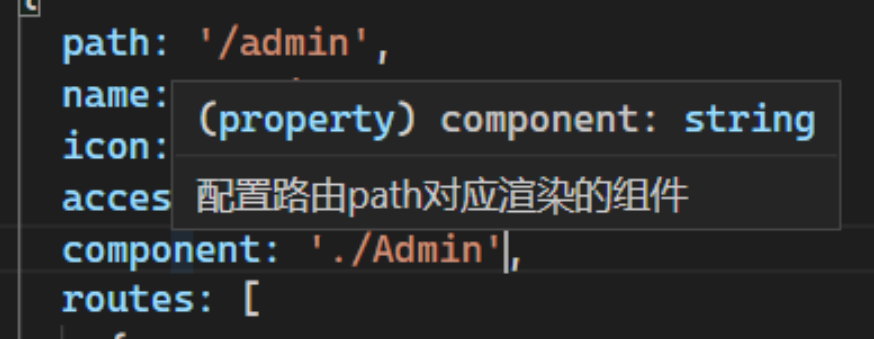
以 umi 的配置为例,我们可以通过配置 QuickInfo 来进行比 jsdoc 更加强大的 API 描述。
最好的解决办法是从 umi 的官网中拉取文档,并根据 AST 进行匹配提示出来,。
const getTextInfo = (sourceText) => {if (sourceText.includes('history')) {return `配置 history 类型和配置项。包含以下子配置项:type: 可选 browser hash 和 memoryoptions:可选 传给 create{{{ type }}}History 的配置项,每个类型器的配置项不同`;}if (sourceText.includes('component')) {return `配置路由path对应渲染的组件`;}return ``;};proxy.getQuickInfoAtPosition = (fileName, position) => {const quickInfo = ctx.getQuickInfoAtPosition(fileName, position);logger(`quickInfo: ${JSON.stringify(quickInfo, null, 2)}`);const node = findNode(getSourceFile(fileName), position);const sourceText = node.getText();return {kind: ts.ScriptElementKind.string,textSpan: {start: position,length: 1,},kindModifiers: '',displayParts: quickInfo.displayParts,documentation: [{text: getTextInfo(sourceText),kind: ts.ScriptElementKind.string,},],} as ts.QuickInfo;};
getCompletionsAtPosition 自定义智能提示的信息
由于 umi 包含 node 和 浏览器环境两种,在 ts 中会同时提示两种 API,导致可以在浏览器中使用 node 的自动提示,在 node 中也可以使用 window 对象。最后导致了一些报错。
getCompletionsAtPosition 可以在自动提示中删除自定义的配置,或者将 umi 的提示提前。
getDefinitionAndBoundSpan 自定义跳转
umi 的路由配置和 path 的配置都是静态的相对路径,在配置之后无法跳转,需要用 ctrl+p 来 copy 字符串进行跳转。getDefinitionAndBoundSpan 可以修改跳转的地址,将路径跳转到合适的位置。
const definitions = [{...andBoundSpanList.definitions[0],containerName: "",kind: "function",// 拼接一下需要跳转的文件路径fileName: slash2(path.join(projectDir, "src/pages", `${fullStart}.tsx`)),// fileName: 'c:/github/umi-plugin/demo/index.ts',},];
开发流程
初始化
首先我们必须要有一个入口文件,一般都是 index.ts。
src├── index.ts
一般的插件系统相同,我们需要通过某种方式来注册。在 lsp 的 plugin 里面我们需要提供一个方法,返回一个 { create },其余的两个我们暂时用不上。
interface PluginModule {create(createInfo: PluginCreateInfo): LanguageService;getExternalFiles?(proj: Project): string[];onConfigurationChanged?(config: any): void;}const pluginModuleFactory: ts.server.PluginModuleFactory = ({}: {typescript: typeof ts;}) => {return { create };};export = pluginModuleFactory;
开发
ts 的 lsp 提供了非常好的 ts 定义。我们的 create 中可以用传入的参数做很多的事情。这里是一个非常简单的getCompletionsAtPosition 自动补全的例子我们可以通过自定义 prior.entries修改自动补全面板返回的内容。
function create(info: ts.server.PluginCreateInfo) {const proxy: ts.LanguageService = Object.create(null);proxy.getCompletionsAtPosition = (fileName, position, options) => {const prior = info.languageService.getCompletionsAtPosition(fileName,position,options);return prior;};// 删除所有自动补全里面带 .umi 的prior.entries = prior.entries.filter(e => !e.name.inclubs(".umi"));return proxy;}
看完上面的代码相信大家已经完全学会了。
debug
lsp serve 的 debug 有两种,打日志和使用 vscode 的 debug 功能。
日志模式
首先我们需要打开 vscode 的 tsserver 日志模式,简单设置即可打开。
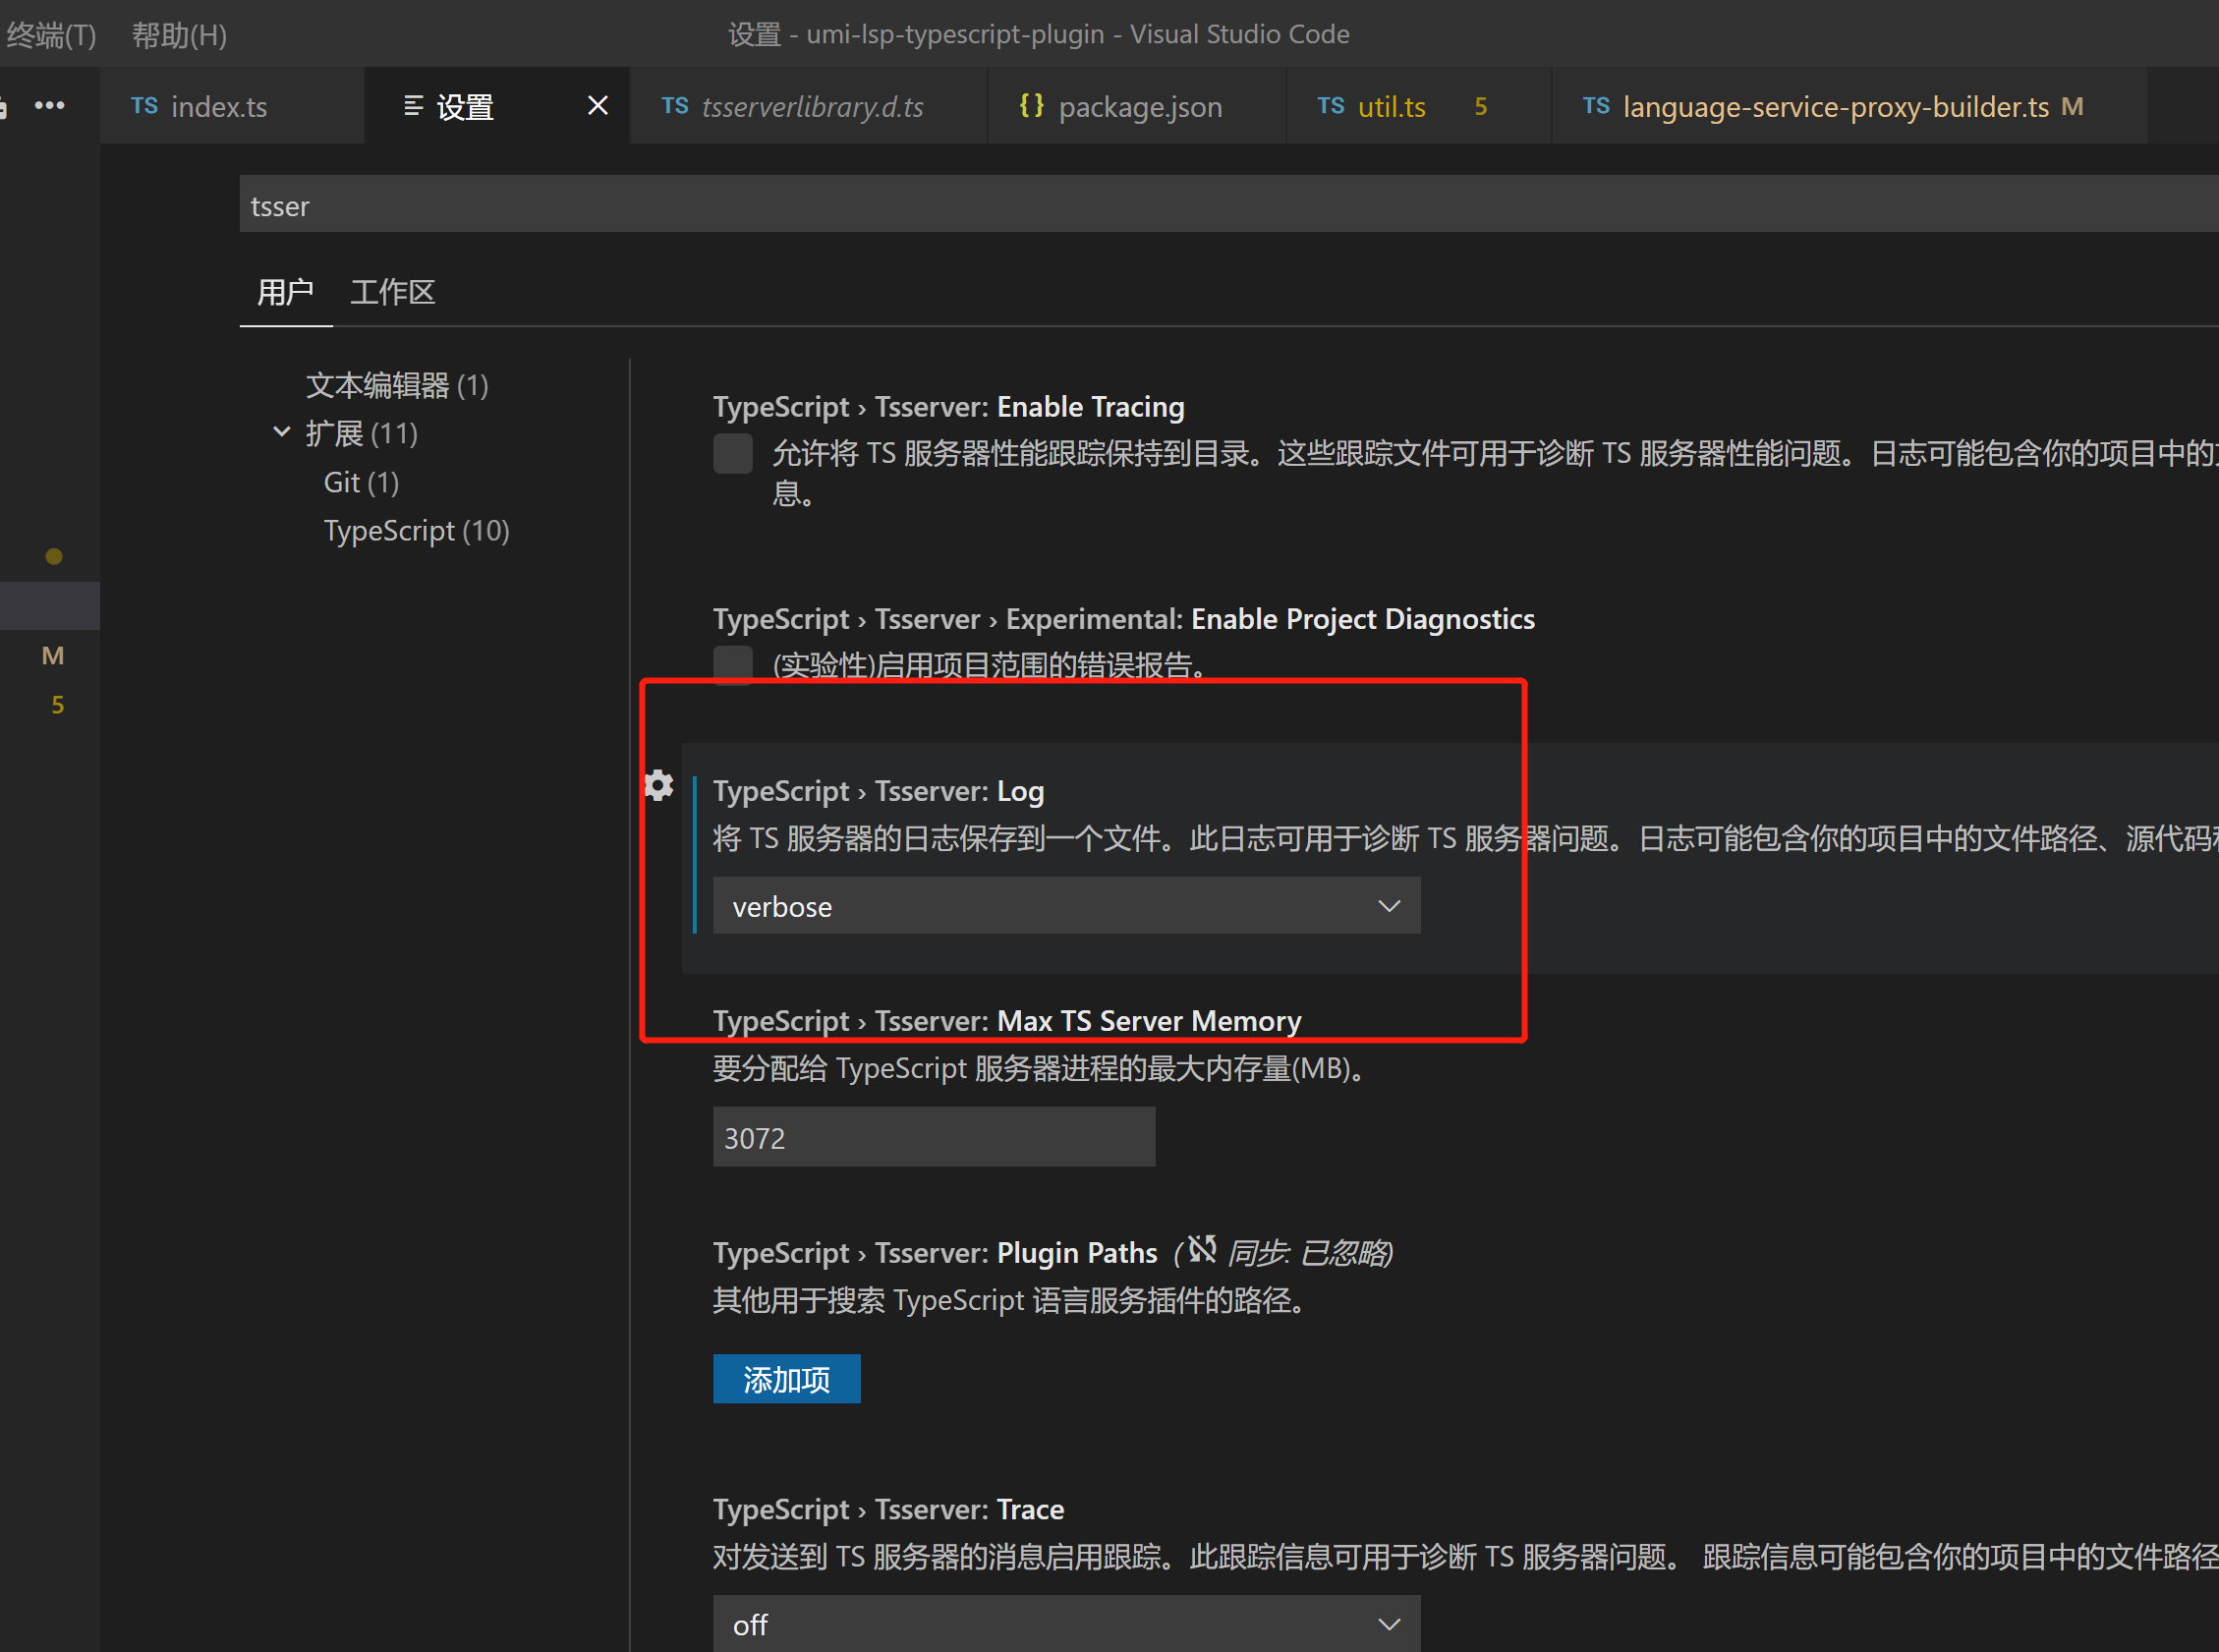
打开之后我们就可以在 output 里面看到日志的地址了。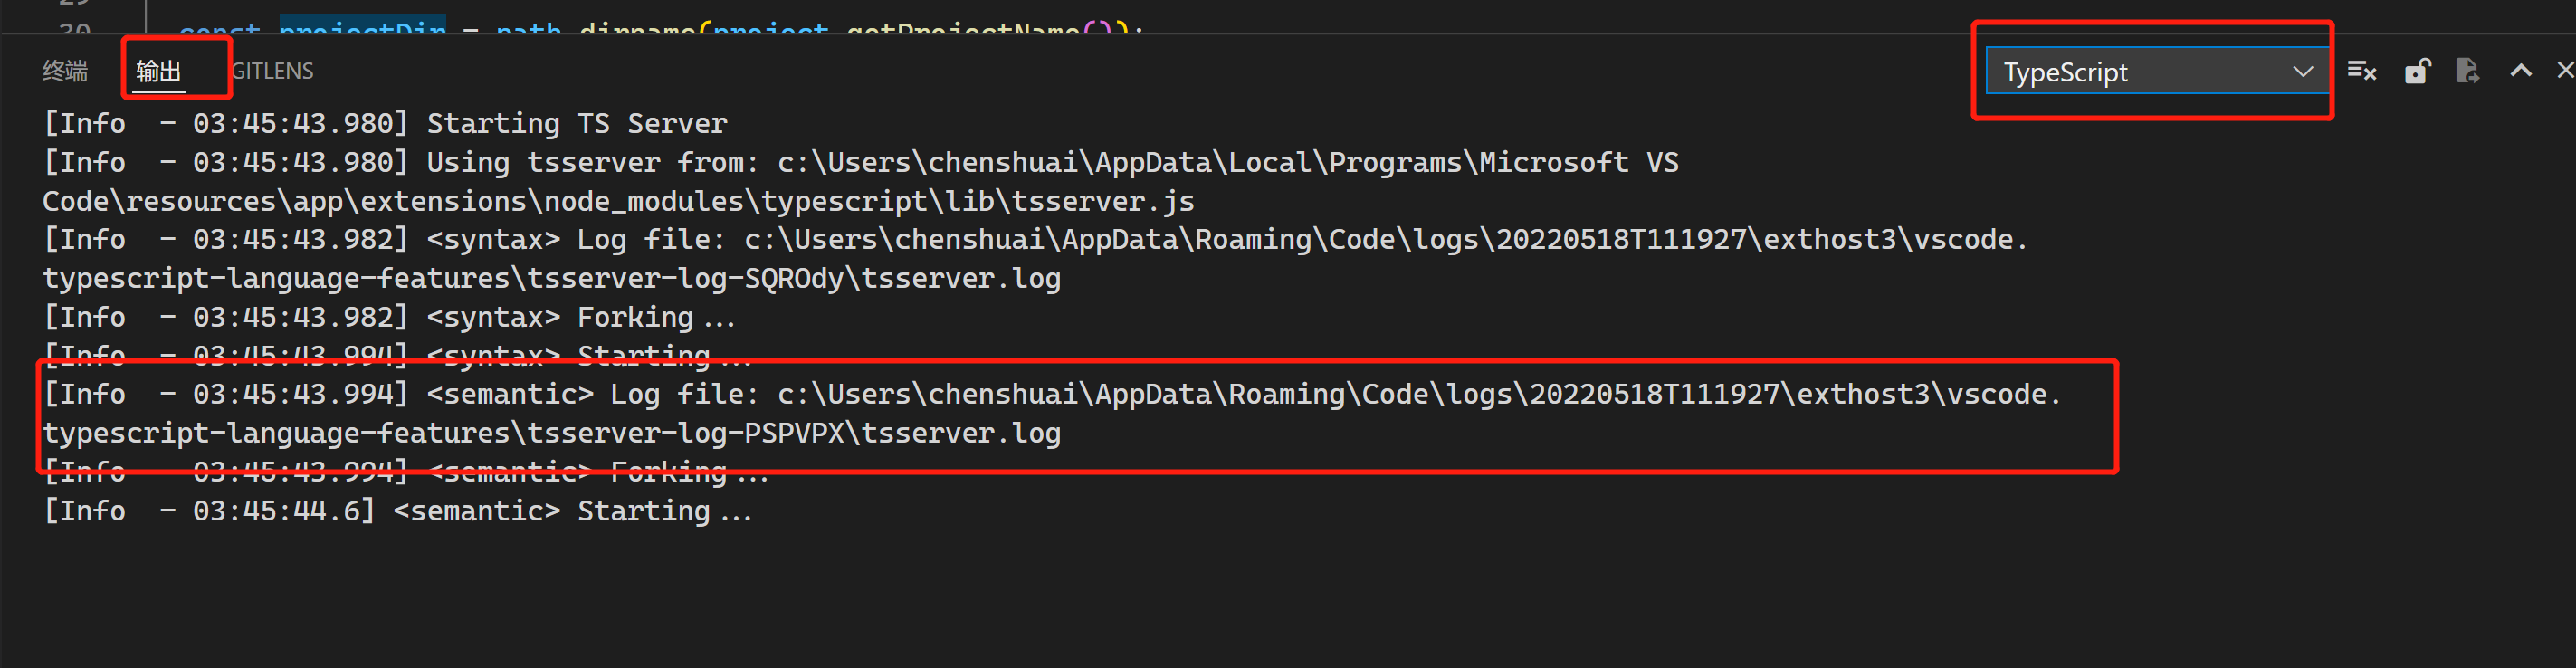
我们可以在代码中通过 project.projectService.logger.info([umi-typescript-plugin] ${msg}); 来打日志。这里有一个我封装的例子。
function create(info: ts.server.PluginCreateInfo) {const { project, config: pluginConfigObj } = info;const projectDir = path.dirname(project.getProjectName());const logger = (msg: string) =>project.projectService.logger.info(`[umi-typescript-plugin] ${msg}`);logger('config: ' + JSON.stringify(pluginConfigObj));logger('projectDir: ' + projectDir);}
打出来的日志是这样的。
Info 28 [13:33:29.558] Loading umi-lsp-typescript-plugin from c:/demo/testrush/test/node_modules/typescript/lib/tsserver.js/../../.. (resolved to c:/demo/testrush/test/node_modules/node_modules)Info 29 [13:33:29.872] [umi-typescript-plugin] config: {"name":"umi-lsp-typescript-plugin"}Info 30 [13:33:29.872] [umi-typescript-plugin] projectDir: c:/demo/testrush/test
如果到具体的项目中测试,推荐还是通过 link 的方式,通过 plugin 拷贝的项目里的方式总是出各种小问题。
要在 tsconfig 中配置 “name”: “your_plugin”, 但是有时候识别不了,有时候一些proxy没生效也是很奇怪。
your_plugin/index.tsyour_plugin/index.js (compiled by tsc)your_plugin/sample_project/package.jsonyour_plugin/sample_project/tsconfig.json
vscode debug 模式
有点麻烦我没跑起来,大家可以试试。
总结
很适合 umi ,egg 等封装的比较重的插件,比如路由 配置 和 serve 配置。它可以做自动补全,自定义错误,自定义跳转甚至 自定义重构。同时 plugin 不支持 build,所以需要框架做好配合,保证语法是完全正确的。
由于其基于 AST 来构建和生成结果,并且对性能要求较高,开发的时候还是要特别注意耗时。我上面的跳转到 routes 对应文件的接口需要 3s,主要开销在于找到那一行的node,拿到路径。
使用场景
- 强约束直接 ide 报错
- umi 导出的内容提供自动补全,比如 useRequest ,antd 和 一系列内置类型
- config 提供 IDE 的内置文档,类似eslint 的规则和 html 的标签提示,点击即可跳转到对应网页
- 配置的补全与过期提示
我学的rust终于有用了.jpg
参考文档
[

若有收获,就点个赞吧
0 人点赞
