主配置环境(准备工作)
//移动至文件夹下[root@localhost ~]# cd /usr/local/src///查看[root@localhost src]# lsmysql-5.6.47-linux-glibc2.12-x86_64.tar.gz//解压[root@localhost src]# tar -zxf mysql-5.6.47-linux-glibc2.12-x86_64.tar.gz[root@localhost src]# lsmysql-5.6.47-linux-glibc2.12-x86_64 mysql-5.6.47-linux-glibc2.12-x86_64.tar.gz//将文件移动到MySQL下[root@localhost src]# mv mysql-5.6.47-linux-glibc2.12-x86_64 /usr/local/mysql[root@localhost src]#[root@localhost src]# cd /usr/local/mysql/[root@localhost mysql]#[root@localhost mysql]#[root@localhost mysql]# lsbin data docs include lib LICENSE man mysql-test README scripts share//改个主机名字没啥用[root@localhost mysql]# vim /etc/hostname[root@localhost mysql]# bash[root@bai mysql]#//创建一个MySQL用户[root@bai mysql]# useradd mysql[root@bai mysql]#//创建一个存放MySQL数据的目录[root@bai mysql]# mkdir /data///安装脚本依赖[root@bai mysql]# yum install perl-Module-Install -y//编译安装 --指定用户 --指定数据目录[root@bai mysql]# ./scripts/mysql_install_db --user=mysql --datadir=/data/mysql//验证[root@bai mysql]# echo $?0//复制配置文件[root@wang mysql]# cp support-files/my-default.cnf /etc/my.cnfcp:是否覆盖"/etc/my.cnf"? y//更改配置文件[root@wang mysql]# vim /etc/my.cnfbasedir = /usr/local/mysqldatadir = /data/mysqlport = 3306server_id = 156socket = /tmp/mysql.sock//拷贝并发送给从服务器[root@wang mysql]# scp /etc/my.cnf root@192.168.142.157:/etc/The authenticity of host '192.168.142.157 (192.168.142.157)' can't be established.ECDSA key fingerprint is 8b:b3:c9:67:cb:cc:e9:c8:f1:38:eb:01:2f:cf:60:89.Are you sure you want to continue connecting (yes/no)? yesWarning: Permanently added '192.168.142.157' (ECDSA) to the list of known hosts.root@192.168.142.157's password:my.cnf 100% 1141 1.1KB/s 00:00//复制启动文件[root@wang mysql]# cp support-files/mysql.server /etc/init.d/mysqld//修改启动文件[root@wang mysql]# vim /etc/init.d/mysqldbasedir=/usr/local/mysqldatadir=/data/mysql//将启动文件拷贝发送给从服务器[root@wang mysql]# scp /etc/init.d/mysqld root@192.168.142.157:/etc/init.d/root@192.168.142.157's password:mysqld 100% 10KB 10.3KB/s 00:00//更改完配置文件后重启[root@wang mysql]# /etc/init.d/mysqld startStarting MySQL.Logging to '/data/mysql/wang.err'.. SUCCESS!//检查是否启动MySQL端口 可以下载依赖[root@wang mysql]# ps -ef |grep mysqlroot 10552 1 0 17:33 pts/1 00:00:00 /bin/sh /usr/local/mysql/bin/mysqld_safe --datadir=/data/mysql --pid-file=/data/mysql/wang.pidmysql 10729 10552 2 17:33 pts/1 00:00:01 /usr/local/mysql/bin/mysqld --basedir=/usr/local/mysql --datadir=/data/mysql --plugin-dir=/usr/local/mysql/lib/plugin --user=mysql --log-error=wang.err --pid-file=/data/mysql/wang.pid --socket=/tmp/mysql.sock --port=3306root 10783 10488 0 17:34 pts/1 00:00:00 grep --color=auto mysql
搭建从配置环境
//移动[root@localhost ~]# cd /usr/local/src///查看压缩包[root@localhost src]# lsmysql-5.6.47-linux-glibc2.12-x86_64.tar.gz//解压[root@localhost src]# tar -zxf mysql-5.6.47-linux-glibc2.12-x86_64.tar.gz[root@localhost src]# lsmysql-5.6.47-linux-glibc2.12-x86_64 mysql-5.6.47-linux-glibc2.12-x86_64.tar.gz//将解压完的文件移动到MySQL目录下[root@localhost src]# mv mysql-5.6.47-linux-glibc2.12-x86_64 /usr/local/mysql//移动[root@localhost src]# cd /usr/local/mysql/[root@localhost mysql]# lsbin data docs include lib LICENSE man mysql-test README scripts share//改个主机名[root@localhost mysql]# vim /etc/hostname[root@localhost mysql]# bash//创建一个MySQL用户[root@bai mysql]# useradd mysql//创建一个存放MySQL数据的目录[root@bai mysql]# mkdir /data///安装脚本依赖[root@bai mysql]# yum install perl-Module-Install -y//编译安装[root@bai mysql]# ./scripts/mysql_install_db --user=mysql --datadir=/data/mysql//验证是否出错[root@bai mysql]# echo $?0[root@bai mysql]# /etc/init.d/mysqld startStarting MySQL.Logging to '/data/mysql/bai.err'.. SUCCESS![root@bai mysql]# ps -ef |grep mysqlroot 10552 1 0 17:33 pts/1 00:00:00 /bin/sh /usr/local/mysql/bin/mysqld_safe --datadir=/data/mysql --pid-file=/data/mysql/bai.pidmysql 10729 10552 2 17:33 pts/1 00:00:01 /usr/local/mysql/bin/mysqld --basedir=/usr/local/mysql --datadir=/data/mysql --plugin-dir=/usr/local/mysql/lib/plugin --user=mysql --log-error=bai.err --pid-file=/data/mysql/bai.pid --socket=/tmp/mysql.sock --port=3306root 10783 10488 0 17:34 pts/1 00:00:00 grep --color=auto mysql

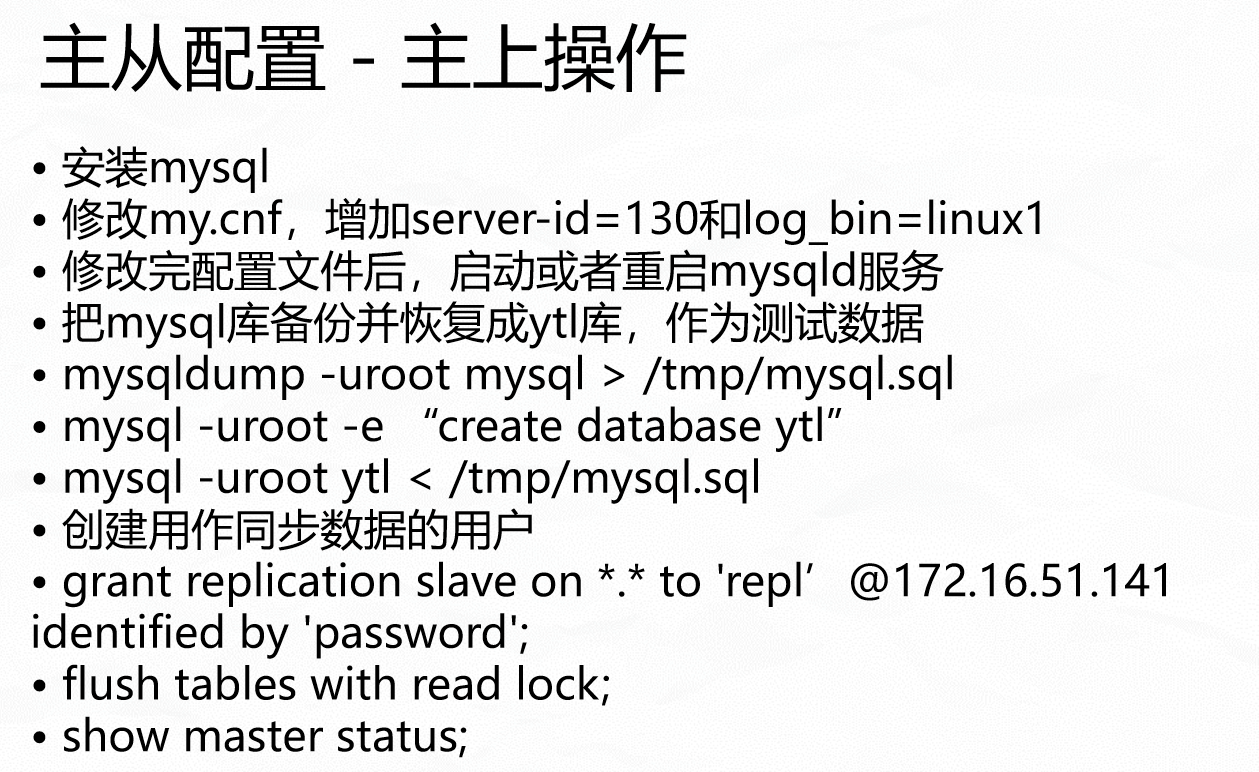
主服务器开始配置
//更改配置文件 (注意log_bin这是记录主服务器的操作的 有他才能进行剩下的操作)[root@wang mysql]# vim /etc/my.cnf//名字随便起log_bin=bailinux1server_id = 156//更改完配置文件要重启[root@wang mysql]# /etc/init.d/mysqld restartShutting down MySQL.. SUCCESS!Starting MySQL.. SUCCESS![root@wang mysql]# cd /data/mysql/[root@wang mysql]#[root@wang mysql]# ls//如果没有这两个文件后面的主从配置就没办法做了auto.cnf ib_logfile1 test bai1.000001ibdata1 mysql wang.err bai1.indexib_logfile0 performance_schema wang.pid//将MySQL所需的环境变量定义一下 不定义的话进入MySQL需要带着路径/usr/local/mysql/bin/进入MySQL[root@wang mysql]# export PATH=$PATH:/usr/local/mysql/bin///把mysql库备份并恢复成ytl库,作为测试数据做了一个备份[root@wang mysql]# mysqldump -uroot mysql > /tmp/mysql.sql//定义完MySQL环境变量后要把他写入vim /etc/profile配置文件中使他永久生效[root@wang mysql]# vim /etc/profile//最后一行填写export PATH=$PATH:/usr/local/mysql/bin///保存一下[root@wang mysql]# source /etc/profile//启动[root@wang mysql]# chkconfig mysqld on//这是那个备份的文件[root@wang mysql]# ls -la /tmp/mysql.sql-rw-r--r--. 1 root root 698597 12月 8 18:04 /tmp/mysql.sql//接下来创建一个用户[root@wang mysql]# mysql -uroot -e "create database bsq"// 把备份文件导进去[root@wang mysql]# mysql -uroot bsq < /tmp/mysql.sql[root@wang mysql]# ls -la总用量 111652drwx------. 6 mysql mysql 4096 12月 8 18:21 .drwxr-xr-x. 3 root root 18 12月 8 16:51 ..-rw-rw----. 1 mysql mysql 56 12月 8 17:33 auto.cnf-rw-rw----. 1 mysql mysql 12582912 12月 8 18:22 ibdata1-rw-rw----. 1 mysql mysql 50331648 12月 8 18:22 ib_logfile0-rw-rw----. 1 mysql mysql 50331648 12月 8 16:51 ib_logfile1drwx------. 2 mysql mysql 4096 12月 8 16:51 mysqldrwx------. 2 mysql mysql 4096 12月 8 16:52 performance_schemadrwx------. 2 mysql mysql 6 12月 8 16:51 test-rw-rw----. 1 mysql mysql 7606 12月 8 17:52 wang.err-rw-rw----. 1 mysql mysql 6 12月 8 17:52 wang.piddrwx------. 2 mysql mysql 4096 12月 8 18:22 bsq-rw-rw----. 1 mysql mysql 698600 12月 8 18:22 bai1.000001-rw-rw----. 1 mysql mysql 18 12月 8 17:52 bai1.index这时我们发现ytlinux1.000001的字节大小变成698600大小了这是说明它把我们的创建库的过程完全的记录了下来(这时我们就会想到我们是不是可以把刚创建的这个库和库文件删除,然后再通过这个二进制备份文件恢复呢? 当然可以,只要保证数据的完整性就可以了)//创建用作同步数据库的用户[root@wang mysql]# mysql -uroot//授权mysql> grant replication slave on *.* to 'repl'@192.168.142.157 identified by 'password';Query OK, 0 rows affected (0.00 sec)//锁住,目前的数距保持当前的状态。这样才能保持数据的一致性mysql> flush tables with read lock;Query OK, 0 rows affected (0.01 sec)//查看当前的状态mysql> show master status;+-----------------+----------+--------------+------------------+-------------------+| File | Position | Binlog_Do_DB | Binlog_Ignore_DB | Executed_Gtid_Set |+-----------------+----------+--------------+------------------+-------------------+| bai1.000001 | 698812 | | | |+-----------------+----------+--------------+------------------+-------------------+1 row in set (0.00 sec)mysql> quitBye//把主服务器上的库复制到从服务器上[root@wang mysql]# scp /tmp/mysql.sql root@192.168.142.157:/tmp/root@192.168.142.157's password:mysql.sql 100% 682KB 682.2KB/s 00:00//查看大小[root@wang mysql]# ls -la /tmp/mysql.sql-rw-r--r--. 1 root root 698597 12月 8 18:04 /tmp/mysql.sql

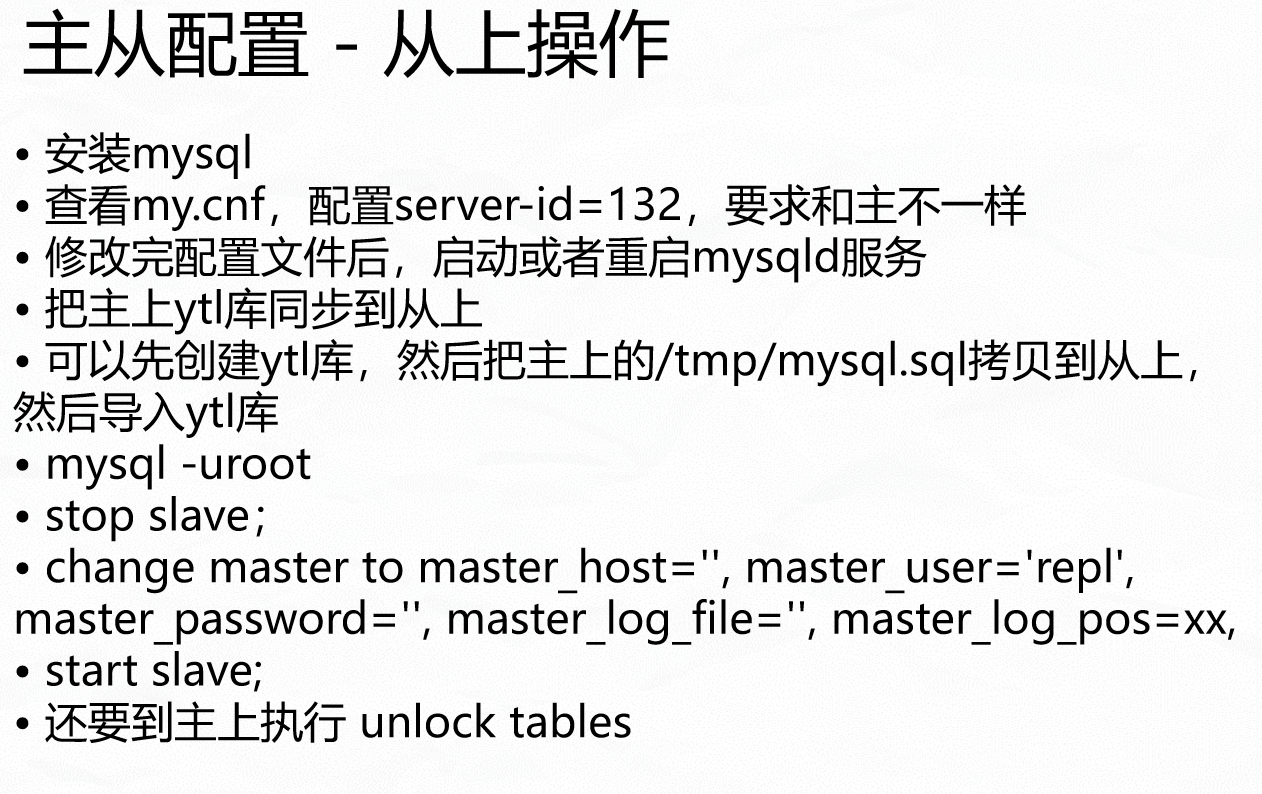
从服务器开始配置
//定义mysql环境变量[root@bai ~]# export PATH=$PATH:/usr/local/mysql/bin///把MySQL环建变量的路径写入配置文件[root@bai ~]# vim /etc/profile//写配置文件的最后面即可export PATH=$PATH:/usr/local/mysql/bin///[root@bai ~]# source /etc/profile//启动[root@bai ~]# chkconfig mysqld on//修改配置文件[root@bai ~]# vim /etc/my.cnfserver_id = 157[root@bai ~]# /etc/init.d/mysqld restartShutting down MySQL.. SUCCESS!Starting MySQL.. SUCCESS!//这是通过主服务器复制过来的库,看看于主服务上上的大小是否一致[root@bai mysql]# ls -la /tmp/mysql.sql-rw-r--r--. 1 root root 698597 12月 8 19:40 /tmp/mysql.sql//把数据库到同名库里面[root@bai ~]# mysql -uroot//创建库mysql> create database bsq;Query OK, 1 row affected (0.00 sec)mysql> quitBye[root@bai ~]# mysql -uroot bsq < /tmp/mysql.sql[root@bai ~]#[root@bai ~]#[root@bai ~]# mysql -uroot//查看库mysql> show databases;+--------------------+| Database |+--------------------+| information_schema || mysql || performance_schema || test || bsq |+--------------------+5 rows in set (0.00 sec)//切换库mysql> use ytl;Reading table information for completion of table and column namesYou can turn off this feature to get a quicker startup with -ADatabase changedmysql>//查看表mysql> show tables;+---------------------------+| Tables_in_bsq |+---------------------------+| columns_priv || db || event || func || general_log || help_category || help_keyword || help_relation || help_topic || innodb_index_stats || innodb_table_stats || ndb_binlog_index || plugin || proc || procs_priv || proxies_priv || servers || slave_master_info || slave_relay_log_info || slave_worker_info || slow_log || tables_priv || time_zone || time_zone_leap_second || time_zone_name || time_zone_transition || time_zone_transition_type || user |+---------------------------+28 rows in set (0.00 sec)mysql> quitBye[root@bai ~]# cd /data/mysql/[root@bai mysql]# ls -la总用量 110624drwx------. 6 mysql mysql 4096 12月 8 21:41 .drwxr-xr-x. 3 root root 18 12月 8 16:52 ..-rw-rw----. 1 mysql mysql 56 12月 8 17:36 auto.cnf-rw-rw----. 1 mysql mysql 7602 12月 8 19:33 bai.err-rw-rw----. 1 mysql mysql 6 12月 8 19:33 bai.pid-rw-rw----. 1 mysql mysql 12582912 12月 8 21:45 ibdata1-rw-rw----. 1 mysql mysql 50331648 12月 8 21:45 ib_logfile0-rw-rw----. 1 mysql mysql 50331648 12月 8 16:52 ib_logfile1drwx------. 2 mysql mysql 4096 12月 8 16:52 mysqldrwx------. 2 mysql mysql 4096 12月 8 16:52 performance_schemadrwx------. 2 mysql mysql 6 12月 8 16:52 testdrwx------. 2 mysql mysql 4096 12月 8 21:45 bsq//实现它的主从//mysql> stop slave;Query OK, 0 rows affected, 1 warning (0.01 sec)//mysql> change master to master_host='192.168.142.156',master_user='repl',master_password='000000', master_log_file='bai1.000001',master_log_pos=698812;Query OK, 0 rows affected, 2 warnings (0.01 sec)//mysql> start slave;Query OK, 0 rows affected (0.00 sec)//mysql> show slave status\G;*************************** 1. row ***************************Slave_IO_State: Waiting for master to send eventMaster_Host: 192.168.142.156Master_User: replMaster_Port: 3306Connect_Retry: 60Master_Log_File: bai1.000001Read_Master_Log_Pos: 410Relay_Log_File: client-relay-bin.000002Relay_Log_Pos: 277Relay_Master_Log_File: bai1.000001Slave_IO_Running: YesSlave_SQL_Running: YesReplicate_Do_DB: // 同步那些库 这些配置都是可以写在著配置文件的my.cnfReplicate_Ignore_DB: // 不同步哪些库Replicate_Do_Table: // 同步哪些表Replicate_Ignore_Table:Replicate_Wild_Do_Table: // 同步哪个库.表 常用Replicate_Wild_Ignore_Table: // 忽略哪个库的哪个表Last_Errno: 0 // 错误信息Last_Error:Skip_Counter: 0Exec_Master_Log_Pos: 410Relay_Log_Space: 451Until_Condition: NoneUntil_Log_File:Until_Log_Pos: 0Master_SSL_Allowed: NoMaster_SSL_CA_File:Master_SSL_CA_Path:Master_SSL_Cert:Master_SSL_Cipher:Master_SSL_Key:Seconds_Behind_Master: 0Master_SSL_Verify_Server_Cert: NoLast_IO_Errno: 0 // 线程错误信息Last_IO_Error:Last_SQL_Errno: 0Last_SQL_Error:Replicate_Ignore_Server_Ids:Master_Server_Id: 41Master_UUID: 197dfb61-1310-11ec-af29-000c29b5c42cMaster_Info_File: /data/mysql/master.infoSQL_Delay: 0SQL_Remaining_Delay: NULLSlave_SQL_Running_State: Slave has read all relay log; waiting for the slave I/O thread to update itMaster_Retry_Count: 86400Master_Bind:Last_IO_Error_Timestamp:Last_SQL_Error_Timestamp:Master_SSL_Crl:Master_SSL_Crlpath:Retrieved_Gtid_Set:Executed_Gtid_Set:Auto_Position: 01 row in set (0.00 sec)

