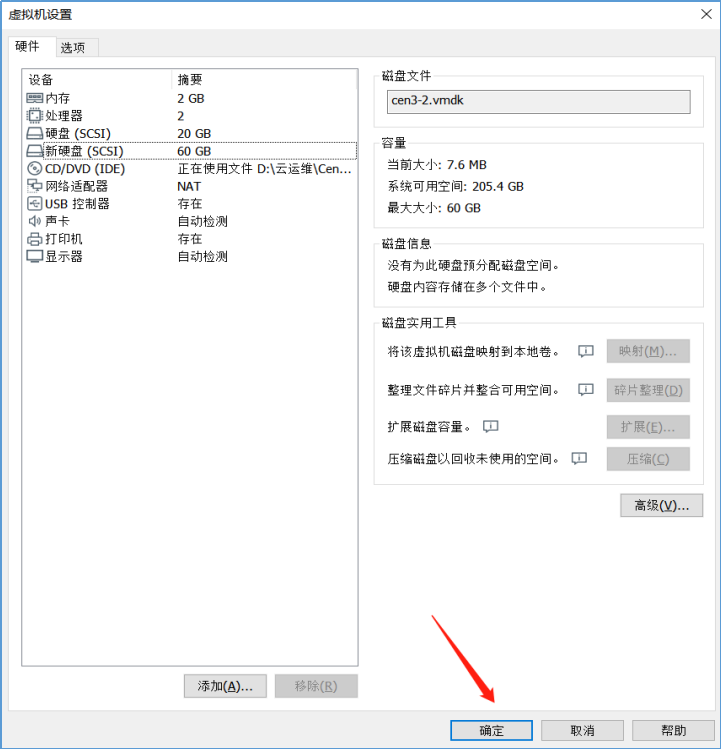
1. 调整虚拟机
(基本配置就是这样)
(做虚拟化最主要的就是虚拟引擎的两处勾选)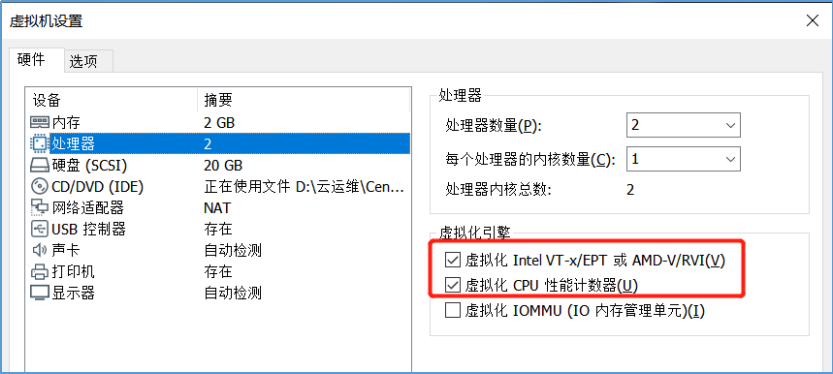
2. 检查CPU参数
启动虚拟机,我们查看以下,内存是否更改成功,命令如下:[root@kvm ~]# freetotal used free shared buff/cache availableMem: 1868688 125360 1582372 8752 160956 1584208Swap: 097148 0 2097148检查CPU是否开启虚拟化支持,命令如下:[root@kvm ~]# grep -Ei 'vmx|svm' /proc/cpuinfo//vmx为英特尔的cpu;svm为AMD的cpu。flags : fpu vme de pse tsc msr pae mce cx8 apic sep mtrr pge mca cmov pat pse36 clflush mmx fxsr sse sse2 ss syscall nx pdpe1gb rdtscp lm constant_tsc arch_perfmon nopl xtopology tsc_reliable nonstop_tsc eagerfpu pni pclmulqdq vmx ssse3 fma cx16 pcid sse4_1 sse4_2 x2apic movbe popcnt tsc_deadline_timer aes xsave avx f16c rdrand hypervisor lahf_lm abm 3dnowprefetch arat tpr_shadow vnmi ept vpid fsgsbase tsc_adjust bmi1 avx2 smep bmi2 invpcid mpx rdseed adx smap clflushopt xsaveopt xsavec xsavesflags : fpu vme de pse tsc msr pae mce cx8 apic sep mtrr pge mca cmov pat pse36 clflush mmx fxsr sse sse2 ss syscall nx pdpe1gb rdtscp lm constant_tsc arch_perfmon nopl xtopology tsc_reliable nonstop_tsc eagerfpu pni pclmulqdq vmx ssse3 fma cx16 pcid sse4_1 sse4_2 x2apic movbe popcnt tsc_deadline_timer aes xsave avx f16c rdrand hypervisor lahf_lm abm 3dnowprefetch arat tpr_shadow vnmi ept vpid fsgsbase tsc_adjust bmi1 avx2 smep bmi2 invpcid mpx rdseed adx smap clflushopt xsaveopt xsavec xsaves如果显示为空,就要检查你虚拟机设置,是否打“√”
3. 挂载新磁盘
//使用lsblk命令,检查虚拟机是否新增一块50 GB的磁盘,命令如下:[root@kvm ~]# lsblkNAME MAJ:MIN RM SIZE RO TYPE MOUNTPOINTsda 8:0 0 20G 0 disk├─sda1 8:1 0 500M 0 part /boot└─sda2 8:2 0 19.5G 0 part├─centos-root 253:0 0 17.5G 0 lvm /└─centos-swap 253:1 0 2G 0 lvm [SWAP]sdb 8:16 0 50G 0 disksr0 11:0 1 4G 0 rom//我们可以看到确实新增了一块磁盘名为sdb。//接下来格式化这块磁盘,格式化成ext4格式,命令如下:[root@kvm ~]# mkfs.ext4 /dev/sdbmke2fs 1.42.9 (28-Dec-2013)/dev/sdb is entire device, not just one partition!Proceed anyway? (y,n) yFilesystem label=OS type: LinuxBlock size=4096 (log=2)Fragment size=4096 (log=2)Stride=0 blocks, Stripe width=0 blocks3276800 inodes, 13107200 blocks655360 blocks (5.00%) reserved for the super userFirst data block=0Maximum filesystem blocks=2162163712400 block groups32768 blocks per group, 32768 fragments per group8192 inodes per groupSuperblock backups stored on blocks:32768, 98304, 163840, 229376, 294912, 819200, 884736, 1605632, 2654208,4096000, 7962624, 11239424Allocating group tables: doneWriting inode tables: doneCreating journal (32768 blocks): doneWriting superblocks and filesystem accounting information: done[root@kvm ~]# blkid /dev/sdb//blkid+磁盘:查看磁盘信息/dev/sdb: UUID="dab6d659-e334-41ed-a15a-96ce05b48c1a" TYPE="ext4"格式化完成后,我们挂载磁盘,先创建挂载目录/kvm_data,然后进行挂载,命令如下:[root@kvm ~]# mkdir /kvm_data[root@kvm ~]# mount /dev/sdb /kvm_data///这种方式挂载,重启虚拟机后,需要再次重新挂载,我们为了方便开机后可以自动挂载,编写/etc/fstab文件,添加文件最末一行,命令如下:[root@kvm ~]# vi /etc/fstab[root@kvm ~]# cat /etc/fstab## /etc/fstab# Created by anaconda on Thu Aug 22 22:51:46 2019## Accessible filesystems, by reference, are maintained under '/dev/disk'# See man pages fstab(5), findfs(8), mount(8) and/or blkid(8) for more info#/dev/mapper/centos-root / xfs defaults 0 0UUID=34f3cd91-b7f0-44dd-9334-2bb66e939898 /boot xfs defaults 0 0/dev/mapper/centos-swap swap swap defaults 0 0/dev/sdb /kvm_data ext4 defaults 0 0
4. 关闭防火墙和selinux
//关闭防火墙并设置开机不自启,命令如下:[root@kvm ~]# systemctl stop firewalld[root@kvm ~]# systemctl disable firewalldRemoved symlink /etc/systemd/system/dbus-org.fedoraproject.FirewallD1.service.Removed symlink /etc/systemd/system/basic.target.wants/firewalld.service.//关闭SELinux,编辑/etc/selinux/config,将enforcing修改为disabled,命令如下:[root@kvm ~]# vi /etc/selinux/config[root@kvm ~]# cat /etc/selinux/config# This file controls the state of SELinux on the system.# SELINUX= can take one of these three values:# enforcing - SELinux security policy is enforced.# permissive - SELinux prints warnings instead of enforcing.# disabled - No SELinux policy is loaded.SELINUX=disabled//修改这一位置的内容# SELINUXTYPE= can take one of three two values:# targeted - Targeted processes are protected,# minimum - Modification of targeted policy. Only selected processes are protected.# mls - Multi Level Security protection.SELINUXTYPE=targeted//修改完成后,重启虚拟机,使其生效,使用getenforce查看,命令如下:[root@kvm ~]# getenforceDisabled
5. 安装KVM
上述操作完成后,我们使用Yum进行安装KVM,命令如下:[root@kvm ~]# yum install -y virt-* libvirt bridge-utils qemu-img…………Complete!
正式配置(启动kvm)
1. 配置网卡
//增加桥接网卡ifcfg-br0,命令如下:[root@kvm ~]# cd /etc/sysconfig/network-scripts/[root@kvm network-scripts]# cp ifcfg-eno16777736 ifcfg-br0//ifcfg-eno16777736为配置IP的网卡,你的网卡可能与我的不同修改桥接网卡ifcfg-br0的内容,命令如下:[root@kvm network-scripts]# vi ifcfg-br0[root@kvm network-scripts]# cat ifcfg-br0TYPE=BridgeBOOTPROTO=noneNAME=br0DEVICE=br0ONBOOT=yesIPADDR=192.168.16.5NETMASK=255.255.255.0GATEWAY=192.168.16.2DNS1=114.114.114.114DNS2=8.8.8.8修改NAT网卡ifcfg-eno16777736,内容如下:[root@kvm network-scripts]# vi ifcfg-eno16777736[root@kvm network-scripts]# cat ifcfg-eno16777736TYPE=EthernetBOOTPROTO=noneNAME=eno16777736DEVICE=eno16777736ONBOOT=yesBRIDGE=br0修改完成网卡内容后,重新启动网卡服务并查看网卡信息,命令如下:[root@kvm network-scripts]# service network restartRestarting network (via systemctl): [ OK ][root@kvm network-scripts]# ifconfigbr0: flags=4163<UP,BROADCAST,RUNNING,MULTICAST> mtu 1500inet 192.168.16.5 netmask 255.255.255.0 broadcast192.168.16.255inet6 fe80::20c:29ff:fe8d:1f90 prefixlen 64 scopeid 0x20<link>ether 00:0c:29:8d:1f:90 txqueuelen 0 (Ethernet)RX packets 90 bytes 7092 (6.9 KiB)RX errors 0 dropped 0 overruns 0 frame 0TX packets 38 bytes 3604 (3.5 KiB)TX errors 0 dropped 0 overruns 0 carrier 0 collisions 0eno16777736: flags=4163<UP,BROADCAST,RUNNING,MULTICAST>mtu 1500ether 00:0c:29:8d:1f:90 txqueuelen 1000 (Ethernet)RX packets 126287 bytes 182444678 (173.9 MiB)RX errors 0 dropped 0 overruns 0 frame 0TX packets 32532 bytes 2953477 (2.8 MiB)TX errors 0 dropped 0 overruns 0 carrier 0 collisions 0lo: flags=73<UP,LOOPBACK,RUNNING> mtu 65536inet 127.0.0.1 netmask 255.0.0.0inet6 ::1 prefixlen 128 scopeid 0x10<host>loop txqueuelen 0 (Local Loopback)RX packets 0 bytes 0 (0.0 B)RX errors 0 dropped 0 overruns 0 frame 0TX packets 0 bytes 0 (0.0 B)TX errors 0 dropped 0 overruns 0 carrier 0 collisions 0可以清楚的看到br0网卡出现并且带有IP,而以前的eno16777736网卡则没有IP。网卡配置完成
2. 启动libvirtd服务
首先检查KVM模块是否加载,命令如下:[root@kvm network-scripts]# lsmod|grep kvmkvm_intel 162153 0kvm 525259 1 kvm_intel启动libvirtd并检查是否成功启动,命令如下:[root@kvm network-scripts]# systemctl start libvirtd[root@kvm network-scripts]# ps -ef |grep libvirtroot 17270 1 1 04:36 ? 00:00:00 /usr/sbin/libvirtdnobody 17383 1 0 04:36 ? 00:00:00 /usr/sbin/dnsmasq --conf-file=/var/lib/libvirt/dnsmasq/default.conf --leasefile-ro --dhcp-script=/usr/libexec/libvirt_leaseshelperroot 17384 17383 0 04:36 ? 00:00:00 /usr/sbin/dnsmasq --conf-file=/var/lib/libvirt/dnsmasq/default.conf --leasefile-ro --dhcp-script=/usr/libexec/libvirt_leaseshelperroot 17416 2264 0 04:36 pts/0 00:00:00 grep --color=auto libvirt启动成功后,使用brctl命令可以看到两个网卡,如下代码所示:[root@kvm ~]# cd[root@kvm ~]# brctl showbridge name bridge id STP enabled interfacesbr0 8000.000c298d1f90 no eno16777736virbr0 8000.525400c7e229 yes virbr0-nic
3. 命令行安装CentOS 7
我用的是CentOS-7-x86_64-DVD-1511.iso的镜像 通过SCRT上传CentOS 7镜像到/tmp目录下,如果没有镜像的可以自行下载。上传后,使用ll命令查看/tmp目录下是否存在CentOS 7镜像文件,
[root@kvm ~]# ll /tmp/total 4228096-rw-r--r-- 1 root root 4329570304 Apr 15 2016 CentOS-7-x86_64-DVD-1511.iso镜像存在,接下来使用virt-install进行CentOS 7的安装,命令如下:[root@kvm ~]# virt-install --name=test --memory=512,maxmemory=1024--vcpus=1,maxvcpus=2 --os-type=linux --os-variant=rhel7 --location=/tmp/CentOS-7-x86_64-DVD-1511.iso --disk path=/kvm_data/test.img,size=10 --bridge=br0 --graphics=none --console=pty,target_type=serial --extra-args="console=tty0 console=ttyS0"
命令解释:
l —name:指定虚拟机的名称。
l —memory:指定分配给虚拟机的内存资源大小。
l maxmemory:指定可调节的最大内存资源大小,因为KVM支持热调整虚拟机的资源。
l —vcpus:指定分配给虚拟机的CPU核心数量。
l maxvcpus:指定可调节的最大CPU核心数量。
l —os-type:指定虚拟机安装的操作系统类型。
l —os-variant:指定系统的发行版本。
l —location:指定ISO镜像文件所在的路径,支持使用网络资源路径,也就是说可以使用URL。
l —disk path:指定虚拟硬盘所存放的路径及名称,size则是指定该硬盘的可用大小,单位是G。
l —bridge:指定使用哪一个桥接网卡,也就是说使用桥接的网络模式。
l —graphics:指定是否开启图形。
l —console:定义终端的属性,target_type 则是定义终端的类型。
l —extra-args:定义终端额外的参数。
打完上面那条命令后,等一会,就可以看见下面这段命令,这是系统基础设置,带[!]基本都是需要配置的,接下来我们开始配置“Timezone settings”,输入“2”,按Enter键,命令如下:Starting installer, one moment...anaconda 21.48.22.56-1 for CentOS 7 started.* installation log files are stored in /tmp during the installation* shell is available on TTY2* when reporting a bug add logs from /tmp as separate text/plain attachments17:01:51 Not asking for VNC because we don't have a network================================================================================================================================================================Installation1) [x] Language settings 2) [!] Timezone settings(English (United States)) (Timezone is not set.)3) [!] Installation source 4) [!] Software selection(Processing...) (Processing...)5) [!] Installation Destination 6) [x] Kdump(No disks selected) (Kdump is enabled)7) [ ] Network configuration 8) [!] Root password(Not connected) (Password is not set.)9) [!] User creation(No user will be created)Please make your choice from above ['q' to quit | 'b' to begin installation | 'r' to refresh]: 2=====================================================================“Timezone settings”时区设置选择 5) Asia亚洲,再选择城市 62) Shanghai上海,命令如下:Timezone settingsAvailable regions1) Africa 6) Atlantic 10) Pacific2) America 7) Australia 11) US3) Antarctica 8) Europe 12) Etc4) Arctic 9) Indian5) AsiaPlease select the timezone.Use numbers or type names directly [b to region list, q to quit]: 5================================================================================================================================================================Timezone settingsAvailable timezones in region Asia1) Aden 28) Irkutsk 54) Pyongyang2) Almaty 29) Jakarta 55) Qatar3) Amman 30) Jayapura 56) Qyzylorda4) Anadyr 31) Jerusalem 57) Rangoon5) Aqtau 32) Kabul 58) Riyadh6) Aqtobe 33) Kamchatka 59) Sakhalin7) Ashgabat 34) Karachi 60) Samarkand8) Baghdad 35) Kathmandu 61) Seoul9) Bahrain 36) Khandyga 62) Shanghai10) Baku 37) Kolkata 63) Singapore11) Bangkok 38)Krasnoyarsk 64) Srednekolymsk12) Beirut 39) Kuala_Lumpur 65) Taipei13) Bishkek 40) Kuching 66) Tashkent14) Brunei 41) Kuwait 67) Tbilisi15) Chita 42) Macau 68) Tehran16) Choibalsan 43) Magadan 69) Thimphu17) Colombo 44) Makassar 70) Tokyo18) Damascus 45) Manila 71) Ulaanbaatar19) Dhaka 46) Muscat 72) Urumqi20) Dili 47) Nicosia 73) Ust-Nera21) Dubai 48) Novokuznetsk 74) Vientiane22) Dushanbe 49) Novosibirsk 75) VladivostokPress ENTER to continue23) Gaza 50) Omsk 76) Yakutsk24) Hebron 51) Oral 77) Yekaterinburg25) Ho_Chi_Minh 52) Phnom_Penh 78) Yerevan26) Hong_Kong 53) Pontianak27) HovdPlease select the timezone.Use numbers or type names directly [b to region list, q to quit]: 62================================================================================输入完毕后,可以发现2的[!]变成了[x],证明配置完毕。接下来我们配置“Software selection”,选择“4”,在选择“c”,因为默认就是minimalinstall,按Enter键,命令如下:Installation1) [x] Language settings 2) [x] Timezone settings(English (United States)) (Asia/Shanghai timezone)3) [x] Installation source 4) [!] Software selection(Local media) (Minimal Install)5) [!] Installation Destination 6) [x] Kdump(No disks selected) (Kdump is enabled)7) [ ] Network configuration 8) [!] Root password(Not connected) (Password is not set.)9) [!] User creation(No user will be created)Please make your choice from above ['q' to quit | 'b' to begin installation |'r' to refresh]: 4================================================================================================================================================================Base environmentSoftware selectionBase environment1) [x] Minimal Install 7) [ ] Server with GUI2) [ ] Compute Node 8) [ ] GNOME Desktop3) [ ] Infrastructure Server 9) [ ] KDE Plasma Workspaces4) [ ] File and Print Server 10) [ ] Development and Creative Work5) [ ] Basic Web Server station6) [ ] Virtualization HostPlease make your choice from above ['q' to quit | 'c' to continue |'r' to refresh]: c接下来我们配置“Installation Destination”,选择“5”,其余的依次选择“c”,按Enter键,命令如下:Installation1) [x] Language settings 2) [x] Timezone settings(English (United States)) (Asia/Shanghai timezone)3) [!] Installation source 4) [!] Software selection(Processing...) (Processing...)5) [!] Installation Destination 6) [x] Kdump(No disks selected) (Kdump is enabled)7) [ ] Network configuration 8) [!] Root password(Not connected) (Password is not set.)9) [!] User creation(No user will be created)Please make your choice from above ['q' to quit | 'b' to begin installation |'r' to refresh]: 5================================================================================================================================================================Probing storage...Installation Destination[x] 1) : 10 GiB (vda)1 disk selected; 10 GiB capacity; 10 GiB free ...Please make your choice from above ['q' to quit | 'c' to continue |'r' to refresh]: c================================================================================================================================================================Autopartitioning Options[ ] 1) Replace Existing Linux system(s)[x] 2) Use All Space[ ] 3) Use Free SpaceInstallation requires partitioning of your hard drive. Select what space to usefor the install target.Please make your choice from above ['q' to quit | 'c' to continue |'r' to refresh]: c================================================================================================================================================================Partition Scheme Options[ ] 1) Standard Partition[ ] 2) Btrfs[x] 3) LVM[ ] 4) LVM Thin ProvisioningSelect a partition scheme configuration.Please make your choice from above ['q' to quit | 'c' to continue |'r' to refresh]: cGenerating updated storage configurationChecking storage configuration...================================================================================================================================================================接下来配置“Root password”,选择8,按Enter键,命令如下:Installation1) [x] Language settings 2) [x] Timezone settings(English (United States)) (Asia/Shanghai timezone)3) [x] Installation source 4) [x] Software selection(Local media) (Minimal Install)5) [x] Installation Destination 6) [x] Kdump(Automatic partitioning selecte (Kdump is enabled)d) 8) [!] Root password7) [ ] Network configuration (Password is not set.)(Not connected)9) [!] User creation(No user will be created)Please make your choice from above ['q' to quit | 'b' to begin installation |'r' to refresh]: 8================================================================================================================================================================Please select new root password. You will have to type it twice.依次输入两次密码,密码相同,我设置的为123456,命令如下:Password: 123456//密码为密文,不显示。Password (confirm): 123456================================================================================================================================================================QuestionYou have provided a weak password: The password fails the dictionary check - itis too simplistic/systematicWould you like to use it anyway?//这句话的意思:你的密码太过简单,是否使用它,输入yes即可。Please respond 'yes' or 'no': yes==================================================================================================================配置完成,选择“b”,按Enter键后,开始安装,命令如下:Installation1) [x] Language settings 2) [x] Timezone settings(English (United States)) (Asia/Shanghai timezone)3) [x] Installation source 4) [x] Software selection(Local media) (Minimal Install)5) [x] Installation Destination 6) [x] Kdump(Automatic partitioning selecte (Kdump is enabled)d) 8) [x] Root password7) [ ] Network configuration (Password is set.)(Not connected)9) [ ] User creation(No user will be created)Please make your choice from above ['q' to quit | 'b' to begin installation |'r' to refresh]: b================================================================================================================================================================ProgressSetting up the installation environment.Creating disklabel on /dev/vda.Creating xfs on /dev/vda1.Creating lvmpv on /dev/vda2.Creating swap on /dev/mapper/centos-swap.……………………Installing readline (34/297)Installing gawk (35/297)Installing elfutils-libelf (36/297)Installing libgpg-error (37/297)Installing libffi (38/297)Installing libattr (39/297)Installing libacl (40/297)Installing libcap (41/297)Installing libgcrypt (42/297)Installing cpio (43/297)Installing libxml2 (44/297)Installing libnl3 (45/297)Installing expat (46/297)Installing p11-kit (47/297)…………………….Performing post-installation setup tasks.Configuring installed system.Writing network configuration.Creating users.Configuring addons.Generating initramfs.Running post-installation scripts.Use of this product is subject to the license agreement found at /usr/share/centos-release/EULAInstallation complete. Press return to quit//按回车……………………CentOS Linux 7 (Core)Kernel 3.10.0-327.el7.x86_64 on an x86_64localhost login: rootPassword: 123456[root@localhost ~]#//按“Ctrl+]”键,退出终端,回到宿主机。[root@kvm ~]#CentOS 7安装完成。
虚拟机管理
1. KVM基本管理
完成虚拟机安装,已经退回到宿主机,接下来我们来通过宿主机virsh命令进行管理刚才安装的CentOS 7虚拟机。查看虚拟机列表,命令如下:[root@kvm ~]# virsh list//查看虚拟机列表,只能看到正在运行的虚拟机Id Name State----------------------------------------------------2 test running[root@kvm ~]# virsh list --all//查看虚拟机列表,包括未运行的虚拟机Id Name State----------------------------------------------------2 test running进入指定的虚拟,命令如下:[root@kvm ~]# virsh console testConnected to domain testEscape character is ^]//如果迟迟未动敲下回车就ok,下面就是正常登录时需要输入的用户名密码CentOS Linux 7 (Core)Kernel 3.10.0-327.el7.x86_64 on an x86_64localhost login:若发生以下报错信息,命令如下:[root@kvm ~]# virsh console testConnected to domain testEscape character is ^]error: operation failed: Active console session exists for this domain解决方式,命令如下:[root@kvm ~]# ps -ef |grep consoleroot 11167 10987 0 01:55 tty1 00:00:00 virsh console testroot 16017 15750 0 10:01 pts/1 00:00:00 grep --color=auto console[root@kvm ~]# kill -9 11167vrish常用命令,命令如下:virsh shutdown test//关闭虚拟机virsh start test//开启虚拟机virsh destroy test//类似stop,这个是强制停止virsh undefine test//彻底销毁虚拟机,会删除虚拟机配置文件,virsh list --all就看不到virsh autostart test//宿主机开机该虚拟机也开机virsh autostart --disable test//解除开机启动virsh suspend test//挂起virsh resume test//恢复
2.克隆虚拟机
克隆虚拟机之前,要先关闭虚拟机,不然会提示这种错误,命令如下:[root@kvm ~]# virt-clone --original test --name test02 --file/kvm_data/test02.imgERROR Domain with devices to clone must be paused or shutoff.关闭虚拟机后,再次进行克隆,命令如下:[root@kvm ~]# virsh shutdown testDomain test is being shutdown[root@kvm ~]# virt-clone --original test --name test02 --file/kvm_data/test02.imgAllocating 'test02.img' 3%[= ] 20 MB/s | 365 MB 00:08:23 ETA//开始克隆[root@kvm ~]# virt-clone --original test --name test02 --file/kvm_data/test02.imgAllocating 'test02.img' | 10 GB 00:00:35Clone 'test02' created successfully.//克隆完成且成功命令解释:--original:指定克隆源虚拟机。--name:指定克隆后的虚拟机名字。--file:指定目标虚拟机的虚拟磁盘文件。查看虚拟机配置文件/etc/libvirt/qemu/,看是否增加test02.xml文件,命令如下:[root@kvm ~]# ls /etc/libvirt/qemu/networks test02.xml test.xml接下来,我们启动刚刚克隆的虚拟机test02,首先查看虚拟机列表,然后启动克隆的虚拟机test02,命令如下:[root@kvm ~]# virsh list --allId Name State----------------------------------------------------- test shut off- test02 shut off[root@kvm ~]# virsh start test02Domain test02 started
3. 快照管理
//快照是在我们使用Vmware的时候,很常用的一个功能。它可以回到之前的某一状态。在KVM中RAW格式的虚拟磁盘不支持做快照,qcow2支持。创建快照,命令如下:[root@kvm ~]# virsh snapshot-create testDomain snapshot 1588485687 created查看test.img信息,同时会查看到快照列表,命令如下:[root@kvm ~]# qemu-img info /kvm_data/test.imgimage: /kvm_data/test.imgfile format: qcow2virtual size: 10G (10737418240 bytes)disk size: 1.1Gcluster_size: 65536Snapshot list:ID TAG VM SIZE DATE VM CLOCK1 1588485687 0 2020-05-03 14:01:27 00:00:00.000Format specific information:compat: 1.1lazy refcounts: true列出所有快照,命令如下:[root@kvm ~]# virsh snapshot-list testName Creation Time State------------------------------------------------------------1588485687 2020-05-03 14:01:27 +0800 shutoff查看当前快照版本,命令如下:[root@kvm ~]# virsh snapshot-current test<domainsnapshot><name>1588485687</name><state>shutoff</state><creationTime>1588485687</creationTime><memory snapshot='no'/><disks><disk name='vda' snapshot='internal'/><disk name='hda' snapshot='no'/></disks><domain type='kvm'><name>test</name><uuid>49d7cb9c-20dc-42dd-a260-01532b5132e5</uuid><memory unit='KiB'>1048576</memory><currentMemory unit='KiB'>524288</currentMemory><vcpu placement='static' current='1'>2</vcpu><os><type arch='x86_64' machine='pc-i440fx-rhel7.0.0'>hvm</type><boot dev='hd'/></os><features><acpi/><apic/></features><cpu mode='custom' match='exact' check='partial'><model fallback='allow'>Broadwell-noTSX-IBRS</model><feature policy='require' name='md-clear'/><feature policy='require' name='spec-ctrl'/><feature policy='require' name='ssbd'/></cpu><clock offset='utc'><timer name='rtc' tickpolicy='catchup'/><timer name='pit' tickpolicy='delay'/><timer name='hpet' present='no'/></clock><on_poweroff>destroy</on_poweroff><on_reboot>restart</on_reboot><on_crash>destroy</on_crash><pm><suspend-to-mem enabled='no'/><suspend-to-disk enabled='no'/></pm><devices><emulator>/usr/libexec/qemu-kvm</emulator><disk type='file' device='disk'><driver name='qemu' type='qcow2'/><source file='/kvm_data/test.img'/><target dev='vda' bus='virtio'/><address type='pci' domain='0x0000' bus='0x00' slot='0x06' function='0x0'/></disk><disk type='file' device='cdrom'><driver name='qemu' type='raw'/><target dev='hda' bus='ide'/><readonly/><address type='drive' controller='0' bus='0' target='0' unit='0'/></disk><controller type='usb' index='0' model='ich9-ehci1'><address type='pci' domain='0x0000' bus='0x00' slot='0x04' function='0x7'/></controller><controller type='usb' index='0' model='ich9-uhci1'><master startport='0'/><address type='pci' domain='0x0000' bus='0x00' slot='0x04' function='0x0' multifunction='on'/></controller><controller type='usb' index='0' model='ich9-uhci2'><master startport='2'/><address type='pci' domain='0x0000' bus='0x00' slot='0x04' function='0x1'/></controller><controller type='usb' index='0' model='ich9-uhci3'><master startport='4'/><address type='pci' domain='0x0000' bus='0x00' slot='0x04' function='0x2'/></controller><controller type='ide' index='0'><address type='pci' domain='0x0000' bus='0x00' slot='0x01' function='0x1'/></controller><controller type='virtio-serial' index='0'><address type='pci' domain='0x0000' bus='0x00' slot='0x05' function='0x0'/></controller><controller type='pci' index='0' model='pci-root'/><interface type='bridge'><mac address='52:54:00:93:bf:07'/><source bridge='br0'/><model type='virtio'/><address type='pci' domain='0x0000' bus='0x00' slot='0x03' function='0x0'/></interface><serial type='pty'><target type='isa-serial' port='0'><model name='isa-serial'/></target></serial><console type='pty'><target type='serial' port='0'/></console><channel type='unix'><target type='virtio' name='org.qemu.guest_agent.0'/><address type='virtio-serial' controller='0' bus='0' port='1'/></channel><input type='mouse' bus='ps2'/><input type='keyboard' bus='ps2'/><memballoon model='virtio'><address type='pci' domain='0x0000' bus='0x00' slot='0x07' function='0x0'/></memballoon><rng model='virtio'><backend model='random'>/dev/urandom</backend><address type='pci' domain='0x0000' bus='0x00' slot='0x08' function='0x0'/></rng></devices></domain></domainsnapshot>查看所有快照配置文件,命令如下:[root@kvm ~]# ls /var/lib/libvirt/qemu/snapshot/test/1588485687.xml恢复指定快照,命令如下:[root@kvm ~]# virsh snapshot-revert test 1588485687删除指定快照,命令如下:[root@kvm ~]# virsh snapshot-delete test 1588485687Domain snapshot 1588485687 deleted
4. 磁盘格式
查看虚拟磁盘格式,命令如下:[root@kvm ~]# qemu-img info /kvm_data/test.imgimage: /kvm_data/test.imgfile format: qcow2virtual size: 10G (10737418240 bytes)disk size: 1.1Gcluster_size: 65536Format specific information:compat: 1.1lazy refcounts: true创建2 GB的RAW格式磁盘,命令如下:[root@kvm ~]# qemu-img create -f raw /kvm_data/test_1.img 2GFormatting '/kvm_data/test_1.img', fmt=raw size=2147483648RAW格式的磁盘转换为qcow2格式,命令如下:[root@kvm ~]# qemu-img convert -O qcow2 /kvm_data/test_1.img/kvm_data/test_1.qcow2查看test1.img大小,命令如下:[root@kvm ~]# ls -lh /kvm_data/test_1.img-rw-r--r-- 1 root root 2.0G May 3 15:11 /kvm_data/test_1.img[root@kvm ~]# ls -lh /kvm_data/test_1.qcow2-rw-r--r-- 1 root root 193K May 3 15:38 /kvm_data/test_1.qcow2//可以看到qcow2文件比较小,raw文件大小和我们指定空间大小一样是2G//raw格式的磁盘性能比qcow2要好,但是raw格式的磁盘无法做快照将test02转成raw格式,命令如下:[root@kvm ~]# qemu-img convert -O raw/kvm_data/test02.img /kvm_data/test02_2.raw更改磁盘格式和文件路径,然后启动test02虚拟机,命令如下:[root@kvm ~]# virsh edit test02…………<disk type='file' device='disk'><driver name='qemu' type='qcow'/><source file='/kvm_data/test02.img'/><target dev='vda' bus='virtio'/><address type='pci' domain='0x0000' bus='0x00' slot='0x06' function='0x0'/></disk>//找到上面这部分将qcow修改为raw,/kvm_data/test02.img改为/kvm_data/test02_2.raw<disk type='file' device='disk'><driver name='qemu' type='raw'/><source file='/kvm_data/test02_2.raw'/><target dev='vda' bus='virtio'/><address type='pci' domain='0x0000' bus='0x00' slot='0x06' function='0x0'/></disk>………………查看磁盘所属用户和组,命令如下:[root@kvm ~]# ls -l /kvm_data/total 3310628drwx------ 2 root root 16384 Apr 29 00:20 lost+found-rw-r--r-- 1 root root 10737418240 May 3 16:14 test02_2.raw-rw------- 1 root root 1133772800 May 3 16:02 test02.img-rw-r--r-- 1 root root 2147483648 May 3 15:11 test_1.img-rw-r--r-- 1 root root 197120 May 3 16:05 test_1.qcow2-rw------- 1 root root 10739384832 May 3 14:14 test.img启动虚拟机test02,然后再次查看磁盘所属用户和组,命令如下:[root@kvm ~]# virsh start test02Domain test02 started[root@kvm ~]# ls -l /kvm_data/total 3310628drwx------ 2 root root 16384 Apr 29 00:20 lost+found-rw-r--r-- 1 qemu qemu 10737418240 May 3 16:14 test02_2.raw-rw------- 1 root root 1133772800 May 3 16:02 test02.img-rw-r--r-- 1 root root 2147483648 May 3 15:11 test_1.img-rw-r--r-- 1 root root 197120 May 3 16:05 test_1.qcow2-rw------- 1 root root 10739384832 May 3 14:14 test.img//启动后所属组变化成qemu的是test02_2.raw,证明这个磁盘正在被使用
5. 磁盘扩容
我们知道,在这里磁盘一共有两种格式,一种是RAW格式,一种是qcow2格式,接下来我们分别给这两种磁盘格式进行扩容。首先扩容RAW格式,命令如下:[root@kvm ~]# qemu-img resize /kvm_data/test02_2.raw +2GImage resized.查看test02_2.raw信息,命令如下:[root@kvm ~]# qemu-img info /kvm_data/test02_2.rawimage: /kvm_data/test02_2.rawfile format: rawvirtual size: 12G (12884901888 bytes)disk size: 1.0G进入虚拟机test02,使用fdisk -l查看磁盘,命令如下:[root@kvm ~]# virsh console test02[root@localhost ~]# fdisk -lDisk /dev/vda: 10.7 GB, 10737418240 bytes, 20971520 sectorsUnits = sectors of 1 * 512 = 512 bytesSector size (logical/physical): 512 bytes / 512 bytesI/O size (minimum/optimal): 512 bytes / 512 bytesDisk label type: dosDisk identifier: 0x0005b865Device Boot Start End Blocks Id System/dev/vda1 * 2048 1026047 512000 83 Linux/dev/vda2 1026048 20971519 9972736 8e Linux LVMDisk /dev/mapper/centos-root: 9093 MB, 9093251072 bytes, 17760256 sectorsUnits = sectors of 1 * 512 = 512 bytesSector size (logical/physical): 512 bytes / 512 bytesI/O size (minimum/optimal): 512 bytes / 512 bytesDisk /dev/mapper/centos-swap: 1073 MB, 1073741824 bytes, 2097152 sectorsUnits = sectors of 1 * 512 = 512 bytesSector size (logical/physical): 512 bytes / 512 bytesI/O size (minimum/optimal): 512 bytes / 512 bytes//可以看到磁盘还是10 GB退出终端,关闭test02虚拟机,重新启动,然后再次进入虚拟机test02,使用fdisk -l查看磁盘,命令如下:[root@kvm ~]# virsh destroy test02Domain test02 destroyed[root@kvm ~]# virsh start test02Domain test02 started[root@kvm ~]# virsh console test02[root@localhost ~]# fdisk -lDisk /dev/vda: 12.9 GB, 12884901888 bytes, 25165824 sectorsUnits = sectors of 1 * 512 = 512 bytesSector size (logical/physical): 512 bytes / 512 bytesI/O size (minimum/optimal): 512 bytes / 512 bytesDisk label type: dosDisk identifier: 0x0005b865Device Boot Start End Blocks Id System/dev/vda1 * 2048 1026047 512000 83 Linux/dev/vda2 1026048 20971519 9972736 8e Linux LVMDisk /dev/mapper/centos-root: 9093 MB, 9093251072 bytes, 17760256 sectorsUnits = sectors of 1 * 512 = 512 bytesSector size (logical/physical): 512 bytes / 512 bytesI/O size (minimum/optimal): 512 bytes / 512 bytesDisk /dev/mapper/centos-swap: 1073 MB, 1073741824 bytes, 2097152 sectorsUnits = sectors of 1 * 512 = 512 bytesSector size (logical/physical): 512 bytes / 512 bytesI/O size (minimum/optimal): 512 bytes / 512 bytes可以看到已经变成12 GB了。接下来,我们怎么使用新增加的这2 GB磁盘,那就是分区,命令如下:[root@localhost ~]# fdisk /dev/vdaWelcome to fdisk (util-linux 2.23.2).Changes will remain in memory only, until you decide to write them.Be careful before using the write command.Command (m for help): n//新建分区Partition type:p primary (2 primary, 0 extended, 2 free)e extendedSelect (default p): pPartition number (3,4, default 3)://按Enter键First sector (20971520-25165823, default 20971520)://按Enter键Using default value 20971520Last sector, +sectors or +size{K,M,G} (20971520-25165823, default 25165823)://按Enter键Using default value 25165823Partition 3 of type Linux and of size 2 GiB is setCommand (m for help): p//查看分区列表Disk /dev/vda: 12.9 GB, 12884901888 bytes, 25165824 sectorsUnits = sectors of 1 * 512 = 512 bytesSector size (logical/physical): 512 bytes / 512 bytesI/O size (minimum/optimal): 512 bytes / 512 bytesDisk label type: dosDisk identifier: 0x0005b865Device Boot Start End Blocks Id System/dev/vda1 * 2048 1026047 512000 83 Linux/dev/vda2 1026048 20971519 9972736 8e Linux LVM/dev/vda3 20971520 25165823 2097152 83 LinuxCommand (m for help): w//保存退出并退出终端除了对已有磁盘扩容外,还可以额外增加磁盘,命令如下:[root@kvm ~]# qemu-img create -f raw /kvm_data/test02_3.raw 5GFormatting '/kvm_data/test02_3.raw', fmt=raw size=5368709120使用virsh edit编辑test02虚拟机,将新磁盘增加到test02虚拟机,命令如下[root@kvm ~]# virsh edit test02………………<disk type='file' device='disk'><driver name='qemu' type='raw'/><source file='/kvm_data/test02_2.raw'/><target dev='vda' bus='virtio'/><address type='pci' domain='0x0000' bus='0x00' slot='0x06'function='0x0'/></disk>//找到这一部分内容,在下面增加以下内容<disk type='file' device='disk'><driver name='qemu' type='raw'/><source file='/kvm_data/test02_3.raw'/><target dev='vdb' bus='virtio'/><address type='pci' domain='0x0000' bus='0x00' slot='0x09'function='0x0'/></disk>………………关闭test02虚拟机,重新启动,然后进入该虚拟机,使用fdisk -l查看磁盘,命令如下:[root@kvm ~]# virsh destroy test02Domain test02 destroyed[root@kvm ~]# virsh start test02Domain test02 started[root@kvm ~]# virsh console test02[root@localhost ~]# fdisk -lDisk /dev/vda: 12.9 GB, 12884901888 bytes, 25165824 sectorsUnits = sectors of 1 * 512 = 512 bytesSector size (logical/physical): 512 bytes / 512 bytesI/O size (minimum/optimal): 512 bytes / 512 bytesDisk label type: dosDisk identifier: 0x0005b865Device Boot Start End Blocks Id System/dev/vda1 * 2048 1026047 512000 83 Linux/dev/vda2 1026048 20971519 9972736 8e Linux LVM/dev/vda3 20971520 25165823 2097152 83 LinuxDisk /dev/vdb: 5368 MB, 5368709120 bytes, 10485760 sectorsUnits = sectors of 1 * 512 = 512 bytesSector size (logical/physical): 512 bytes / 512 bytesI/O size (minimum/optimal): 512 bytes / 512 bytesDisk /dev/mapper/centos-root: 9093 MB, 9093251072 bytes, 17760256 sectorsUnits = sectors of 1 * 512 = 512 bytesSector size (logical/physical): 512 bytes / 512 bytesI/O size (minimum/optimal): 512 bytes / 512 bytesDisk /dev/mapper/centos-swap: 1073 MB, 1073741824 bytes, 2097152 sectorsUnits = sectors of 1 * 512 = 512 bytesSector size (logical/physical): 512 bytes / 512 bytesI/O size (minimum/optimal): 512 bytes / 512 bytes可以看到多了一块5 GB的磁盘,退出终端。接下来,我们扩容qcow2格式的磁盘,命令如下:[root@kvm ~]# qemu-img resize /kvm_data/test.img +2GImage resized.//若提示qemu-img: Can't resize an image which has snapshots,需要删除快照查看test.img信息,命令如下:[root@kvm ~]# qemu-img info /kvm_data/test.imgimage: /kvm_data/test.imgfile format: qcow2virtual size: 12G (12884901888 bytes)disk size: 1.1Gcluster_size: 65536Format specific information:compat: 1.1lazy refcounts: true关闭test虚拟机,重新启动,然后再次进入虚拟机test02,使用fdisk -l查看磁盘,命令如下:[root@kvm ~]# virsh destroy testDomain test destroyed[root@kvm ~]# virsh start testDomain test started[root@kvm ~]# virsh console test[root@localhost ~]# fdisk -lDisk /dev/vda: 12.9 GB, 12884901888 bytes, 25165824 sectorsUnits = sectors of 1 * 512 = 512 bytesSector size (logical/physical): 512 bytes / 512 bytesI/O size (minimum/optimal): 512 bytes / 512 bytesDisk label type: dosDisk identifier: 0x0005b865Device Boot Start End Blocks Id System/dev/vda1 * 2048 1026047 512000 83 Linux/dev/vda2 1026048 20971519 9972736 8e Linux LVMDisk /dev/mapper/centos-root: 9093 MB, 9093251072 bytes, 17760256 sectorsUnits = sectors of 1 * 512 = 512 bytesSector size (logical/physical): 512 bytes / 512 bytesI/O size (minimum/optimal): 512 bytes / 512 bytesDisk /dev/mapper/centos-swap: 1073 MB, 1073741824 bytes, 2097152 sectorsUnits = sectors of 1 * 512 = 512 bytesSector size (logical/physical): 512 bytes / 512 bytesI/O size (minimum/optimal): 512 bytes / 512 bytes分区新增加的2 GB磁盘,命令如下:[root@localhost ~]# fdisk /dev/vdaWelcome to fdisk (util-linux 2.23.2).Changes will remain in memory only, until you decide to write them.Be careful before using the write command.Command (m for help): nPartition type:p primary (2 primary, 0 extended, 2 free)e extendedSelect (default p): pPartition number (3,4, default 3):First sector (20971520-25165823, default 20971520):Using default value 20971520Last sector, +sectors or +size{K,M,G} (20971520-25165823, default 25165823):Using default value 25165823Partition 3 of type Linux and of size 2 GiB is setCommand (m for help): w/保存并退出终端新增一块qcow2格式的磁盘,命令如下:[root@kvm ~]# qemu-img create -f qcow2 /kvm_data/test_2.img 5GFormatting '/kvm_data/test_2.img', fmt=qcow2 size=5368709120 encryption=off cluster_size=65536 lazy_refcounts=off使用virsh edit编辑test虚拟机,将新磁盘增加到test虚拟机,命令如下:[root@kvm ~]# virsh edit test………………<disk type='file' device='disk'><driver name='qemu' type='qcow2'/><source file='/kvm_data/test.img'/><target dev='vda' bus='virtio'/><address type='pci' domain='0x0000' bus='0x00' slot='0x06' function='0x0'/></disk>//找到这一部分内容,在下面增加以下内容<disk type='file' device='disk'><driver name='qemu' type='qcow2'/><source file='/kvm_data/test_2.img'/><target dev='vdb' bus='virtio'/><address type='pci' domain='0x0000' bus='0x00' slot='0x08' function='0x0'/></disk>………………关闭test虚拟机,重新启动,然后进入该虚拟机,使用fdisk -l查看磁盘,命令如下:[root@kvm ~]# virsh destroy testDomain test destroyed[root@kvm ~]# virsh start testDomain test started[root@kvm ~]# virsh console test[root@localhost ~]# fdisk -lDisk /dev/vda: 12.9 GB, 12884901888 bytes, 25165824 sectorsUnits = sectors of 1 * 512 = 512 bytesSector size (logical/physical): 512 bytes / 512 bytesI/O size (minimum/optimal): 512 bytes / 512 bytesDisk label type: dosDisk identifier: 0x0005b865Device Boot Start End Blocks Id System/dev/vda1 * 2048 1026047 512000 83 Linux/dev/vda2 1026048 20971519 9972736 8e Linux LVM/dev/vda3 20971520 25165823 2097152 83 LinuxDisk /dev/vdb: 5368 MB, 5368709120 bytes, 10485760 sectorsUnits = sectors of 1 * 512 = 512 bytesSector size (logical/physical): 512 bytes / 512 bytesI/O size (minimum/optimal): 512 bytes / 512 bytesDisk /dev/mapper/centos-root: 9093 MB, 9093251072 bytes, 17760256 sectorsUnits = sectors of 1 * 512 = 512 bytesSector size (logical/physical): 512 bytes / 512 bytesI/O size (minimum/optimal): 512 bytes / 512 bytesDisk /dev/mapper/centos-swap: 1073 MB, 1073741824 bytes, 2097152 sectorsUnits = sectors of 1 * 512 = 512 bytesSector size (logical/physical): 512 bytes / 512 bytesI/O size (minimum/optimal): 512 bytes / 512 bytes退出终端
6. 调整CPU内存、网卡
查看虚拟机配置信息,命令如下:[root@kvm ~]# virsh dominfo testId: 8Name: testUUID: 49d7cb9c-20dc-42dd-a260-01532b5132e5OS Type: hvmState: runningCPU(s): 1CPU time: 20.8sMax memory: 1048576 KiBUsed memory: 524288 KiBPersistent: yesAutostart: disableManaged save: noSecurity model: noneSecurity DOI: 0编辑虚拟机内存,命令如下:[root@kvm ~]# virsh edit test…………<memory unit='KiB'>1048576</memory>//最大内存<currentMemory unit='KiB'>524288</currentMemory>//可用内存<vcpu placement='static' current='1'>2</vcpu>//最大cpu………………//将以上内容修改为如下内容…………<memory unit='KiB'>1048576</memory><currentMemory unit='KiB'>624288</currentMemory><vcpu placement='static' current='1'>2</vcpu>…………关闭虚拟机,重启动虚拟机,命令如下:[root@kvm ~]# virsh destroy testDomain test destroyed[root@kvm ~]# virsh start testDomain test started查看虚拟机配置信息,看是否修改成功,命令如下:[root@kvm ~]# virsh dominfo testId: 10Name: testUUID: 49d7cb9c-20dc-42dd-a260-01532b5132e5OS Type: hvmState: runningCPU(s): 1CPU time: 21.4sMax memory: 1048576 KiBUsed memory: 624288 KiBPersistent: yesAutostart: disableManaged save: noSecurity model: noneSecurity DOI: 0除了这种修改方式之外,还有一种动态修改,命令如下:[root@kvm ~]# virsh setmem test 800m//动态修改内存[root@kvm ~]# virsh setvcpus test 2//动态修改cpu,只可以增加不可以减少查看配置信息,看是否修改成功,命令如下:[root@kvm ~]# virsh dominfo testId: 10Name: testUUID: 49d7cb9c-20dc-42dd-a260-01532b5132e5OS Type: hvmState: runningCPU(s): 2CPU time: 22.8sMax memory: 1048576 KiBUsed memory: 819200 KiBPersistent: yesAutostart: disableManaged save: noSecurity model: noneSecurity DOI: 0[root@kvm ~]# virsh dumpxml test > /etc/libvirt/qemu/test.xml//需要把配置写入到配置文件里查看网卡列表,命令如下:[root@kvm ~]# virsh domiflist testInterface Type Source Model MAC-------------------------------------------------------vnet1 bridge br0 virtio 52:54:00:93:bf:07增加一块新的网卡,并设置为NAT网络模式(virbr0类似VMware的VMnet8),这里如果写--source br0,则网络模式为桥接,命令如下:[root@kvm ~]# virsh attach-interface test --type bridge --source virbr0Interface attached successfully[root@kvm ~]# virsh domiflist testInterface Type Source Model MAC-------------------------------------------------------vnet1 bridge br0 virtio 52:54:00:93:bf:07vnet2 bridge virbr0 rtl8139 52:54:00:29:ed:8b[root@kvm ~]# virsh dumpxml test > /etc/libvirt/qemu/test.xml进入test虚拟机,查看网卡信息,命令如下:[root@kvm ~]# virsh console test[root@localhost ~]# ifconfigens10: flags=4163<UP,BROADCAST,RUNNING,MULTICAST> mtu 1500inet 192.168.122.8 netmask 255.255.255.0 broadcast 192.168.122.255inet6 fe80::5054:ff:fe29:ed8b prefixlen 64 scopeid 0x20<link>ether 52:54:00:29:ed:8b txqueuelen 1000 (Ethernet)RX packets 5186 bytes 7413267 (7.0 MiB)RX errors 0 dropped 0 overruns 0 frame 0TX packets 1480 bytes 84889 (82.8 KiB)TX errors 0 dropped 0 overruns 0 carrier 0 collisions 0ens11: flags=4163<UP,BROADCAST,RUNNING,MULTICAST> mtu 1500inet 192.168.16.129 netmask 255.255.255.0 broadcast 192.168.16.255inet6 fe80::5054:ff:fe15:abbd prefixlen 64 scopeid 0x20<link>ether 52:54:00:15:ab:bd txqueuelen 1000 (Ethernet)RX packets 13 bytes 1328 (1.2 KiB)RX errors 0 dropped 0 overruns 0 frame 0TX packets 16 bytes 1668 (1.6 KiB)TX errors 0 dropped 0 overruns 0 carrier 0 collisions 0eth0: flags=4163<UP,BROADCAST,RUNNING,MULTICAST> mtu 1500ether 52:54:00:93:bf:07 txqueuelen 1000 (Ethernet)RX packets 55 bytes 8520 (8.3 KiB)RX errors 0 dropped 0 overruns 0 frame 0TX packets 0 bytes 0 (0.0 B)TX errors 0 dropped 0 overruns 0 carrier 0 collisions 0lo: flags=73<UP,LOOPBACK,RUNNING> mtu 65536inet 127.0.0.1 netmask 255.0.0.0inet6 ::1 prefixlen 128 scopeid 0x10<host>loop txqueuelen 0 (Local Loopback)RX packets 0 bytes 0 (0.0 B)RX errors 0 dropped 0 overruns 0 frame 0TX packets 0 bytes 0 (0.0 B)TX errors 0 dropped 0 overruns 0 carrier 0 collisions 0
7. 迁移虚拟机
首先关闭虚拟机,命令如下:[root@kvm ~]# virsh shutdown testDomain test is being shutdown查看虚拟机磁盘所在目录,命令如下:[root@kvm ~]# virsh domblklist testTarget Source------------------------------------------------vda /kvm_data/test.imgvdb /kvm_data/test_2.imghda -[root@kvm ~]# virsh dumpxml test > /etc/libvirt/qemu/test03.xml//如果是远程机器,需要把该配置文件拷贝到远程机器上[root@kvm ~]# rsync -av /kvm_data/test.img /kvm_data/test03.img//-bash: rsync: command not found则yum install -y rsync//如果是迁移到远程,则需要把该磁盘文件拷贝到远程机器上sending incremental file listtest.imgsent 10,742,006,844 bytes received 35 bytes 60,179,310.25 bytes/sectotal size is 10,739,384,832 speedup is 1.00因为是迁移到本机,配置文件用的是test子机的配置,不改会有冲突,所以需要修改该文件。如果是远程机器不用修改,命令如下:[root@kvm ~]# vi /etc/libvirt/qemu/test03.xml<name>test03</name>//修改domname://修改uuid(随便改一下数字,位数不要变)<disk type='file' device='disk'><driver name='qemu' type='qcow2'/><source file='/kvm_data/test03.img'/><target dev='vda' bus='virtio'/><address type='pci' domain='0x0000' bus='0x00' slot='0x06' function='0x0'/></disk>//修改磁盘路径定义新虚拟机,命令如下:[root@kvm ~]# virsh define /etc/libvirt/qemu/test03.xmlDomain test03 defined from /etc/libvirt/qemu/test03.xml查看虚拟机列表,会发现新迁移的虚拟机test03,命令如下:[root@kvm ~]# virsh list --allId Name State----------------------------------------------------6 test02 running- test shut off- test03 shut off

若有收获,就点个赞吧
0 人点赞
