一、概述
定位为透明化的数据库代理端,提供封装了数据库⼆进制协议的服务端版本,⽤于完成对异构语⾔的⽀持。⽬前提供 MySQL 和 PostgreSQL 版本,它可以使⽤任何兼MySQL/PostgreSQL 协议的访问客⼾端(如:MySQL Command Client, MySQL Workbench, Navicat 等) 操作数据,对 DBA 更加友好。
• 向应⽤程序完全透明,可直接当做 MySQL/PostgreSQL 使⽤。
• 适⽤于任何兼容 MySQL/PostgreSQL 协议的的客⼾端。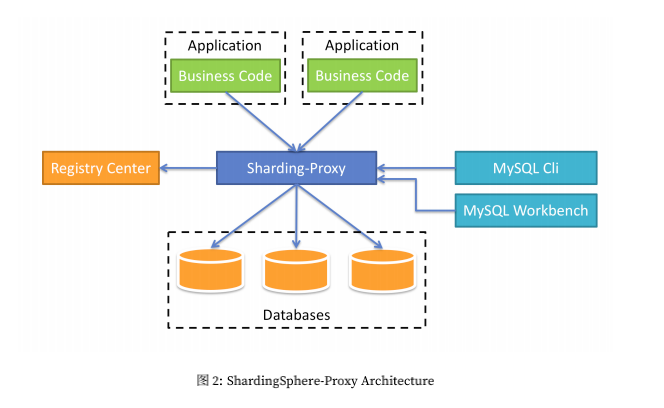
二、如何使用?
配置分表
他是一个独立服务应用,需要安装服务,进行分库分表或者读写分离配置,启动使用
步骤1:下载安装
https://archive.apache.org/dist/shardingsphere/4.1.0/apache-shardingsphere-4.1.0-sharding-proxy-bin.tar.gz
链接: https://pan.baidu.com/s/1s55bnpPAlo1guYBpzXo4vg 提取码: 4u7s 复制这段内容后打开百度网盘手机App,操作更方便哦
下载解压到目录(官网很慢,建议复制链接到迅雷下载)
步骤2:修改配置文件 server.yaml
在解压的根目录下的conf文件夹中,找到server.yaml,将下面截图标记的内容解开注释
## Licensed to the Apache Software Foundation (ASF) under one or more# contributor license agreements. See the NOTICE file distributed with# this work for additional information regarding copyright ownership.# The ASF licenses this file to You under the Apache License, Version 2.0# (the "License"); you may not use this file except in compliance with# the License. You may obtain a copy of the License at## http://www.apache.org/licenses/LICENSE-2.0## Unless required by applicable law or agreed to in writing, software# distributed under the License is distributed on an "AS IS" BASIS,# WITHOUT WARRANTIES OR CONDITIONS OF ANY KIND, either express or implied.# See the License for the specific language governing permissions and# limitations under the License.######################################################################################################### If you want to configure orchestration, authorization and proxy properties, please refer to this file.#########################################################################################################orchestration:# orchestration_ds:# orchestrationType: registry_center,config_center,distributed_lock_manager# instanceType: zookeeper# serverLists: localhost:2181# namespace: orchestration# props:# overwrite: false# retryIntervalMilliseconds: 500# timeToLiveSeconds: 60# maxRetries: 3# operationTimeoutMilliseconds: 500#authentication:users:root:password: 123456sharding:password: shardingauthorizedSchemas: sharding_dbprops:max.connections.size.per.query: 1acceptor.size: 16 # The default value is available processors count * 2.executor.size: 16 # Infinite by default.proxy.frontend.flush.threshold: 128 # The default value is 128.# LOCAL: Proxy will run with LOCAL transaction.# XA: Proxy will run with XA transaction.# BASE: Proxy will run with B.A.S.E transaction.proxy.transaction.type: LOCALproxy.opentracing.enabled: falseproxy.hint.enabled: falsequery.with.cipher.column: truesql.show: falseallow.range.query.with.inline.sharding: false
步骤3:修改 config-sharding.yaml
这里面配置分库分表的策略
找到以下配置信息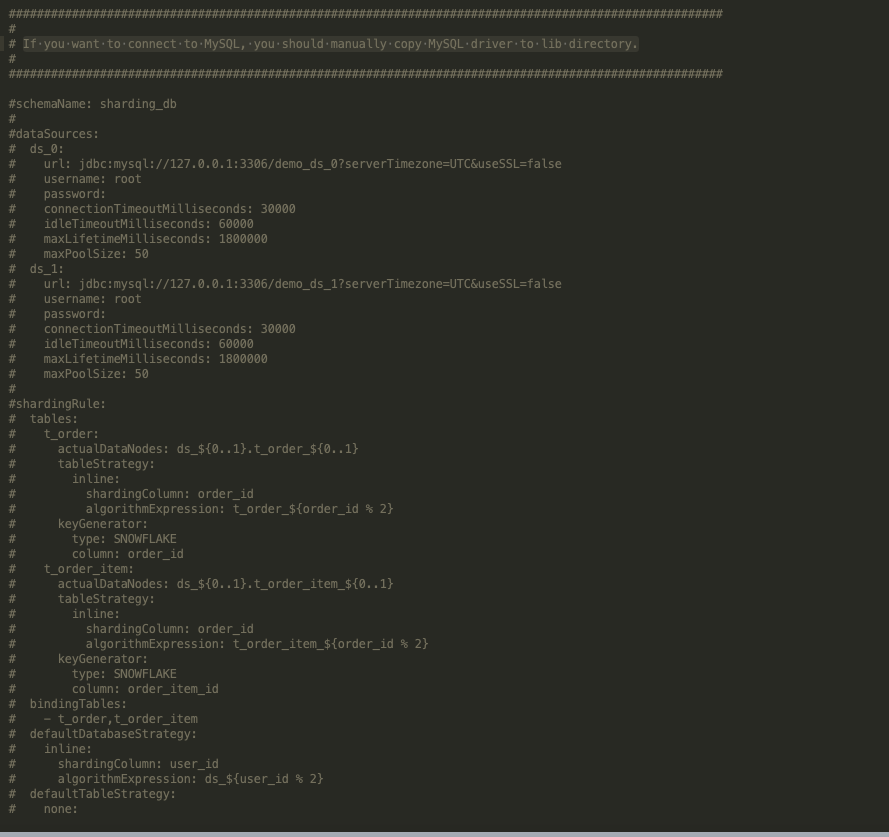
If you want to connect to MySQL, you should manually copy MySQL driver to lib directory.(如果你想要链接MySQL,那么要先将MySQl驱动放入lib目录中)
然后为了测试,我这里只设置一个库一个表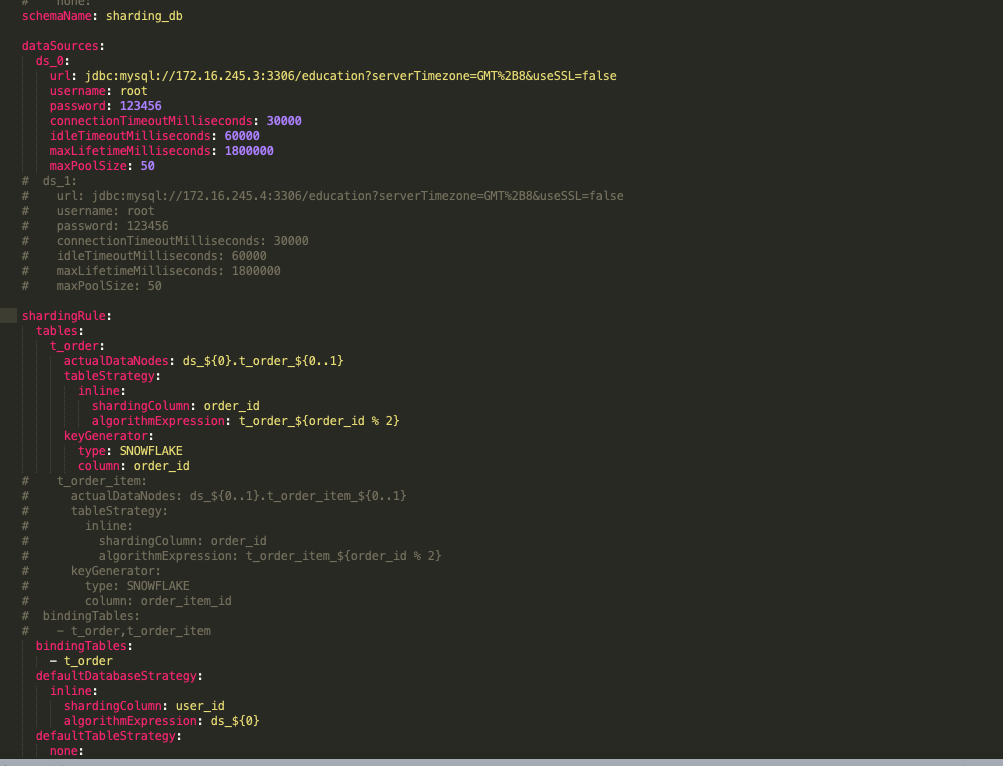
#
# Licensed to the Apache Software Foundation (ASF) under one or more
# contributor license agreements.  See the NOTICE file distributed with
# this work for additional information regarding copyright ownership.
# The ASF licenses this file to You under the Apache License, Version 2.0
# (the "License"); you may not use this file except in compliance with
# the License.  You may obtain a copy of the License at
#
#     http://www.apache.org/licenses/LICENSE-2.0
#
# Unless required by applicable law or agreed to in writing, software
# distributed under the License is distributed on an "AS IS" BASIS,
# WITHOUT WARRANTIES OR CONDITIONS OF ANY KIND, either express or implied.
# See the License for the specific language governing permissions and
# limitations under the License.
#

######################################################################################################
#
# Here you can configure the rules for the proxy.
# This example is configuration of sharding rule.
#
# If you want to use sharding, please refer to this file;
# if you want to use master-slave, please refer to the config-master_slave.yaml.
#
######################################################################################################
#
#schemaName: sharding_db
#
#dataSources:
#  ds_0:
#    url: jdbc:postgresql://127.0.0.1:5432/demo_ds_0?serverTimezone=UTC&useSSL=false
#    username: postgres
#    password: postgres
#    connectionTimeoutMilliseconds: 30000
#    idleTimeoutMilliseconds: 60000
#    maxLifetimeMilliseconds: 1800000
#    maxPoolSize: 50
#  ds_1:
#    url: jdbc:postgresql://127.0.0.1:5432/demo_ds_1?serverTimezone=UTC&useSSL=false
#    username: postgres
#    password: postgres
#    connectionTimeoutMilliseconds: 30000
#    idleTimeoutMilliseconds: 60000
#    maxLifetimeMilliseconds: 1800000
#    maxPoolSize: 50
#
#shardingRule:
#  tables:
#    t_order:
#      actualDataNodes: ds_${0..1}.t_order_${0..1}
#      tableStrategy:
#        inline:
#          shardingColumn: order_id
#          algorithmExpression: t_order_${order_id % 2}
#      keyGenerator:
#        type: SNOWFLAKE
#        column: order_id
#    t_order_item:
#      actualDataNodes: ds_${0..1}.t_order_item_${0..1}
#      tableStrategy:
#        inline:
#          shardingColumn: order_id
#          algorithmExpression: t_order_item_${order_id % 2}
#      keyGenerator:
#        type: SNOWFLAKE
#        column: order_item_id
#  bindingTables:
#    - t_order,t_order_item
#  defaultDatabaseStrategy:
#    inline:
#      shardingColumn: user_id
#      algorithmExpression: ds_${user_id % 2}
#  defaultTableStrategy:
#    none:

######################################################################################################
#
# If you want to connect to MySQL, you should manually copy MySQL driver to lib directory.
#
######################################################################################################

#schemaName: sharding_db
#
#dataSources:
#  ds_0:
#    url: jdbc:mysql://127.0.0.1:3306/demo_ds_0?serverTimezone=UTC&useSSL=false
#    username: root
#    password:
#    connectionTimeoutMilliseconds: 30000
#    idleTimeoutMilliseconds: 60000
#    maxLifetimeMilliseconds: 1800000
#    maxPoolSize: 50
#  ds_1:
#    url: jdbc:mysql://127.0.0.1:3306/demo_ds_1?serverTimezone=UTC&useSSL=false
#    username: root
#    password:
#    connectionTimeoutMilliseconds: 30000
#    idleTimeoutMilliseconds: 60000
#    maxLifetimeMilliseconds: 1800000
#    maxPoolSize: 50
#
#shardingRule:
#  tables:
#    t_order:
#      actualDataNodes: ds_${0..1}.t_order_${0..1}
#      tableStrategy:
#        inline:
#          shardingColumn: order_id
#          algorithmExpression: t_order_${order_id % 2}
#      keyGenerator:
#        type: SNOWFLAKE
#        column: order_id
#    t_order_item:
#      actualDataNodes: ds_${0..1}.t_order_item_${0..1}
#      tableStrategy:
#        inline:
#          shardingColumn: order_id
#          algorithmExpression: t_order_item_${order_id % 2}
#      keyGenerator:
#        type: SNOWFLAKE
#        column: order_item_id
#  bindingTables:
#    - t_order,t_order_item
#  defaultDatabaseStrategy:
#    inline:
#      shardingColumn: user_id
#      algorithmExpression: ds_${user_id % 2}
#  defaultTableStrategy:
#    none:
schemaName: sharding_db

dataSources:
  ds_0:
    url: jdbc:mysql://172.16.245.3:3306/education?serverTimezone=GMT%2B8&useSSL=false
    username: root
    password: 123456
    connectionTimeoutMilliseconds: 30000
    idleTimeoutMilliseconds: 60000
    maxLifetimeMilliseconds: 1800000
    maxPoolSize: 50
#  ds_1:
#    url: jdbc:mysql://172.16.245.4:3306/education?serverTimezone=GMT%2B8&useSSL=false
#    username: root
#    password: 123456
#    connectionTimeoutMilliseconds: 30000
#    idleTimeoutMilliseconds: 60000
#    maxLifetimeMilliseconds: 1800000
#    maxPoolSize: 50

shardingRule:
  tables:
    t_order:
      actualDataNodes: ds_${0}.t_order_${0..1}
      tableStrategy:
        inline:
          shardingColumn: order_id
          algorithmExpression: t_order_${order_id % 2}
      keyGenerator:
        type: SNOWFLAKE
        column: order_id
#    t_order_item:
#      actualDataNodes: ds_${0..1}.t_order_item_${0..1}
#      tableStrategy:
#        inline:
#          shardingColumn: order_id
#          algorithmExpression: t_order_item_${order_id % 2}
#      keyGenerator:
#        type: SNOWFLAKE
#        column: order_item_id
#  bindingTables:
#    - t_order,t_order_item
  bindingTables:
    - t_order
  defaultDatabaseStrategy:
    inline:
      shardingColumn: user_id
      algorithmExpression: ds_${0}
  defaultTableStrategy:
    none:
步骤4:启动
软件根目录下的bin目录中的 startup.bat或startup.sh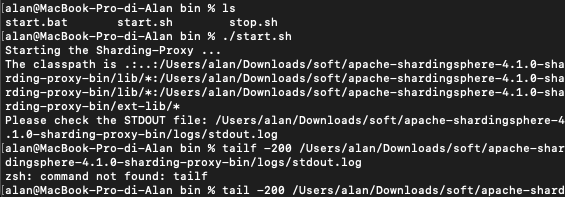
然后会让你查看日志
我们通过日志看出,我们已经启动成功了,而且告诉我们端口是3307(默认端口)
步骤5:通过 sharding-proxy启动端口链接

(sql可视化工具可能会出现不兼容问题,可以使用用命令行链接 mysql -P3307 -uroot -p)
小测试

然后我们回到真实的库中查看。我们的education库中已经多了t_order_1 和t_order_2,并且由于我们配置了分表的策略,order_id 为奇数,他跑到了t_order_1 表中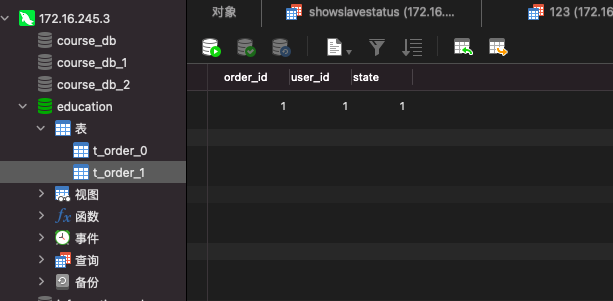
配置分库
步骤1:修改config-sharding.yaml文件
#
# Licensed to the Apache Software Foundation (ASF) under one or more
# contributor license agreements.  See the NOTICE file distributed with
# this work for additional information regarding copyright ownership.
# The ASF licenses this file to You under the Apache License, Version 2.0
# (the "License"); you may not use this file except in compliance with
# the License.  You may obtain a copy of the License at
#
#     http://www.apache.org/licenses/LICENSE-2.0
#
# Unless required by applicable law or agreed to in writing, software
# distributed under the License is distributed on an "AS IS" BASIS,
# WITHOUT WARRANTIES OR CONDITIONS OF ANY KIND, either express or implied.
# See the License for the specific language governing permissions and
# limitations under the License.
#

######################################################################################################
#
# Here you can configure the rules for the proxy.
# This example is configuration of sharding rule.
#
# If you want to use sharding, please refer to this file;
# if you want to use master-slave, please refer to the config-master_slave.yaml.
#
######################################################################################################
#
#schemaName: sharding_db
#
#dataSources:
#  ds_0:
#    url: jdbc:postgresql://127.0.0.1:5432/demo_ds_0?serverTimezone=UTC&useSSL=false
#    username: postgres
#    password: postgres
#    connectionTimeoutMilliseconds: 30000
#    idleTimeoutMilliseconds: 60000
#    maxLifetimeMilliseconds: 1800000
#    maxPoolSize: 50
#  ds_1:
#    url: jdbc:postgresql://127.0.0.1:5432/demo_ds_1?serverTimezone=UTC&useSSL=false
#    username: postgres
#    password: postgres
#    connectionTimeoutMilliseconds: 30000
#    idleTimeoutMilliseconds: 60000
#    maxLifetimeMilliseconds: 1800000
#    maxPoolSize: 50
#
#shardingRule:
#  tables:
#    t_order:
#      actualDataNodes: ds_${0..1}.t_order_${0..1}
#      tableStrategy:
#        inline:
#          shardingColumn: order_id
#          algorithmExpression: t_order_${order_id % 2}
#      keyGenerator:
#        type: SNOWFLAKE
#        column: order_id
#    t_order_item:
#      actualDataNodes: ds_${0..1}.t_order_item_${0..1}
#      tableStrategy:
#        inline:
#          shardingColumn: order_id
#          algorithmExpression: t_order_item_${order_id % 2}
#      keyGenerator:
#        type: SNOWFLAKE
#        column: order_item_id
#  bindingTables:
#    - t_order,t_order_item
#  defaultDatabaseStrategy:
#    inline:
#      shardingColumn: user_id
#      algorithmExpression: ds_${user_id % 2}
#  defaultTableStrategy:
#    none:

######################################################################################################
#
# If you want to connect to MySQL, you should manually copy MySQL driver to lib directory.
#
######################################################################################################

#schemaName: sharding_db
#
#dataSources:
#  ds_0:
#    url: jdbc:mysql://127.0.0.1:3306/demo_ds_0?serverTimezone=UTC&useSSL=false
#    username: root
#    password:
#    connectionTimeoutMilliseconds: 30000
#    idleTimeoutMilliseconds: 60000
#    maxLifetimeMilliseconds: 1800000
#    maxPoolSize: 50
#  ds_1:
#    url: jdbc:mysql://127.0.0.1:3306/demo_ds_1?serverTimezone=UTC&useSSL=false
#    username: root
#    password:
#    connectionTimeoutMilliseconds: 30000
#    idleTimeoutMilliseconds: 60000
#    maxLifetimeMilliseconds: 1800000
#    maxPoolSize: 50
#
#shardingRule:
#  tables:
#    t_order:
#      actualDataNodes: ds_${0..1}.t_order_${0..1}
#      tableStrategy:
#        inline:
#          shardingColumn: order_id
#          algorithmExpression: t_order_${order_id % 2}
#      keyGenerator:
#        type: SNOWFLAKE
#        column: order_id
#    t_order_item:
#      actualDataNodes: ds_${0..1}.t_order_item_${0..1}
#      tableStrategy:
#        inline:
#          shardingColumn: order_id
#          algorithmExpression: t_order_item_${order_id % 2}
#      keyGenerator:
#        type: SNOWFLAKE
#        column: order_item_id
#  bindingTables:
#    - t_order,t_order_item
#  defaultDatabaseStrategy:
#    inline:
#      shardingColumn: user_id
#      algorithmExpression: ds_${user_id % 2}
#  defaultTableStrategy:
#    none:
schemaName: sharding_db

dataSources:
  ds_0:
    url: jdbc:mysql://172.16.245.3:3306/course_db_1?serverTimezone=GMT%2B8&useSSL=false
    username: root
    password: 123456
    connectionTimeoutMilliseconds: 30000
    idleTimeoutMilliseconds: 60000
    maxLifetimeMilliseconds: 1800000
    maxPoolSize: 50
  ds_1:
    url: jdbc:mysql://172.16.245.3:3306/course_db_2?serverTimezone=GMT%2B8&useSSL=false
    username: root
    password: 123456
    connectionTimeoutMilliseconds: 30000
    idleTimeoutMilliseconds: 60000
    maxLifetimeMilliseconds: 1800000
    maxPoolSize: 50

shardingRule:
  tables:
    t_order:
      actualDataNodes: ds_${0..1}.t_order_${0..1}
      tableStrategy:
        inline:
          shardingColumn: order_id
          algorithmExpression: t_order_${order_id % 2}
      keyGenerator:
        type: SNOWFLAKE
        column: order_id
  bindingTables:
    - t_order
  defaultDatabaseStrategy:
    inline:
      shardingColumn: user_id
      algorithmExpression: ds_${user_id % 2}
  defaultTableStrategy:
    none:
步骤2:启动sharding-proxy(先停止)
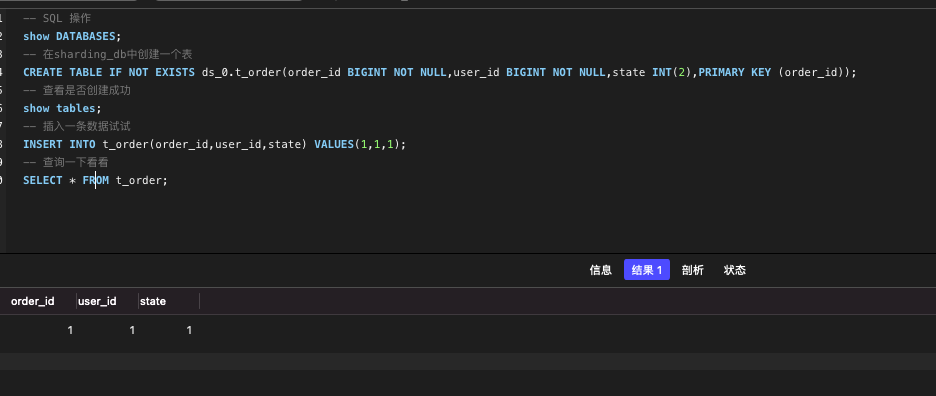
步骤3:测试
 CREATE TABLE IF NOT EXISTS ds_0.t_order(order_id BIGINT NOT NULL,user_id BIGINT NOT NULL,state INT(2),PRIMARY KEY (order_id));
可以看到我们course_db_1和course_db_2都创建成功了
然后我们插入一条 orderid为1userid为1的 数据试试,根据我们配置的规则,userid是奇数就到ds1数据库中,也就是course_db_2,而orderid为奇数就是order_1表中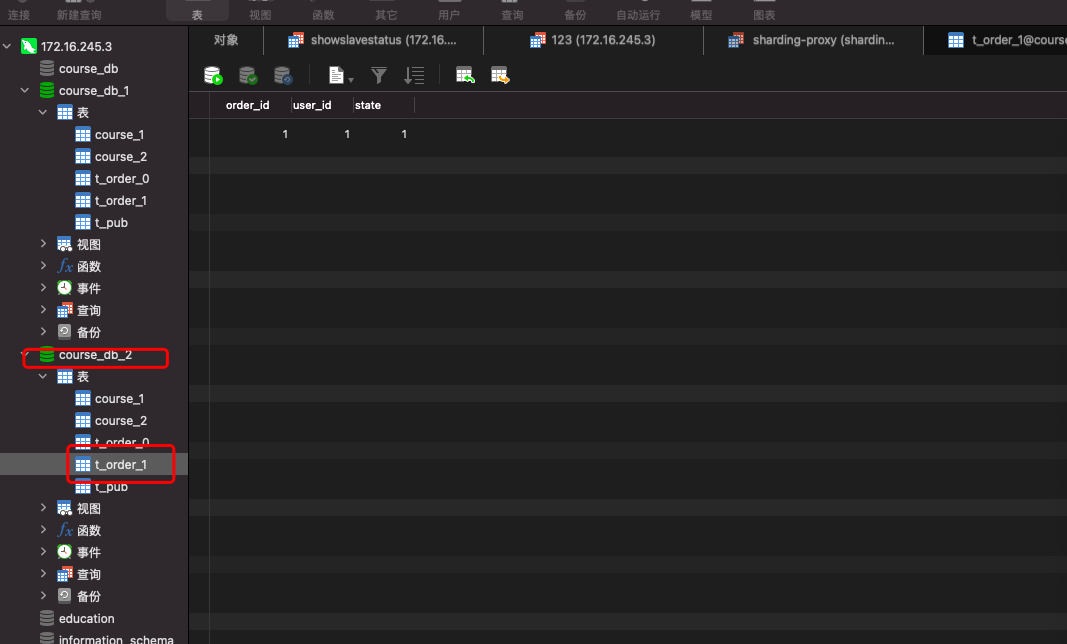
INSERT INTO t_order(order_id,user_id,state) VALUES(1,1,1);
INSERT INTO t_order(order_id,user_id,state) VALUES(1,2,2);
INSERT INTO t_order(order_id,user_id,state) VALUES(2,1,3);
INSERT INTO t_order(order_id,user_id,state) VALUES(2,2,4);
当我们执行完这四条插入命令的时候,我们执行 SELECT * FROM t_order;
虽然他们处在不同的数据库和不同的表中,但是他们能全部查出来的。
配置读写分离
同样,Sharding-proxy并不能实现数据同步功能,也是只能靠MySQL的binlog
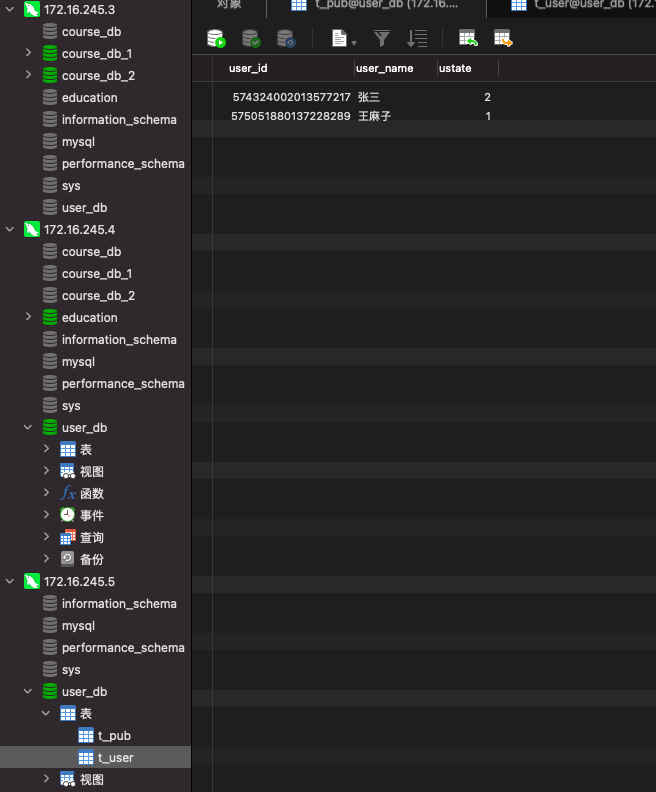
步骤1:创建三个数据库(一主多从)
步骤2:修改config-master_slave.yaml配置文件
将MySQL下面的配置取消注释
修改为对应的数据库
#
# Licensed to the Apache Software Foundation (ASF) under one or more
# contributor license agreements.  See the NOTICE file distributed with
# this work for additional information regarding copyright ownership.
# The ASF licenses this file to You under the Apache License, Version 2.0
# (the "License"); you may not use this file except in compliance with
# the License.  You may obtain a copy of the License at
#
#     http://www.apache.org/licenses/LICENSE-2.0
#
# Unless required by applicable law or agreed to in writing, software
# distributed under the License is distributed on an "AS IS" BASIS,
# WITHOUT WARRANTIES OR CONDITIONS OF ANY KIND, either express or implied.
# See the License for the specific language governing permissions and
# limitations under the License.
#

######################################################################################################
#
# Here you can configure the rules for the proxy.
# This example is configuration of master-slave rule.
#
# If you want to use master-slave, please refer to this file;
# if you want to use sharding, please refer to the config-sharding.yaml.
#
######################################################################################################
#
#schemaName: master_slave_db
#
#dataSources:
#  master_ds:
#    url: jdbc:postgresql://127.0.0.1:5432/demo_ds_master?serverTimezone=UTC&useSSL=false
#    username: postgres
#    password: postgres
#    connectionTimeoutMilliseconds: 30000
#    idleTimeoutMilliseconds: 60000
#    maxLifetimeMilliseconds: 1800000
#    maxPoolSize: 50
#  slave_ds_0:
#    url: jdbc:postgresql://127.0.0.1:5432/demo_ds_slave_0?serverTimezone=UTC&useSSL=false
#    username: postgres
#    password: postgres
#    connectionTimeoutMilliseconds: 30000
#    idleTimeoutMilliseconds: 60000
#    maxLifetimeMilliseconds: 1800000
#    maxPoolSize: 50
#  slave_ds_1:
#    url: jdbc:postgresql://127.0.0.1:5432/demo_ds_slave_1?serverTimezone=UTC&useSSL=false
#    username: postgres
#    password: postgres
#    connectionTimeoutMilliseconds: 30000
#    idleTimeoutMilliseconds: 60000
#    maxLifetimeMilliseconds: 1800000
#    maxPoolSize: 50
#
#masterSlaveRule:
#  name: ms_ds
#  masterDataSourceName: master_ds
#  slaveDataSourceNames:
#    - slave_ds_0
#    - slave_ds_1

######################################################################################################
#
# If you want to connect to MySQL, you should manually copy MySQL driver to lib directory.
#
######################################################################################################

#schemaName: master_slave_db
#
#dataSources:
#  master_ds:
#    url: jdbc:mysql://127.0.0.1:3306/demo_ds_master?serverTimezone=UTC&useSSL=false
#    username: root
#    password:
#    connectionTimeoutMilliseconds: 30000
#    idleTimeoutMilliseconds: 60000
#    maxLifetimeMilliseconds: 1800000
#    maxPoolSize: 50
#  slave_ds_0:
#    url: jdbc:mysql://127.0.0.1:3306/demo_ds_slave_0?serverTimezone=UTC&useSSL=false
#    username: root
#    password:
#    connectionTimeoutMilliseconds: 30000
#    idleTimeoutMilliseconds: 60000
#    maxLifetimeMilliseconds: 1800000
#    maxPoolSize: 50
#  slave_ds_1:
#    url: jdbc:mysql://127.0.0.1:3306/demo_ds_slave_1?serverTimezone=UTC&useSSL=false
#    username: root
#    password:
#    connectionTimeoutMilliseconds: 30000
#    idleTimeoutMilliseconds: 60000
#    maxLifetimeMilliseconds: 1800000
#    maxPoolSize: 50
#
#masterSlaveRule:
#  name: ms_ds
#  masterDataSourceName: master_ds
#  slaveDataSourceNames:
#    - slave_ds_0
#    - slave_ds_1
schemaName: master_slave_db

dataSources:
  master_ds:
    url: jdbc:mysql://172.16.245.3:3306/user_db?serverTimezone=GMT%2B8&useSSL=false
    username: root
    password: 123456
    connectionTimeoutMilliseconds: 30000
    idleTimeoutMilliseconds: 60000
    maxLifetimeMilliseconds: 1800000
    maxPoolSize: 50
  slave_ds_0:
    url: jdbc:mysql://172.16.245.4:3306/user_db?serverTimezone=GMT%2B8&useSSL=false
    username: root
    password: 123456
    connectionTimeoutMilliseconds: 30000
    idleTimeoutMilliseconds: 60000
    maxLifetimeMilliseconds: 1800000
    maxPoolSize: 50
  slave_ds_1:
    url: jdbc:mysql://172.16.245.5:3306/user_db?serverTimezone=GMT%2B8&useSSL=false
    username: root
    password: 123456
    connectionTimeoutMilliseconds: 30000
    idleTimeoutMilliseconds: 60000
    maxLifetimeMilliseconds: 1800000
    maxPoolSize: 50

masterSlaveRule:
  name: ms_ds
  masterDataSourceName: master_ds
  slaveDataSourceNames:
    - slave_ds_0
    - slave_ds_1
步骤3:启动Sharding-proxy
步骤4:测试查询和插入

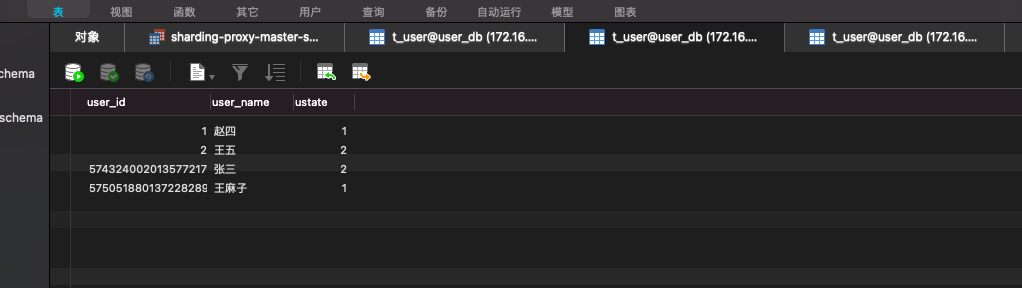
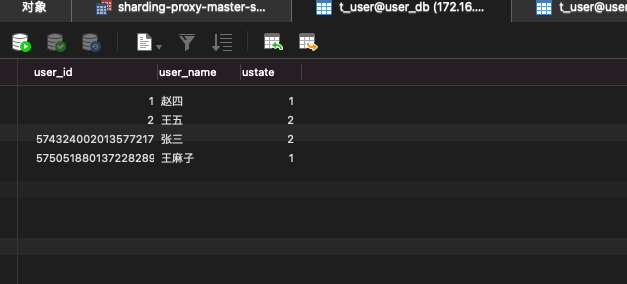

当我们不指定库创建表的时候,三个数据库也会同时出现新的表
CREATE TABLE IF NOT EXISTS t_order(order_id BIGINT NOT NULL,user_id BIGINT NOT NULL,state INT(2),PRIMARY KEY (order_id));
步骤4:

若有收获,就点个赞吧
0 人点赞
