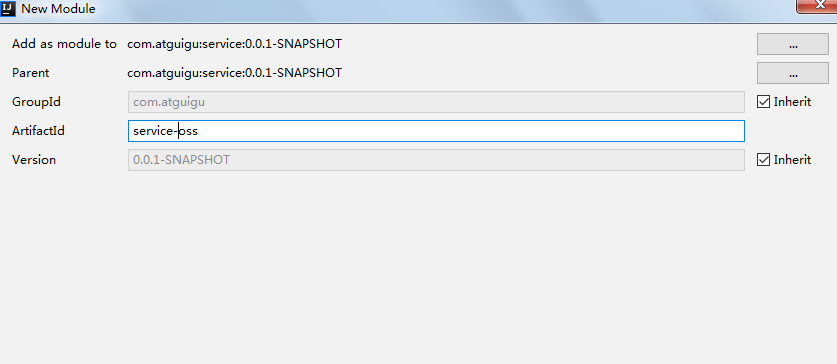
一、新建云存储微服务
1、在service模块下创建子模块service-oss

2、配置pom.xml
service-oss上级模块service已经引入service的公共依赖,所以service-oss模块只需引入阿里云oss相关依赖即可,
service父模块已经引入了service-base模块,所以Swagger相关默认已经引入
<dependencies><!-- 阿里云oss依赖 --><dependency><groupId>com.aliyun.oss</groupId><artifactId>aliyun-sdk-oss</artifactId></dependency><!-- 日期工具栏依赖 --><dependency><groupId>joda-time</groupId><artifactId>joda-time</artifactId></dependency></dependencies>
3、配置application.properties
#服务端口
server.port=8002
#服务名
spring.application.name=service-oss

#环境设置:dev、test、prod
spring.profiles.active=dev

#阿里云 OSS
#不同的服务器,地址不同
aliyun.oss.file.endpoint=your endpoint
aliyun.oss.file.keyid=your accessKeyId
aliyun.oss.file.keysecret=your accessKeySecret
#bucket可以在控制台创建,也可以使用java代码创建
aliyun.oss.file.bucketname=guli-file
4、logback-spring.xml
5、创建启动类
创建OssApplication.java
package com.guli.oss;
@SpringBootApplication
@ComponentScan({"com.atguigu"})
public class OssApplication {

  public static void main(String[] args) {
      SpringApplication.run(OssApplication.class, args);
  }
}
6、启动项目
报错
spring boot 会默认加载org.springframework.boot.autoconfigure.jdbc.DataSourceAutoConfiguration这个类,
而DataSourceAutoConfiguration类使用了@Configuration注解向spring注入了dataSource bean,又因为项目(oss模块)中并没有关于dataSource相关的配置信息,所以当spring创建dataSource bean时因缺少相关的信息就会报错。
解决办法:
方法1、在@SpringBootApplication注解上加上exclude,解除自动加载DataSourceAutoConfiguration
@SpringBootApplication(exclude = DataSourceAutoConfiguration.class)
二、实现文件上传
1、从配置文件读取常量
创建常量读取工具类:ConstantPropertiesUtil.java
使用@Value读取application.properties里的配置内容
用spring的 InitializingBean 的 afterPropertiesSet 来初始化配置信息,这个方法将在所有的属性被初始化后调用。
/**
 * 常量类,读取配置文件application.properties中的配置
 */
@Component
//@PropertySource("classpath:application.properties")
public class ConstantPropertiesUtil implements InitializingBean {

 @Value("${aliyun.oss.file.endpoint}")
 private String endpoint;

 @Value("${aliyun.oss.file.keyid}")
 private String keyId;

 @Value("${aliyun.oss.file.keysecret}")
 private String keySecret;

 @Value("${aliyun.oss.file.filehost}")
 private String fileHost;

 @Value("${aliyun.oss.file.bucketname}")
 private String bucketName;

 public static String END_POINT;
 public static String ACCESS_KEY_ID;
 public static String ACCESS_KEY_SECRET;
 public static String BUCKET_NAME;
 public static String FILE_HOST ;

 @Override
 public void afterPropertiesSet() throws Exception {
     END_POINT = endpoint;
     ACCESS_KEY_ID = keyId;
     ACCESS_KEY_SECRET = keySecret;
     BUCKET_NAME = bucketName;
     FILE_HOST = fileHost;
 }
}
2、文件上传
创建Service接口:FileService.java
public interface FileService {

  /**
   * 文件上传至阿里云
   * @param file
   * @return
   */
  String upload(MultipartFile file);
}
实现:FileServiceImpl.java
参考SDK中的:Java->上传文件->简单上传->流式上传->上传文件流
public class FileServiceImpl implements FileService {

     @Override
     public String upload(MultipartFile file) {

         //获取阿里云存储相关常量
         String endPoint = ConstantPropertiesUtil.END_POINT;
         String accessKeyId = ConstantPropertiesUtil.ACCESS_KEY_ID;
         String accessKeySecret = ConstantPropertiesUtil.ACCESS_KEY_SECRET;
         String bucketName = ConstantPropertiesUtil.BUCKET_NAME;
         String fileHost = ConstantPropertiesUtil.FILE_HOST;

         String uploadUrl = null;

         try {
             //判断oss实例是否存在:如果不存在则创建,如果存在则获取
             OSSClient ossClient = new OSSClient(endPoint, accessKeyId, accessKeySecret);
             if (!ossClient.doesBucketExist(bucketName)) {
                 //创建bucket
                 ossClient.createBucket(bucketName);
                 //设置oss实例的访问权限:公共读
                 ossClient.setBucketAcl(bucketName, CannedAccessControlList.PublicRead);
             }

             //获取上传文件流
             InputStream inputStream = file.getInputStream();

             //构建日期路径:avatar/2019/02/26/文件名
             String filePath = new DateTime().toString("yyyy/MM/dd");

             //文件名:uuid.扩展名
             String original = file.getOriginalFilename();
             String fileName = UUID.randomUUID().toString();
             String fileType = original.substring(original.lastIndexOf("."));
             String newName = fileName + fileType;
             String fileUrl = fileHost + "/" + filePath + "/" + newName;

             //文件上传至阿里云
             ossClient.putObject(bucketName, fileUrl, inputStream);

             // 关闭OSSClient。
             ossClient.shutdown();

             //获取url地址
             uploadUrl = "http://" + bucketName + "." + endPoint + "/" + fileUrl;

         } catch (IOException e) {
             throw new GuliException(ResultCodeEnum.FILE_UPLOAD_ERROR);
         }

         return uploadUrl;
     }
    }
3、控制层
创建controller:FileUploadController.java
package com.guli.oss.controller;

@Api(description="阿里云文件管理")
@CrossOrigin //跨域
@RestController
@RequestMapping("/admin/oss/file")
public class FileController {

     @Autowired
     private FileService fileService;

     /**
      * 文件上传
      *
      * @param file
      */
     @ApiOperation(value = "文件上传")
     @PostMapping("upload")
     public R upload(
             @ApiParam(name = "file", value = "文件", required = true)
             @RequestParam("file") MultipartFile file) {

         String uploadUrl = fileService.upload(file);
         //返回r对象
         return R.ok().message("文件上传成功").data("url", uploadUrl);

     }
    }
4、重启oss服务
5、Swagger中测试文件上传
6、配置nginx反向代理
将接口地址加入nginx配置
location ~ /eduoss/ {
    proxy_pass http://localhost:8001;
}

