- 发布内容配置
- contributes.configurationDefaults
- contributes.commands
- contributes.menus
- contributes.keybindings
- contributes.languages
- contributes.debuggers
- contributes.breakpoints
- contributes.grammars
- contributes.themes
- contributes.snippets
- contributes.jsonValidation
- contributes.views
- contributes.viewsWelcome
- contributes.viewsContainers
- contributes.problemMatchers
- contributes.problemPatterns
- contributes.taskDefinitions
- contributes.colors
- contributes.typescriptServerPlugins
- 下一步
发布内容配置
发布内容配置(即VS Code为插件扩展提供的配置项)是pacakge.json插件清单的contributes字段,你可以在其中注册各种配置项扩展VS Code的能力。下面是目前可用的配置项列表:
- 发布内容配置
- ## contributes.configuration
- ## contributes.configurationDefaults
- ## contributes.commands
- ## contributes.menus
- ## contributes.keybindings
- ## contributes.languages
- ## contributes.debuggers
- ## contributes.breakpoints
- ## contributes.grammars
- ## contributes.themes
- ## contributes.snippets
- ## contributes.jsonValidation
- ## contributes.views
- contributes.viewsWelcome
- ## contributes.viewsContainers
- ## contributes.problemMatchers
- ## contributes.problemPatterns
- ## contributes.taskDefinitions
- ## contributes.colors
- ## contributes.typescriptServerPlugins
- 下一步
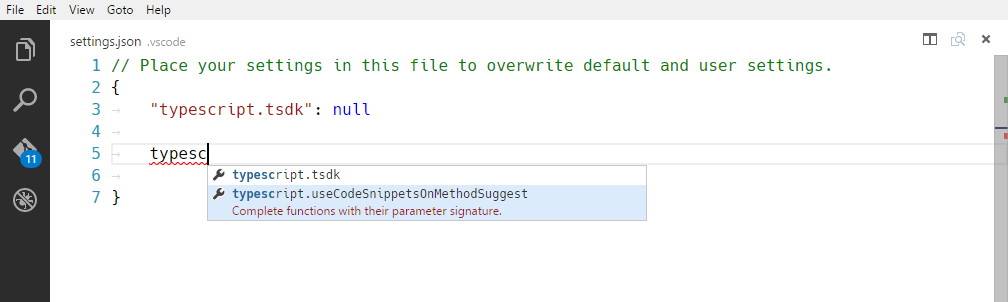
contributes.configuration
在configuration中配置的内容会暴露给用户,用户可以从“用户设置”和“工作区设置”中修改你暴露的选项。
configuration是JSON格式的键值对,用户会在修改设置时获得对应的提示和更好的体验。
你可以用vscode.workspace.getConfiguration('myExtension')读取配置值。
?> 小提示:配置markdownDescription比配置description更好,它能呈现Markdown格式的文档。
示例
"contributes": {"configuration": {"type": "object","title": "TypeScript configuration","properties": {"typescript.useCodeSnippetsOnMethodSuggest": {"type": "boolean","default": false,"description": "Complete functions with their parameter signature."},"typescript.tsdk": {"type": ["string", "null"],"default": null,"description": "Specifies the folder path containing the tsserver and lib*.d.ts files to use."}}}}
contributes.configurationDefaults
为特定的语言配置编辑器的默认值,修改这个配置会覆盖编辑器已经为语言提供的默认配置。
下面的示例是修改markdown语言的默认配置。
示例
"contributes": {"configurationDefaults": {"[markdown]": {"editor.wordWrap": "on","editor.quickSuggestions": false}}}
contributes.commands
设置命令标题和命令体,随后这个命令会显示在命令面板中。你也可以加上category前缀,在命令面板中会以分类显示。
?>注意:当调用命令时(通过组合键或者在命令面板中调用),VS Code会触发激活事件onCommand:${command}。
下面的示例是修改markdown语言的默认配置。
示例
"contributes": {"commands": [{"command": "extension.sayHello","title": "Hello World","category": "Hello"}]}
?> 提示: 想了解更多的有关于在VS Code插件开发中使用命令, 请参阅命令章节
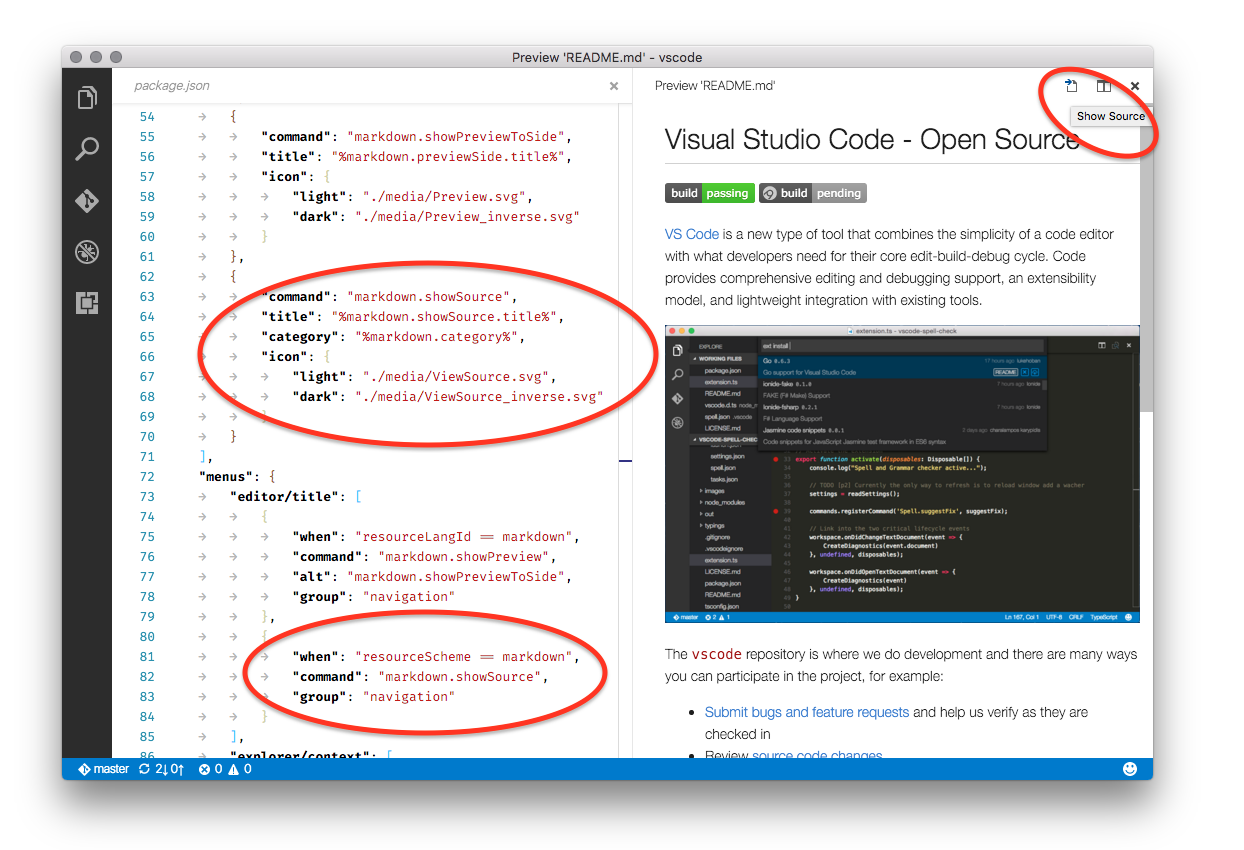
contributes.menus
为编辑器或者文件管理器设置命令的菜单项。菜单项至少包含1️⃣选中时调用的命令和2️⃣何时显示这个菜单项的时机。显示菜单的时机由when键定义,而对应的值语法需要参考键值绑定的when语法。
command键则是必须的。可选的命令使用alt定义,当你按下ALT键时,菜单中会显示对应的菜单项。
最后,group属性定义了菜单的分组。navigation值不同于普通的group值,一旦设置这个值就会总是显示在菜单的最顶端。
当前插件创作者可以配置的菜单的地方有:
- 全局命令面板 -
commandPalette - 资源管理器上下文菜单 -
explorer/context - 编辑器上下文菜单 -
editor/context - 编辑器标题栏 -
editor/title - 编辑器标题上下文菜单 -
editor/title/context - 调试栈视图的上下文菜单 -
debug/callstack/context - SCM 标题菜单 -
scm/title - SCM 资源组 -
scm/resourceGroup/context - SCM 资源 -
scm/resource/context - SCM 改变标题 -
scm/change/title - 视图的标题菜单 -
view/title - 视图项的菜单 -
view/item/context
?>注意:当菜单中的命令被调用,VS Code会将当前选中资源作为参数传给调用的命令。比方说,资源管理器的菜单被触发,选中资源的URI会作为参数,编辑器中的菜单项被触发,则将当前文件的URI作为参数传入。
关于标题还有一点要说,命令还可以定义图标,VS Code会显示在编辑器的标题菜单栏中。
示例
"contributes": {"menus": {"editor/title": [{"when": "resourceLangId == markdown","command": "markdown.showPreview","alt": "markdown.showPreviewToSide","group": "navigation"}]}}
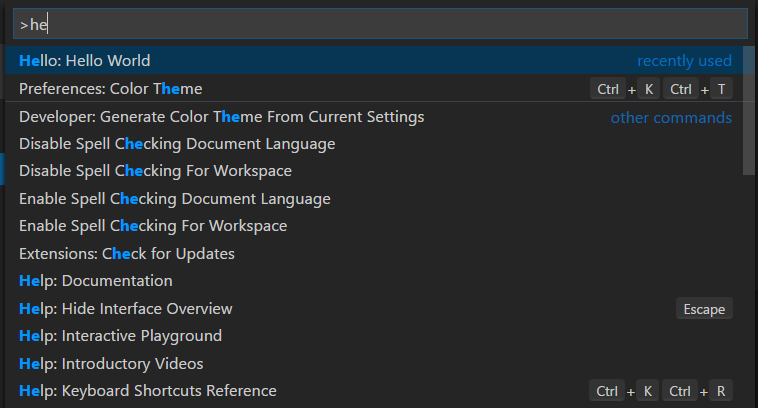
让菜单项只显示在命令面板中
注册的命令默认显示在命令面板中。要想控制命令的可见性,我们提供了一个commandPalette菜单配置,在这个配置中,你可以定义一个when控制是否在命令菜单中显示。
下面的片段只在编辑器中选中了什么东西的时候才会在命令面板中显示出‘Hello World’:
"commands": [{"command": "extension.sayHello","title": "Hello World"}],"menus": {"commandPalette": [{"command": "extension.sayHello","when": "editorHasSelection"}]}
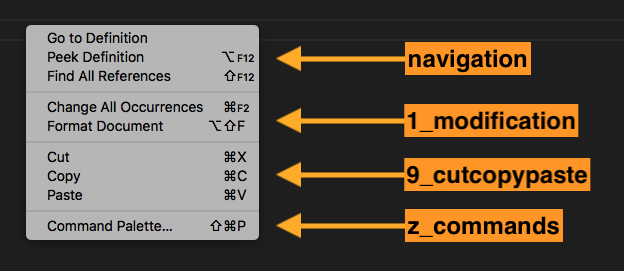
分组排序
菜单项可以通过组来分类。根据下列默认规则,然后按照字母排序,
编辑器上下文菜单默认有这些分组:
navigation-navigation组始终在最上方。1_modification- 紧接上一个组,这个组包含可以修改你代码的命令。9_cutcopypaste- 然后是基础编辑命令。z_commands- 最后一个分组则是命令面板入口。
资源管理器上下文菜单默认有下列分组:
navigation- 在VS Code中导航的相关命令。navigation组始终在最上方。2_workspace- 和工作区操作相关的命令。3_compare- 比较文件和diff相关的命令。4_search- 在搜索视图中和搜索相关的命令。5_cutcopypaste- 和剪切、复制、粘贴文件相关的命令。7_modification- 修改文件的相关命令。
编辑器标签菜单默认有下列分组
- 1_close - 和关闭编辑器相关的命令。
- 3_preview - 和固定编辑器相关的命令。
编辑器标题菜单默认有下列分组
- 1_diff - diff编辑器相关的命令。
- 3_open - 打开编辑器的相关命令。
- 5_close - 和关闭编辑器相关的命令。
组内排序
组内的菜单顺序取决于标题或者序号属性。菜单的组内顺序由@<number>加到group值的后面得以确定:
"editor/title": [{"when": "editorHasSelection","command": "extension.Command","group": "myGroup@1"}]
contributes.keybindings
这个配置确定了用户输入按键组合时的触发规则。在快捷键绑定中,你可以了解更加细节的东西。
配置快捷键绑定会使默认键盘快捷方式中显示你的规则,每一处和命令相关的UI部分也会显示你添加的快捷键组合。
?>注意因为VS Code支持Windows,macOS和Linux平台,而
示例
Windows和Linux下使用Ctrl+F1,macOS下使用Cmd+F1调用"extension.sayHello"命令:
"contributes": {"keybindings": [{"command": "extension.sayHello","key": "ctrl+f1","mac": "cmd+f1","when": "editorTextFocus"}]}

contributes.languages
配置一门语言,引入一门新的语言或者加强VS Code已有的语言支持。
在这部分内容中,一个语言必须要有一个标识符(identifier)关联到文件上(查看 TextDocument.getLanguageId())。
VS Code提供三种文件应该关联哪种语言的方式。每种方式都可以可以“单独”加强:
- 插件的文件名
- 文件名
- 文件内的首行
用户打开文件后,三种规则都会使用,然后确定语言。接着VS Code就会触发激活事件onLanguage:${language}(比如:下面的onLanguage:python例子)
aliases属性包含着这门语言的可读性名称。这个列表的第一项会作为语言标签(在VS Code右下角状态栏显示)。
configuration属性确定了语言配置文件的路径。路径是指相对插件文件夹的路径,通常是./language-configuration.json,这个文件是JSON格式的,包含着下列可配置属性:
comments- 定义了注释的符号blockComment- 用于标识块注释的起始和结束token。被’Toggle Block Comment’使用lineComment- 用于标识行注释的起始token。被’Add Line Comment’使用
brackets- 定义括号,同时也会影响括号内的代码缩进。进入新的一行时,被编辑器用来确定或是更正新的缩进距离autoClosingPairs- 为自动闭合功能定义某个符号的开闭符(open and close symbols)。开符号输入后,编辑器会自动插入闭符号。使用notIn参数,关闭字符串或者注释中的符号对surroundingPairs- 定义选中文本的开闭符号folding- 定义编辑器中的代码应何时、应怎么样折叠offSide- 和一下个缩进块之间的代码块尾部的空行(用于基于缩进的语言,如Python or F#)markers- 使用正则自定义代码中的折叠区域标识符
wordPattern- 使用正则匹配编程语言中哪些词应该是单个词
如果你的语言配置文件是language-configuration.json,或者以这样的字符串结尾的,VS Code就会提供校验和编辑支持。
示例
..."contributes": {"languages": [{"id": "python","extensions": [ ".py" ],"aliases": [ "Python", "py" ],"filenames": [ ... ],"firstLine": "^#!/.*\\bpython[0-9.-]*\\b","configuration": "./language-configuration.json"}]}
language-configuration.json
{"comments": {"lineComment": "//","blockComment": [ "/*", "*/" ]},"brackets": [["{", "}"],["[", "]"],["(", ")"]],"autoClosingPairs": [["{", "}"],["[", "]"],["(", ")"],{ "open": "'", "close": "'", "notIn": ["string", "comment"] },{ "open": "/**", "close": " */", "notIn": ["string"] }],"surroundingPairs": [["{", "}"],["[", "]"],["(", ")"],["<", ">"],["'", "'"]],"folding": {"offSide": true,"markers": {"start": "^\\s*//#region","end": "^\\s*//#endregion"}},"wordPattern": "(-?\\d*\\.\\d\\w*)|([^\\`\\~\\!\\@\\#\\%\\^\\&\\*\\(\\)\\-\\=\\+\\[\\{\\]\\}\\\\\\|\\;\\:\\'\\\"\\,\\.\\<\\>\\/\\?\\s]+)"}
contributes.debuggers
配置VS Code的调试器,调试器配置有下列属性:
type用于加载配置的调试器唯一标识——ID。label会在UI中显示的调试器名称。program调试适配的路径,调试适配通过VS Code debug protocol连接到真正的调试器或者运行时。runtime如果调试适配器的路径不是可执行程序,那么就会用到这个运行时。configurationAttributes调试器的启动配置参数。initialConfigurations列出了初始化launch.json需要的加载配置。configurationSnippets列出了编辑launch.json文件时可以提供的加载配置智能提示。variables引入替代变量,并绑定到调试器插件实现的命令上。languages调试插件会使用“默认调试器”的语言adapterExecutableCommand调试适配器执行路径和参数动态计算的命令。命令返回的格式如下:command: "<executable>",args: [ "<argument1>", "<argument2>", ... ]
command属性必须是一个可执行程序的绝对路径,或者是通过PATH环境变量可以查找到可执行程序的名称。使用特殊值node,则会映射到VS Code内建的node运行时,而不会在PATH中查找。
示例
"contributes": {"debuggers": [{"type": "node","label": "Node Debug","program": "./out/node/nodeDebug.js","runtime": "node","languages": ["javascript", "typescript", "javascriptreact", "typescriptreact"],"configurationAttributes": {"launch": {"required": [ "program" ],"properties": {"program": {"type": "string","description": "The program to debug."}}}},"initialConfigurations": [{"type": "node","request": "launch","name": "Launch Program","program": "${workspaceFolder}/app.js"}],"configurationSnippets": [{"label": "Node.js: Attach Configuration","description": "A new configuration for attaching to a running node program.","body": {"type": "node","request": "attach","name": "${2:Attach to Port}","port": 9229}}],"variables": {"PickProcess": "extension.node-debug.pickNodeProcess"}}]}
想要完整地学习debugger,移步至调试器
contributes.breakpoints
通常调试器插件会有contributes.breakpoints入口,插件可以在这里面设置哪些语言可以设置断点。
"contributes": {"breakpoints": [{"language": "javascript"},{"language": "javascriptreact"}]}
contributes.grammars
为一门语言配置TextMate语法。你必须提供应用语法的language,TextMate的scopeName确定了语法和文件路径。
!>注意:包含语法的文件必须是JSON(以.json结尾的文件)或者XML的plist格式文件。
示例
"contributes": {"grammars": [{"language": "markdown","scopeName": "text.html.markdown","path": "./syntaxes/markdown.tmLanguage.json","embeddedLanguages": {"meta.embedded.block.frontmatter": "yaml",...}}]}
查看语法高亮指南学习更多从现有的语法高亮插件迁移的内容。
contributes.themes
为VS Code添加TextMate主题。你必须添加一个label,指定这个主题是dark还是light的(以便VS Code根据你的主题调整界面),当然还需要加上目标文件路径(XML plist 格式)。
!>注意:包含语法的文件必须是JSON(以.json结尾的文件)或者XML的plist格式文件。
示例
"contributes": {"themes": [{"label": "Monokai","uiTheme": "vs-dark","path": "./themes/Monokai.tmTheme"}]}

查看改变色彩主题学习使用yo code插件生成器将TextMate.tmTheme文件快速打包成VS Code插件。
contributes.snippets
为语言添加代码片段。language属性必须是语言标识符而path则必须是使用VS Code代码片段格式的代码片段文件的相对路径。
示例
下面是一个Go语言的代码片段:
"contributes": {"snippets": [{"language": "go","path": "./snippets/go.json"}]}
contributes.jsonValidation
为json文件添加校验器。url值可以是本地路径也可以是插件中的模式文件(schema file),或者是远程服务器的URL比如:json schema
示例
"contributes": {"jsonValidation": [{"fileMatch": ".jshintrc","url": "http://json.schemastore.org/jshintrc"}]}
contributes.views
为VS Code 添加视图。你需要为视图指定唯一标识和名称。可以配置的属性如下:
explorer: 活动栏中的资源管理视图容器。scm: 活动栏中的源代码管理(SCM) 视图容器。debug: 活动栏中的调试视图容器。test: 活动栏中的测试视图容器。- Custom view containers 由插件提供的自定义视图容器。
当用户打开视图,VS Code会触发onView:${viewId}激活事件(比如:下面示例中的onView:nodeDependencies)。你也可以用when控制视图的可见性。
示例
"contributes": {"views": {"explorer": [{"id": "nodeDependencies","name": "Node Dependencies","when": "workspaceHasPackageJSON"}]}}
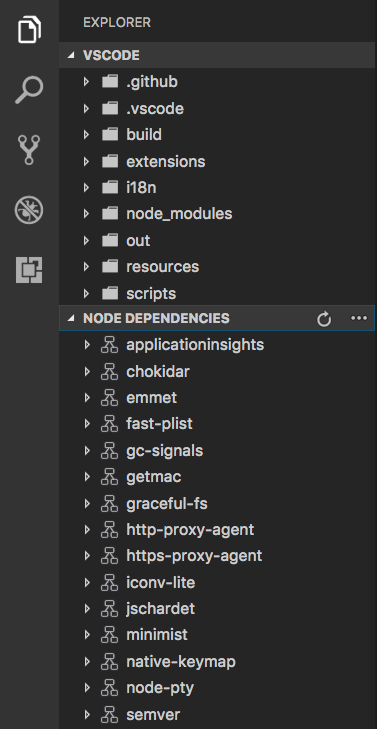
插件创作者应该通过createTreeViewAPI提供的data provider创建一个TreeView或者直接使用registerTreeDataProvider注册一个data provider。更多示例参考这里
contributes.viewsWelcome
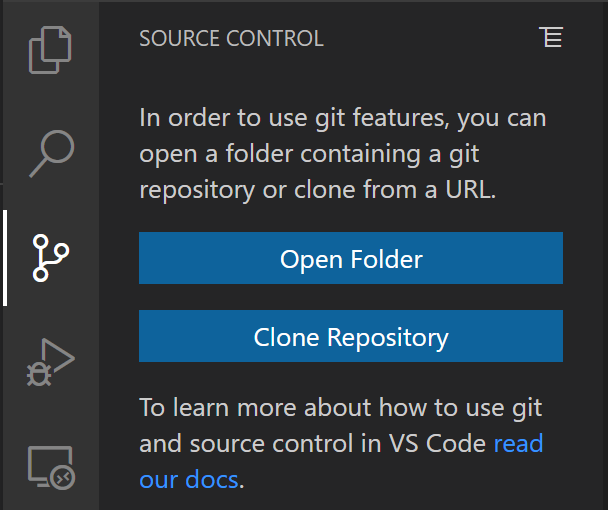
给自定义视图配置欢迎内容。欢迎内容只能应用到空的树视图中。如果一个树视图中没有任何子树数据时,才是空的树视图。按照约定,任何单独成行的链接会被展示为按钮。你可以配置view属性,指定欢迎页展示的位置。欢迎页的可见性可通过when语句和变量值配置。展示在欢迎页的内容,可通过contents属性配置。
{"contributes": {"viewsWelcome": [{"view": "scm","contents": "In order to use git features, you can open a folder containing a git repository or clone from a URL.\n[Open Folder](command:vscode.openFolder)\n[Clone Repository](command:git.clone)\nTo learn more about how to use git and source control in VS Code [read our docs](https://aka.ms/vscode-scm).","when": "config.git.enabled && git.state == initialized && workbenchState == empty"}]}}
一个视图可以展示多条欢迎内容,当出现这类场景时,VS Code 内置的内容会优先呈现,然后是插件提供欢迎内容,最后是来自其他插件的内容。
contributes.viewsContainers
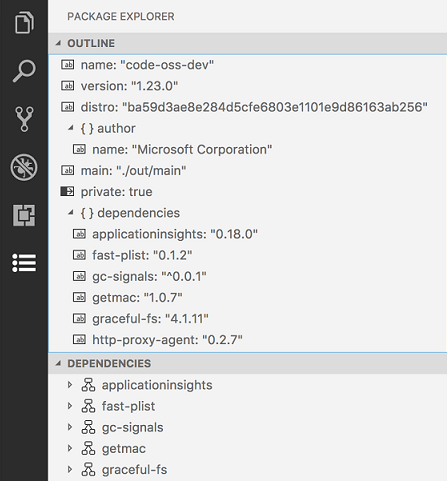
配置自定义视图的视图容器。你需要为视图指定唯一标识和标题和图标。目前你只可以配置活动栏(activitybar),下面的示例展示了活动栏中的Package Explorer视图容器应该如何配置。
示例
"contributes": {"viewsContainers": {"activitybar": [{"id": "package-explorer","title": "Package Explorer","icon": "resources/package-explorer.svg"}]},"views": {"package-explorer": [{"id": "package-dependencies","name": "Dependencies"},{"id": "package-outline","name": "Outline"}]}}
图标规格
Size:28x28的图标居中于50x40的视图块上。Color:图标应使用黑白单色。Format:虽然图片格式的图标都是可以的,但建议使用SVG图标。States:所有图标状态继承下列样式:
| State | Opacity |
|---|---|
| Default | 60% |
| Hover | 100% |
| Active | 100% |
contributes.problemMatchers
配置问题定位器的模式。这些配置在输出面板和终端中都会有所体现,下面是一个配置了插件中的gcc编译器的问题定位器示例:
示例
"contributes": {"problemMatchers": [{"name": "gcc","owner": "cpp","fileLocation": ["relative", "${workspaceFolder}"],"pattern": {"regexp": "^(.*):(\\d+):(\\d+):\\s+(warning|error):\\s+(.*)$","file": 1,"line": 2,"column": 3,"severity": 4,"message": 5}}]}
这个问题定位器现在可以通过名称引用$gcc在task.json中使用了,示例如下:
{"version": "2.0.0","tasks": [{"label": "build","command": "gcc","args": ["-Wall", "helloWorld.c", "-o", "helloWorld"],"problemMatcher": "$gcc"}]}
更多内容请查看:实现一个问题定位器
contributes.problemPatterns
配置可以在问题定位器(见上)中可以使用的问题模式的名称。
contributes.taskDefinitions
配置和定义一个object结构,定义系统中唯一的配置任务。任务定义最少需要一个type属性,不过通常需要更多的属性配置。
在package.json文件中,一个展示脚本的任务看起来是这样的:
"taskDefinitions": [{"type": "npm","required": ["script"],"properties": {"script": {"type": "string","description": "The script to execute"},"path": {"type": "string","description": "The path to the package.json file. If omitted the package.json in the root of the workspace folder is used."}}}]
任务定义是JSON格式的,且包含required和properties两个属性。
type属性定义了任务类型,如果上述例子变成:
"type": "npm"要求任务与npm任务相关联"required": [ "script" ]其中script属性不可或缺。path属性变成可选。"properties": {...}:定义了其他属性和他们的类型
当插件真的创建了一个任务,它需要传入一个与package.json中任务配置对应的TaskDefinition。对于npm任务来说,pacakge.json中的脚本应该是这样的:
let task = new vscode.Task({ type: 'npm', script: 'test' }, ....);
contributes.colors
这些色彩可用于状态栏的编辑器装饰器。定义之后,用户可以在workspace.colorCustomization设置中自定义颜色,用户的主题会覆盖这些色值。
"contributes": {"colors": [{"id": "superstatus.error","description": "Color for error message in the status bar.","defaults": {"dark": "errorForeground","light": "errorForeground","highContrast": "#010203"}}]}
contributes.typescriptServerPlugins
配置VS Code的Javascript和Typescript支持的Typescript 服务器插件:
"contributes": {"typescriptServerPlugins": [{"name": "typescript-styled-plugin"}]}
上述例子配置了typescript-styled-plugin,这个插件为Javascript和Typescript添加了风格化的组件智能提示。这个插件会从扩展插件中加载,而且必须在dependency中列明:
{"dependencies": {"typescript-styled-plugin": "*"}}
Typescript 服务器插件可以被所有Javascript和Typescript文件加载,只有当用户的工作区使用Typescript时才会激活。
下一步
学习更多VS Code的扩展性模型,试着查看下面的主题吧:

若有收获,就点个赞吧
0 人点赞
