- Chapter 9 Better Together Or Better Apart?
- 9.1 Bring together if information is shared
- 9.2 Bring together if it will simplify the interface
- 9.3 Bring together to eliminate duplication
- 9.4 Separate general-purpose and special-purpose code
- 9.5 Example: insertion cursor and selection
- 9.6 Example: separate class for logging
- 9.7 Example: editor undo mechanism
- 9.8 Splitting and joining methods
- 9.9 Conclusion
Chapter 9 Better Together Or Better Apart?
One of the most fundamental questions in software design is this: given two pieces of functionality, should they be implemented together in the same place, or should their implementations be separated? This question applies at all levels in a system, such as functions, methods, classes, and services. For example, should buffering be included in the class that provides stream-oriented file I/O, or should it be in a separate class? Should the parsing of an HTTP request be implemented entirely in one method, or should it be divided among multiple methods (or even multiple classes)? This chapter discusses the factors to consider when making these decisions. Some of these factors have already been discussed in previous chapters, but they will be revisited here for completeness.
When deciding whether to combine or separate, the goal is to reduce the complexity of the system as a whole and improve its modularity. It might appear that the best way to achieve this goal is to divide the system into a large number of small components: the smaller the components, the simpler each individual component is likely to be. However, the act of subdividing creates additional complexity that was not present before subdivision:
- Some complexity comes just from the number of components: the more components, the harder to keep track of them all and the harder to find a desired component within the large collection. Subdivision usually results in more interfaces, and every new interface adds complexity.
- Subdivision can result in additional code to manage the components. For example, a piece of code that used a single object before subdivision might now have to manage multiple objects.
- Subdivision creates separation: the subdivided components will be farther apart than they were before subdivision. For example, methods that were together in a single class before subdivision may be in different classes after subdivision, and possibly in different files. Separation makes it harder for developers to see the components at the same time, or even to be aware of their existence. If the components are truly independent, then separation is good: it allows the developer to focus on a single component at a time, without being distracted by the other components. On the other hand, if there are dependencies between the components, then separation is bad: developers will end up flipping back and forth between the components. Even worse, they may not be aware of the dependencies, which can lead to bugs.
- Subdivision can result in duplication: code that was present in a single instance before subdivision may need to be present in each of the subdivided components.
Bringing pieces of code together is most beneficial if they are closely related. If the pieces are unrelated, they are probably better off apart. Here are a few indications that two pieces of code are related:
- They share information; for example, both pieces of code might depend on the syntax of a particular type of document.
- They are used together: anyone using one of the pieces of code is likely to use the other as well. This form of relationship is only compelling if it is bidirectional. As a counter-example, a disk block cache will almost always involve a hash table, but hash tables can be used in many situations that don’t involve block caches; thus, these modules should be separate.
- They overlap conceptually, in that there is a simple higher-level category that includes both of the pieces of code. For example, searching for a substring and case conversion both fall under the category of string manipulation; flow control and reliable delivery both fall under the category of network communication.
- It is hard to understand one of the pieces of code without looking at the other.
The rest of this chapter uses more specific rules as well as examples to show when it makes sense to bring pieces of code together and when it makes sense to separate them.
9.1 Bring together if information is shared
Section 5.4 introduced this principle in the context of a project implementing an HTTP server. In its first implementation, the project used two different methods in different classes to read in and parse HTTP requests. The first method read the text of an incoming request from a network socket and placed it in a string object. The second method parsed the string to extract the various components of the request. With this decomposition, both of the methods ended up with considerable knowledge of the format of HTTP requests: the first method was only trying to read the request, not parse it, but it couldn’t identify the end of the request without doing most of the work of parsing it (for example, it had to parse header lines in order to identify the header containing the overall request length). Because of this shared information, it is better to both read and parse the request in the same place; when the two classes were combined into one, the code got shorter and simpler.
9.2 Bring together if it will simplify the interface
When two or more modules are combined into a single module, it may be possible to define an interface for the new module that is simpler or easier to use than the original interfaces. This often happens when the original modules each implement part of the solution to a problem. In the HTTP server example from the preceding section, the original methods required an interface to return the HTTP request string from the first method and pass it to the second. When the methods were combined, these interfaces were eliminated.
In addition, when the functionality of two or more classes is combined, it may be possible to perform some functions automatically, so that most users need not be aware of them. The Java I/O library illustrates this opportunity. If the FileInputStream and BufferedInputStream classes were combined and buffering were provided by default, the vast majority of users would never even need to be aware of the existence of buffering. A combined FileInputStream class might provide methods to disable or replace the default buffering mechanism, but most users would not need to learn about them.
9.3 Bring together to eliminate duplication
If you find the same pattern of code repeated over and over, see if you can reorganize the code to eliminate the repetition. One approach is to factor the repeated code out into a separate method and replace the repeated code snippets with calls to the method. This approach is most effective if the repeated code snippet is long and the replacement method has a simple signature. If the snippet is only one or two lines long, there may not be much benefit in replacing it with a method call. If the snippet interacts in complex ways with its environment (such as by accessing numerous local variables), then the replacement method might require a complex signature (such as many pass-by-reference arguments), which would reduce its value.
Another way to eliminate duplication is to refactor the code so that the snippet in question only needs to be executed in one place. Suppose you are writing a method that needs to return errors at several different points, and the same cleanup actions need to be performed at each of these points before returning (see Figure 9.1 for an example). If the programming language supports goto, you can move the cleanup code to the very end of the method and then goto that snippet at each of the points where an error return is required, as in Figure 9.2. Goto statements are generally considered a bad idea, and they can result in indecipherable code if used indiscriminately, but they are useful in situations like this where they are used to escape from nested code.
9.4 Separate general-purpose and special-purpose code
If a module contains a mechanism that can be used for several different purposes, then it should provide just that one general-purpose mechanism. It should not include code that specializes the mechanism for a particular use, nor should it contain other general-purpose mechanisms. Special-purpose code associated with a general-purpose mechanism should normally go in a different module (typically one associated with the particular purpose). The GUI editor discussion in Chapter 6 illustrated this principle: the best design was one where the text class provided general-purpose text operations, while operations particular to the user interface (such as deleting the selection) were implemented in the user interface module. This approach eliminated information leakage and additional interfaces that were present in an earlier design where the specialized user interface operations were implemented in the text class.
img Red Flag: Repetition img
If the same piece of code (or code that is almost the same) appears over and over again, that’s a red flag that you haven’t found the right abstractions.
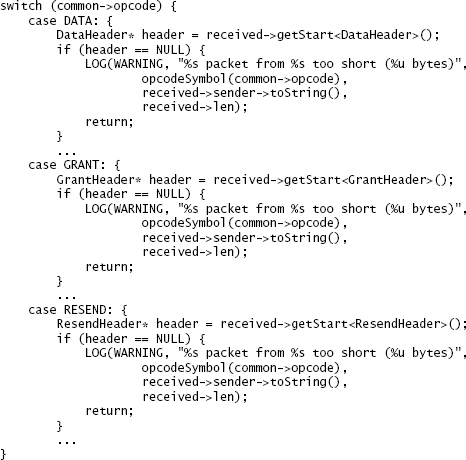
Figure 9.1: This code processes incoming network packets of different types; for each type, if the packet is too short for that type, a message gets logged. In this version of the code, the LOG statement is duplicated for several different packet types.
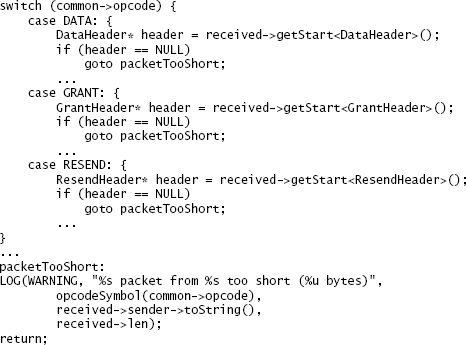
Figure 9.2: A reorganization of the code from Figure 9.1 so that there is only one copy of the LOG statement.
In general, the lower layers of a system tend to be more general-purpose and the upper layers more special-purpose. For example, the topmost layer of an application consists of features totally specific to that application. The way to separate special-purpose code from general-purpose code is to pull the special-purpose code upwards, into the higher layers, leaving the lower layers general-purpose. When you encounter a class that includes both general-purpose and special-purpose features for the same abstraction, see if the class can be separated into two classes, one containing the general-purpose features, and the other layered on top of it to provide the special-purpose features.
9.5 Example: insertion cursor and selection
The next sections work through three examples that illustrate the principles discussed above. In two of the examples the best approach is to separate the relevant pieces of code; in the third example it is better to join them together.
The first example consists of the insertion cursor and the selection in the GUI editor project from Chapter 6. The editor displayed a blinking vertical line indicating where text typed by the user would appear in the document. It also displayed a highlighted range of characters called the selection, which was used for copying or deleting text. The insertion cursor was always visible, but there could be times when no text was selected. If the selection existed, the insertion cursor was always positioned at one end of it.
The selection and insertion cursor are related in some ways. For example, the cursor is always positioned at one end of the selection, and the cursor and selection tend to be manipulated together: clicking and dragging the mouse sets both of them, and text insertion first deletes the selected text, if there is any, and then inserts new text at the cursor position. Thus, it might seem logical to use a single object to manage both the selection and the cursor, and one project team took this approach. The object stored two positions in the file, along with booleans indicating which end was the cursor and whether the selection existed.
However, the combined object was awkward. It provided no benefit for higher-level code, since the higher-level code still needed to be aware of the selection and cursor as distinct entities, and it manipulated them separately (during text insertion, it first invoked a method on the combined object to delete the selected text; then it invoked another method to retrieve the cursor position in order to insert new text). The combined object was actually more complex to implement than separate objects. It avoided storing the cursor position as a separate entity, but instead had to store a boolean indicating which end of the selection was the cursor. In order to retrieve the cursor position, the combined object had to first test the boolean and then choose the appropriate end of the selection.
img Red Flag: Special-General Mixture img
This red flag occurs when a general-purpose mechanism also contains code specialized for a particular use of that mechanism. This makes the mechanism more complicated and creates information leakage between the mechanism and the particular use case: future modifications to the use case are likely to require changes to the underlying mechanism as well.
In this case, the selection and cursor were not closely enough related to combine them. When the code was revised to separate the selection and the cursor, both the usage and the implementation became simpler. Separate objects provided a simpler interface than a combined object from which selection and cursor information had to be extracted. The cursor implementation also got simpler because the cursor position was represented directly, rather than indirectly through a selection and a boolean. In fact, in the revised version no special classes were used for either the selection or the cursor. Instead, a new Position class was introduced to represent a location in the file (a line number and character within line). The selection was represented with two Positions and the cursor with one. Positions also found other uses in the project. This example also demonstrates the benefits of a lower-level but more general-purpose interface, which were discussed in Chapter 6.
9.6 Example: separate class for logging
The second example involved error logging in a student project. A class contained several code sequences like the following:
try {rpcConn = connectionPool.getConnection(dest);} catch (IOException e) {NetworkErrorLogger.logRpcOpenError(req, dest, e);return null;}
Rather than logging the error at the point where it was detected, a separate method in a special error logging class was invoked. The error logging class was defined at the end of the same source file:
private static class NetworkErrorLogger {/*** Output information relevant to an error that occurs when trying* to open a connection to send an RPC.** @param req* The RPC request that would have been sent through the connection* @param dest* The destination of the RPC* @param e* The caught error*/public static void logRpcOpenError(RpcRequest req, AddrPortTuple dest, Exception e) {logger.log(Level.WARNING, "Cannot send message: " + req + ". \n" + "Unable to find or open connection to " + dest + " :" + e);}...}
The NetworkErrorLogger class contained several methods such as logRpcSendError and logRpcReceiveError, each of which logged a different kind of error.
This separation added complexity with no benefit. The logging methods were shallow: most consisted of a single line of code, but they required a considerable amount of documentation. Each method was only invoked in a single place. The logging methods were highly dependent on their invocations: someone reading the invocation would most likely flip over to the logging method to make sure that the right information was being logged; similarly, someone reading the logging method would probably flip over to the invocation site to understand the purpose of the method.
In this example, it would be better to eliminate the logging methods and place the logging statements at the locations where the errors were detected. This would make the code easier to read and eliminate the interfaces required for the logging methods.
9.7 Example: editor undo mechanism
In the GUI editor project from Section 6.2, one of the requirements was to support multi-level undo/redo, not just for changes to the text itself, but also for changes in the selection, insertion cursor, and view. For example, if a user selected some text, deleted it, scrolled to a different place in the file, and then invoked undo, the editor had to restore its state to what it was just before the deletion. This included restoring the deleted text, selecting it again, and also making the selected text visible in the window.
Some of the student projects implemented the entire undo mechanism as part of the text class. The text class maintained a list of all the undoable changes. It automatically added entries to this list whenever the text was changed. For changes to the selection, insertion cursor, and view, the user interface code invoked additional methods in the text class, which then added entries for those changes to the undo list. When undo or redo was requested by the user, the user interface code invoked a method in the text class, which then processed the entries in the undo list. For entries related to text, it updated the internals of the text class; for entries related to other things, such as the selection, the text class called back to the user interface code to carry out the undo or redo.
This approach resulted in an awkward set of features in the text class. The core of undo/redo consists of a general-purpose mechanism for managing a list of actions that have been executed and stepping through them during undo and redo operations. The core was located in the text class along with special-purpose handlers that implemented undo and redo for specific things such as text and the selection. The special-purpose undo handlers for the selection and the cursor had nothing to do with anything else in the text class; they resulted in information leakage between the text class and the user interface, as well as extra methods in each module to pass undo information back and forth. If a new sort of undoable entity were added to the system in the future, it would require changes to the text class, including new methods specific to that entity. In addition, the general-purpose undo core had little to do with the general-purpose text facilities in the class.
These problems can be solved by extracting the general-purpose core of the undo/redo mechanism and placing it in a separate class:
public class History {public interface Action {public void redo();public void undo();}History() {...}void addAction(Action action) {...}void addFence() {...}void undo() {...}void redo() {...}}
In this design, the History class manages a collection of objects that implement the interface History.Action. Each History.Action describes a single operation, such as a text insertion or a change in the cursor location, and it provides methods that can undo or redo the operation. The History class knows nothing about the information stored in the actions or how they implement their undo and redo methods. History maintains a history list describing all of the actions executed over the lifetime of an application, and it provides undo and redo methods that walk backwards and forwards through the list in response to user-requested undos and redos, calling undo and redo methods in the History.Actions.
History.Actions are special-purpose objects: each one understands a particular kind of undoable operation. They are implemented outside the History class, in modules that understand particular kinds of undoable actions. The text class might implement UndoableInsert and UndoableDelete objects to describe text insertions and deletions. Whenever it inserts text, the text class creates a new UndoableInsert object describing the insertion and invokes History.addAction to add it to the history list. The editor’s user interface code might create UndoableSelection and UndoableCursor objects that describe changes to the selection and insertion cursor.
The History class also allows actions to be grouped so that, for example, a single undo request from the user can restore deleted text, reselect the deleted text, and reposition the insertion cursor. There are a number of ways to group actions; the History class uses fences, which are markers placed in the history list to separate groups of related actions. Each call to History.redo walks backwards through the history list, undoing actions until it reaches the next fence. The placement of fences is determined by higher-level code by invoking History.addFence.
This approach divides the functionality of undo into three categories, each of which is implemented in a different place:
A general-purpose mechanism for managing and grouping actions and invoking undo/redo operations (implemented by the History class). The specifics of particular actions (implemented by a variety of classes, each of which understands a small number of action types). The policy for grouping actions (implemented by high-level user interface code to provide the right overall application behavior). Each of these categories can be implemented without any understanding of the other categories. The History class does not know what kind of actions are being undone; it could be used in a variety of applications. Each action class understands only a single kind of action, and neither the History class nor the action classes needs to be aware of the policy for grouping actions.
The key design decision was the one that separated the general-purpose part of the undo mechanism from the special-purpose parts and put the general-purpose part in a class by itself. Once that was done, the rest of the design fell out naturally.
Note: the suggestion to separate general-purpose code from special-purpose code refers to code related to a particular mechanism. For example, special-purpose undo code (such as code to undo a text insertion) should be separated from general-purpose undo code (such as code to manage the history list). However, it often makes sense to combine special-purpose code for one mechanism with general-purpose code for another. The text class is an example of this: it implements a general-purpose mechanism for managing text, but it includes special-purpose code related to undoing. The undo code is special-purpose because it only handles undo operations for text modifications. It doesn’t make sense to combine this code with the general-purpose undo infrastructure in the History class, but it does make sense to put it in the text class, since it is closely related to other text functions.
9.8 Splitting and joining methods
The issue of when to subdivide applies not just to classes, but also to methods: are there times when it is better to divide an existing method into multiple smaller methods? Or, should two smaller methods be combined into one larger one? Long methods tend to be more difficult to understand than shorter ones, so many people argue that length alone is a good justification for breaking up a method. Students in classes are often given rigid criteria, such as “Split up any method longer than 20 lines!”
However, length by itself is rarely a good reason for splitting up a method. In general, developers tend to break up methods too much. Splitting up a method introduces additional interfaces, which add to complexity. It also separates the pieces of the original method, which makes the code harder to read if the pieces are actually related. You shouldn’t break up a method unless it makes the overall system simpler; I’ll discuss how this might happen below.
Long methods aren’t always bad. For example, suppose a method contains five 20-line blocks of code that are executed in order. If the blocks are relatively independent, then the method can be read and understood one block at a time; there’s not much benefit in moving each of the blocks into a separate method. If the blocks have complex interactions, it’s even more important to keep them together so readers can see all of the code at once; if each block is in a separate method, readers will have to flip back and forth between these spread-out methods in order to understand how they work together. Methods containing hundreds of lines of code are fine if they have a simple signature and are easy to read. These methods are deep (lots of functionality, simple interface), which is good.
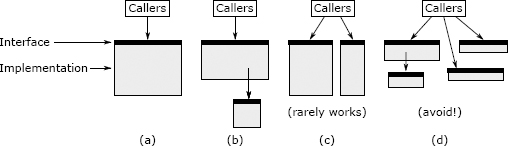
Figure 9.3: A method (a) can be split either by by extracting a subtask (b) or by dividing its functionality into two separate methods (c). A method should not be split if it results in shallow methods, as in (d).
When designing methods, the most important goal is to provide clean and simple abstractions. Each method should do one thing and do it completely. The method should have a clean and simple interface, so that users don’t need to have much information in their heads in order to use it correctly. The method should be deep: its interface should be much simpler than its implementation. If a method has all of these properties, then it probably doesn’t matter whether it is long or not.
Splitting up a method only makes sense if it results in cleaner abstractions, overall. There are two ways to do this, which are diagrammed in Figure 9.3. The best way is by factoring out a subtask into a separate method, as shown in Figure 9.3(b). The subdivision results in a child method containing the subtask and a parent method containing the remainder of the original method; the parent invokes the child. The interface of the new parent method is the same as the original method. This form of subdivision makes sense if there is a subtask that is cleanly separable from the rest of the original method, which means (a) someone reading the child method doesn’t need to know anything about the parent method and (b) someone reading the parent method doesn’t need to understand the implementation of the child method. Typically this means that the child method is relatively general-purpose: it could conceivably be used by other methods besides the parent. If you make a split of this form and then find yourself flipping back and forth between the parent and child to understand how they work together, that is a red flag (“Conjoined Methods”) indicating that the split was probably a bad idea.
The second way to break up a method is to split it into two separate methods, each visible to callers of the original method, as in Figure 9.3(c). This makes sense if the original method had an overly complex interface because it tried to do multiple things that were not closely related. If this is the case, it may be possible to divide the method’s functionality into two or more smaller methods, each of which has only a part of the original method’s functionality. If you make a split like this, the interface for each of the resulting methods should be simpler than the interface of the original method. Ideally, most callers should only need to invoke one of the two new methods; if callers must invoke both of the new methods, then that adds complexity, which makes it less likely that the split is a good idea. The new methods will be more focused in what they do. It is a good sign if the new methods are more general-purpose than the original method (i.e., you can imagine using them separately in other situations).
Splits of the form shown in Figure 9.3(c) don’t make sense very often, because they result in callers having to deal with multiple methods instead of one. When you split this way, you run the risk of ending up with several shallow methods, as in Figure 9.3(d). If the caller has to invoke each of the separate methods, passing state back and forth between them, then splitting is not a good idea. If you’re considering a split like the one in Figure 9.3(c), you should judge it based on whether it simplifies things for callers.
There are also situations where a system can be made simpler by joining methods together. For example, joining methods might replace two shallow methods with one deeper method; it might eliminate duplication of code; it might eliminate dependencies between the original methods, or intermediate data structures; it might result in better encapsulation, so that knowledge that was previously present in multiple places is now isolated in a single place; or it might result in a simpler interface, as discussed in Section 9.2.
img Red Flag: Conjoined Methods img
It should be possible to understand each method independently. If you can’t understand the implementation of one method without also understanding the implementation of another, that’s a red flag. This red flag can occur in other contexts as well: if two pieces of code are physically separated, but each can only be understood by looking at the other, that is a red flag.
9.9 Conclusion
The decision to split or join modules should be based on complexity. Pick the structure that results in the best information hiding, the fewest dependencies, and the deepest interfaces.

若有收获,就点个赞吧
0 人点赞
