出现的问题
- 主机的xshell连接不上虚拟机,情况是主机ping不通虚拟机,但是虚拟机能ping通外网。经过查看资料。这种情况下是VMWARE8网卡出现问题。因为VMWARE8网卡是负责虚拟机和主机的通信。于是就在物理主机中将VMWARE8网卡禁用再启动就顺利连接上了。
FTP文件服务
匿名用户登陆:
匿名用户登陆就是允许任何人登陆到服务器上传文件 ```shellFTP是基于C/S架构的所以需要服务端和客户端
服务端配置
systemctl stop firewalld //关闭防火墙,不推荐可以通过iptables设置过滤规则 setenforce 0
yum install vsftpd -y vim /etc/vsftpd/vsftpd.conf anonymous_enable=YES anon_upload_enable=YES anon_umask=022 anon_mkdir_write_enable=YES anon_other_write_enable=YES
添加关于匿名登陆的配置
systemctl start vsftpd
默认的目录是在/var/ftp下
客户端
yum install ftp ftp 192.168.36.128 #连接登陆
上传文件 put /文件路径/文件名 //文件权限由配置文件中的umask决定 下载文件 get 文件名 //可以通过lcd来决定下载的位置 lcd /var/….
1. 问题: 客户端登陆出现:500 OOPS: vsftpd: refusing to run with writable root inside chroot()因为vsftpd在2.3.5版本后就不支持修改ftp目录的权限应该变为755后再登陆问题就解决了。2. 问题:无法通过get下载文件。因为文件权限的问题3. ipv6端口打开了,但是ipv4端口没打开通过设置配置文件中的listen=YES配置打开。<a name="acEmi"></a>##<a name="baCwv"></a>## NFS文件服务NFS文件系统是基于RPC协议的网络文件系统,是基于C/S架构的。能够实现对目录的共享。```shell#server端yum install nfs-utils -ymkdir /webdatacat /etc/exports/webdata 192.168.36.0/24(rw)systemctl start nfs-server#clientyum install nfs-utils -yshowmount -e 192.168.36.128mount -t nfs 192.168.36.128:/webdata /var/www/html/
https://www.jianshu.com/p/7d6853140e13 //RPC远程调度协议
LVM逻辑卷管理
逻辑卷管理器是Linux系统用于对硬盘分区进行管理的一种机制,其创建初衷是为了解决硬盘设备在创建分区后不易修改分区大小的缺陷。LVM技术是在硬盘分区和文件系统之间添加了一个逻辑层,它提供了一个抽象的卷组,可以把多块硬盘进行卷组合并,这样一来,用户不必关心物理硬盘设备的底层架构和布局,就可以实现对硬盘发你去的动态调整。
#将新添加的两块硬盘设备支持LVM技术
pvcreate /dev/sdb
pvcreate /dev/sdc
#将两块硬盘加入到卷组中
vgcreate storage /dev/sdb /dev/sdc
vgdisplay
#切割出一个约为150M的逻辑卷设备
lvcreate -n my-lv -l 37 storage
lvdisplay
#将逻辑卷格式化
mkfs.ext4 /dev/storage/my-lv
#挂载
mkdir /webdata
mount /dev/storage/my-lv /webdata
df -h //查看挂载情况
-------------
#扩容逻辑卷
umount /webdata
lvextend -L 290M /dev/storage/my-lv
#检查硬盘完整性
e2fsck -f /dev/storage/my-lv
#重置硬盘
resize2fs /dev/storage/my-lv
#重新挂载
mount /dev/storage/my-lv
df-h
--------------
#缩小逻辑卷
umount /webdata
e2fsck -f /dev/storage/my-lv
resize2fs /dev/storage/my-lv 120M
lvreduce -L 120M /dev/storage/my-lv
mount /dev/storage/my-lv /webdata
df -h
---------------
#逻辑卷快照
#拍摄快照
lvcreate -L 120M -s -n SNAP /dev/storage/my-lv
#卸载
umount /webdata
#恢复快照
lvconvert --merge /dev/storage/SNAP
#挂载
mount /dev/storage/my-lv /webdata

#删除逻辑卷
umount /webdata
lvremove /dev/storage/my-lv
vgremove storage
pvremove /dev/sdb /dev/sdc
Nginx7层和4层负载均衡
- Nginx的首页文件在哪儿?
/usr/share/nginx/html/index.html
七层负载均衡
- 配置文件
四层负载均衡
- 布置四层负载均衡的时候报错。

原因:现在版本的Nginx 没有安装ngx_stream_core_modules模块。需要自己手动添加。
手动添加模块:
http://nginx.org/download/ //nginx源码下载
- 下载nginx的源码包。
```shell
wget http://nginx.org/download/nginx-1.21.1.tar.gz -P /usr/local/src/ #将源码包下载到文件夹中
tar -xzvf
-x 从归档中解出文件
-z 通过gzip过滤文档
-v 详细地列出处理的文件
-f 强制执行
安装编译环境
yum install gcc pcre-devel openssl-devel zlib-devel -y创建用户
useradd -r -s /sbin/nologin nginx编译配置
./configure —prefix=/apps/nginx \ —user=nginx \ —group=nginx \ —with-pcre \ —with-http_ssl_module \ —with-http_v2_module \ —with-http_realip_module \ —with-http_addition_module \ —with-http_sub_module \ —with-http_dav_module \ —with-http_flv_module \ —with-http_mp4_module \ —with-http_gunzip_module \ —with-http_gzip_static_module \ —with-http_random_index_module \ —with-http_secure_link_module \ —with-http_stub_status_module \ —with-http_auth_request_module \ —with-http_image_filter_module \ —with-http_slice_module \ —with-mail \ —with-threads \ —with-file-aio \ —with-stream \ —with-mail_ssl_module \ —with-stream_ssl_module编译
make -j 2 && make install更改目录的属主
chown -R nginx:nginx /apps/nginx建立软连接
ln -s /apps/nginx/sbin/nginx /usr/bin/ ln -s /apps/nginx/sbin/nginx /usr/sbin/检查
nginx -v配置Nginx服务命令和服务并开机启动
cat /usr/lib/systemd/system/nginx.service [Unit] Description=The nginx HTTP and reverse proxy server Documentation=http://nginx.org/en/docs/ After=network.target remote-fs.target nss-lookup.target Wants=network-online.target [Service] Type=forking PIDFile=/apps/nginx/run/nginx.pid ExecStart=/apps/nginx/sbin/nginx -c /apps/nginx/conf/nginx.conf ExecReload=/bin/kill -s HUP $MAINPID ExecStop=/bin/kill -s TERM $MAINPID [Install] WantedBy=multi-user.target创建/apps/nginx/run/这个目录
在配置文件中指定启动的pid文件。
vim /apps/nginx/conf/nginx.conf pid /apps/nginx/run/nginx.pid //pid文件就是存放进程的pid号 systemctl daemon—reload systemctl start nginx
问题启动失败
一直启动失败是因为pid文件报错。
```shell
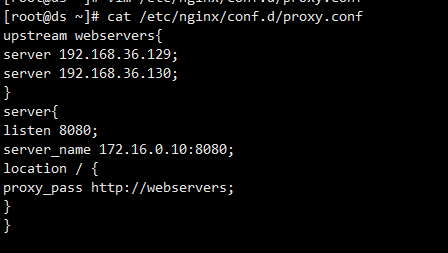
四层负载均衡的实验
#需要模块 http_stream_core_module需要自己加载
#在主配置文件中
cat /apps/nginx/conf/nginx.conf
stream {
upstream sshsers{
server 192.168.36.129:22;
server 192.168.36.130:22;
least_conn;
}
server{
listen 22222;
proxy_pass sshsers;
}
}
//用ssh连接就可以了
LVS/NAT实验
- 需要添加一块网卡来作为VIP ```shell vim /etc/sysconfig/network-scripts/ifcfg-ens37 //作为VIP TYPE=”Ethernet” PROXY_METHOD=”none” BROWSER_ONLY=”no” BOOTPROTO=”static” DEFROUTE=”yes” IPV4_FAILURE_FATAL=”no” IPV6INIT=”yes” IPV6_AUTOCONF=”yes” IPV6_DEFROUTE=”yes” IPV6_FAILURE_FATAL=”no” IPV6_ADDR_GEN_MODE=”stable-privacy” NAME=”ens37” UUID=”b3f5c29d-4900-493d-98ca-099dc1d54853” //通过uuidgen生成 DEVICE=”ens37” ONBOOT=”yes” IPADDR=172.100.10.10 // VIP地址 NETMASK=255.255.255.0 DNS1=114.114.114.114 GATEWAY=172.100.10.2
```shell
#DS配置
yum ipvsadm //安装ipvsadm工具
echo 1 > /proc/sys/net/ipv4/ip_forward //手动开启路由转发功能
iptables -t nat -F //清空规则表
iptables -t nat -A postrouting -s 192.168.36.0/24 -o ens37 -j
MASQUERADE //
#设置wrr策略和添加RS主机
ipvsadm -A -t 172.100.10.10:80 -s wrr //配置负载均衡策略wrr
ipvsadm -a -t 172.100.10.10:80 -r 192.168.36.129 -m -w 1
ipvsadm -a -t 172.100.10.10:80 -r 192.168.36.130 -m -w 1
#查看设定号的规则
ipvsadm -ln
#RS配置
安装web软件并开启
网关必须指向DS
cat /etc/sysconfig/network-scripts/ifcfg-ens33
TYPE="Ethernet"
PROXY_METHOD="none"
BROWSER_ONLY="no"
BOOTPROTO="static"
DEFROUTE="yes"
IPV4_FAILURE_FATAL="no"
IPV6INIT="yes"
IPV6_AUTOCONF="yes"
IPV6_DEFROUTE="yes"
IPV6_FAILURE_FATAL="no"
IPV6_ADDR_GEN_MODE="stable-privacy"
NAME="ens33"
UUID="1afa5ab4-07fb-4a17-b199-ed34479f1a07"
DEVICE="ens33"
ONBOOT="yes"
IPADDR=192.168.36.130
NETMASK=255.255.255.0
DNS1=114.114.114.114
GATEWAY=192.168.36.128
LVS/DR实验
#部署DR
#先配置vip
yum install net-tools -y
ifconfig add ens33:0 192.168.36.100 broadcast 192.168.36.255 netmask 255.255.255.0 up
//在ens33网卡的另一个接口上配置vip地址
route add -host 192.168.36.100 dev ens33:0 //配置默认路由
yum install ipvsadm -y
ipvsadm -A -t 192.168.36.100:80 -s wr //配置lvs的真实服务器组
ipvsadm -a -t 192.168.36.100:80 -r 192.168.36.129:80 -g
ipvsadm -a -t 192.168.36.100:80 -r 192.168.36.130:80 -g
ipvsadm -ln
#RS部署
yum install net-tools -y
ifconfig lo:0 192.168.36.100 broadcast 192.168.36.255 netmask 255.255.255.255 up
route add -host 192.168.36.100 lo:0
echo "1" > /proc/sys/net/ipv4/conf/lo/arp_ignore
echo "2" > /proc/sys/net/ipv4/conf/lo/arp_announce
echo "1" > /proc/sys/net/ipv4/conf/all/arp_ignore
echo "2" > /proc/sys/net/ipv4/conf/all/arp_announce
问题:
配置完成后,访问后没有响应
原因:防火墙没关
Keepalived+nginx实验
https://www.keepalived.org/pdf/sery-lvs-cluster.pdf //可以看一看
#部署MASTER
[root@ds src] cat /etc/keepalived/keepalived.conf //将原有的配置文件替换掉
! configuration file for keepalived
global_defs {
  router_id node1
}
vrrp_script chk_http_port {  //通过关键字vrrp_script定义脚本。 为0不执行 为1执行
  script "/usr/local/src/check_nginx_pid.sh"
  interval 1
  weight -2
}
vrrp_instance VI_1 {  //定义vrrp组
  state MASTER
  interface ens33
  virtual_router_id 10  //vrrp组id 同一个组的id要相同
  priority 100   //0-254
  advert_int 1
  authentication { //组内的路由器进行认证
  auth_type PASS
  auth_pass 1111
  }
  track_script {   //通过关键字track_script调用脚本
  chk_http_port
  }
  virtual_ipaddress {
  192.168.36.100
  }
}
#脚本
#!/bin/bash
nginx_process_number=`ps -C nginx --no-header | wc -l `
if [ $nginx_process_number -eq 0 ];then
  #nginx
  nginx_process_number=`ps -C nginx --no-header | wc -l `
  if [ $nginx_process_number -eq 0 ];then
      exit 1
  else
      exit 0
  fi
else
  exit 0
fi
#backup节点
#与主节点类似有几个地方不一样
 state backup
 priority 99
 #脚本也是一样的。
问题:
- 在加入了检测nginx脚本的情况下。将nginx关闭后,vip不能漂移到另外一台机器上
原因:排查出了shell脚本有问题
- 在解决了shell脚本的问题后,出现了VIP消失的情况
原因:通过查看日志发现配置文件的花括号出现了一点问题,重新改正后问题被解决。
- 为什么MASTER的nginxdown机后重启地址会飘过来?因为是抢占模式吗
Keepalive+HAproxy+mysql双主
#部署mysql
yum install mariadb-server -y

cat /etc/my.cnf.d/server.conf
  [mysqld]
  server-id = 1
  auto_increment_offset = 1
  log-bin = mysql-bin
  auto-increment-increment = 1
  skip-name-resolve
  binlog-ignore = mysql
  binlog-ignore = information_schema

  systemctl start mariadb
  mysql -uroot -e "gant replication slave on *.* to 'repuser@192.168.36.131'
  identified by'000000'
  #在数据库中的操作
  show master status;
  change master to master_host='192.168.36.131',master_port=3306,master_user='repuser'
  master_password='000000',master_log_file='mysql-bin.000003',mastet_log_pos=245;
  start slave;
#HAproxuy部署
问题:haproxy实现负载均衡的代理IP是如何确定的。
部署完成后如何验证是否代理成功。
mv /etc/haproxy/haproxy.cfg{,.bak}
cat /etc/haproxy/haproxy.cfg
global
  log 127.0.0.1 local2
  chroot /var/lib/haproxy
  pidfile /var/run/haproxy.pid
  maxconn 4000
  user haproxy
  group haproxy
  daemon
  stats socket /var/lib/haproxy/stats
listen mysql_proxy
  bind 0.0.0.0:3306
  mode tcp
  balance rr
  server mysql1 192.168.36.130:3306 check
  server mysql2 192.168.36.131:3306 check
systemctl start haproxy
#keepalived配置
[root@ds haproxy]# cat /etc/keepalived/keepalived.conf
! configuration file for keepalived
global_defs {
  router_id node1
}
vrrp_script chk_proxy_port {
  script "/usr/local/src/check_proxy_pid.sh"
  interval 1
  weight -2
}
vrrp_instance VI_1 {
  state MASTER
  interface ens33
  virtual_router_id 10
  priority 100
  advert_int 1
  authentication {
  auth_type PASS
  auth_pass 1111
  }
  track_script {
  chk_proxy_port
  }
  virtual_ipaddress {
  192.168.36.100
  }
}
问题:BACKUP节点在启用时报错,
WARNING - default user 'keepalived_script' for script execution does not exist - please create.
解决办法:脚本执行的时候出现了问题。首先是赋予权限,第二个是写完脚本后就先执行
总结:
keepalived+haproxy+mysql双主的实验。就是mysql实现双主,haproxy实现负载均衡,keepalived实现高可用。大概的想法是这样的。mysql实现双主,haproxy的负载均衡能够提供对外的一个接口给用户访问这两台数据库,也就是提升了数据库的并发能力,但是haproxy一旦不可用后,就会导致数据库不可用。因此就多布置了一台负载均衡节点来提高可用性,那么如何提高可用性呢。就需要keepalived来实现高可用。具体的实现原理是这样的。keepalived具有心跳检测和失败切换功能,这里我们需要用到的就是失败切换功能,那么失败切换功能又是如何实现的呢,就是根据vrrp协议里面的内容,具体是这样的,在两台haproxy节点上布置keepalived。然后在keepalived配置文件中,根据参数virtual_router_id 来确认它们属于同一个vrrp组,当一个keepalived服务不可用,或者是优先级降低后,VIP就会飘到另一台keepalived服务上。这样就由另一台haproxy负载均衡器来提供服务。那么我们就可以利用优先级降低这个方法来等同于haproxy服务的正常与否,如果服务不正常则优先级降低,高优先级的路由器就会变成MASTER。我们可以通过关键字vrrp_script 引入一个脚本 当正常是时候退出码为0 优先级不变,当不正常的时候退出状态码为1优先级 weight -2 。这样就能将服务与优先级进行关联。这样就能实现高可用。
有几个需要注意的点:
优先级降低后,当服务再次启动的时候,vip飘回原来的主机,优先级会变成设定值。不是累计的值
https://www.cnblogs.com/soymilk2019/p/11136639.html
Keepalived+LVS实验
#RS配置
在环回接口上配置vip
ip addr add 192.168.36.99/32 broadcast 192.168.36.99 dev lo:0
使用Ansible搭建Halo博客系统
Halo博客系统是基于JAVA开发的开源的博客系统。
#从 oracle官网通过wget下载JRE解压报错。原因是缺少license。下载下来的是HTML文件
解决办法:注册了一个甲骨文的用户,下载到windows,通过lrzsz工具上传到linux中。
#解压完成后,配置环境变量运行报错。之后去bin目录下执行java二进制文件还是报错。
-bash: ./java: /lib/ld-linux.so.2: bad ELF interpreter: 没有那个文件或目录
解决办法:yum install glibc.i686 -y

#配置环境变量
cat /etc/profile
export JAVA_HOME=/root/app
export JRE_HOME=/root/app/jre1.8.0_333
export CLASSPATH=$JRE_HOME/lib/rt.jar:$JRE_HOME/lib/ext
export PATH=$PATH:$JRE_HOME/bin
source /etc/profile
#检查是否成功
java -version
总结:
JRE是JAVA程序运行时的环境,linux默认不是自带的。需要我们自己配置安装。
大概的步骤是:
通过wget下载工具包。
然后解压
然后配置环境变量
最后检查是否安装成功。
#方法二:
yum install java-11-openjdk -y
#用ansible系统部署一个框架,首先要有一个步骤,和流程。首先肯定要编写三个角色。分别是Halo,nginx,JAVA,其中nginx用来做反向代理服务器,JAVA用来实现环境部署。Halo用来实现具体的网站功能。具体还需要将Halo进程托管给systemd通过systectl工具来监管。

#第一步编写剧本
[root@ds roles]# cat yum_halo.yaml
- name: create halo blog system
  hosts: node1
  remote_user: root
  strategy: free
  pre_tasks:
    - name: yum epel
      yum:
        name: epel-release
        state: present
  roles:
  - nginx

#编写nginx角色
[root@ds roles]# cat ./nginx/tasks/main.yml
---
# tasks file for nginx
- name: install nginx
  yum:
    name: nginx
    state: present
- name: copy halo to nginx config file
  template:
    src: "halo.conf"
    dest: "/etc/nginx/conf.d/halo.conf"
- name: make sure nginx service is runing
  service:
    name: nginx
    state: started
- name: make sure port is open
  wait_for:
    port:{{ nginx_port }}
#相关的模板
[root@ds nginx]# cat ./templates/halo.conf
upstream halo {
  server 127.0.0.1:8090;
}
server {
  listen 80;
  listen [::]:80;
  server_name {{halo_domain}};
  client_max_body_size 1024m;
location / {
  proxy_pass http://halo;
  proxy_set_header HOST $host;
  proxy_set_header X-Forwarded-Proto $scheme;
  proxy_set_header X-Real-IP $remote_addr;
  proxy_set_header X-Forwarded-For $proxy_add_x_forwarded_for;
}
}
#依赖关系
cat ./meta/main.yml
dependencies:
  # List your role dependencies here, one per line. Be sure to remove the '[]' above,
  # if you add dependencies to this list.
  - role: java
  - role: halo
#编写JAVA角色
[root@ds roles]# cat ./java/tasks/main.yml
---
# tasks file for java
- name: yum java envirment
  yum:
    name: java-11-openjdk
    state: present
#编写Halo角色
[root@ds halo]# cat tasks/main.yml
---
# tasks file for halo
- name: get halo
  get_url:
    url: https://dl.halo.run/release/halo-1.4.11.jar
    dest: "{{ halopath }}"
- name: add halo service file
  template:
    src: halo.service
    dest: /etc/systemd/system/halo.service
- name: touch work directory
  file:
    path: /root/.halo
    state: directory
- name: copy halo config file
  template:
    src: application.yaml
    dest: /root/.halo/application.yaml
- name: start halo
  systemd:
    daemon_reload: yes
    name: halo
    state: started
    enabled: yes
- name: wait to start halo
  wait_for:
    port: "{{ halo_port }}"

 #相关模板
 [root@ds templates]# cat ./halo.service
[Unit]
Description=Halo Service
Documentation=https://docs.halo.run
After=network-online.target
Wants=network-online.target

[Service]
Type=simple
ExecStart=/usr/bin/java -server -Xms256m -Xmx256m -jar /root/halo.jar
ExecStop=/bin/kill -s QUIT $MAINPID
Restart=always
StandOutput=syslog

StandError=inherit

[Install]
WantedBy=multi-user.target

[root@ds templates]# cat ./application.yaml
server:
  port: 8090

  # Response data gzip.
  compression:
    enabled: false
spring:
  datasource:

    # H2 database configuration.
    driver-class-name: org.h2.Driver
    url: jdbc:h2:file:~/.halo/db/halo
    username: admin
    password: 123456

    # MySQL database configuration.
#    driver-class-name: com.mysql.cj.jdbc.Driver
#    url: jdbc:mysql://127.0.0.1:3306/halodb?characterEncoding=utf8&useSSL=false&serverTimezone=Asia/Shanghai&allowPublicKeyRetrieval=true
#    username: root
#    password: 123456

  # H2 database console configuration.
  h2:
    console:
      settings:
        web-allow-others: false
      path: /h2-console
      enabled: false

halo:

  # Your admin client path is https://your-domain/{admin-path}
  admin-path: admin

  # memory or level
  cache: memory

#上面用到的变量
[root@ds halo]# cat ./vars/main.yml
---
# vars file for halo
memory: 512m
halo_port: 8090
halopath: /root/halo.jar
halo_domain: 192.168.36.128
nginx_port: 80

#service文件下载
wget https://dl.halo.run/config/halo.service -O halo/templates/halo.service
#application文件下载
wget https://dl.halo.run/config/applicationtemplate.yaml -O halo/templates/application.yaml
使用Ansible搭建LAMP架构
环境准备:
一台管理节点
一台nginx作为负载均衡器
两台apache作为web服务器
一台作为mariadb数据库
一台作为网站存储(nfs)
- 工作流程(主机清单文件、ssh通信、免密登录、生成py脚本、sleep0退出)
- 更换远程主机的yum仓库(更换为国内的源速度更快)
- 安装httpd、mariadb、nginx
- 使用模板给httpd准备配置文件,使用ansible-galaxy安装负载均衡角色
- 使用parted模块创建分区,使用lvg模块创建卷组,使用lvol模块创建逻辑卷,逻辑卷作为nfs存储
使用 - 使用shell模块为数据库添加指定库、用户等操作
思考:
- 如何设计整个流程呢?
答:一步一步来,多做,多熟练
- shell模块如何能够为数据库添加指定库,用户?
答:
步骤:
#配置免密登陆
ssh-keygen -P "" -t rsa
ssh-copy-id -i id.key.pub root@192.168.36.129
#配置主机清单文件

[root@ds ~]# cat ansible/playbook/host.yaml
- name: config hosts file
  hosts: all_ip
  remote_user: root
  tasks:
  - name: copy host.j2 to group servers
    template:
      src: /root/ansible/template/host.j2
      dest: /etc/hosts
#模板文件

[root@ds ~]# cat /root/ansible/template/host.j2
127.0.0.1 localhost localhost.localdomain localhost4
localhost4.localdomain4
::1 localhost localhost.localdomain localhost6
localhost6.localdomain6
{% for host in groups.all_ip %}
{{ hostvars[host].ansible_ens33.ipv4.address }} {{ hostvars[host].ansible_hostname }}
{% endfor %}

#问题
生成host解析文件的时候,在host.j2文件中的for host in group.all_ip中报错。说没有这个group变量
原因:groups是anshible内置的变量。代表的是主机清单文件中的组和主机。
#思考:如何删除yum.repo.d目录下的所有文件呢?
#思路:通过file模块可以删除单个文件,删除一个目录下的多个文件就应该用with_items来循环删除所有文件。
问题:ERROR! 'shell' is not a valid attribute for a Play
解决思路:shell模块一直报错
问题:ERROR! 'register' is not a valid attribute for a Play
原因:我检查的是角色文件。所以一直报错。应该检查的是剧本而不是角色文件。角色是定义出来在剧本中使用的。
#角色
[root@ds roles]# cat /etc/ansible/roles/yum_repo/tasks/main.yml
---
# tasks file for yum_repo
- name: find files in yum.repos.d
  shell:
    chdir: /etc/yum.repos.d/
    cmd: ls
  register: files_list

- name: delet
  file:
    path: "/etc/yum.repos.d/{{ item }}"
    state: absent
  with_items: "{{ files_list.stdout_lines}}"

- name: copy aliyun yum.repo to all nodes
  copy:
    src: yum.repo
    dest: /etc/yum.repos.d/
#剧本
[root@ds roles]# cat /etc/ansible/roles/yum.repos.yaml
- name: yum repos
  hosts: all_ip
  remote_user: root
  roles:
  - yum_repo
#使用角色安装nginx
[root@ds roles]# cat nginx-1/tasks/main.yml
---
# tasks file for nginx-1
- name: install epel
yum:
name: epel-release
state: present
- name: install nginx
yum:
name: nginx
state: present
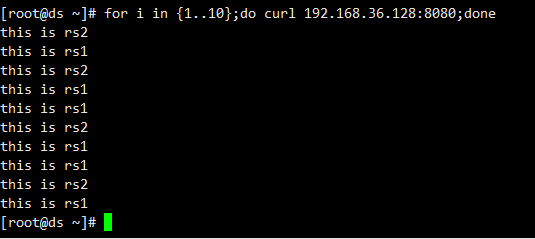
#使用nginx做负载均衡
[root@ds roles]# cat ./nginx_lb/tasks/main.yml
---
# tasks file for nginx_lb
- name: copy conf to nginx_lb
copy:
src: /etc/ansible/roles/nginx_lb/templates/lb.conf.j2
dest: /etc/nginx/conf.d/lb.conf
- name: restart nginx
service:
name: nginx
state: restarted
#模板文件
[root@ds roles]# cat ./nginx_lb/templates/lb.conf.j2
upstream webserver {
server slave2;
server slave3;
}
server{
listen 8080;
location / {
proxy_pass http://webserver;
}
}
#安装httpd,php-fpm,php-mysql
[root@ds roles]# cat httpd-1/tasks/main.yml
---
# tasks file for httpd-1
- name: yum install apache
yum:
name: httpd,php-fpm,php-mysql,mod_php
state: present
- name: start httpd
service:
name: httpd
state: restarted
- name: start php-fpm
service:
name: php-fpm
state: restarted
#安装mysql
[root@ds roles]# cat ./mariadb-1/tasks/main.yml
---
# tasks file for mariadb-1
- name: yum mariadb
yum:
name: mariadb-server
state: present
- name: start mariadb
service:
name: mariadb
state: restarted
#创建逻辑卷并挂载到共享目录下
[root@ds roles]# cat mount_lv/tasks/main.yml
---
# tasks file for mount_lv
- name: create disk
parted:
device: /dev/sdb
number: 1
flags: [lvm]
state: present
part_start: 1MiB
part_end: 2GiB
- name: create vg
lvg:
vg: vg-nfs
pvs: /dev/sdb1
- name: create lvm 1G
lvol:
vg: vg-nfs
lv: nginx-nfs
size: 1G
- name: format lv-nfs
filesystem:
fstype: ext4
dev: /dev/vg-nfs/nginx-nfs
- name: Mkfir for nfs
file:
path: /nfs
state: directory
- name: mount lvm
mount:
path: /nfs
src: /dev/vg-nfs/nginx-nfs
fstype: ext4
state: mounted
opts: noatime
- name: yum pkg for nfs
yum:
name: nfs-utils, rpcbind
state: present
- name: config file
shell: chmod -Rf 777 /nfs | echo "/nfs 192.168.36.0/24(rw,sync,no_root_squash)" > /etc/exports
- name: start service
service:
name: "{{ item }}"
state: restarted
loop:
- rpcbind
- nfs-server
#webserver挂载目录
[root@ds roles]# cat ./node_mount/tasks/main.yml
---
# tasks file for node_mount
- name: yum nfs pkg
yum:
name: nfs-utils, rpcbind
state: present
- name: mount nfs share directory in local
mount:
src: 192.168.36.133:/nfs
path: /var/www/html
fstype: nfs
state: mounted
#将全部角色加入到一个剧本中
[root@ds roles]# cat /root/ansible/playbook/all.yaml
- name: updata hosts file
hosts: all_ip
remote_user: root
tasks:
- name: copy hosts.j2 to group servers
template:
src: /root/ansible/template/host.j2
dest: /etc/hosts
- name: updata ali yumrepos
hosts: all_ip
remote_user: root
tasks:
- include_tasks: /etc/ansible/roles/yum_repo/tasks/main.yml
- name: install nginx
hosts: nginx
remote_user: root
tasks:
- include_tasks: /etc/ansible/roles/nginx-1/tasks/main.yml
- name: install httpd
hosts: apache
remote_user: root
tasks:
- include_tasks: /etc/ansible/roles/httpd-1/tasks/main.yml
- name: install mysql
hosts: mariadb
remote_user: root
tasks:
- include_tasks: /etc/ansible/roles/mariadb-1/tasks/main.yml
- name: config nginx lb server
hosts: nginx
remote_user: root
tasks:
- include_tasks: /etc/ansible/roles/nginx_lb/tasks/main.yml
- name: create lvm for nfs
hosts: nfs
remote_user: root
tasks:
- include_tasks: /etc/ansible/roles/mount_lv/tasks/main.yml
- name: node mount nfs
hosts: apache
remote_user: root
tasks:
- include_tasks: /etc/ansible/roles/node_mount/tasks/main.yml
总结:
搭建整个系统,首先进行规划,哪一台主机用来干什么,并且对每个步骤都有一个流程化的思考,那一步需要做什么,在这个过程中,尽可能的将角色的任务写得具体。降低角色之间的耦合关系。这样能提高角色的使用率。
整个搭建过程,首先是给每个主机生成解析文件。里面用到了循环结构。然后更换yum源里面用到了find模块。用于找出yum.repos.d目录下的所有文件并用register注册一个变量来替代找到的文件。并使用file模块使用{{item.path}},将文件删除后,将aliyun的repo文件拷贝到目标机。在创建nginx负载均衡的时候,使用到的配置文件保存在file模块下。在创建逻辑卷并进行挂载的时候,用到了parted模块对硬盘进行分区。使用到了lvg模块生成卷组,使用了lvol模块生成逻辑卷。并通过filesystem模块进行格式化以后。通过mount模块将逻辑卷挂载到/nfs目录下。在搭建NFS文件服务时需要下载nfs-utils和rpcbind工具。并将挂载信息通过shell模块写入到/etc/exports文件中。具体的语法是 /nfs 192.168.36.0/24(rw,sync,no_root_sqush)。在写入完成后,通过service模块将两个进程启动。一个一个启动太慢了就需要用一个循环将两个变量放在一起,并通过{{item}}来指定。这样就成功部署了server端。在客户端(http服务器)也需要下载nfs-utils和rpcbind工具。启动之后通过mount模块指定src为:192.168.36.133:/nfs type为nfs。state为mounted。就成功挂载。

若有收获,就点个赞吧
0 人点赞
